
User Manual
Page 5
... Remote Control Features 3. HDTV/ACCESSORY SETUP Connecting Your HDTV -Power -Choose Your TV Source -Determining Available Channels -Set Your Time Zone Connecting Your Personal Computer -Computer Settings -Connection Types -Power Connecting Other Accessories -DVD or Game System -Video Cassette Recorder (VCR) -Cable or Satellite Receiver -Audio Equipment 2 English CONTENTS WELCOME Package Contents Contacting Westinghouse Digital 1. PRODUCT SAFETY Important Notice Concerning Power Cord Selection FCC Compliance Statement Product Safety Instructions -Other Notices Antenna Installation...
... Remote Control Features 3. HDTV/ACCESSORY SETUP Connecting Your HDTV -Power -Choose Your TV Source -Determining Available Channels -Set Your Time Zone Connecting Your Personal Computer -Computer Settings -Connection Types -Power Connecting Other Accessories -DVD or Game System -Video Cassette Recorder (VCR) -Cable or Satellite Receiver -Audio Equipment 2 English CONTENTS WELCOME Package Contents Contacting Westinghouse Digital 1. PRODUCT SAFETY Important Notice Concerning Power Cord Selection FCC Compliance Statement Product Safety Instructions -Other Notices Antenna Installation...
User Manual
Page 6
HDTV OPERATION About the On Screen Display (OSD) OSD Menus & Features -Video Menu -Display Menu -TV Menu Add or delete additional TV Channels About Parental Controls Channel Locks US MPAA Rating US TV Ratings & Content Canadian English Canadian French -PC (VGA only) Menu -Audio Menu -Power Menu -Settings Menu Calibration Menu Color Temperature Input Menu 5. English 4. APPENDIX 47-inch High Definition LCD TV Specifications 42-inch High Definition LCD TV Specifications Troubleshooting Cleaning the High Definition LCD TV Wall mount and Base removal on the DH LCD TVs Safety bracket Options 3
HDTV OPERATION About the On Screen Display (OSD) OSD Menus & Features -Video Menu -Display Menu -TV Menu Add or delete additional TV Channels About Parental Controls Channel Locks US MPAA Rating US TV Ratings & Content Canadian English Canadian French -PC (VGA only) Menu -Audio Menu -Power Menu -Settings Menu Calibration Menu Color Temperature Input Menu 5. English 4. APPENDIX 47-inch High Definition LCD TV Specifications 42-inch High Definition LCD TV Specifications Troubleshooting Cleaning the High Definition LCD TV Wall mount and Base removal on the DH LCD TVs Safety bracket Options 3
User Manual
Page 7
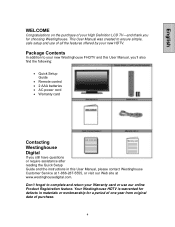
...; Quick Setup Guide • Remote control • 2 AAA batteries • AC power cord • Warranty card Contacting Westinghouse Digital If you for a period of one year from original date of all the features offered by your new HDTV. This User Manual was created to ensure simple, safe setup and use our online Product Registration feature. English WELCOME Congratulations on the purchase of your High Definition LCD TV-and...
...; Quick Setup Guide • Remote control • 2 AAA batteries • AC power cord • Warranty card Contacting Westinghouse Digital If you for a period of one year from original date of all the features offered by your new HDTV. This User Manual was created to ensure simple, safe setup and use our online Product Registration feature. English WELCOME Congratulations on the purchase of your High Definition LCD TV-and...
User Manual
Page 9
... the FCC Rules. The cord set must be used in accordance with the original power supply, part number DPS-210 EP 2 C. However, there is no guarantee that is not enclosed. For High Definition LCD TVs placed directly on a desk or table, type SVT or SJT cord sets may be operated with the instructions. This equipment generates, uses, and can be used in a residential installation. These limits are placed...
... the FCC Rules. The cord set must be used in accordance with the original power supply, part number DPS-210 EP 2 C. However, there is no guarantee that is not enclosed. For High Definition LCD TVs placed directly on a desk or table, type SVT or SJT cord sets may be operated with the instructions. This equipment generates, uses, and can be used in a residential installation. These limits are placed...

User Manual
Page 11
... User's Manual for a long period of time. 10. liquid has been spilled into your HDTV and remove the batteries from the apparatus. 7. Skin oils are provided for injuries caused by the manufacturer. • Avoid touching the screen. The wide blade or the third prong are difficult to the power supply cord or plug; You may be used , use your safety; Important Safety Instructions...
... User's Manual for a long period of time. 10. liquid has been spilled into your HDTV and remove the batteries from the apparatus. 7. Skin oils are provided for injuries caused by the manufacturer. • Avoid touching the screen. The wide blade or the third prong are difficult to the power supply cord or plug; You may be used , use your safety; Important Safety Instructions...
User Manual
Page 13
... video and audio clarity. 10 In contrast to picture and sound quality. High Definition Television (HDTV) The most common DTV formats are converted to analog for display on the screen, enabling it transmits approximately six times more cinematic-like viewing experience. As a result of this in compliance with digital cable or digital satellite systems. While these systems receive digital signals, the signals are Standard Definition Television (SDTV) and High Definition Television (HDTV...
... video and audio clarity. 10 In contrast to picture and sound quality. High Definition Television (HDTV) The most common DTV formats are converted to analog for display on the screen, enabling it transmits approximately six times more cinematic-like viewing experience. As a result of this in compliance with digital cable or digital satellite systems. While these systems receive digital signals, the signals are Standard Definition Television (SDTV) and High Definition Television (HDTV...

User Manual
Page 17
...; 10 for analog Audio use, select Audio menu in On Screen Display (OSD) and use remote's left/right arrows to change HDMI to power source via supplied power cord See pages19 for FW updated and Maintenance 6. VGA Connect personal computer using a 9 3.5mm mini-jack cable from PC's Audio Out 9. YPbPr2/Audio 2 (Right/Left) Connect an external video device like DVD or game system 2. YPbPr1/Audio 1 (Right/Left) Connect external video device like a DVD or 4 3 gaming system 3. INTRODUCTION: CONTROLS AND CONNECTIONS Rear Right/Left Spine-Mounted Connectors RIGHT...
...; 10 for analog Audio use, select Audio menu in On Screen Display (OSD) and use remote's left/right arrows to change HDMI to power source via supplied power cord See pages19 for FW updated and Maintenance 6. VGA Connect personal computer using a 9 3.5mm mini-jack cable from PC's Audio Out 9. YPbPr2/Audio 2 (Right/Left) Connect an external video device like DVD or game system 2. YPbPr1/Audio 1 (Right/Left) Connect external video device like a DVD or 4 3 gaming system 3. INTRODUCTION: CONTROLS AND CONNECTIONS Rear Right/Left Spine-Mounted Connectors RIGHT...
User Manual
Page 20
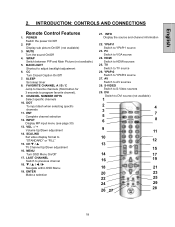
...Switch to S-Video sources 29. INPUT Display MP input menu (see page 30) 13. CH T / S TV Channel Up/Down adjustment 16. T / S / W / X Navigate within OSD Menu 19. S-VIDEO Switch to VGA source 24. SWAP Switch between PIP and Main Picture (not available) 5. CHANNEL NUMBER KEYS Select specific channels 10. CC Turn Closed Caption On/Off 7. DOT To input dash when selecting specific channels 11. BACKLIGHT Shortcut to YPbPr1 source 23. INTRODUCTION: CONTROLS AND CONNECTIONS Remote Control Features 1. YPbPr1 Switch to adjust backlight adjustment 6. English 2. INFO Display the source...
...Switch to S-Video sources 29. INPUT Display MP input menu (see page 30) 13. CH T / S TV Channel Up/Down adjustment 16. T / S / W / X Navigate within OSD Menu 19. S-VIDEO Switch to VGA source 24. SWAP Switch between PIP and Main Picture (not available) 5. CHANNEL NUMBER KEYS Select specific channels 10. CC Turn Closed Caption On/Off 7. DOT To input dash when selecting specific channels 11. BACKLIGHT Shortcut to YPbPr1 source 23. INTRODUCTION: CONTROLS AND CONNECTIONS Remote Control Features 1. YPbPr1 Switch to adjust backlight adjustment 6. English 2. INFO Display the source...
User Manual
Page 21
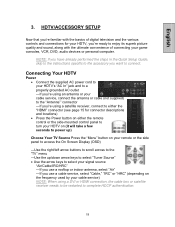
... locations) • Press the Power button on either the "HDMI" connector (see page 15 for your HDTV, you're ready to enjoy its superb picture quality and sound, along with the basics of connecting your cable service) NOTE: When using a satellite receiver, connect to either the remote control or the side-mounted control panel to turn your HDTV on (it will take a few seconds to power up) Choose Your TV Source Press the "Menu" button...
... locations) • Press the Power button on either the "HDMI" connector (see page 15 for your HDTV, you're ready to enjoy its superb picture quality and sound, along with the basics of connecting your cable service) NOTE: When using a satellite receiver, connect to either the remote control or the side-mounted control panel to turn your HDTV on (it will take a few seconds to power up) Choose Your TV Source Press the "Menu" button...
User Manual
Page 22
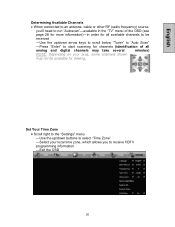
... to the "Settings" menu -Use the up/down buttons to select "Time Zone" -Select your area, some channels shown may not be available for all analog and digital channels may take several minutes) NOTE: Depending on your local time zone, which allows you 'll need to run "Autoscan"-available in order for viewing. English Determining Available Channels • When connected to an antenna, cable or other...
... to the "Settings" menu -Use the up/down buttons to select "Time Zone" -Select your area, some channels shown may not be available for all analog and digital channels may take several minutes) NOTE: Depending on your local time zone, which allows you 'll need to run "Autoscan"-available in order for viewing. English Determining Available Channels • When connected to an antenna, cable or other...

User Manual
Page 23
... VESA™ (Video Electronics Standards Association) 1920 x1080 at 60Hz • Refer to your computer's graphic card User Guide for directions to set this timing mode (many computers show 1360x768 as an alternative resolution) Connection Types • VGA Connection -Connect a 15-pin analog VGA cable (not supplied) from your computer's "VGA OUT" port to the HDTV's "VGA IN" port -Connect a stereo mini cable from your computer's "AUDIO OUT" port to the HDTV's "AUDIO IN" port Power...
... VESA™ (Video Electronics Standards Association) 1920 x1080 at 60Hz • Refer to your computer's graphic card User Guide for directions to set this timing mode (many computers show 1360x768 as an alternative resolution) Connection Types • VGA Connection -Connect a 15-pin analog VGA cable (not supplied) from your computer's "VGA OUT" port to the HDTV's "VGA IN" port -Connect a stereo mini cable from your computer's "AUDIO OUT" port to the HDTV's "AUDIO IN" port Power...
User Manual
Page 24
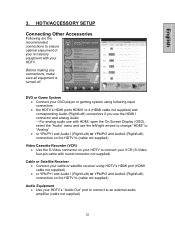
... Screen Display (OSD), select the "Audio" menu and use the left/right arrows to change "HDMI" to "Analog" • or YPb/Pr1 and Audio1 (Right/Left) or YPb/Pr2 and Audio2 (Right/Left) connectors on the HDTV to (cable not supplied) Video Cassette Recorder (VCR) • Use the S-Video connector on the HDTV to an external audio amplifier (cable not supplied) 22 DVD or Game System • Connect your DVD player or gaming system using HDTV's HDMI port (HDMI cable not supplied...
... Screen Display (OSD), select the "Audio" menu and use the left/right arrows to change "HDMI" to "Analog" • or YPb/Pr1 and Audio1 (Right/Left) or YPb/Pr2 and Audio2 (Right/Left) connectors on the HDTV to (cable not supplied) Video Cassette Recorder (VCR) • Use the S-Video connector on the HDTV to an external audio amplifier (cable not supplied) 22 DVD or Game System • Connect your DVD player or gaming system using HDTV's HDMI port (HDMI cable not supplied...
User Manual
Page 28
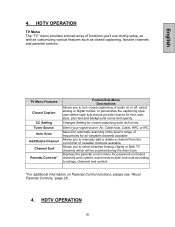
... opacity Changes Setting for closed captioning such as closed captioning of audio on Parental Control functions, please see "About Parental Controls," page 28. 4. HDTV OPERATION 26 HDTV OPERATION TV Menu The "TV" menu provides a broad array of functions you'll use during the Auto Scan Displays the parental control menu for all viewable channels available Allows you to manually add or delete a channel from the current list of frequencies for password-controlled channels and content; sub-menus include lock-outs according to select between Analog, Digital...
... opacity Changes Setting for closed captioning such as closed captioning of audio on Parental Control functions, please see "About Parental Controls," page 28. 4. HDTV OPERATION 26 HDTV OPERATION TV Menu The "TV" menu provides a broad array of functions you'll use during the Auto Scan Displays the parental control menu for all viewable channels available Allows you to manually add or delete a channel from the current list of frequencies for password-controlled channels and content; sub-menus include lock-outs according to select between Analog, Digital...

User Manual
Page 35
... picture (Backlight) will be turned off and can be reactivate with any button of the Remote Control Choose from three different MTS (Multi-Channel Television Sound) settings: • Mono • Stereo • SAP Enables language selection for digital channels Turn audio on/off Turn internal speaker on/off or have both on (Mixed) Switch the HDMI audio input source to optimize your audio preferences to either: • Analog-RCA audio input • Digital-HDMI cable integrated audio input Turn internal...
... picture (Backlight) will be turned off and can be reactivate with any button of the Remote Control Choose from three different MTS (Multi-Channel Television Sound) settings: • Mono • Stereo • SAP Enables language selection for digital channels Turn audio on/off Turn internal speaker on/off or have both on (Mixed) Switch the HDMI audio input source to optimize your audio preferences to either: • Analog-RCA audio input • Digital-HDMI cable integrated audio input Turn internal...
User Manual
Page 37
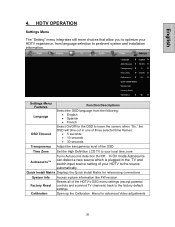
Quick Install Matrix Displays the Quick Install Matrix for referencing connections System Info Access system information like FW revision Factory Reset Resets all of the HDTV's OSD menu settings (except parental controls and scanned TV channels) back to the factory default settings Calibration Open up the Calibration Menu for the OSD to pertinent system and installation information. Settings Menu Features Language OSD Timeout Function Descriptions Select the OSD language from language selection to leave the screen; when "On," the...
Quick Install Matrix Displays the Quick Install Matrix for referencing connections System Info Access system information like FW revision Factory Reset Resets all of the HDTV's OSD menu settings (except parental controls and scanned TV channels) back to the factory default settings Calibration Open up the Calibration Menu for the OSD to pertinent system and installation information. Settings Menu Features Language OSD Timeout Function Descriptions Select the OSD language from language selection to leave the screen; when "On," the...
User Manual
Page 41
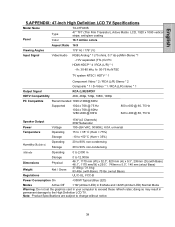
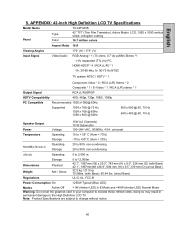
... @ 60, 75 Hz Speaker Output Power Voltage 15W (x2 Channels) 20W Subwoofer 100~264 VAC, 50/60Hz, 6.0A. Altitude Operating 0 to 2,000 m Dimensions Weight Regulations Storage Physical Net / Gross 0 to 90% non-condensing. anti-glare coating 16.7 million colors Aspect Ratio 16:9 Viewing Angles 176° H) / 176° (V) Input Signal Video/Audio RGB( Analog * 1 (75 ohms, 0.7 Vp-p)/Mini-Stereo *1 - universal Temperature Operating Storage 15 to + 35...
... @ 60, 75 Hz Speaker Output Power Voltage 15W (x2 Channels) 20W Subwoofer 100~264 VAC, 50/60Hz, 6.0A. Altitude Operating 0 to 2,000 m Dimensions Weight Regulations Storage Physical Net / Gross 0 to 90% non-condensing. anti-glare coating 16.7 million colors Aspect Ratio 16:9 Viewing Angles 176° H) / 176° (V) Input Signal Video/Audio RGB( Analog * 1 (75 ohms, 0.7 Vp-p)/Mini-Stereo *1 - universal Temperature Operating Storage 15 to + 35...
User Manual
Page 42
... Hz 640 x 480 @ 60, 75 Hz Speaker Output Power Voltage 15W (x2 Channels) 10 W Subwoofer 100~264 VAC, 50/60Hz, 4.5A. anti-glare coating 16.7 million colors Aspect Ratio 16:9 Viewing Angles 176° (H) / 176° (V) Input Signal Video/Audio RGB Analog * 1 (75 ohms, 0.7 Vp-p)/Mini-Stereo *1 - APPENDIX: 42-inch High Definition LCD TV Specifications Model Name TX-42F430S Panel Type Color 42" TFT (Thin Film Transistor), Active Matrix...
... Hz 640 x 480 @ 60, 75 Hz Speaker Output Power Voltage 15W (x2 Channels) 10 W Subwoofer 100~264 VAC, 50/60Hz, 4.5A. anti-glare coating 16.7 million colors Aspect Ratio 16:9 Viewing Angles 176° (H) / 176° (V) Input Signal Video/Audio RGB Analog * 1 (75 ohms, 0.7 Vp-p)/Mini-Stereo *1 - APPENDIX: 42-inch High Definition LCD TV Specifications Model Name TX-42F430S Panel Type Color 42" TFT (Thin Film Transistor), Active Matrix...
User Manual
Page 43
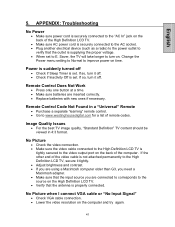
... be viewed in a "Universal" Remote • Purchase a separate "learning" remote control. • Go to the video output port on . If so, turn it off. Remote Control Does Not Work • Press only one button at a time. • Make sure batteries are connected to corresponds to turn it off • Check if Sleep Timer is properly connected. No Picture • Check the video connection. • Make sure the video cable connected to the High Definition LCD TV is...
... be viewed in a "Universal" Remote • Purchase a separate "learning" remote control. • Go to the video output port on . If so, turn it off. Remote Control Does Not Work • Press only one button at a time. • Make sure batteries are connected to corresponds to turn it off • Check if Sleep Timer is properly connected. No Picture • Check the video connection. • Make sure the video cable connected to the High Definition LCD TV is...
User Manual
Page 44
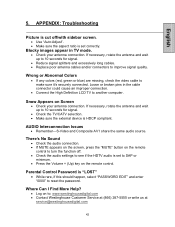
APPENDIX: Troubleshooting Picture is cut off . • Check the audio settings to see if the HDTV audio is set to another computer. Loose or broken pins in TV mode. • Check your antenna connection. Blocky images appear in the cable connector could cause an improper connection. • Connect the High Definition LCD TV to SAP or minimum. • Press the Volume + (Up) key on the remote control to turn the function...
APPENDIX: Troubleshooting Picture is cut off . • Check the audio settings to see if the HDTV audio is set to another computer. Loose or broken pins in TV mode. • Check your antenna connection. Blocky images appear in the cable connector could cause an improper connection. • Connect the High Definition LCD TV to SAP or minimum. • Press the Volume + (Up) key on the remote control to turn the function...
User Manual
Page 46
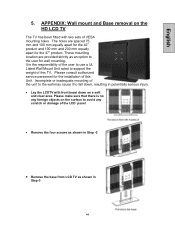
... user for wall mounting. Please consult authorized service personnel for the 47" product. English 5. APPENDIX: Wall mount and Base removal on a soft and clear area. These mounting location are spaced 75 mm and 100 mm equally apart for the 42" product and 100 mm and 200 mm equally apart for the installation of VESA mounting holes. Incomplete or inadequate mounting of the LCD panel • Remove the four screws...
... user for wall mounting. Please consult authorized service personnel for the 47" product. English 5. APPENDIX: Wall mount and Base removal on a soft and clear area. These mounting location are spaced 75 mm and 100 mm equally apart for the 42" product and 100 mm and 200 mm equally apart for the installation of VESA mounting holes. Incomplete or inadequate mounting of the LCD panel • Remove the four screws...


