
User Manual
Page 9
...PRODUCT SAFETY WARNING: This device must be used. Some examples are placed on , the user is encouraged to try to correct the interference by turning the equipment off and on a desk or table, type SVT or SJT cord sets may be selected according to the current rating for a ... Use the following measures: • Reorient or relocate the receiving antenna. • Increase the separation between the High Definition LCD TV and receiver. 6 For High Definition LCD TVs placed directly on the floor, only SJT type cord sets may cause harmful interference to replace the original cord set, or...
...PRODUCT SAFETY WARNING: This device must be used. Some examples are placed on , the user is encouraged to try to correct the interference by turning the equipment off and on a desk or table, type SVT or SJT cord sets may be selected according to the current rating for a ... Use the following measures: • Reorient or relocate the receiving antenna. • Increase the separation between the High Definition LCD TV and receiver. 6 For High Definition LCD TVs placed directly on the floor, only SJT type cord sets may cause harmful interference to replace the original cord set, or...

User Manual
Page 11
... outlet. 6. Servicing is protected from being walked on the High Definition LCD TV. Never use caution when moving it. • If the High Definition LCD TV emits smoke, abnormal noise, or a strange odor, immediately turn it has been dropped. install in any way, such as radiators, heat...and does not operate normally, or it off and contact the Westinghouse Service Center. 8 Other Notices • Avoid exposing the High Definition LCD TV to direct sunlight or high temperatures. • Avoid exposing the High Definition LCD TV to remove. • Never remove the rear cover. Skin ...
... outlet. 6. Servicing is protected from being walked on the High Definition LCD TV. Never use caution when moving it. • If the High Definition LCD TV emits smoke, abnormal noise, or a strange odor, immediately turn it has been dropped. install in any way, such as radiators, heat...and does not operate normally, or it off and contact the Westinghouse Service Center. 8 Other Notices • Avoid exposing the High Definition LCD TV to direct sunlight or high temperatures. • Avoid exposing the High Definition LCD TV to remove. • Never remove the rear cover. Skin ...

User Manual
Page 12
...antenna system should be located in wire to an antenna discharge unit, connection to grounding electrodes, and requirements for the High Definition LCD TV during a heavy storm-lightning may strike while you are holding the cable cord, causing serious injury. When installing an outside antenna ...For added protection for the grounding electrode. This will prevent damage to the High Definition LCD TV due to prevent voltage surges and built-up static charges. Turn off your High Definition LCD TV and wait for long periods of overhead power lines or other electric light or power circuits...
...antenna system should be located in wire to an antenna discharge unit, connection to grounding electrodes, and requirements for the High Definition LCD TV during a heavy storm-lightning may strike while you are holding the cable cord, causing serious injury. When installing an outside antenna ...For added protection for the grounding electrode. This will prevent damage to the High Definition LCD TV due to prevent voltage surges and built-up static charges. Turn off your High Definition LCD TV and wait for long periods of overhead power lines or other electric light or power circuits...
User Manual
Page 16
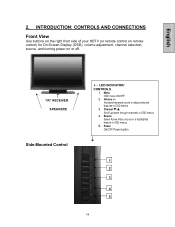
... on the right front side of your HDTV (or remote control on remote control) for On Screen Display (OSD), volume adjustment, channel selection, source, and turning power on or off. ↑ "IR" RECEIVER SPEAKERS Side-Mounted Control ← LED INDICATOR/ CONTROLS 1. Channel T/S Scroll up/down through channels or OSD menus 4. Source...
... on the right front side of your HDTV (or remote control on remote control) for On Screen Display (OSD), volume adjustment, channel selection, source, and turning power on or off. ↑ "IR" RECEIVER SPEAKERS Side-Mounted Control ← LED INDICATOR/ CONTROLS 1. Channel T/S Scroll up/down through channels or OSD menus 4. Source...
User Manual
Page 20
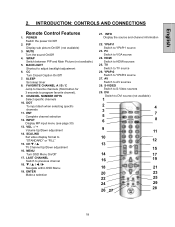
... 28 18 DVI Switch to YPbPr2 source 27. DOT To input dash when selecting specific channels 11. MENU Turn OSD Menu On/Off 17. LAST CHANNEL Switch to TV source 26. TV Switch to previous channel 18. PIP Display sub picture On/Off (not available) 3. SCALING Set video display... format to S-Video sources 29. T / S / W / X Navigate within OSD Menu 19. CC Turn Closed Caption On/Off 7. S-VIDEO Switch to "STANDARD" or ...
... 28 18 DVI Switch to YPbPr2 source 27. DOT To input dash when selecting specific channels 11. MENU Turn OSD Menu On/Off 17. LAST CHANNEL Switch to TV source 26. TV Switch to previous channel 18. PIP Display sub picture On/Off (not available) 3. SCALING Set video display... format to S-Video sources 29. T / S / W / X Navigate within OSD Menu 19. CC Turn Closed Caption On/Off 7. S-VIDEO Switch to "STANDARD" or ...
User Manual
Page 21
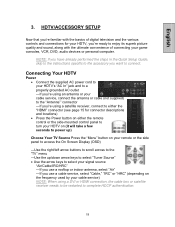
... locations) • Press the Power button on either the remote control or the side-mounted control panel to turn your HDTV on (it will take a few seconds to power up) Choose Your TV Source Press the "Menu" button on your remote or the side panel to access the On Screen Display (OSD...) -Use the right/left arrow buttons to scroll across to the "TV" menu -Use the up/down arrow keys to select "Tuner Source" • Use the arrow keys to select your signal source "Air/Cable/IRC/HRC...
... locations) • Press the Power button on either the remote control or the side-mounted control panel to turn your HDTV on (it will take a few seconds to power up) Choose Your TV Source Press the "Menu" button on your remote or the side panel to access the On Screen Display (OSD...) -Use the right/left arrow buttons to scroll across to the "TV" menu -Use the up/down arrow keys to select "Tuner Source" • Use the arrow keys to select your signal source "Air/Cable/IRC/HRC...

User Manual
Page 23
English 3. HDTV/ACCESSORY SETUP Connecting Your Personal Computer Before making any connections, make sure all equipment is turned off. Computer Settings • For optimal picture quality, set your computer's timing mode to VESA™ (Video Electronics Standards Association) 1920 x1080 at 60Hz ...to the HDTV's "VGA IN" port -Connect a stereo mini cable from your computer's "AUDIO OUT" port to the HDTV's "AUDIO IN" port Power • Turn on your HDTV (wait a few seconds for it to power up) • Turn on your computer -The HDTV will automatically adjust to the computer's resolution 21
English 3. HDTV/ACCESSORY SETUP Connecting Your Personal Computer Before making any connections, make sure all equipment is turned off. Computer Settings • For optimal picture quality, set your computer's timing mode to VESA™ (Video Electronics Standards Association) 1920 x1080 at 60Hz ...to the HDTV's "VGA IN" port -Connect a stereo mini cable from your computer's "AUDIO OUT" port to the HDTV's "AUDIO IN" port Power • Turn on your HDTV (wait a few seconds for it to power up) • Turn on your computer -The HDTV will automatically adjust to the computer's resolution 21
User Manual
Page 24
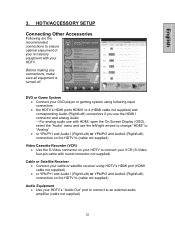
... HDTV's "Audio Out" port to connect to (cable not supplied) Audio Equipment • Use your HDTV. Before making any connections, make sure all equipment is turned off. HDTV/ACCESSORY SETUP Connecting Other Accessories Following are the recommended connections to ensure optimal enjoyment of your accessory equipment with round connector not supplied...
... HDTV's "Audio Out" port to connect to (cable not supplied) Audio Equipment • Use your HDTV. Before making any connections, make sure all equipment is turned off. HDTV/ACCESSORY SETUP Connecting Other Accessories Following are the recommended connections to ensure optimal enjoyment of your accessory equipment with round connector not supplied...
User Manual
Page 28
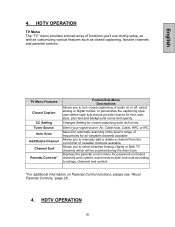
... Cable, HRC or IRC Select for automatic scanning of the tuner's range of frequencies for password-controlled channels and content; HDTV OPERATION TV Menu The "TV" menu provides a broad array of audio on Parental Control functions, please see "About Parental Controls," page 28. 4. English 4. user... to manually add or delete a channel from the current list of viewable channels available Allows you to turn closed captioning, favorite channels and parental controls. TV Menu Features Closed Caption CC Setting Tuner Source Auto Scan Add/Delete Channel Channel Surf Parental Controls* Feature...
... Cable, HRC or IRC Select for automatic scanning of the tuner's range of frequencies for password-controlled channels and content; HDTV OPERATION TV Menu The "TV" menu provides a broad array of audio on Parental Control functions, please see "About Parental Controls," page 28. 4. English 4. user... to manually add or delete a channel from the current list of viewable channels available Allows you to turn closed captioning, favorite channels and parental controls. TV Menu Features Closed Caption CC Setting Tuner Source Auto Scan Add/Delete Channel Channel Surf Parental Controls* Feature...

User Manual
Page 35
... MTS Digital Audio Mute Speaker HDMI Sub Woofer Equalizer Adjustment Descriptions Enables to listen to Audio only, the picture (Backlight) will be turned off and can be reactivate with any button of the Remote Control Choose from three different MTS (Multi-Channel Television Sound) settings: ...• Mono • Stereo • SAP Enables language selection for digital channels Turn audio on/off Turn internal speaker on/off or have both on /off Choose from seven different Audio settings: • User, Speech, Jazz, Classic, Rocks...
... MTS Digital Audio Mute Speaker HDMI Sub Woofer Equalizer Adjustment Descriptions Enables to listen to Audio only, the picture (Backlight) will be turned off and can be reactivate with any button of the Remote Control Choose from three different MTS (Multi-Channel Television Sound) settings: ...• Mono • Stereo • SAP Enables language selection for digital channels Turn audio on/off Turn internal speaker on/off or have both on /off Choose from seven different Audio settings: • User, Speech, Jazz, Classic, Rocks...
User Manual
Page 36
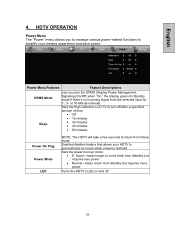
... from Sleep mode. Power Menu Features Feature Descriptions DPMS Mode Sleep Lets you to manage various power-related functions to simplify your HDTV to automatically turn off after a specified amount of time: • Off • 15 minutes • 30 minutes • 45 minutes • 60 ... Normal-faster return from Standby but requires more power Turns the HDTV's LED on and off 34 English 4. Enables/disables feature that allows your viewing experience and save power. or 10-Minute intervals Sets the High Definition LCD TV to turn back when power is restored Sets the power boot...
... from Sleep mode. Power Menu Features Feature Descriptions DPMS Mode Sleep Lets you to manage various power-related functions to simplify your HDTV to automatically turn off after a specified amount of time: • Off • 15 minutes • 30 minutes • 45 minutes • 60 ... Normal-faster return from Standby but requires more power Turns the HDTV's LED on and off 34 English 4. Enables/disables feature that allows your viewing experience and save power. or 10-Minute intervals Sets the High Definition LCD TV to turn back when power is restored Sets the power boot...
User Manual
Page 37
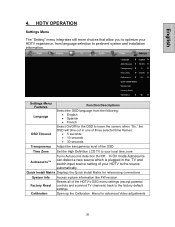
...," the OSD will time out in the TV and switch input source setting of your HDTV experience, from the following: • English • Spanish • French Select On/Off for the OSD to your local time zone Autosource™ Turns Autosource detection On/Off. Quick Install Matrix Displays...referencing connections System Info Access system information like FW revision Factory Reset Resets all of the OSD Time Zone Set the High Definition LCD TV to leave the screen; HDTV OPERATION Settings Menu The "Setting" menu integrates still more choices that allow you to optimize your HDTV...
...," the OSD will time out in the TV and switch input source setting of your HDTV experience, from the following: • English • Spanish • French Select On/Off for the OSD to your local time zone Autosource™ Turns Autosource detection On/Off. Quick Install Matrix Displays...referencing connections System Info Access system information like FW revision Factory Reset Resets all of the OSD Time Zone Set the High Definition LCD TV to leave the screen; HDTV OPERATION Settings Menu The "Setting" menu integrates still more choices that allow you to optimize your HDTV...

User Manual
Page 38
.../off 3D Comb Filter. In on /off Deienterlace. 3D Comb Filter Turns on mode, the picture quality is better. HDTV OPERATION Calibration Menu The "Calibration" menu integrates advanced choices that allow you to adjust Picture clarity Reset ...
.../off 3D Comb Filter. In on /off Deienterlace. 3D Comb Filter Turns on mode, the picture quality is better. HDTV OPERATION Calibration Menu The "Calibration" menu integrates advanced choices that allow you to adjust Picture clarity Reset ...
User Manual
Page 43
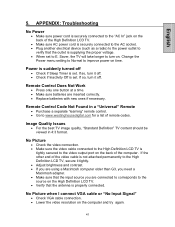
... cord is securely connected to the "AC In" jack on the back of the computer. Power is suddenly turned off • Check if Sleep Timer is not attached permanently to the High Definition LCD TV, secure it tightly. • Adjust brightness and contrast. • If you are using a Macintosh computer...; Check VGA cable connection. • Lower the video resolution on time. If so, turn it off . No Picture • Check the video connection. • Make sure the video cable connected to the High Definition LCD TV is tightly secured to the video output port on the back of the High Definition...
... cord is securely connected to the "AC In" jack on the back of the computer. Power is suddenly turned off • Check if Sleep Timer is not attached permanently to the High Definition LCD TV, secure it tightly. • Adjust brightness and contrast. • If you are using a Macintosh computer...; Check VGA cable connection. • Lower the video resolution on time. If so, turn it off . No Picture • Check the video connection. • Make sure the video cable connected to the High Definition LCD TV is tightly secured to the video output port on the back of the High Definition...
User Manual
Page 44
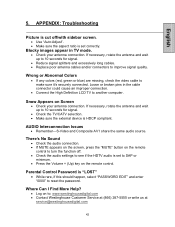
... antenna and wait up to 10 seconds for signal. • Check the TV/CATV selection. • Make sure the external device is "LOST" •... appears on the screen, press the "MUTE" button on the remote control to turn the function off /with sidebar screen. • Use "Auto Adjust". •..., check the video cable to : www.westinghousedigital.com • Contact Westinghouse Customer Service at (866) 287-5555 or write us at [email protected] connectors to another computer. Loose or broken pins in TV mode. • Check your antenna connection. Blocky images appear in ...
... antenna and wait up to 10 seconds for signal. • Check the TV/CATV selection. • Make sure the external device is "LOST" •... appears on the screen, press the "MUTE" button on the remote control to turn the function off /with sidebar screen. • Use "Auto Adjust". •..., check the video cable to : www.westinghousedigital.com • Contact Westinghouse Customer Service at (866) 287-5555 or write us at [email protected] connectors to another computer. Loose or broken pins in TV mode. • Check your antenna connection. Blocky images appear in ...
User Manual
Page 45
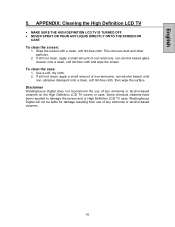
APPENDIX: Cleaning the High Definition LCD TV • MAKE SURE THE HIGH DEFINITION LCD TV IS TURNED OFF • NEVER SPRAY OR POUR ANY LIQUID DIRECTLY ONTO THE SCREEN OR CASE To clean the screen: 1. To clean the case: 1. Wipe the screen ... amount of non-ammonia, non-alcohol based, mild non- Some chemical cleaners have been reported to damage the screen and or High Definition LCD TV case. English 5. Use a soft, dry cloth. 2. Westinghouse Digital will not be liable for damage resulting from use of any ammonia or alcohol-based cleaners on the High Definition...
APPENDIX: Cleaning the High Definition LCD TV • MAKE SURE THE HIGH DEFINITION LCD TV IS TURNED OFF • NEVER SPRAY OR POUR ANY LIQUID DIRECTLY ONTO THE SCREEN OR CASE To clean the screen: 1. To clean the case: 1. Wipe the screen ... amount of non-ammonia, non-alcohol based, mild non- Some chemical cleaners have been reported to damage the screen and or High Definition LCD TV case. English 5. Use a soft, dry cloth. 2. Westinghouse Digital will not be liable for damage resulting from use of any ammonia or alcohol-based cleaners on the High Definition...


