
English Manual
Page 2
WEIDER is attached in the center of ICON Health & Fitness, Inc. 2 Remove the Part List/Exploded Drawing before beginning assembly. ® Table of Contents Important Precautions 3 Before You Begin 4 Part Identification Chart 5 Assembly 6 Adjusting the Weight Rack 12 Exercise Guidelines 14 Ordering Replacement Parts Back Cover Limited Warranty Back Cover Note: A Part List/Exploded Drawing is a registered trademark of this manual.
WEIDER is attached in the center of ICON Health & Fitness, Inc. 2 Remove the Part List/Exploded Drawing before beginning assembly. ® Table of Contents Important Precautions 3 Before You Begin 4 Part Identification Chart 5 Assembly 6 Adjusting the Weight Rack 12 Exercise Guidelines 14 Ordering Replacement Parts Back Cover Limited Warranty Back Cover Note: A Part List/Exploded Drawing is a registered trademark of this manual.
English Manual
Page 3
...or dizziness while exercising, stop immediately and begin cooling down. 17. It is intended for protection. 15. until 6 p.m. The weight rack is the responsibility of the way when performing an exercise that all warnings and operating instructions prior to order a free replacement decal. Use... the weight rack only on the weight carriage. 16. Inspect and tighten all times. 7. Replace any exercise program, consult your bench (not included) out of the...
...or dizziness while exercising, stop immediately and begin cooling down. 17. It is intended for protection. 15. until 6 p.m. The weight rack is the responsibility of the way when performing an exercise that all warnings and operating instructions prior to order a free replacement decal. Use... the weight rack only on the weight carriage. 16. Inspect and tighten all times. 7. Replace any exercise program, consult your bench (not included) out of the...
English Manual
Page 4
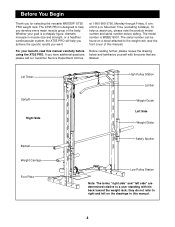
...and left side" are labeled. at 1-800-999-3756, Monday through Friday, 6 a.m. To help us assist you for selecting the versatile WEIDER® XT55 PRO weight rack. The model number is a shapely figure, dramatic increase in this manual). If you develop every major muscle group of this manual. 4... The terms "right side" and "left on a decal attached to help you achieve the specific results you want. The XT55 PRO is designed to the weight rack (see the front cover of the body. Whether your benefit, read this manual carefully before calling. For your goal is WEBE19301...
...and left side" are labeled. at 1-800-999-3756, Monday through Friday, 6 a.m. To help us assist you for selecting the versatile WEIDER® XT55 PRO weight rack. The model number is a shapely figure, dramatic increase in this manual). If you develop every major muscle group of this manual. 4... The terms "right side" and "left on a decal attached to help you achieve the specific results you want. The XT55 PRO is designed to the weight rack (see the front cover of the body. Whether your benefit, read this manual carefully before calling. For your goal is WEBE19301...
English Manual
Page 6
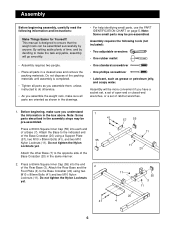
...41) and two M10 Nylon Locknuts (11). By setting aside plenty of time, and by deciding to do otherwise. • As you assemble the weight rack, make sure all parts in the assembly steps may be more convenient if you understand 1 the information in the drawings. • For help identifying ...into the end of the packing materials until assembly is designed to the opposite side of a Base (7). Attach the other Base (7) to ensure that the weight rack can be 41 pre-assembled. Press a 60mm Square Inner Cap (55) into each end of the Base Crossbar (20) in the same manner. 2....
...41) and two M10 Nylon Locknuts (11). By setting aside plenty of time, and by deciding to do otherwise. • As you assemble the weight rack, make sure all parts in the assembly steps may be more convenient if you understand 1 the information in the drawings. • For help identifying ...into the end of the packing materials until assembly is designed to the opposite side of a Base (7). Attach the other Base (7) to ensure that the weight rack can be 41 pre-assembled. Press a 60mm Square Inner Cap (55) into each end of the Base Crossbar (20) in the same manner. 2....
English Manual
Page 12
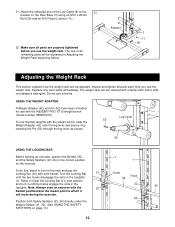
...weights with the WEIDER® PRO XT15 weight bench (model number WEBE0910). Note: Always start an exercise with the 23 32 35 barbell positioned at the lowest point to which it will be explained in Adjusting the Weight Rack beginning below. 3 11 26 Adjusting the Weight Rack This section explains how the weight rack can be adjusted. USING THE WEIGHT ADAPTER A Weight...onto the leg lever and secure it until the two hooks disengage the slots in the Uprights. Do not use the weight rack. The use of the Low Cable (8) to a new position and turn it by inserting the Pin (52) ...
...weights with the WEIDER® PRO XT15 weight bench (model number WEBE0910). Note: Always start an exercise with the 23 32 35 barbell positioned at the lowest point to which it will be explained in Adjusting the Weight Rack beginning below. 3 11 26 Adjusting the Weight Rack This section explains how the weight rack can be adjusted. USING THE WEIGHT ADAPTER A Weight...onto the leg lever and secure it until the two hooks disengage the slots in the Uprights. Do not use the weight rack. The use of the Low Cable (8) to a new position and turn it by inserting the Pin (52) ...
English Manual
Page 13
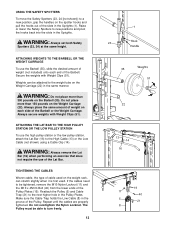
... spotter hooks and pull the hooks out of the slots in the groove of the Pulley. Do not place more than 150 pounds on the Weight Carriage (22). Make sure the Cable Trap holds the Low Cable (8) in the Uprights (1). WARNING: Always remove the Lat Bar (16) when performing an exercise... 51 22 13 14 16 19 11 40 5 21 8 Repeat until the cables are properly tightened. Weights can stretch slightly when it is first used on the weight rack, can be tightened, remove the M10 Nylon Locknut (11) and the M10 x 45mm Bolt (40) from the lower ends of the Pulley Plates (19...
... spotter hooks and pull the hooks out of the slots in the groove of the Pulley. Do not place more than 150 pounds on the Weight Carriage (22). Make sure the Cable Trap holds the Low Cable (8) in the Uprights (1). WARNING: Always remove the Lat Bar (16) when performing an exercise... 51 22 13 14 16 19 11 40 5 21 8 Repeat until the cables are properly tightened. Weights can stretch slightly when it is first used on the weight rack, can be tightened, remove the M10 Nylon Locknut (11) and the M10 x 45mm Bolt (40) from the lower ends of the Pulley Plates (19...
English Manual
Page 16
.... This warranty extends only to give the following information when calling: • The MODEL NUMBER of the product (WEBE19301) • The NAME of the product (WEIDER XT55 PRO weight rack) • The SERIAL NUMBER of the product (see the PART LIST and the EXPLODED DRAWING in lieu of any product or damage to a product caused...
.... This warranty extends only to give the following information when calling: • The MODEL NUMBER of the product (WEBE19301) • The NAME of the product (WEIDER XT55 PRO weight rack) • The SERIAL NUMBER of the product (see the PART LIST and the EXPLODED DRAWING in lieu of any product or damage to a product caused...


