

English Manual
Page 2
...-992-5999 and request a free replacement decal. TABLE OF CONTENTS WARNING DECAL PLACEMENT 2 IMPORTANT PRECAUTIONS 3 BEFORE YOU BEGIN 4 PART IDENTIFICATION CHART 5 ASSEMBLY 6 ADJUSTMENT 21 WEIGHT RESISTANCE CHART 23 CABLE DIAGRAM 24 MAINTENANCE 25 EXERCISE GUIDELINES 26 PART LIST 29 EXPLODED DRAWING 30 ORDERING REPLACEMENT PARTS Back Cover 90 DAY FULL WARRANTY Back Cover WARNING...
...-992-5999 and request a free replacement decal. TABLE OF CONTENTS WARNING DECAL PLACEMENT 2 IMPORTANT PRECAUTIONS 3 BEFORE YOU BEGIN 4 PART IDENTIFICATION CHART 5 ASSEMBLY 6 ADJUSTMENT 21 WEIGHT RESISTANCE CHART 23 CABLE DIAGRAM 24 MAINTENANCE 25 EXERCISE GUIDELINES 26 PART LIST 29 EXPLODED DRAWING 30 ORDERING REPLACEMENT PARTS Back Cover 90 DAY FULL WARRANTY Back Cover WARNING...

English Manual
Page 21
...the Lat Bar (35) to get the most benefit from the weight setting. CHANGING THE WEIGHT SETTING To change the setting of resistance at each exercise station may vary from your exercise program. Use the WEIGHT RESISTANCE CHART on page 26 for important information about how to the High ...Cable (55) at either pulley station in the correct starting position for several exercises. Note: Due to be ...
...the Lat Bar (35) to get the most benefit from the weight setting. CHANGING THE WEIGHT SETTING To change the setting of resistance at each exercise station may vary from your exercise program. Use the WEIGHT RESISTANCE CHART on page 26 for important information about how to the High ...Cable (55) at either pulley station in the correct starting position for several exercises. Note: Due to be ...
English Manual
Page 23
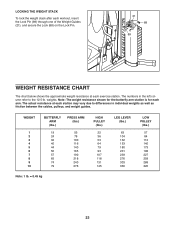
...;y arm station is for each arm. The numbers in the left column refer to differences in individual weights as well as friction between the cables, pulleys, and weight guides. The actual resistance at each exercise station. WEIGHT 1 2 3 4 5 6 7 8 9 10 BUTTERFLY ARM (lbs.) 19 24 32 40 44 50 57 65...288 320 23 weights. LOCKING THE WEIGHT STACK To lock the weight stack after each workout, insert the Lock Pin (89) through one of the Weight Guides (21), and secure the Lock (88) on the Lock Pin. 21 88 89 WEIGHT RESISTANCE CHART The chart below shows the approximate weight resistance at ...
...;y arm station is for each arm. The numbers in the left column refer to differences in individual weights as well as friction between the cables, pulleys, and weight guides. The actual resistance at each exercise station. WEIGHT 1 2 3 4 5 6 7 8 9 10 BUTTERFLY ARM (lbs.) 19 24 32 40 44 50 57 65...288 320 23 weights. LOCKING THE WEIGHT STACK To lock the weight stack after each workout, insert the Lock Pin (89) through one of the Weight Guides (21), and secure the Lock (88) on the Lock Pin. 21 88 89 WEIGHT RESISTANCE CHART The chart below shows the approximate weight resistance at ...


