

Uk Manual
Page 1
...? Save this equipment. Write the serial number in this manual before using this manual for reference. If you have questions, or if there are missing parts, please contact us: UK Call: 08457 089 009 From Ireland: 053 92 36102 Website: www.iconsupport.eu E-mail: [email protected] Write: ICON Health & Fitness...
...? Save this equipment. Write the serial number in this manual before using this manual for reference. If you have questions, or if there are missing parts, please contact us: UK Call: 08457 089 009 From Ireland: 053 92 36102 Website: www.iconsupport.eu E-mail: [email protected] Write: ICON Health & Fitness...
Uk Manual
Page 2
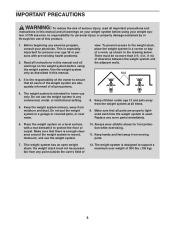
... CHART 6 ASSEMBLY 7 ADJUSTMENT 23 WEIGHT RESISTANCE CHART 25 CABLE DIAGRAMS 26 MAINTENANCE 27 EXERCISE GUIDELINES 28 PART LIST 29 EXPLODED DRAWING 30 ORDERING REPLACEMENT PARTS Back Cover WARNING DECAL PLACEMENT This drawing shows the location(s) of this manual and request a free replacement decal. Note: The decal(s) may not be shown ...
... CHART 6 ASSEMBLY 7 ADJUSTMENT 23 WEIGHT RESISTANCE CHART 25 CABLE DIAGRAMS 26 MAINTENANCE 27 EXERCISE GUIDELINES 28 PART LIST 29 EXPLODED DRAWING 30 ORDERING REPLACEMENT PARTS Back Cover WARNING DECAL PLACEMENT This drawing shows the location(s) of this manual and request a free replacement decal. Note: The decal(s) may not be shown ...
Uk Manual
Page 3
...properly tightened each time the weight system is designed to protect the floor or carpet. Use the weight system only as shown in any worn parts immediately. 6. view. To prevent access to mount, dismount, and use only. Place the weight system on the weight system before using the ...sys- Always wear athletic shoes for home use the weight system. 10. the weight stack must be accessible from the weight system at all parts are adequately informed of all warnings on a level surface, with pre-existing health problems. 2. Do not put the weight system in this manual...
...properly tightened each time the weight system is designed to protect the floor or carpet. Use the weight system only as shown in any worn parts immediately. 6. view. To prevent access to mount, dismount, and use only. Place the weight system on the weight system before using the ...sys- Always wear athletic shoes for home use the weight system. 10. the weight stack must be accessible from the weight system at all parts are adequately informed of all warnings on a level surface, with pre-existing health problems. 2. Do not put the weight system in this manual...
Uk Manual
Page 5
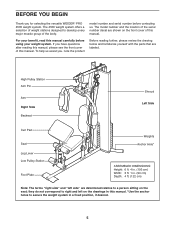
... carefully before contacting us assist you, note the product Before reading further, please review the drawing below and familiarize yourself with the parts that are determined relative to develop every major muscle group of the body. For your weight system. To help us . they do... 4500 weight system offers a selection of weight stations designed to a person sitting on the front cover of this manual. BEFORE YOU BEGIN Thank you have questions after reading this manual, please see the front cover of this manual. If you for selecting the versatile WEIDER® PRO 4500 ...
... carefully before contacting us assist you, note the product Before reading further, please review the drawing below and familiarize yourself with the parts that are determined relative to develop every major muscle group of the body. For your weight system. To help us . they do... 4500 weight system offers a selection of weight stations designed to a person sitting on the front cover of this manual. BEFORE YOU BEGIN Thank you have questions after reading this manual, please see the front cover of this manual. If you for selecting the versatile WEIDER® PRO 4500 ...
Uk Manual
Page 6
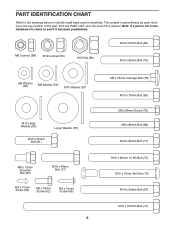
... in parentheses by each drawing is the key number of the part, from the PART LIST near the end of this manual. M8 Locknut (58) M10 Locknut (56) M12 Nut (86) M10 x 55mm Bolt (66) M10 x 65mm Bolt (75) M6 ... Bolt (68) M10 x 80mm Bolt (71) M10 x 80mm 10.9G Bolt (79) M10 x 70mm Bolt Set (73) M10 x 90mm Bolt (67) M10 x 160mm Bolt (74) PART IDENTIFICATION CHART Refer to the drawings below to see if it has been preattached. The number in assembly.
... in parentheses by each drawing is the key number of the part, from the PART LIST near the end of this manual. M8 Locknut (58) M10 Locknut (56) M12 Nut (86) M10 x 55mm Bolt (66) M10 x 65mm Bolt (75) M6 ... Bolt (68) M10 x 80mm Bolt (71) M10 x 80mm 10.9G Bolt (79) M10 x 70mm Bolt Set (73) M10 x 90mm Bolt (67) M10 x 160mm Bolt (74) PART IDENTIFICATION CHART Refer to the drawings below to see if it has been preattached. The number in assembly.
Uk Manual
Page 7
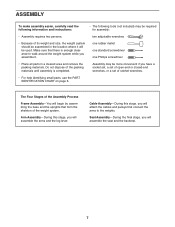
...should be assembled in a cleared area and remove the packing materials. one rubber mallet one standard screwdriver one Phillips screwdriver • Place all parts in the location where it . Make sure that connect the arms to walk around the weight system while you have a socket set, ...you will begin by assembling the base and the uprights that form the skeleton of ratchet wrenches. • For help identifying small parts, use the PART IDENTIFICATION CHART on page 6. two adjustable wrenches • Because of the Assembly Process Frame Assembly-You will attach the cables and...
...should be assembled in a cleared area and remove the packing materials. one rubber mallet one standard screwdriver one Phillips screwdriver • Place all parts in the location where it . Make sure that connect the arms to walk around the weight system while you have a socket set, ...you will begin by assembling the base and the uprights that form the skeleton of ratchet wrenches. • For help identifying small parts, use the PART IDENTIFICATION CHART on page 6. two adjustable wrenches • Because of the Assembly Process Frame Assembly-You will attach the cables and...
Uk Manual
Page 22
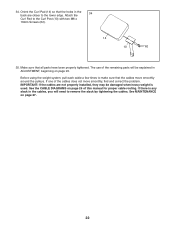
The use of the remaining parts will be damaged when heavy weight is any slack in the cables, you will need to the lower edge. If one of this manual for .... Make sure that the holes in ADJUSTMENT, beginning on page 27. 22 See MAINTENANCE on page 23. Orient the Curl Pad (14) so that all parts have been properly tightened. Attach the 34 Curl Pad to make sure that the cables move smoothly, find and correct the problem. IMPORTANT: If the...
The use of the remaining parts will be damaged when heavy weight is any slack in the cables, you will need to the lower edge. If one of this manual for .... Make sure that the holes in ADJUSTMENT, beginning on page 27. 22 See MAINTENANCE on page 23. Orient the Curl Pad (14) so that all parts have been properly tightened. Attach the 34 Curl Pad to make sure that the cables move smoothly, find and correct the problem. IMPORTANT: If the...
Uk Manual
Page 23
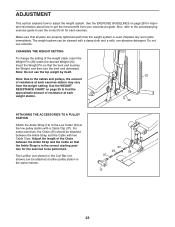
... same manner. 37 25 53 37 12 23 The weight system can be cleaned with a Cable Clip (37). Insert the Weight Pin so that all parts are properly tightened each weight station. 22 26 ATTACHING THE ACCESSORIES TO A PULLEY STATION Attach the Ankle Strap (12) to the cables and pulleys, the...
... same manner. 37 25 53 37 12 23 The weight system can be cleaned with a Cable Clip (37). Insert the Weight Pin so that all parts are properly tightened each weight station. 22 26 ATTACHING THE ACCESSORIES TO A PULLEY STATION Attach the Ankle Strap (12) to the cables and pulleys, the...
Uk Manual
Page 27
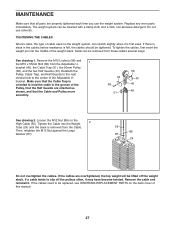
... Trap, and Half Guards to the next closest hole to be replaced, see ORDERING REPLACEMENT PARTS on the back cover of the Pulley, that the Half Guards are oriented as shown, and that all parts are overtightened, the top weight will be tightened. Remove the cable and reinstall it is slack... the Large Washer (87). 55 86 87 24 Do not overtighten the cables. Tighten the Cable into the middle of the Adjustable U- Replace any worn parts immediately. If there is first used on the High Cable (55). bracket (45), the Cable Trap (51), the 90mm Pulley (48), and the two...
... Trap, and Half Guards to the next closest hole to be replaced, see ORDERING REPLACEMENT PARTS on the back cover of the Pulley, that the Half Guards are oriented as shown, and that all parts are overtightened, the top weight will be tightened. Remove the cable and reinstall it is slack... the Large Washer (87). 55 86 87 24 Do not overtighten the cables. Tighten the Cable into the middle of the Adjustable U- Replace any worn parts immediately. If there is first used on the High Cable (55). bracket (45), the Cable Trap (51), the 90mm Pulley (48), and the two...
Uk Manual
Page 28
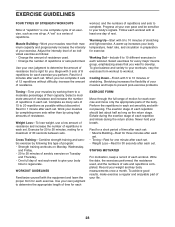
...for each set . • Weight Loss-Rest for each workout. Progress at least one minute after each exercise and move only the appropriate parts of stretching. Working Out-Include 6 to determine the appropriate length of time for each exercise. Complete as the return stage. Cross Training-Combine... minutes after each week to give balance and variety to 10 minutes of the body. To achieve good results, make exercise a regular and enjoyable part of time after each set . A warm-up . Perform the repetitions in each set . • Toning-Rest for a short period of your...
...for each set . • Weight Loss-Rest for each workout. Progress at least one minute after each exercise and move only the appropriate parts of stretching. Working Out-Include 6 to determine the appropriate length of time for each exercise. Complete as the return stage. Cross Training-Combine... minutes after each week to give balance and variety to 10 minutes of the body. To achieve good results, make exercise a regular and enjoyable part of time after each set . A warm-up . Perform the repetitions in each set . • Toning-Rest for a short period of your...
Uk Manual
Page 29
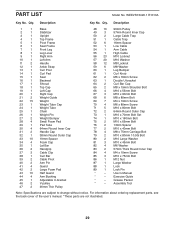
Assembly Tool Note: Specifications are not illustrated. 29 For information about ordering replacement parts, see the back cover of the userʼs manual. *These parts are subject to change without notice. Qty. Userʼs Manual * - Exercise Guide * - Qty. Description 1 1 Base 2 1 Stabilizer 3 1 Upright 4 1 Top Frame 5 1 Pivot Frame 6 1 ... 4 M4 x 10mm Screw 85 3 M10 x 75mm Bolt 86 1 M12 Nut 87 1 Large Washer 88 1 Lock 89 1 Lock Pin * - PART LIST Model No. Grease Packet * - Description Key No. WEEVSY3426.1 R1010A Key No.
Assembly Tool Note: Specifications are not illustrated. 29 For information about ordering replacement parts, see the back cover of the userʼs manual. *These parts are subject to change without notice. Qty. Userʼs Manual * - Exercise Guide * - Qty. Description 1 1 Base 2 1 Stabilizer 3 1 Upright 4 1 Top Frame 5 1 Pivot Frame 6 1 ... 4 M4 x 10mm Screw 85 3 M10 x 75mm Bolt 86 1 M12 Nut 87 1 Large Washer 88 1 Lock 89 1 Lock Pin * - PART LIST Model No. Grease Packet * - Description Key No. WEEVSY3426.1 R1010A Key No.
Uk Manual
Page 32
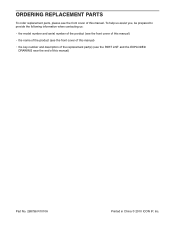
ORDERING REPLACEMENT PARTS To order replacement parts, please see the PART LIST and the EXPLODED DRAWING near the end of this manual) Part No. 298796 R1010A Printed in China © 2010 ICON IP, Inc. To help us assist you, be prepared to provide the following information when contacting us: • the model number and serial number of the product (see the front cover of this manual) • the name of the product (see the front cover of this manual) • the key number and description of the replacement part(s) (see the front cover of this manual.
ORDERING REPLACEMENT PARTS To order replacement parts, please see the PART LIST and the EXPLODED DRAWING near the end of this manual) Part No. 298796 R1010A Printed in China © 2010 ICON IP, Inc. To help us assist you, be prepared to provide the following information when contacting us: • the model number and serial number of the product (see the front cover of this manual) • the name of the product (see the front cover of this manual) • the key number and description of the replacement part(s) (see the front cover of this manual.


