

English Manual
Page 2
TABLE OF CONTENTS IMPORTANT PRECAUTIONS 3 BEFORE YOU BEGIN 4 ASSEMBLY 5 ADJUSTMENTS 21 WEIGHT RESISTANCE CHART 23 CABLE DIAGRAM 24 EXERCISE GUIDELINES 26 ORDERING REPLACEMENT PARTS Back Cover FULL 90 DAY WARRANTY Back Cover Note: A PART IDENTIFICATION CHART and a PART LIST/EXPLODED DRAWING are attached in the center of this manual. Remove the PART IDENTIFICATION CHART and the PART LIST/EXPLODED DRAWING before beginning assembly. 2
TABLE OF CONTENTS IMPORTANT PRECAUTIONS 3 BEFORE YOU BEGIN 4 ASSEMBLY 5 ADJUSTMENTS 21 WEIGHT RESISTANCE CHART 23 CABLE DIAGRAM 24 EXERCISE GUIDELINES 26 ORDERING REPLACEMENT PARTS Back Cover FULL 90 DAY WARRANTY Back Cover Note: A PART IDENTIFICATION CHART and a PART LIST/EXPLODED DRAWING are attached in the center of this manual. Remove the PART IDENTIFICATION CHART and the PART LIST/EXPLODED DRAWING before beginning assembly. 2
English Manual
Page 5
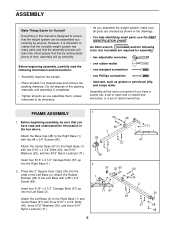
...with a #8 x 3/4" Screw (68). Most people find that the assembly process will go smoothly. Attach the Center Base (67) to realize that the versatile weight system has many parts and that by anyone. FRAME ASSEMBLY 1. Insert four 5/16" x 2 1/2" Carriage Bolts (57) up into the Right Base (1). 2.... make sure all parts are required for Yourself Everything in the drawings. • For help identifying small parts, use the PART IDENTIFICATION CHART. Press two 2" Square Inner Caps (33) into the Left Base (2). ASSEMBLY Make Things Easier for assembly: • two adjustable ...
...with a #8 x 3/4" Screw (68). Most people find that the assembly process will go smoothly. Attach the Center Base (67) to realize that the versatile weight system has many parts and that by anyone. FRAME ASSEMBLY 1. Insert four 5/16" x 2 1/2" Carriage Bolts (57) up into the Right Base (1). 2.... make sure all parts are required for Yourself Everything in the drawings. • For help identifying small parts, use the PART IDENTIFICATION CHART. Press two 2" Square Inner Caps (33) into the Left Base (2). ASSEMBLY Make Things Easier for assembly: • two adjustable ...

English Manual
Page 11
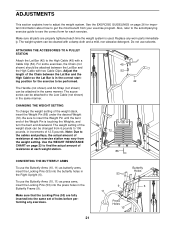
...71). Attach the Pulley inside of the Pulley. Retighten the Locknuts when this step, it may be able to the CABLE DIAGRAMS and CABLE ID CHART on the Center Top Frame (14) with the Left Top Frame (3) removed for proper cable routing and help identifying the cables. IMPORTANT: While ... 3 1/2" Pulley (38) and down through the Left Top Frame (3) and around a 3 1/2" Pulley (38). the pulleys must be necessary to the single hole side of the weight system, with a 3/8" x 1 3/4" Bolt (66) and a 3/8" Nylon Locknut (70). 70 14 38 45 66 11 Note: To complete this step is turned to hold ...
...71). Attach the Pulley inside of the Pulley. Retighten the Locknuts when this step, it may be able to the CABLE DIAGRAMS and CABLE ID CHART on the Center Top Frame (14) with the Left Top Frame (3) removed for proper cable routing and help identifying the cables. IMPORTANT: While ... 3 1/2" Pulley (38) and down through the Left Top Frame (3) and around a 3 1/2" Pulley (38). the pulleys must be necessary to the single hole side of the weight system, with a 3/8" x 1 3/4" Bolt (66) and a 3/8" Nylon Locknut (70). 70 14 38 45 66 11 Note: To complete this step is turned to hold ...
English Manual
Page 21
... to find the actual amount of resistance at each exercise station may vary from your exercise program. Use the WEIGHT RESISTANCE CHART on page 26 for the exercise to adjust the weight system. Make sure all parts are fully inserted into the butterfly holes in the Butterfly Frame (9). Also, refer... to the accompanying exercise guide to see the correct form for each time the weight system is in the correct...
... to find the actual amount of resistance at each exercise station may vary from your exercise program. Use the WEIGHT RESISTANCE CHART on page 26 for the exercise to adjust the weight system. Make sure all parts are fully inserted into the butterfly holes in the Butterfly Frame (9). Also, refer... to the accompanying exercise guide to see the correct form for each time the weight system is in the correct...
English Manual
Page 23
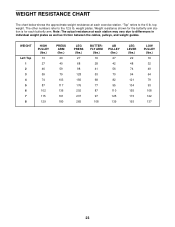
WEIGHT Left Top 1 2 3 4 5 6 7 8 HIGH PULLEY (lbs.) 13 27 46 59 74 87 102 115 129 PRESS ARM (lbs.) 20 40 59 79 103 117 136 161 ...: The actual resistance at each station may vary due to differences in individual weight plates as well as friction between the cables, pulleys, and weight guides. WEIGHT RESISTANCE CHART The chart below shows the approximate weight resistance at each exercise station. top weight. Weight resistance shown for the butterfly arm station is for each butterfly arm. The other...
WEIGHT Left Top 1 2 3 4 5 6 7 8 HIGH PULLEY (lbs.) 13 27 46 59 74 87 102 115 129 PRESS ARM (lbs.) 20 40 59 79 103 117 136 161 ...: The actual resistance at each station may vary due to differences in individual weight plates as well as friction between the cables, pulleys, and weight guides. WEIGHT RESISTANCE CHART The chart below shows the approximate weight resistance at each exercise station. top weight. Weight resistance shown for the butterfly arm station is for each butterfly arm. The other...
English Manual
Page 26
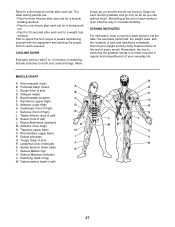
...Warming up prepares your muscles. Select exercises for more strenuous exercise by increasing circulation, raising your limits and select the amount of weight that is : • Plan weight training workouts on Monday, Wednesday, and Friday. • Plan 20 to 30 minutes of aerobic exercise, such as the return...on page 27 to find photographs showing the correct form for 3 minutes after each set . To give your body time to the muscle chart on Tuesday and Thursday. • Rest from session to session. Exhale during the exertion stage of each workout with it during the ...
...Warming up prepares your muscles. Select exercises for more strenuous exercise by increasing circulation, raising your limits and select the amount of weight that is : • Plan weight training workouts on Monday, Wednesday, and Friday. • Plan 20 to 30 minutes of aerobic exercise, such as the return...on page 27 to find photographs showing the correct form for 3 minutes after each set . To give your body time to the muscle chart on Tuesday and Thursday. • Rest from session to session. Exhale during the exertion stage of each workout with it during the ...
English Manual
Page 27
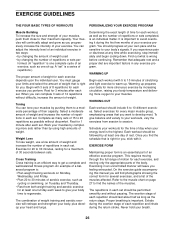
... COOLING DOWN End each workout with the equipment and learning the proper form for each set for a toning work- MUSCLE CHART A. Sartorius (front of arm) B D. out. • Rest for 30 seconds after each workout is to increase ... U V W 27 Gastrocnemius (back of thigh) I Q. Brachioradials (forearm) C F. Tibialis Anterior (front of calf) F L L. Adductor (inner thigh) M N. Record your weight and key body measurements at the end of each set . Soleus (front of calf) K. Ease into each set for a muscle building workout. • Rest for...
... COOLING DOWN End each workout with the equipment and learning the proper form for each set for a toning work- MUSCLE CHART A. Sartorius (front of arm) B D. out. • Rest for 30 seconds after each workout is to increase ... U V W 27 Gastrocnemius (back of thigh) I Q. Brachioradials (forearm) C F. Tibialis Anterior (front of calf) F L L. Adductor (inner thigh) M N. Record your weight and key body measurements at the end of each set . Soleus (front of calf) K. Ease into each set for a muscle building workout. • Rest for...


