
English Manual
Page 4
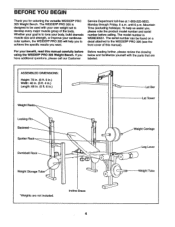
... results you , please note the product model number and serial number before Before reading further, please review the drawing using the WEIDER• PRO 305 Weight Bench. The serial number can be used with the parts that are not included. ASSEMBLED DIMENSIONS: Height: 78 in. (6 ft....225-0653, Monday through Friday, 6 a.m. If you for selecting the versatile WEIDER• PRO 305 Weight Bench. The model number is designed to be found on a decal attached to the WEIDER° PRO 305 (see the front cover of the body. The WEIDER• PRO 305 is WEBE30551. Incline Brace 4
... results you , please note the product model number and serial number before Before reading further, please review the drawing using the WEIDER• PRO 305 Weight Bench. The serial number can be used with the parts that are not included. ASSEMBLED DIMENSIONS: Height: 78 in. (6 ft....225-0653, Monday through Friday, 6 a.m. If you for selecting the versatile WEIDER• PRO 305 Weight Bench. The model number is designed to be found on a decal attached to the WEIDER° PRO 305 (see the front cover of the body. The WEIDER• PRO 305 is WEBE30551. Incline Brace 4
English Manual
Page 10
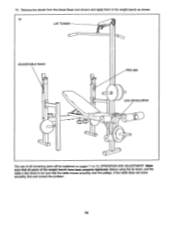
If the cable does not move smoothly, find and correct the problem. 10 19. Remove the decals from the Decal Sheet (not shown) and apply them to 13, OPERATION AND ADJUSTMENT. Before using the lat tower, pull the cable a few times to be explained on pages 11 to the weight bench as shown. 19 LAT TOWER ot ADJUSTABLE RACK PRO 305 LEG DEVELOPER • 0 0 0, The use of all parts of the weight bench have been properly tightened. Make sure that all remaining parts will be sure that the cable moves smoothly over the pulleys.
If the cable does not move smoothly, find and correct the problem. 10 19. Remove the decals from the Decal Sheet (not shown) and apply them to 13, OPERATION AND ADJUSTMENT. Before using the lat tower, pull the cable a few times to be explained on pages 11 to the weight bench as shown. 19 LAT TOWER ot ADJUSTABLE RACK PRO 305 LEG DEVELOPER • 0 0 0, The use of all parts of the weight bench have been properly tightened. Make sure that all remaining parts will be sure that the cable moves smoothly over the pulleys.
English Manual
Page 11
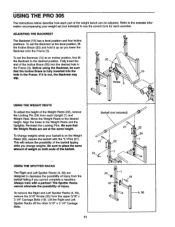
...from the upper 5/16" x 3 1/4" Carriage Bolts (19). Be sure that the Incline Brace is fully inserted into the desired hole in the Weight Rests and the Uprights. Re-insert the Locking Pins. Always train with the "L"-Pins (21). 1 This will reduce the possibility of the barbell ...Fully insert the end of injury. Barbell (not included) 21 22 24 To change weights. USING THE PRO 305 The instructions below describe how each part of the weight bench can be sure that the Weight Rests are designed to decrease the possibility of injury from the barbell falling if you ...
...from the upper 5/16" x 3 1/4" Carriage Bolts (19). Be sure that the Incline Brace is fully inserted into the desired hole in the Weight Rests and the Uprights. Re-insert the Locking Pins. Always train with the "L"-Pins (21). 1 This will reduce the possibility of the barbell ...Fully insert the end of injury. Barbell (not included) 21 22 24 To change weights. USING THE PRO 305 The instructions below describe how each part of the weight bench can be sure that the Weight Rests are designed to decrease the possibility of injury from the barbell falling if you ...
English Manual
Page 12
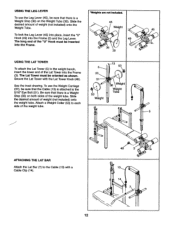
... Lat Tower with a Cable Clip (14). 0 13 14 7 12 To use the Leg Lever (45), be sure that the Cable (13) is attached to the weight bench, insert the lower end of the Lat Tower into the Frame (3) and the Leg Lever. USING THE LEG LEVER To use the... Weight Carriage (37), be sure that there is a Weight Stop (36) on both sides of weight (not included) onto the weight tube. Slide the desired amount of the weight tube. 5 37 51 .0 53 Weight 13 53 36 Weight Weight Tube ATTACHING THE LAT BAR Attach the Lat Bar (7) to...
... Lat Tower with a Cable Clip (14). 0 13 14 7 12 To use the Leg Lever (45), be sure that the Cable (13) is attached to the weight bench, insert the lower end of the Lat Tower into the Frame (3) and the Leg Lever. USING THE LEG LEVER To use the... Weight Carriage (37), be sure that there is a Weight Stop (36) on both sides of weight (not included) onto the weight tube. Slide the desired amount of the weight tube. 5 37 51 .0 53 Weight 13 53 36 Weight Weight Tube ATTACHING THE LAT BAR Attach the Lat Bar (7) to...
English Manual
Page 14
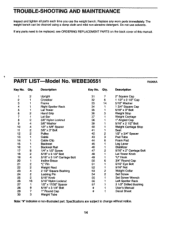
...PARTS on the back cover of this manual. Replace any parts need to change without notice. 14 Do not use the weight bench. PART LIST Model No. TROUBLE-SHOOTING AND MAINTENANCE Inspect and tighten all parts each time you use solvents. Qty. ... 1 Backrest 16 1 Backrest Rail 17 8 1/4" x 1/2" Screw 18 2 5/16" x 3 1/2" Bolt 19 4 5/16" x 3 1/4" Carriage Bolt 20 1 Incline Brace 21 2 "L" Pin 22 2 Weight Rest 23 4 2 1/2" Square Bushing 24 2 Locking Pin 25 2 5/16" Knob 26 18 5/16" Nylon Locknut 27 1 1/2" x 17/32" Spacer 28 9 5/16" x 3 1/4" Bolt 29 7...
...PARTS on the back cover of this manual. Replace any parts need to change without notice. 14 Do not use the weight bench. PART LIST Model No. TROUBLE-SHOOTING AND MAINTENANCE Inspect and tighten all parts each time you use solvents. Qty. ... 1 Backrest 16 1 Backrest Rail 17 8 1/4" x 1/2" Screw 18 2 5/16" x 3 1/2" Bolt 19 4 5/16" x 3 1/4" Carriage Bolt 20 1 Incline Brace 21 2 "L" Pin 22 2 Weight Rest 23 4 2 1/2" Square Bushing 24 2 Locking Pin 25 2 5/16" Knob 26 18 5/16" Nylon Locknut 27 1 1/2" x 17/32" Spacer 28 9 5/16" x 3 1/4" Bolt 29 7...
English Manual
Page 16
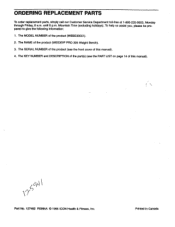
... parts, simply call our Customer Service Department toll-free at 1-800-225-0653, Monday through Friday, 6 a.m. Printed in Canada The MODEL NUMBER of the product (WEIDER' PRO 305 Weight Bench). 3. The SERIAL NUMBER of the product (see the PART LIST on page 14 of this manual). The NAME of the product (WEBE30551). 2. Part No. 127482...
... parts, simply call our Customer Service Department toll-free at 1-800-225-0653, Monday through Friday, 6 a.m. Printed in Canada The MODEL NUMBER of the product (WEIDER' PRO 305 Weight Bench). 3. The SERIAL NUMBER of the product (see the PART LIST on page 14 of this manual). The NAME of the product (WEBE30551). 2. Part No. 127482...


