
English Manual
Page 1
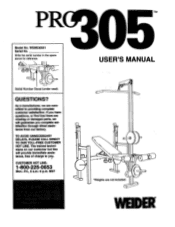
... provide immediate assistance, free of charge to providing complete customer satisfaction. Write the serial number in the space above for reference. 0 o, Serial Number Decal (under seat) QUESTIONS? W Serial No. MST USER'S MANUAL 0 o • o, *Weights are committed to you complete satisfaction through direct assistance from our factory. EBR E305G 51 305 Model No. TO AVOID UNNECESSARY DELAYS, PLEASE CALL DIRECT TO OUR TOLL-FREE CUSTOMER HOT UNE.
... provide immediate assistance, free of charge to providing complete customer satisfaction. Write the serial number in the space above for reference. 0 o, Serial Number Decal (under seat) QUESTIONS? W Serial No. MST USER'S MANUAL 0 o • o, *Weights are committed to you complete satisfaction through direct assistance from our factory. EBR E305G 51 305 Model No. TO AVOID UNNECESSARY DELAYS, PLEASE CALL DIRECT TO OUR TOLL-FREE CUSTOMER HOT UNE.
English Manual
Page 2
... or abnormal usage or repairs not provided by ICON. Accordingly, the above limitation may also have other transportation charges prepaid, accompanied by ICON. Remove the PART IDENTIFICATION CHART before beginning assembly. TABLE OF CONTENTS LIMITED WARRANTY IMPORTANT PRECAUTIONS BEFORE YOU BEGIN ASSEMBLY USING THE PRO 305 TROUBLE-SHOOTING AND MAINTENANCE PART LIST EXPLODED DRAWING ORDERING REPLACEMENT PARTS 2 3 4 5 11 14 14 15 Back Cover Note: A PART IDENTIFICATION CHART is limited in its scope and duration...
... or abnormal usage or repairs not provided by ICON. Accordingly, the above limitation may also have other transportation charges prepaid, accompanied by ICON. Remove the PART IDENTIFICATION CHART before beginning assembly. TABLE OF CONTENTS LIMITED WARRANTY IMPORTANT PRECAUTIONS BEFORE YOU BEGIN ASSEMBLY USING THE PRO 305 TROUBLE-SHOOTING AND MAINTENANCE PART LIST EXPLODED DRAWING ORDERING REPLACEMENT PARTS 2 3 4 5 11 14 14 15 Back Cover Note: A PART IDENTIFICATION CHART is limited in its scope and duration...
English Manual
Page 4
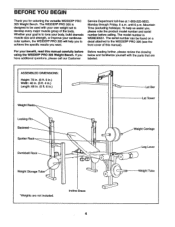
... Rack Weight Storage Tube Bar Lat Tower Weight Carriage 0 o - until 6 p.m. To help you to tone your body, build dramatic muscle size and strength, or improve your benefit, read this manual). The WEIDER• PRO 305 is WEBE30551. If you , please note the product model number and serial number before Before reading further, please review the drawing using the WEIDER• PRO 305 Weight Bench. Incline Brace 4 Whether your goal is to achieve the specific...
... Rack Weight Storage Tube Bar Lat Tower Weight Carriage 0 o - until 6 p.m. To help you to tone your body, build dramatic muscle size and strength, or improve your benefit, read this manual). The WEIDER• PRO 305 is WEBE30551. If you , please note the product model number and serial number before Before reading further, please review the drawing using the WEIDER• PRO 305 Weight Bench. Incline Brace 4 Whether your goal is to achieve the specific...
English Manual
Page 5
... instructed to an Upright (1) with holes drilled near one end. The Weight Tube must be needed. Attach the Weight Tube (30) to do not dispose of the packing materials until assembly is completed. • For help identifying the small parts used in assembly, use the PART IDENTIFICATION CHART located in the drawings. do otherwise. • As you 1 have read the following tools: A socket set, a set of open...
... instructed to an Upright (1) with holes drilled near one end. The Weight Tube must be needed. Attach the Weight Tube (30) to do not dispose of the packing materials until assembly is completed. • For help identifying the small parts used in assembly, use the PART IDENTIFICATION CHART located in the drawings. do otherwise. • As you 1 have read the following tools: A socket set, a set of open...
English Manual
Page 6
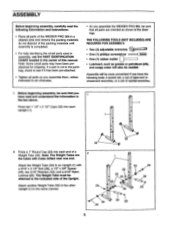
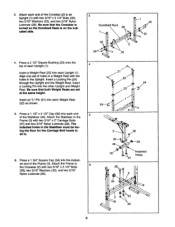
... that both Weight Rests are set of the. Press a 1 1/2" x 2 1/2" Cap (32) into each end 5 of each Upright (1). 4 Insert a Weight Rest (22) into each end of holes in the Upright. Press a 2 1/2" Square Bushing (23) onto the top of the Stabilizer (46). Insert a Locking Pin (24) through the Upright and the Weight Rest. Attach the Stabilizer to an Upright (1) with two 5/16" x 2" Carriage Bolts (47...
... that both Weight Rests are set of the. Press a 1 1/2" x 2 1/2" Cap (32) into each end 5 of each Upright (1). 4 Insert a Weight Rest (22) into each end of holes in the Upright. Press a 2 1/2" Square Bushing (23) onto the top of the Stabilizer (46). Insert a Locking Pin (24) through the Upright and the Weight Rest. Attach the Stabilizer to an Upright (1) with two 5/16" x 2" Carriage Bolts (47...
English Manual
Page 7
.... Press a 2" Square Cap (31) into the Leg Lever (45) in one of the 5/16" x 3 1/4" Carriage Bolt (19) in the Right Spotter Rack and the Upright from the direction shown. Insert another 5/16" x 3 1/4" Carriage Bolt through the lower hole in the indicated locations. 7 25 26 33 1 1 56 • 19 31 4 8 t-?..„,.-31 45 -11-31 9. Lubricate the 5/16" x 3" Bolt (35). Tighten a 5/16" Knob...
.... Press a 2" Square Cap (31) into the Leg Lever (45) in one of the 5/16" x 3 1/4" Carriage Bolt (19) in the Right Spotter Rack and the Upright from the direction shown. Insert another 5/16" x 3 1/4" Carriage Bolt through the lower hole in the indicated locations. 7 25 26 33 1 1 56 • 19 31 4 8 t-?..„,.-31 45 -11-31 9. Lubricate the 5/16" x 3" Bolt (35). Tighten a 5/16" Knob...

English Manual
Page 8
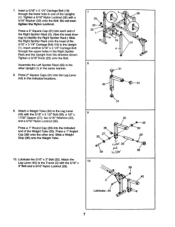
... inserted. Do not tighten the Screws until all four Screws are inserted. Attach the Backrest Rail (16) to the Frame (3) with a 5/16" x 3 1/2" Bolt (18) and a 5/16" Nylon Locknut (26). Be sure that the Seat is turned as shown. \ .. 41 . Attach the Incline Brace (20) to the Backrest Rail (16) with a 5/16" x 3 1/2" Bolt (18) and a 5/16" Nylon Locknut (26). Press 3/4" Round Caps...
... inserted. Do not tighten the Screws until all four Screws are inserted. Attach the Backrest Rail (16) to the Frame (3) with a 5/16" x 3 1/2" Bolt (18) and a 5/16" Nylon Locknut (26). Be sure that the Seat is turned as shown. \ .. 41 . Attach the Incline Brace (20) to the Backrest Rail (16) with a 5/16" x 3 1/2" Bolt (18) and a 5/16" Nylon Locknut (26). Press 3/4" Round Caps...

English Manual
Page 9
Attach the Pulley to the weight tube with a 3/8" x 3" Bolt (11), two 3/8" Washers (9), two 1/2" x 5/8" Spacers (10), and a 3/8" Nylon Locknut (8). Slide the Weight Carriage (37) onto the Lat Tower (5). Press the 2 1/2" Drilled Bushing (57) onto the Weight Carriage Stop (40). Slide the Weight Carriage Stop (40) onto the Lat Tower (5). The ball must run smoothly over both Pulleys. Slide a Weight Stop (36) onto each end of the Lat Bar. 15...
Attach the Pulley to the weight tube with a 3/8" x 3" Bolt (11), two 3/8" Washers (9), two 1/2" x 5/8" Spacers (10), and a 3/8" Nylon Locknut (8). Slide the Weight Carriage (37) onto the Lat Tower (5). Press the 2 1/2" Drilled Bushing (57) onto the Weight Carriage Stop (40). Slide the Weight Carriage Stop (40) onto the Lat Tower (5). The ball must run smoothly over both Pulleys. Slide a Weight Stop (36) onto each end of the Lat Bar. 15...
English Manual
Page 10
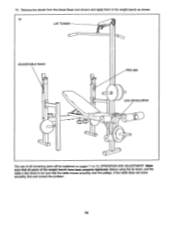
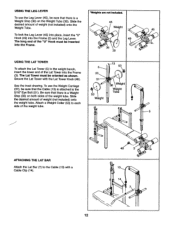
Before using the lat tower, pull the cable a few times to be sure that all remaining parts will be explained on pages 11 to the weight bench as shown. 19 LAT TOWER ot ADJUSTABLE RACK PRO 305 LEG DEVELOPER • 0 0 0, The use of all parts of the weight bench have been properly tightened. If the cable does not move smoothly, find and correct the problem. 10 Make sure that the cable moves smoothly over the pulleys. 19. Remove the decals from the Decal Sheet (not shown) and apply them to 13, OPERATION AND ADJUSTMENT.
Before using the lat tower, pull the cable a few times to be sure that all remaining parts will be explained on pages 11 to the weight bench as shown. 19 LAT TOWER ot ADJUSTABLE RACK PRO 305 LEG DEVELOPER • 0 0 0, The use of all parts of the weight bench have been properly tightened. If the cable does not move smoothly, find and correct the problem. 10 Make sure that the cable moves smoothly over the pulleys. 19. Remove the decals from the Decal Sheet (not shown) and apply them to 13, OPERATION AND ADJUSTMENT.
English Manual
Page 11
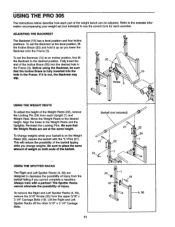
... the level position, lift the Incline Brace (20) and hold it up as you change weights while your weight set at the same height. USING THE PRO 305 The instructions below describe how each Upright (1) and Weight Rest. If It is fully inserted into the desired hole in the Weight Rests and the Uprights. Re-insert the Locking Pins. ADJUSTING THE BACKREST O The Backrest (15...
... the level position, lift the Incline Brace (20) and hold it up as you change weights while your weight set at the same height. USING THE PRO 305 The instructions below describe how each Upright (1) and Weight Rest. If It is fully inserted into the desired hole in the Weight Rests and the Uprights. Re-insert the Locking Pins. ADJUSTING THE BACKREST O The Backrest (15...
English Manual
Page 12
... Weight Weight Tube ATTACHING THE LAT BAR Attach the Lat Bar (7) to the Cable (13) with the Lat Tower Knob (48). Slide the desired amount of weight (not included) onto the weight tube. Be sure that there is a Weight Stop (36) on the Weight Tube (30). USING THE LEG LEVER To use the Weight Carriage (37), be sure that the Cable (13) is attached to the 5/16" Eye Bolt (51). To lock the Leg...
... Weight Weight Tube ATTACHING THE LAT BAR Attach the Lat Bar (7) to the Cable (13) with the Lat Tower Knob (48). Slide the desired amount of weight (not included) onto the weight tube. Be sure that there is a Weight Stop (36) on the Weight Tube (30). USING THE LEG LEVER To use the Weight Carriage (37), be sure that the Cable (13) is attached to the 5/16" Eye Bolt (51). To lock the Leg...
English Manual
Page 13
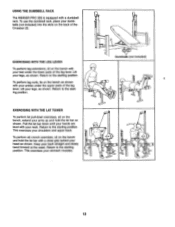
... perform ab crunch exercises, sit on the bench, extend your arms up and hold the lat bar with your feet under the upper pads of the leg lever. Lift your back straight and slowly bend forward at the waist. USING THE DUMBBELL RACK The WEIDER PRO 305 is equipped with your head as shown. Return to the starting position. Lift your...
... perform ab crunch exercises, sit on the bench, extend your arms up and hold the lat bar with your feet under the upper pads of the leg lever. Lift your back straight and slowly bend forward at the waist. USING THE DUMBBELL RACK The WEIDER PRO 305 is equipped with your head as shown. Return to the starting position. Lift your...
English Manual
Page 14
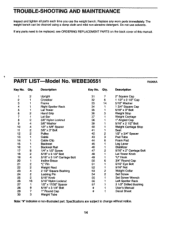
... 2 5/16" x 2" Carriage Bolt 48 1 Lat Tower Knob 49 1 "U" Hook 50 6 3/4" Round Cap 51 1 5/16" Eye Bolt 52 1 5/16" Nut 53 2 Weight Collar 54 2 Set Screw 55 1 Set Screw Wrench 56 1 Left Spotter Rack 57 1 2 1/2" Drilled Bushing 1 User's Manual 1 Decal Sheet Note: "#" indicates a non-illustrated part. Do not use the weight bench. Description Key No. Qty. TROUBLE-SHOOTING AND MAINTENANCE Inspect and tighten all parts each time you use solvents. PART LIST Model No. Qty.
... 2 5/16" x 2" Carriage Bolt 48 1 Lat Tower Knob 49 1 "U" Hook 50 6 3/4" Round Cap 51 1 5/16" Eye Bolt 52 1 5/16" Nut 53 2 Weight Collar 54 2 Set Screw 55 1 Set Screw Wrench 56 1 Left Spotter Rack 57 1 2 1/2" Drilled Bushing 1 User's Manual 1 Decal Sheet Note: "#" indicates a non-illustrated part. Do not use the weight bench. Description Key No. Qty. TROUBLE-SHOOTING AND MAINTENANCE Inspect and tighten all parts each time you use solvents. PART LIST Model No. Qty.
English Manual
Page 15
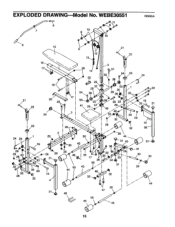
WEBE30551 6 7 10 9 11 9 10 R0995A 6 15 16 17 21 .9‹ 22 18 20 28 8 12 13 21 22 5 26 14 51 2 23 55 23 37 29 54 36 53 1 25 2 17 53 0 23 4*0 2§''. 28 33 0 41 26 5 ' 1° 40 2-1V 24 28 19 ro 31 Y. 29 23 1 26 2 ! EXPLODED DRAWING Model No. I 26 19 32 56 26 50 24 25 19 44 31 45 31 26 29 28 3 3 Ao- 26 26 26 -Ae- 31 4\2 3-3 33 17 39 26 54 50 -K 36 32e, ; 30 29 50 43 44 33 19 28 32 4 32 32 0 31 49 50 47 50 4 4 43 0 15
WEBE30551 6 7 10 9 11 9 10 R0995A 6 15 16 17 21 .9‹ 22 18 20 28 8 12 13 21 22 5 26 14 51 2 23 55 23 37 29 54 36 53 1 25 2 17 53 0 23 4*0 2§''. 28 33 0 41 26 5 ' 1° 40 2-1V 24 28 19 ro 31 Y. 29 23 1 26 2 ! EXPLODED DRAWING Model No. I 26 19 32 56 26 50 24 25 19 44 31 45 31 26 29 28 3 3 Ao- 26 26 26 -Ae- 31 4\2 3-3 33 17 39 26 54 50 -K 36 32e, ; 30 29 50 43 44 33 19 28 32 4 32 32 0 31 49 50 47 50 4 4 43 0 15
English Manual
Page 16
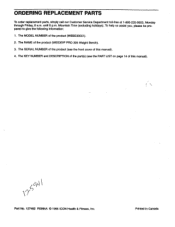
Printed in Canada until 6 p.m. The MODEL NUMBER of the product (WEIDER' PRO 305 Weight Bench). 3. Part No. 127482 R0995A © 1995 ICON Health & Fitness, Inc. The SERIAL NUMBER of the product (see the PART LIST on page 14 of this manual). Mountain Time (excluding holidays). The KEY NUMBER and DESCRIPTION of the part(s) (see the front cover of this manual). 4. To help us assist you, please be prepared to give the following...
Printed in Canada until 6 p.m. The MODEL NUMBER of the product (WEIDER' PRO 305 Weight Bench). 3. Part No. 127482 R0995A © 1995 ICON Health & Fitness, Inc. The SERIAL NUMBER of the product (see the PART LIST on page 14 of this manual). Mountain Time (excluding holidays). The KEY NUMBER and DESCRIPTION of the part(s) (see the front cover of this manual). 4. To help us assist you, please be prepared to give the following...
English Manual
Page 17
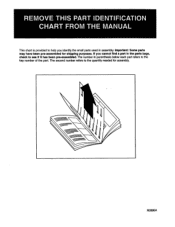
Important: Some parts may have been pre-assembled for assembly. 1'11 4iii R0995A The number in parenthesis below each part refers to the key number of the part. If you identify the small parts used in assembly. The second number refers to the quantity needed for shipping purposes. REMOVE THIS PART IDENTIFICATION CHART FROM THE MANUAL This chart is provided to help you cannot find a part in the parts bags, check to see if it has been pre-assembled.
Important: Some parts may have been pre-assembled for assembly. 1'11 4iii R0995A The number in parenthesis below each part refers to the key number of the part. If you identify the small parts used in assembly. The second number refers to the quantity needed for shipping purposes. REMOVE THIS PART IDENTIFICATION CHART FROM THE MANUAL This chart is provided to help you cannot find a part in the parts bags, check to see if it has been pre-assembled.
English Manual
Page 18
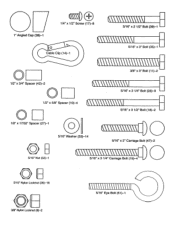
i !\,\\\\ 1/4" x 1/2" Screw (17)-8 5/16" x 2 1/2" Bolt (39)-1 - 1" Angled Cap (38)-1 0 Cable Clip (14)-1 M\\\\\\\\\\ 5/16" x 3" Bolt (35)-1 - 0 3/8" x 3" Bolt (11)-2 1/2" x 3/4" Spacer (42)-2 O 5/16" x 3 1/4" Bolt (28)-9 - 1/2" x 5/8" Spacer (10)-4 0 1/2" x 17/32" Spacer (27)-1 0 5/16" x 3 1/2" Bolt (18)-2 - 0 5/16" Washer (33)-14 1 © 5/16" x 2" Carriage Bolt (47)-2 5/16" Nut (52)-1 5/16" x 3 1/4" Carriage Bolt (19)-4 5/16" Nylon Locknut (26)-18 3/8" Nylon Locknut (8)-2 5/16" Eye Bolt (51)-1
i !\,\\\\ 1/4" x 1/2" Screw (17)-8 5/16" x 2 1/2" Bolt (39)-1 - 1" Angled Cap (38)-1 0 Cable Clip (14)-1 M\\\\\\\\\\ 5/16" x 3" Bolt (35)-1 - 0 3/8" x 3" Bolt (11)-2 1/2" x 3/4" Spacer (42)-2 O 5/16" x 3 1/4" Bolt (28)-9 - 1/2" x 5/8" Spacer (10)-4 0 1/2" x 17/32" Spacer (27)-1 0 5/16" x 3 1/2" Bolt (18)-2 - 0 5/16" Washer (33)-14 1 © 5/16" x 2" Carriage Bolt (47)-2 5/16" Nut (52)-1 5/16" x 3 1/4" Carriage Bolt (19)-4 5/16" Nylon Locknut (26)-18 3/8" Nylon Locknut (8)-2 5/16" Eye Bolt (51)-1

English Manual
Page 19
r r 2" Square Cap (31)-7 r 2 1/2" Square Bushing (23)-4 1 3/4" Square Cap (34)-1 r /-* 2 1/2" Drilled Bushing (57)-1 1 1/2" x 2 1/2" Cap (32)-6 3/4" Round Cap (50)-6 O 1" Round Cap (29)-7 Weight Stop (36)-3
r r 2" Square Cap (31)-7 r 2 1/2" Square Bushing (23)-4 1 3/4" Square Cap (34)-1 r /-* 2 1/2" Drilled Bushing (57)-1 1 1/2" x 2 1/2" Cap (32)-6 3/4" Round Cap (50)-6 O 1" Round Cap (29)-7 Weight Stop (36)-3


