
English Manual
Page 2
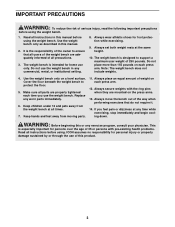
This decal is placed on the bench side of each weight rest. TABLE OF CONTENTS WARNING DECAL PLACEMENT 2 IMPORTANT PRECAUTIONS 3 BEFORE YOU BEGIN 4 PART IDENTIFICATION CHART 5 ASSEMBLY 6 ADJUSTMENTS 10 EXERCISE GUIDELINES 12 PART LIST ... Health & Fitness, Inc. 2 This decal is placed in the location shown. WEIDER is missing or illegible, please call our Customer Service Department tollfree at 1-800-999-3756, Monday through Friday, 6 a.m. Apply the decal in the same location on the weight bench. until 6 p.m. To avoid injury, insert pin completely and securely. If a...
This decal is placed on the bench side of each weight rest. TABLE OF CONTENTS WARNING DECAL PLACEMENT 2 IMPORTANT PRECAUTIONS 3 BEFORE YOU BEGIN 4 PART IDENTIFICATION CHART 5 ASSEMBLY 6 ADJUSTMENTS 10 EXERCISE GUIDELINES 12 PART LIST ... Health & Fitness, Inc. 2 This decal is placed in the location shown. WEIDER is missing or illegible, please call our Customer Service Department tollfree at 1-800-999-3756, Monday through Friday, 6 a.m. Apply the decal in the same location on the weight bench. until 6 p.m. To avoid injury, insert pin completely and securely. If a...
English Manual
Page 3
... it. 14. Keep children under 12 and pets away from moving parts. 11. WARNING: Before beginning this product. 3 Use the weight bench only as described in this manual. 2. Do not place more than 155 pounds on each press arm. Make sure all instructions before using... the weight bench. 1. Always place an equal amount of weight on each press arm. 12. Note: The weight bench does not include weights. 4. Keep hands and feet away from the weight bench at the same height. 10. Always move the bench out of this or any time while...
... it. 14. Keep children under 12 and pets away from moving parts. 11. WARNING: Before beginning this product. 3 Use the weight bench only as described in this manual. 2. Do not place more than 155 pounds on each press arm. Make sure all instructions before using... the weight bench. 1. Always place an equal amount of weight on each press arm. 12. Note: The weight bench does not include weights. 4. Keep hands and feet away from the weight bench at the same height. 10. Always move the bench out of this or any time while...

English Manual
Page 4
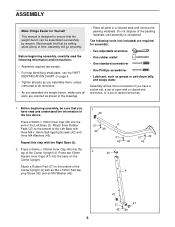
... ASSEMBLED DIMENSIONS: Height: 53.5 in . Adjustment Pin Adjustment Carriage Center Upright Backrest Bench Lock Bench Frame Right Side 4 Mountain Time (excluding holidays). If you for selecting the versatile WEIDER® PRO 250X weight bench. Width: 64 in the drawing below. To help you want. The serial number... can be found on the bench, facing away from the center upright. the parts that are ...
... ASSEMBLED DIMENSIONS: Height: 53.5 in . Adjustment Pin Adjustment Carriage Center Upright Backrest Bench Lock Bench Frame Right Side 4 Mountain Time (excluding holidays). If you for selecting the versatile WEIDER® PRO 250X weight bench. Width: 64 in the drawing below. To help you want. The serial number... can be found on the bench, facing away from the center upright. the parts that are ...
English Manual
Page 6
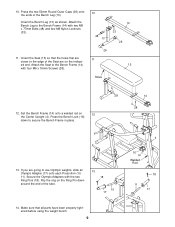
... Inner Cap (44) into the base on page 5. • Tighten all parts as you assemble them, unless instructed to ensure that the weight bench can be assembled successfully by setting aside plenty of ratchet wrenches. 1. Do not dispose of the packing materials until assembly is designed to do otherwise...people. • For help identifying small parts, use the PART IDENTIFICATION CHART on the Center Upright. Most people find that you assemble the weight bench, make sure all parts are required for Yourself This manual is completed. Press a 50mm x 70mm Inner Cap (46) into the end ...
... Inner Cap (44) into the base on page 5. • Tighten all parts as you assemble them, unless instructed to ensure that the weight bench can be assembled successfully by setting aside plenty of ratchet wrenches. 1. Do not dispose of the packing materials until assembly is designed to do otherwise...people. • For help identifying small parts, use the PART IDENTIFICATION CHART on the Center Upright. Most people find that you assemble the weight bench, make sure all parts are required for Yourself This manual is completed. Press a 50mm x 70mm Inner Cap (46) into the end ...
English Manual
Page 8
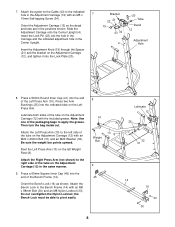
... Carriage (12) in the Adjustment Carriage (12) with an M8 x 88mm Bolt (30) and an M8 Nylon Locknut (33). the Bench Lock must be able to the left Weight Rest (8). Slide the Adjustment Carriage onto the Center Upright (4). Lubricate both sides of the tube on the Adjustment Carriage (12) with an...with an M5 x 7 10mm Self-tapping Screw (34). Attach the Left Press Arm (10) to pivot easily. 8 41 Weight Bar 10 8 9 45 8 Lubricate 12 25 32 31 14 16 33 30 Orient the Bench Lock (16) as shown. Bracket 22 21 19 43 34 4 20 Tube Decal 12 Adjustment Hole 8. Be sure...
... Carriage (12) in the Adjustment Carriage (12) with an M8 x 88mm Bolt (30) and an M8 Nylon Locknut (33). the Bench Lock must be able to the left Weight Rest (8). Slide the Adjustment Carriage onto the Center Upright (4). Lubricate both sides of the tube on the Adjustment Carriage (12) with an...with an M5 x 7 10mm Self-tapping Screw (34). Attach the Left Press Arm (10) to pivot easily. 8 41 Weight Bar 10 8 9 45 8 Lubricate 12 25 32 31 14 16 33 30 Orient the Bench Lock (16) as shown. Bracket 22 21 19 43 34 4 20 Tube Decal 12 Adjustment Hole 8. Be sure...
English Manual
Page 9
... 48 13 33 26 26 11 15 Holes 12. Orient the Bench Leg (13) as shown. If you are on the indicated end. Orient the Seat (15) so that the holes that all parts have been properly tightened before using the weight bench. 9 4 16 14 Welded Rod 18 11 17 Flip the ring... on 12 the Center Upright (4). Press the Bench Lock (16) down around the end of the Bench Leg (13). Attach the Bench Leg to the Bench Frame (14) with the two Ring Pins (18). 10...
... 48 13 33 26 26 11 15 Holes 12. Orient the Bench Leg (13) as shown. If you are on the indicated end. Orient the Seat (15) so that the holes that all parts have been properly tightened before using the weight bench. 9 4 16 14 Welded Rod 18 11 17 Flip the ring... on 12 the Center Upright (4). Press the Bench Lock (16) down around the end of the Bench Leg (13). Attach the Bench Leg to the Bench Frame (14) with the two Ring Pins (18). 10...
English Manual
Page 10
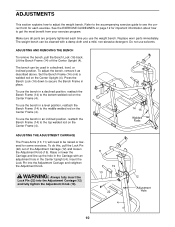
...hole in the Carriage with a damp cloth and a mild, non-abrasive detergent. The weight bench can be cleaned with an adjustment hole in place. Lift the Bench Frame (14) off the Center Upright (4). To use the bench in a declined, level, or inclined position. Insert the Lock Pin into the Adjustment ...welded rod on the Center Frame (4). Refer to the accompanying exercise guide to see the correct form for important information about how to adjust the weight bench. To do this, pull the Lock Pin (22) out of the Adjustment Carriage (12) and loosen the Adjustment Knob (19). Do not...
...hole in the Carriage with a damp cloth and a mild, non-abrasive detergent. The weight bench can be cleaned with an adjustment hole in place. Lift the Bench Frame (14) off the Center Upright (4). To use the bench in a declined, level, or inclined position. Insert the Lock Pin into the Adjustment ...welded rod on the Center Frame (4). Refer to the accompanying exercise guide to see the correct form for important information about how to adjust the weight bench. To do this, pull the Lock Pin (22) out of the Adjustment Carriage (12) and loosen the Adjustment Knob (19). Do not...
English Manual
Page 14
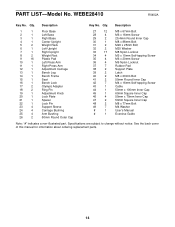
... without notice. Description 1 1 Floor Base 2 1 Left Base 3 1 Right Base 4 1 Center Upright 5 2 Weight Rack 6 1 Left Upright 7 1 Right Upright 8 2 Weight Rest 9 16 Plastic Pad 10 1 Left Press Arm 11 1 Right Press Arm 12 1 Adjustment Carriage 13 1 Bench Leg 14 1 Bench Frame 15 1 Seat 16 1 Bench Lock 17 2 Olympic Adapter 18 2 Ring Pin 19 1 Adjustment Knob 20 1 Lock...
... without notice. Description 1 1 Floor Base 2 1 Left Base 3 1 Right Base 4 1 Center Upright 5 2 Weight Rack 6 1 Left Upright 7 1 Right Upright 8 2 Weight Rest 9 16 Plastic Pad 10 1 Left Press Arm 11 1 Right Press Arm 12 1 Adjustment Carriage 13 1 Bench Leg 14 1 Bench Frame 15 1 Seat 16 1 Bench Lock 17 2 Olympic Adapter 18 2 Ring Pin 19 1 Adjustment Knob 20 1 Lock...
English Manual
Page 16
The KEY NUMBER and DESCRIPTION of the part(s) (see the front cover of the product (WEIDER® PRO 250X weight bench) 3. This warranty extends only to you , please be free from the date of incidental or consequential damages. This warranty does not extend to any product ...
The KEY NUMBER and DESCRIPTION of the part(s) (see the front cover of the product (WEIDER® PRO 250X weight bench) 3. This warranty extends only to you , please be free from the date of incidental or consequential damages. This warranty does not extend to any product ...


