
English Manual
Page 1
... will guarantee complete satisfaction through direct assistance from our factory. MST CAUTION Read all precautions and instructions in the space above for future reference. USER'S MANUAL Visit our website at www.nordictrack.com new products, prizes, fitness tips, and much more! As a manufacturer, we will provide immediate assistance, free of charge. Serial Number Decal (Under Seat) QUESTIONS? If you have...
... will guarantee complete satisfaction through direct assistance from our factory. MST CAUTION Read all precautions and instructions in the space above for future reference. USER'S MANUAL Visit our website at www.nordictrack.com new products, prizes, fitness tips, and much more! As a manufacturer, we will provide immediate assistance, free of charge. Serial Number Decal (Under Seat) QUESTIONS? If you have...
English Manual
Page 2
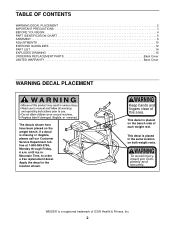
... of ICON Health & Fitness, Inc. 2 Apply the decal in the same location on the weight bench. To avoid injury, insert pin completely and securely. If a decal is placed on the bench side of this area. TABLE OF CONTENTS WARNING DECAL PLACEMENT 2 IMPORTANT PRECAUTIONS 3 BEFORE YOU BEGIN 4 PART IDENTIFICATION CHART 5 ASSEMBLY 6 ADJUSTMENTS 10 EXERCISE GUIDELINES 12 PART LIST 14 EXPLODED DRAWING 15 ORDERING REPLACEMENT PARTS Back Cover LIMITED WARRANTY Back Cover WARNING...
... of ICON Health & Fitness, Inc. 2 Apply the decal in the same location on the weight bench. To avoid injury, insert pin completely and securely. If a decal is placed on the bench side of this area. TABLE OF CONTENTS WARNING DECAL PLACEMENT 2 IMPORTANT PRECAUTIONS 3 BEFORE YOU BEGIN 4 PART IDENTIFICATION CHART 5 ASSEMBLY 6 ADJUSTMENTS 10 EXERCISE GUIDELINES 12 PART LIST 14 EXPLODED DRAWING 15 ORDERING REPLACEMENT PARTS Back Cover LIMITED WARRANTY Back Cover WARNING...
English Manual
Page 3
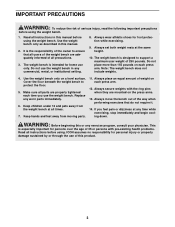
... the ring pins when they are adequately informed of all instructions in any worn parts immediately. 6. ICON assumes no responsibility for home use of this or any time while exercising, stop immediately and begin cooling down. It is especially important for foot protection while exercising. 9. Note: The weight bench does not include weights. 4. Use the weight bench only as described in this manual before using the weight bench. 1. IMPORTANT PRECAUTIONS...
... the ring pins when they are adequately informed of all instructions in any worn parts immediately. 6. ICON assumes no responsibility for home use of this or any time while exercising, stop immediately and begin cooling down. It is especially important for foot protection while exercising. 9. Note: The weight bench does not include weights. 4. Use the weight bench only as described in this manual before using the weight bench. 1. IMPORTANT PRECAUTIONS...

English Manual
Page 4
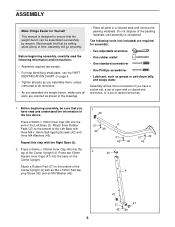
..., read this manual). Mountain Time (excluding holidays). The serial number can be found on a decal attached to a person sitting on the bench, facing away from the center upright. If you for selecting the versatile WEIDER® PRO 250X weight bench. Length: 63 in . BEFORE YOU BEGIN Thank you have additional ques- ASSEMBLED DIMENSIONS: Height: 53.5 in . Ring Pin Olympic Adapter Press Arm Adjustment Knob Weight Rest Weight Rack Adjustment Latch Floor Base Left...
..., read this manual). Mountain Time (excluding holidays). The serial number can be found on a decal attached to a person sitting on the bench, facing away from the center upright. If you for selecting the versatile WEIDER® PRO 250X weight bench. Length: 63 in . BEFORE YOU BEGIN Thank you have additional ques- ASSEMBLED DIMENSIONS: Height: 53.5 in . Ring Pin Olympic Adapter Press Arm Adjustment Knob Weight Rest Weight Rack Adjustment Latch Floor Base Left...

English Manual
Page 5
... to identify small parts used in parentheses by each drawing is not in the parts bag, check to see if it has been pre-attached. The number in assembly. Note: Some small parts may have been pre-attached. M6 Nylon Locknut (36) M20 x 25mm Bolt (31) M8 Nylon Locknut (33) M8 x 20mm Bolt (40) M5 x 10mm Self-tapping Screw (34) M4...
... to identify small parts used in parentheses by each drawing is not in the parts bag, check to see if it has been pre-attached. The number in assembly. Note: Some small parts may have been pre-attached. M6 Nylon Locknut (36) M20 x 25mm Bolt (31) M8 Nylon Locknut (33) M8 x 20mm Bolt (40) M5 x 10mm Self-tapping Screw (34) M4...
English Manual
Page 6
... following information and instructions: • Assembly requires two people. • For help identifying small parts, use the PART IDENTIFICATION CHART on the Center Upright. Press a 50mm x 70mm Inner Cap (46) into the base on page 5. • Tighten all parts as you assemble them, unless instructed to do otherwise. • As you have a socket set, a set of open-end or closed-end wrenches, or a set of ratchet wrenches. 1. Attach...
... following information and instructions: • Assembly requires two people. • For help identifying small parts, use the PART IDENTIFICATION CHART on the Center Upright. Press a 50mm x 70mm Inner Cap (46) into the base on page 5. • Tighten all parts as you assemble them, unless instructed to do otherwise. • As you have a socket set, a set of open-end or closed-end wrenches, or a set of ratchet wrenches. 1. Attach...
English Manual
Page 7
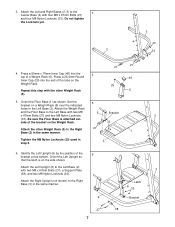
... x 67mm Bolts (27), a Support Plate (38), and two M8 Nylon Locknuts (33). Set the 5 bracket on the side shown. Attach the Left Upright (6) to the Right 27 Base (3) in the same manner. 1 Tighten the M8 Nylon Locknuts (33) used in 2 step 3. 6. Be sure the Floor Base is on a Weight Rack (5) over the indicated holes in the same manner. 2 3 Latch 6 33...
... x 67mm Bolts (27), a Support Plate (38), and two M8 Nylon Locknuts (33). Set the 5 bracket on the side shown. Attach the Left Upright (6) to the Right 27 Base (3) in the same manner. 1 Tighten the M8 Nylon Locknuts (33) used in 2 step 3. 6. Be sure the Floor Base is on a Weight Rack (5) over the indicated holes in the same manner. 2 3 Latch 6 33...
English Manual
Page 8
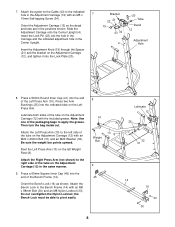
...: Use one of the Left Press Arm (10). Attach the Bench Lock to pivot easily. 8 41 Weight Bar 10 8 9 45 8 Lubricate 12 25 32 31 14 16 33 30 Orient the Adjustment Carriage (12) so the decal and tube are in the Adjustment Carriage (12) with the included grease. Press two Arm Bushings (25) into the indicated tube on the Adjustment Carriage (12), and tighten...
...: Use one of the Left Press Arm (10). Attach the Bench Lock to pivot easily. 8 41 Weight Bar 10 8 9 45 8 Lubricate 12 25 32 31 14 16 33 30 Orient the Adjustment Carriage (12) so the decal and tube are in the Adjustment Carriage (12) with the included grease. Press two Arm Bushings (25) into the indicated tube on the Adjustment Carriage (12), and tighten...
English Manual
Page 9
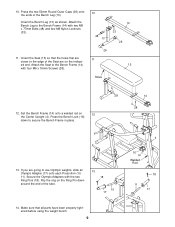
...Attach the Seat to the Bench Frame (14) with four M6 x 16mm Screws (28). 10 14 48 13 33 26 26 11 15 Holes 12. Flip the ring on 12 the Center Upright (4). Press the Bench Lock (16) down around the end of the tube. 13 18 10 17 14. Orient the Bench Leg (13) as shown. Attach the Bench Leg... to the Bench Frame (14) with two M8 x 77mm Bolts (48) and two M8 Nylon Locknuts (33). 11. Set the Bench Frame (14) onto a welded rod on the Ring Pin down to use Olympic weights, slide an Olympic Adapter (17) onto each Press Arm (10...
...Attach the Seat to the Bench Frame (14) with four M6 x 16mm Screws (28). 10 14 48 13 33 26 26 11 15 Holes 12. Flip the ring on 12 the Center Upright (4). Press the Bench Lock (16) down around the end of the tube. 13 18 10 17 14. Orient the Bench Leg (13) as shown. Attach the Bench Leg... to the Bench Frame (14) with two M8 x 77mm Bolts (48) and two M8 Nylon Locknuts (33). 11. Set the Bench Frame (14) onto a welded rod on the Ring Pin down to use Olympic weights, slide an Olympic Adapter (17) onto each Press Arm (10...
English Manual
Page 10
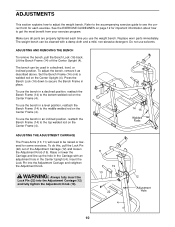
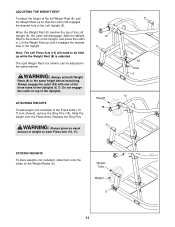
... exercise program. The weight bench can be raised or lowered for important information about how to adjust the weight bench. Set the Bench Frame (14) onto a welded rod on page 12 for some exercises. See the EXERCISE GUIDELINES on the Center Upright (4). To adjust the bench, remove it as described above. Press the Bench Lock (16) down to secure the Bench Frame in a declined, level, or inclined position. Replace worn parts immediately. ADJUSTING AND REMOVING...
... exercise program. The weight bench can be raised or lowered for important information about how to adjust the weight bench. Set the Bench Frame (14) onto a welded rod on page 12 for some exercises. See the EXERCISE GUIDELINES on the Center Upright (4). To adjust the bench, remove it as described above. Press the Bench Lock (16) down to secure the Bench Frame in a declined, level, or inclined position. Replace worn parts immediately. ADJUSTING AND REMOVING...
English Manual
Page 11
... desired hole in . Note: The Left Press Arm (10) will disengage. When the Weight Rest (8) reaches the top of the Left Upright (6), the Latch will need to the bottom of the Upright, and press the Latch in the Left Upright (6). WARNING: Always set both Weight Rests (8) to the Press Arms (10, 11 [not shown]), remove the Ring Pins (18). Slide the Weight Rest to be adjusted in the Uprights (6, 7).
... desired hole in . Note: The Left Press Arm (10) will disengage. When the Weight Rest (8) reaches the top of the Left Upright (6), the Latch will need to the bottom of the Upright, and press the Latch in the Left Upright (6). WARNING: Always set both Weight Rests (8) to the Press Arms (10, 11 [not shown]), remove the Ring Pins (18). Slide the Weight Rest to be adjusted in the Uprights (6, 7).
English Manual
Page 12
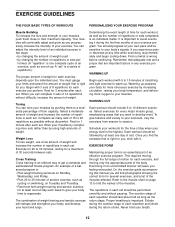
... upon the individual user. WORKING OUT Each workout should progress at least one sit-up. This requires moving only the appropriate parts of 30 seconds between sets. EXERCISE GUIDELINES THE FOUR BASIC TYPES OF WORKOUTS PERSONALIZING YOUR EXERCISE PROGRAM Muscle Building To increase the size and strength of your muscles, push them to a moderate percentage of their maximum capacity. A "set . When you experience...
... upon the individual user. WORKING OUT Each workout should progress at least one sit-up. This requires moving only the appropriate parts of 30 seconds between sets. EXERCISE GUIDELINES THE FOUR BASIC TYPES OF WORKOUTS PERSONALIZING YOUR EXERCISE PROGRAM Muscle Building To increase the size and strength of your muscles, push them to a moderate percentage of their maximum capacity. A "set . When you experience...
English Manual
Page 13
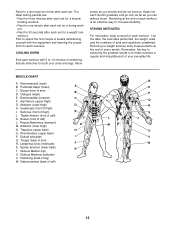
... periods are: • Rest for three minutes after each set for a muscle building workout. • Rest for one minute after each set . List the date, the exercises performed, the weight used, and the numbers of leg) W. Sartorius (front of arm) R. Rectus Abdominus (stomach) G M. Sternomastoid (neck) B. Triceps (back of thigh) E J. Spinae Erectors (lower back) K T. Hip Flexors (upper thigh) G. Adductor (inner thigh) M N. Tibialis...
... periods are: • Rest for three minutes after each set for a muscle building workout. • Rest for one minute after each set . List the date, the exercises performed, the weight used, and the numbers of leg) W. Sartorius (front of arm) R. Rectus Abdominus (stomach) G M. Sternomastoid (neck) B. Triceps (back of thigh) E J. Spinae Erectors (lower back) K T. Hip Flexors (upper thigh) G. Adductor (inner thigh) M N. Tibialis...
English Manual
Page 14
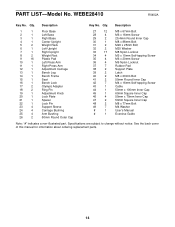
.... Specifications are subject to change without notice. PART LIST-Model No. See the back cover of this manual for information about ordering replacement parts. 14 WEBE28410 R0402A Key No. Description 1 1 Floor Base 2 1 Left Base 3 1 Right Base 4 1 Center Upright 5 2 Weight Rack 6 1 Left Upright 7 1 Right Upright 8 2 Weight Rest 9 16 Plastic Pad 10 1 Left Press Arm 11 1 Right Press Arm 12 1 Adjustment Carriage 13 1 Bench Leg 14 1 Bench Frame 15 1 Seat 16 1 Bench Lock 17 2 Olympic Adapter 18 2 Ring Pin 19 1 Adjustment Knob...
.... Specifications are subject to change without notice. PART LIST-Model No. See the back cover of this manual for information about ordering replacement parts. 14 WEBE28410 R0402A Key No. Description 1 1 Floor Base 2 1 Left Base 3 1 Right Base 4 1 Center Upright 5 2 Weight Rack 6 1 Left Upright 7 1 Right Upright 8 2 Weight Rest 9 16 Plastic Pad 10 1 Left Press Arm 11 1 Right Press Arm 12 1 Adjustment Carriage 13 1 Bench Leg 14 1 Bench Frame 15 1 Seat 16 1 Bench Lock 17 2 Olympic Adapter 18 2 Ring Pin 19 1 Adjustment Knob...
English Manual
Page 15
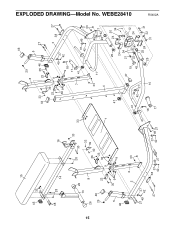
15 15 45 33 48 28 14 16 33 28 26 30 33 13 26 8 46 29 23 33 39 36 40 23 33 9 1 5 35 9 9 46 6 2 33 27 49 37 42 27 38 37 49 42 27 37 42 49 27 46 29 8 5 33 44 40 39 23 36 9 35 46 23 9 49 37 9 42 18 27 3 27 38 17 7 41 37 49 42 33 33 11 4 49 37 25 42 47 41 18 17 49 42 37 10 47 19 43 25 24 34 21 22 25 24 25 20 24 34 12 24 31 32 31 R0402A EXPLODED DRAWING-Model No. WEBE28410
15 15 45 33 48 28 14 16 33 28 26 30 33 13 26 8 46 29 23 33 39 36 40 23 33 9 1 5 35 9 9 46 6 2 33 27 49 37 42 27 38 37 49 42 27 37 42 49 27 46 29 8 5 33 44 40 39 23 36 9 35 46 23 9 49 37 9 42 18 27 3 27 38 17 7 41 37 49 42 33 33 11 4 49 37 25 42 47 41 18 17 49 42 37 10 47 19 43 25 24 34 21 22 25 24 25 20 24 34 12 24 31 32 31 R0402A EXPLODED DRAWING-Model No. WEBE28410
English Manual
Page 16
... exclusion or limitation of this manual) 4. The MODEL NUMBER of the product (WEIDER® PRO 250X weight bench) 3. The SERIAL NUMBER of the product (see the PART LIST and EXPLODED DRAWING on how long an implied warranty lasts. Mountain Time (excluding holidays). ICON HEALTH & FITNESS, INC., 1500 S. 1000 W., LOGAN, UT 84321-9813 Part No. 184733 R0402A Printed in its authorized service centers. To help us assist you specific legal rights...
... exclusion or limitation of this manual) 4. The MODEL NUMBER of the product (WEIDER® PRO 250X weight bench) 3. The SERIAL NUMBER of the product (see the PART LIST and EXPLODED DRAWING on how long an implied warranty lasts. Mountain Time (excluding holidays). ICON HEALTH & FITNESS, INC., 1500 S. 1000 W., LOGAN, UT 84321-9813 Part No. 184733 R0402A Printed in its authorized service centers. To help us assist you specific legal rights...


