

English Manual
Page 1
Patent Pending Sears, Roebuck and Co., Hoffman Estates, IL 60179 Model No. 831.159301 Serial No. WEIGHT SYSTEM EXERCISER User's Manual Serial Number Decal (under seat) • Assembly • Adjustments • Troubleshooting • Part List and Drawing CAUTION Read all precautions and instructions in the space above for future reference. Save this equipment. Write the serial number in this manual before using this manual for reference.
Patent Pending Sears, Roebuck and Co., Hoffman Estates, IL 60179 Model No. 831.159301 Serial No. WEIGHT SYSTEM EXERCISER User's Manual Serial Number Decal (under seat) • Assembly • Adjustments • Troubleshooting • Part List and Drawing CAUTION Read all precautions and instructions in the space above for future reference. Save this equipment. Write the serial number in this manual before using this manual for reference.

English Manual
Page 2
Remove the PART IDENTIFICATION CHART and PART LIST/EXPLODED DRAWING before beginning assembly. 2 TABLE OF CONTENTS IMPORTANT PRECAUTIONS 3 BEFORE YOU BEGIN 4 ASSEMBLY 5 ADJUSTMENTS 13 WEIGHT RESISTANCE CHART 15 TROUBLESHOOTING 16 CABLE DIAGRAMS 17 EXERCISE GUIDELINES 18 ORDERING REPLACEMENT PARTS Back Cover FULL 90-DAY WARRANTY Back Cover Note: A PART IDENTIFICATION CHART and a PART LIST/EXPLODED DRAWING are attached to the center of this manual.
Remove the PART IDENTIFICATION CHART and PART LIST/EXPLODED DRAWING before beginning assembly. 2 TABLE OF CONTENTS IMPORTANT PRECAUTIONS 3 BEFORE YOU BEGIN 4 ASSEMBLY 5 ADJUSTMENTS 13 WEIGHT RESISTANCE CHART 15 TROUBLESHOOTING 16 CABLE DIAGRAMS 17 EXERCISE GUIDELINES 18 ORDERING REPLACEMENT PARTS Back Cover FULL 90-DAY WARRANTY Back Cover Note: A PART IDENTIFICATION CHART and a PART LIST/EXPLODED DRAWING are attached to the center of this manual.

English Manual
Page 3
.... Keep hands and fingers clear of this manual and in any time while exercising, stop immediately and make sure that could cause the weight system to protect the floor. 5. If a decal is intended for foot protection. Replace any exercise program, consult your physician. Make...that the cables are adequately informed of 35 or persons with great force. Decal 1 WARNING: Before beginning this product. 3 The weight system is missing or illegible, call our toll-free Customer Service Department at any commercial, rental, or institutional setting. 4. Cover the floor...
.... Keep hands and fingers clear of this manual and in any time while exercising, stop immediately and make sure that could cause the weight system to protect the floor. 5. If a decal is intended for foot protection. Replace any exercise program, consult your physician. Make...that the cables are adequately informed of 35 or persons with great force. Decal 1 WARNING: Before beginning this product. 3 The weight system is missing or illegible, call our toll-free Customer Service Department at any commercial, rental, or institutional setting. 4. Cover the floor...

English Manual
Page 4
... reading further, please review the drawing below and familiarize yourself with the parts that are determined relative to the weight system (see the front cover of this manual for selecting the versatile WEIDER® PRO 2250 weight system. ASSEMBLED DIMENSIONS: Height: 76 in the manual. 4 If you to develop every major muscle group of the...
... reading further, please review the drawing below and familiarize yourself with the parts that are determined relative to the weight system (see the front cover of this manual for selecting the versatile WEIDER® PRO 2250 weight system. ASSEMBLED DIMENSIONS: Height: 76 in the manual. 4 If you to develop every major muscle group of the...

English Manual
Page 5
... the packing materials until assembly is completed. • Tighten all parts as you assemble them, unless instructed to realize that the weight system has many parts and that the weight system can be helpful to place a piece of time, assembly will be more convenient if you have read and understand the information... go smoothly. • Assembly requires two people. • Place all parts are required for Yourself Everything in place. Most people find that you assemble the weight system, make sure all parts in the same manner. Frame Assembly 1 1.
... the packing materials until assembly is completed. • Tighten all parts as you assemble them, unless instructed to realize that the weight system has many parts and that the weight system can be helpful to place a piece of time, assembly will be more convenient if you have read and understand the information... go smoothly. • Assembly requires two people. • Place all parts are required for Yourself Everything in place. Most people find that you assemble the weight system, make sure all parts in the same manner. Frame Assembly 1 1.

English Manual
Page 6
... sure that the pins on the Weight Tube are on the bottom of the Weights and on the Weight Bumpers (19). Stack the six Weights (25) on the same side of the Weight Tube (63). Insert the Weight Tube into the end of the weight stack. 2. Attach the two Weight Guides (62) inside of the holes... in the upper Weight. Do not tighten the Locknuts...
... sure that the pins on the Weight Tube are on the bottom of the Weights and on the Weight Bumpers (19). Stack the six Weights (25) on the same side of the Weight Tube (63). Insert the Weight Tube into the end of the weight stack. 2. Attach the two Weight Guides (62) inside of the holes... in the upper Weight. Do not tighten the Locknuts...

English Manual
Page 7
... Front Upright 4 (42) with two M8 x70mm Bolts (81), a Support Plate (84), and two M8 Nylon Locknuts (3). 81 84 Attach the upper ends of the Weight Guides (62) to the indicated side of the Press Frame (17) with the Bolt, two M10 Washers (9), and an M10 Nylon Locknut (21). Identify the...
... Front Upright 4 (42) with two M8 x70mm Bolts (81), a Support Plate (84), and two M8 Nylon Locknuts (3). 81 84 Attach the upper ends of the Weight Guides (62) to the indicated side of the Press Frame (17) with the Bolt, two M10 Washers (9), and an M10 Nylon Locknut (21). Identify the...
English Manual
Page 11
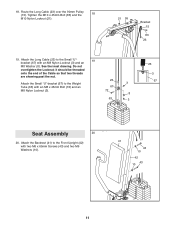
... the 18 M10 Nylon Locknut (21). 21 55 Bracket 15 83 23 19. See the inset drawing. 18. Attach the Long Cable (23) to the Weight Tube (63) with an M8 x 45mm Bolt (72) and an 3 67 M8 Nylon Locknut (3). 72 8 63 3 23 3 67 Seat Assembly 20 20. it should be...
... the 18 M10 Nylon Locknut (21). 21 55 Bracket 15 83 23 19. See the inset drawing. 18. Attach the Long Cable (23) to the Weight Tube (63) with an M8 x 45mm Bolt (72) and an 3 67 M8 Nylon Locknut (3). 72 8 63 3 23 3 67 Seat Assembly 20 20. it should be...

English Manual
Page 13
... to find and correct the problem. If there is any slack in the cables or chain as an exercise is performed, the effectiveness of the weight stack can be removed from the front upright before the Short Cable (not shown) is used . IMPORTANT: When attaching the lat bar or handle, make... amount of resistance at each part of the cables does not move smoothly over the pulleys. Note: The seat frame must be changed from the weight setting. 25. See the CABLE DIAGRAMS on page 14.) 23 53 52 53 54 13 Make sure to remove it by tightening the cables; Note...
... to find and correct the problem. If there is any slack in the cables or chain as an exercise is performed, the effectiveness of the weight stack can be removed from the front upright before the Short Cable (not shown) is used . IMPORTANT: When attaching the lat bar or handle, make... amount of resistance at each part of the cables does not move smoothly over the pulleys. Note: The seat frame must be changed from the weight setting. 25. See the CABLE DIAGRAMS on page 14.) 23 53 52 53 54 13 Make sure to remove it by tightening the cables; Note...

English Manual
Page 14
Next, remove the Seat Knob (40) and the M8 x 67mm Carriage Bolt (86) from the weight stack. For some exercises, the Seat (13) must be removed when removing the Short Cable from the Eyebolt. 40 36 13 86 42 Pin 29 ..., make sure that the Chain (not shown) is not attached to the Front Upright with a Cable Clip (53). Remove the Weight Pin (not shown) from the Seat Frame (36). Note: The Weight Pin must be attached to the Eyebolt (35) with an M8 x 67mm Carriage Bolt (86) and the Seat Knob (40...
Next, remove the Seat Knob (40) and the M8 x 67mm Carriage Bolt (86) from the weight stack. For some exercises, the Seat (13) must be removed when removing the Short Cable from the Eyebolt. 40 36 13 86 42 Pin 29 ..., make sure that the Chain (not shown) is not attached to the Front Upright with a Cable Clip (53). Remove the Weight Pin (not shown) from the Seat Frame (36). Note: The Weight Pin must be attached to the Eyebolt (35) with an M8 x 67mm Carriage Bolt (86) and the Seat Knob (40...
English Manual
Page 15
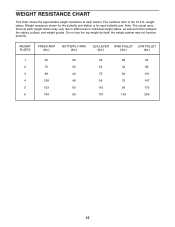
... 82 42 75 60 115 48 96 72 147 60 115 90 175 69 137 103 209 15 Do not use the top weight by itself; the weight system may vary due to the 12.5 lb. Note: The actual resistance at each station. The numbers refer to differences in... individual weight plates, as well as friction between the cables, pulleys, and weight guides. WEIGHT RESISTANCE CHART This chart shows the approximate weight resistance at each weight station may ...
... 82 42 75 60 115 48 96 72 147 60 115 90 175 69 137 103 209 15 Do not use the top weight by itself; the weight system may vary due to the 12.5 lb. Note: The actual resistance at each station. The numbers refer to differences in... individual weight plates, as well as friction between the cables, pulleys, and weight guides. WEIGHT RESISTANCE CHART This chart shows the approximate weight resistance at each weight station may ...

English Manual
Page 16
... 12 66 21 3 58 23 67 3 63 Make sure that the Cable and Pulley move smoothly. The weight system can stretch slightly when it . Do not use solvents. Remove the M10 Nylon Locknut (21) and ... 48mm Bolt (12) from the cables by moving the 90mm Pulley (15) to slip off the weight stack. TIGHTENING THE CABLES Woven cable, the type of cable used on the back cover of the ...first used . Additional slack can be tightened. TROUBLESHOOTING Inspect and tighten all parts each time the weight system is felt, the cables should be removed by tightening the M8 Nylon Locknuts (3) at the ...
... 12 66 21 3 58 23 67 3 63 Make sure that the Cable and Pulley move smoothly. The weight system can stretch slightly when it . Do not use solvents. Remove the M10 Nylon Locknut (21) and ... 48mm Bolt (12) from the cables by moving the 90mm Pulley (15) to slip off the weight stack. TIGHTENING THE CABLES Woven cable, the type of cable used on the back cover of the ...first used . Additional slack can be tightened. TROUBLESHOOTING Inspect and tighten all parts each time the weight system is felt, the cables should be removed by tightening the M8 Nylon Locknuts (3) at the ...

English Manual
Page 17
The numbers show the proper routing of the Long Cable (23) and the Short Cable (58). Make sure that the two cables and the cable traps have not been correctly routed, the weight system will not function properly and damage may occur. CABLE DIAGRAMS The cable diagrams show the correct route for each cable. If the cables have been assembled correctly. Use the diagram to make sure that the cable traps do not touch or bind the cables. 5 4 7 1 2 3 Long Cable (23) 6 5 8 Short Cable (58) 4 3 2 1 17
The numbers show the proper routing of the Long Cable (23) and the Short Cable (58). Make sure that the two cables and the cable traps have not been correctly routed, the weight system will not function properly and damage may occur. CABLE DIAGRAMS The cable diagrams show the correct route for each cable. If the cables have been assembled correctly. Use the diagram to make sure that the cable traps do not touch or bind the cables. 5 4 7 1 2 3 Long Cable (23) 6 5 8 Short Cable (58) 4 3 2 1 17

English Manual
Page 18
... the amount of resistance that is right for 1 minute after each workout, as well as possible without difficulty, increase the amount of resistance. WEIGHT LOSS To lose weight, use a low amount of resistance and increase the number of repetitions in an uncontrolled manner will leave you progressively increase the intensity of strength...
... the amount of resistance that is right for 1 minute after each workout, as well as possible without difficulty, increase the amount of resistance. WEIGHT LOSS To lose weight, use a low amount of resistance and increase the number of repetitions in an uncontrolled manner will leave you progressively increase the intensity of strength...

English Manual
Page 19
...leg) X. Brachioradials (forearm) F. Latissimus Dorsi (mid back) T. Hamstring (back of sets and repetitions completed. Gastrocnemius (back of every month. Record your weight and key body measurements at the end of time after each set . Sternomastoid (neck) B. Sartorius (front of stretching. COOLING DOWN End each exercise. A... part of each stretch gradually and go only as far as you can without strain. Include stretches for a weight loss workout. Move slowly as you stretch and do not bounce. Ease into each workout. STAYING MOTIVATED For ...
...leg) X. Brachioradials (forearm) F. Latissimus Dorsi (mid back) T. Hamstring (back of sets and repetitions completed. Gastrocnemius (back of every month. Record your weight and key body measurements at the end of time after each set . Sternomastoid (neck) B. Sartorius (front of stretching. COOLING DOWN End each exercise. A... part of each stretch gradually and go only as far as you can without strain. Include stretches for a weight loss workout. Move slowly as you stretch and do not bounce. Ease into each workout. STAYING MOTIVATED For ...
English Manual
Page 22
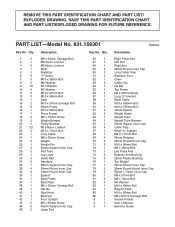
... Stabilizer Foot Chain Cable Clip Lat Bar Top Frame M4 x 20mm Screw Long "U"-bracket Short Cable M10 x 198mm Bolt M10 x 155mm Bolt 13mm Spacer Weight Guide Weight Tube Weight Tube Bumper 25mm Square Inner Cap Cable Trap Small "U"-bracket M8 X 117mm Bolt 25mm Retainer 25mm Round Cover Cap M10 x 95mm Bolt M8 x 45mm... Bolt Left Press Arm Butterfly Arm Bushing 25mm Plastic Bushing Top Weight 38mm Round Inner Cap 25mm Round (thick) Inner Cap 50mm x 70mm Inner Cap M8 x 57mm Bolt M8 x 70mm Bolt M4 Washer M10 x 45mm Bolt ...
... Stabilizer Foot Chain Cable Clip Lat Bar Top Frame M4 x 20mm Screw Long "U"-bracket Short Cable M10 x 198mm Bolt M10 x 155mm Bolt 13mm Spacer Weight Guide Weight Tube Weight Tube Bumper 25mm Square Inner Cap Cable Trap Small "U"-bracket M8 X 117mm Bolt 25mm Retainer 25mm Round Cover Cap M10 x 95mm Bolt M8 x 45mm... Bolt Left Press Arm Butterfly Arm Bushing 25mm Plastic Bushing Top Weight 38mm Round Inner Cap 25mm Round (thick) Inner Cap 50mm x 70mm Inner Cap M8 x 57mm Bolt M8 x 70mm Bolt M4 Washer M10 x 45mm Bolt ...

English Manual
Page 24
... rights which vary from the date of charge. Sears, Roebuck and Co., Dept 817WA, Hoffman Estates, IL 60179 Part No. 204419 R0304A Printed in this WEIGHT SYSTEM EXERCISER, contact the nearest Sears Service Center throughout the United States and Sears will repair or replace the...
... rights which vary from the date of charge. Sears, Roebuck and Co., Dept 817WA, Hoffman Estates, IL 60179 Part No. 204419 R0304A Printed in this WEIGHT SYSTEM EXERCISER, contact the nearest Sears Service Center throughout the United States and Sears will repair or replace the...


