
English Manual
Page 1
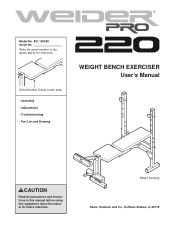
Model No. 831.150290 Serial No. Save this equipment. Patent Pending Sears, Roebuck and Co., Hoffman Estates, IL 60179 Write the serial number in this manual before using this manual for reference. Serial Number Decal (under seat) • Assembly • Adjustments • Troubleshooting • Part List and Drawing WEIGHT BENCH EXERCISER User's Manual CAUTION Read all precautions and instructions in the space above for future reference.
Model No. 831.150290 Serial No. Save this equipment. Patent Pending Sears, Roebuck and Co., Hoffman Estates, IL 60179 Write the serial number in this manual before using this manual for reference. Serial Number Decal (under seat) • Assembly • Adjustments • Troubleshooting • Part List and Drawing WEIGHT BENCH EXERCISER User's Manual CAUTION Read all precautions and instructions in the space above for future reference.
English Manual
Page 2
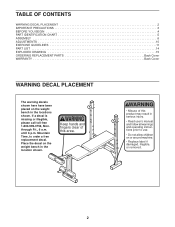
... 2 IMPORTANT PRECAUTIONS 3 BEFORE YOU BEGIN 4 PART IDENTIFICATION CHART 5 ASSEMBLY 6 ADJUSTMENTS 10 EXERCISE GUIDELINES 11 PART LIST 14 EXPLODED DRAWING 15 ORDERING REPLACEMENT PARTS Back Cover WARRANTY Back Cover WARNING DECAL PLACEMENT The warning decals shown here have been placed on the weight bench in the location shown. Mountain Time, to use. • Do not allow children on the weight bench in the locations shown. WARNING • Misuse of this...
... 2 IMPORTANT PRECAUTIONS 3 BEFORE YOU BEGIN 4 PART IDENTIFICATION CHART 5 ASSEMBLY 6 ADJUSTMENTS 10 EXERCISE GUIDELINES 11 PART LIST 14 EXPLODED DRAWING 15 ORDERING REPLACEMENT PARTS Back Cover WARRANTY Back Cover WARNING DECAL PLACEMENT The warning decals shown here have been placed on the weight bench in the location shown. Mountain Time, to use. • Do not allow children on the weight bench in the locations shown. WARNING • Misuse of this...
English Manual
Page 3
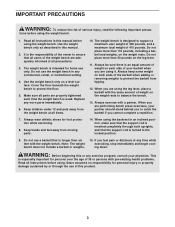
... properly tightened each side of weight on the leg lever. 11. Replace any time while exercising, stop immediately and begin cooling down. Note: The weight bench does not include a barbell or weights. 15. Do not use a barbell that all instructions in this manual before using it. If you are adequately informed of 410 pounds. The weight bench is turned to balance the bench. 13. When you are performing bench press exercises...
... properly tightened each side of weight on the leg lever. 11. Replace any time while exercising, stop immediately and begin cooling down. Note: The weight bench does not include a barbell or weights. 15. Do not use a barbell that all instructions in this manual before using it. If you are adequately informed of 410 pounds. The weight bench is turned to balance the bench. 13. When you are performing bench press exercises...
English Manual
Page 4
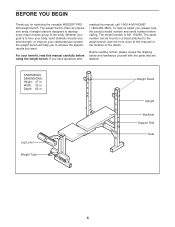
... front cover of this manual for selecting the versatile WEIDER® PRO 220 weight bench. Leg Lever Weight Tube Weight Rests Upright Backrest Support Rod Seat 4 Before reading further, please review the drawing below and familiarize yourself with the parts that are labeled. For your goal is 831.150290. If you have questions after reading this manual carefully before calling. To help you to achieve the specific...
... front cover of this manual for selecting the versatile WEIDER® PRO 220 weight bench. Leg Lever Weight Tube Weight Rests Upright Backrest Support Rod Seat 4 Before reading further, please review the drawing below and familiarize yourself with the parts that are labeled. For your goal is 831.150290. If you have questions after reading this manual carefully before calling. To help you to achieve the specific...
English Manual
Page 5
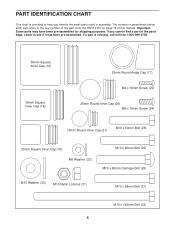
Important: Some parts may have been pre-assembled for shipping purposes. If a part is provided to help you cannot find a part in the parts bags, check to the key number of the part, from the PART LIST on page 14 of this manual. PART IDENTIFICATION CHART This chart is missing, call toll-free 1-800-999-3756. 50mm ...Screw (24) 19mm Round Inner Cap (21) M10 x 50mm Bolt (28) 25mm Square Inner Cap (19) M6 Washer (22) M10 x 60mm Bolt (25) M10 x 60mm Carriage Bolt (26) M10 Washer (30) M10 Nylon Locknut (31) M10 x 68mm Bolt (27) M10 x 142mm Bolt (23) 5 If you identify the small parts used...
Important: Some parts may have been pre-assembled for shipping purposes. If a part is provided to help you cannot find a part in the parts bags, check to the key number of the part, from the PART LIST on page 14 of this manual. PART IDENTIFICATION CHART This chart is missing, call toll-free 1-800-999-3756. 50mm ...Screw (24) 19mm Round Inner Cap (21) M10 x 50mm Bolt (28) 25mm Square Inner Cap (19) M6 Washer (22) M10 x 60mm Bolt (25) M10 x 60mm Carriage Bolt (26) M10 Washer (30) M10 Nylon Locknut (31) M10 x 68mm Bolt (27) M10 x 142mm Bolt (23) 5 If you identify the small parts used...
English Manual
Page 6
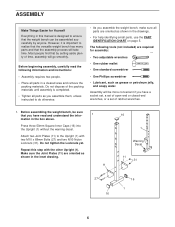
... help identifying small parts, use the PART IDENTIFICATION CHART on page 5. Repeat this manual is important to realize that the versatile weight bench has many parts and that you have read the following tools (not included) are required for Yourself Everything in this step with two M10 x 68mm Bolts (27) and two M10 Nylon Locknuts (31). Before assembling the weight bench, be more...
... help identifying small parts, use the PART IDENTIFICATION CHART on page 5. Repeat this manual is important to realize that the versatile weight bench has many parts and that you have read the following tools (not included) are required for Yourself Everything in this step with two M10 x 68mm Bolts (27) and two M10 Nylon Locknuts (31). Before assembling the weight bench, be more...

English Manual
Page 7
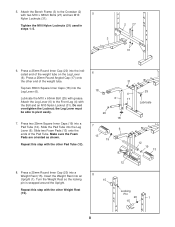
...yet. Press three 50mm Square Inner Caps (16) into 3 the Front Leg (4) and the Stabilizer (5). Repeat this step with two M10 x 60mm Carriage Bolts (26) and two M10 Nylon Locknuts (31). Attach the Front Leg (4) to the Stabilizer (5) with the other Upright (1). 1 1 31 11 27 2 3. Do not tighten the Locknuts...31 16 26 4. Do not tighten the Locknuts yet. Attach the Front Leg (4) to an Upright (1) with two M10 x 50mm Bolts (28), two M10 Washers (30), and two M10 Nylon Locknuts (31). Make sure the bolt heads fit inside the hexagon holes in 31 30 the Bench Frame. 30 4 31 5 ...
...yet. Press three 50mm Square Inner Caps (16) into 3 the Front Leg (4) and the Stabilizer (5). Repeat this step with two M10 x 60mm Carriage Bolts (26) and two M10 Nylon Locknuts (31). Attach the Front Leg (4) to the Stabilizer (5) with the other Upright (1). 1 1 31 11 27 2 3. Do not tighten the Locknuts...31 16 26 4. Do not tighten the Locknuts yet. Attach the Front Leg (4) to an Upright (1) with two M10 x 50mm Bolts (28), two M10 Washers (30), and two M10 Nylon Locknuts (31). Make sure the bolt heads fit inside the hexagon holes in 31 30 the Bench Frame. 30 4 31 5 ...
English Manual
Page 8
...other end of the Pad Tube. Insert the Weight Rest into a Weight Rest (15). Tighten the M10 Nylon Locknuts (31) used in steps 1-5. 3 2 27 31 6. Press a 25mm Round Inner Cap (20) into the Leg Lever (6). Lubricate the M10 x 60mm Bolt (25) with two M10 x 68mm Bolts (27) and two M10 5 Nylon Locknuts (... the Locknut; Slide two Foam Pads (13) onto the ends of the weight tube. Slide the Pad Tube into the indicated end of the weight tube on the Leg Lever (6). Turn the Weight Rest so the locking pin is wrapped around the Upright. Attach the Bench Frame (3) to the Crossbar (2) with...
...other end of the Pad Tube. Insert the Weight Rest into a Weight Rest (15). Tighten the M10 Nylon Locknuts (31) used in steps 1-5. 3 2 27 31 6. Press a 25mm Round Inner Cap (20) into the Leg Lever (6). Lubricate the M10 x 60mm Bolt (25) with two M10 x 68mm Bolts (27) and two M10 5 Nylon Locknuts (... the Locknut; Slide two Foam Pads (13) onto the ends of the weight tube. Slide the Pad Tube into the indicated end of the weight tube on the Leg Lever (6). Turn the Weight Rest so the locking pin is wrapped around the Upright. Attach the Bench Frame (3) to the Crossbar (2) with...

English Manual
Page 9
...) into a set of all parts are properly tightened before you use the weight bench. Do not overtighten the Locknut; Tighten the M6 x 38mm Screws (32) used in the Uprights (1). Attach the Backrest Tubes (7) to the Bench Frame (3) with grease. the Backrest Tubes must be explained in ADJUSTMENTS, beginning on the Bench Frame (3) with four M6 x 38mm Screws (32) and four M6 Washers (22). 9. Insert the Support Rod...
...) into a set of all parts are properly tightened before you use the weight bench. Do not overtighten the Locknut; Tighten the M6 x 38mm Screws (32) used in the Uprights (1). Attach the Backrest Tubes (7) to the Bench Frame (3) with grease. the Backrest Tubes must be explained in ADJUSTMENTS, beginning on the Bench Frame (3) with four M6 x 38mm Screws (32) and four M6 Washers (22). 9. Insert the Support Rod...

English Manual
Page 10
...). ATTACHING WEIGHTS TO THE LEG LEVER To use solvents. Rotate the Weight Rests so that the locking pins wrap around the Uprights. ADJUSTING THE BACKREST The Backrest (8) can be adjusted. WARNING: Always set of holes. Replace any worn parts immediately. WARNING: Do not place more than 50 pounds on page 11 for important exercise information and refer to the accompanying exercise guide to see the correct form...
...). ATTACHING WEIGHTS TO THE LEG LEVER To use solvents. Rotate the Weight Rests so that the locking pins wrap around the Uprights. ADJUSTING THE BACKREST The Backrest (8) can be adjusted. WARNING: Always set of holes. Replace any worn parts immediately. WARNING: Do not place more than 50 pounds on page 11 for important exercise information and refer to the accompanying exercise guide to see the correct form...
English Manual
Page 11
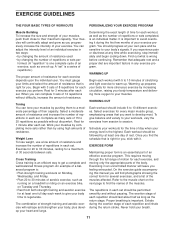
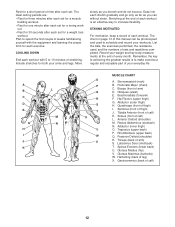
... their capacity. Work your muscles by completing more oxygen to your muscles by at your own pace and be sensitive to your body's signals. Begin with 5 to 10 minutes of resistance for at any exercise program. Weight Loss To lose weight, use a low amount of resistance and increase the number of the muscles. Cross Training Cross training is wrong before continuing. Refer to the muscle chart...
... their capacity. Work your muscles by completing more oxygen to your muscles by at your own pace and be sensitive to your body's signals. Begin with 5 to 10 minutes of resistance for at any exercise program. Weight Loss To lose weight, use a low amount of resistance and increase the number of the muscles. Cross Training Cross training is wrong before continuing. Refer to the muscle chart...
English Manual
Page 12
... COOLING DOWN End each workout with 5 to spend the first couple of sets and repetitions completed. List the date, the exercises performed, the resistance used to schedule and record your weight and key body measurements at the end of each stretch gradually and go only as far as you can be photocopied and used , and the numbers of weeks familiarizing yourself...
... COOLING DOWN End each workout with 5 to spend the first couple of sets and repetitions completed. List the date, the exercises performed, the resistance used to schedule and record your weight and key body measurements at the end of each stretch gradually and go only as far as you can be photocopied and used , and the numbers of weeks familiarizing yourself...
English Manual
Page 13
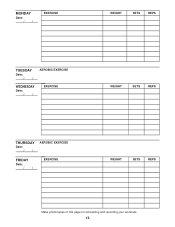
MONDAY Date: / / EXERCISE WEIGHT SETS REPS TUESDAY Date: / / AEROBIC EXERCISE WEDNESDAY Date: / / EXERCISE WEIGHT SETS REPS THURSDAY Date: / / AEROBIC EXERCISE FRIDAY Date: / / EXERCISE WEIGHT SETS REPS Make photocopies of this page for scheduling and recording your workouts. 13
MONDAY Date: / / EXERCISE WEIGHT SETS REPS TUESDAY Date: / / AEROBIC EXERCISE WEDNESDAY Date: / / EXERCISE WEIGHT SETS REPS THURSDAY Date: / / AEROBIC EXERCISE FRIDAY Date: / / EXERCISE WEIGHT SETS REPS Make photocopies of this page for scheduling and recording your workouts. 13
English Manual
Page 14
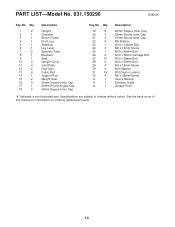
... Round Inner Cap M6 Washer M10 x 142mm Bolt M6 x 16mm Screw M10 x 60mm Bolt M10 x 60mm Carriage Bolt M10 x 68mm Bolt M10 x 50mm Bolt M4 x 16mm Screw M10 Washer M10 Nylon Locknut M6 x 38mm Screw User's Manual Exercise Guide Grease Pack "#" Indicates a non-illustrated part. See the back cover of this manual for information on ordering replacement parts. 14 PART LIST-Model No. 831.150290 R0803A Key No. Specifications are subject to change without notice.
... Round Inner Cap M6 Washer M10 x 142mm Bolt M6 x 16mm Screw M10 x 60mm Bolt M10 x 60mm Carriage Bolt M10 x 68mm Bolt M10 x 50mm Bolt M4 x 16mm Screw M10 Washer M10 Nylon Locknut M6 x 38mm Screw User's Manual Exercise Guide Grease Pack "#" Indicates a non-illustrated part. See the back cover of this manual for information on ordering replacement parts. 14 PART LIST-Model No. 831.150290 R0803A Key No. Specifications are subject to change without notice.
English Manual
Page 15
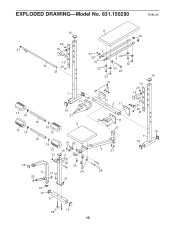
EXPLODED DRAWING-Model No. 831.150290 R0803A 8 16 19 21 13 19 13 19 29 15 20 10 14 29 21 7 31 30 19 22 32 22 7 32 30 23 31 1 16 11 16 27 12 9 19 13 12 19 31 30 13 16 31 4 11 2 11 27 11 27 3 31 10 29 15 20 31 29 1 16 25 18 24 6 17 31 24 28 20 31 16 16 18 16 5 16 26 15
EXPLODED DRAWING-Model No. 831.150290 R0803A 8 16 19 21 13 19 13 19 29 15 20 10 14 29 21 7 31 30 19 22 32 22 7 32 30 23 31 1 16 11 16 27 12 9 19 13 12 19 31 30 13 16 31 4 11 2 11 27 11 27 3 31 10 29 15 20 31 29 1 16 25 18 24 6 17 31 24 28 20 31 16 16 18 16 5 16 26 15
English Manual
Page 16
..., IL 60179 Part No. 199258 R0803A Printed in this WEIGHT BENCH EXERCISER, contact the nearest Sears Service Center throughout the United States and Sears will repair or replace the WEIGHT BENCH EXERCISER, free of charge. WARRANTY For 90 days from state to defect in material or workmanship in China © 2003 Sears, Roebuck and Co. This warranty does not apply when the WEIGHT BENCH EXERCISER is used commercially or for...
..., IL 60179 Part No. 199258 R0803A Printed in this WEIGHT BENCH EXERCISER, contact the nearest Sears Service Center throughout the United States and Sears will repair or replace the WEIGHT BENCH EXERCISER, free of charge. WARRANTY For 90 days from state to defect in material or workmanship in China © 2003 Sears, Roebuck and Co. This warranty does not apply when the WEIGHT BENCH EXERCISER is used commercially or for...


