
Owners Manual
Page 1
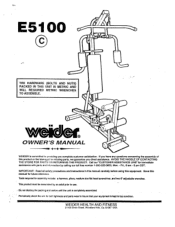
... bolt tightness and parts wear to providing you direct assistance. Tools required for future reference. E5100 C 0 THE HARDWARE (BOLTS AND NUTS) PACKED IN THIS UNIT IS METRIC AND WILL REQUIRED METRIC WRENCHES TO ASSEMBLE. 0 vvvo..idet 3 0 OWNER'S MANUAL 0 WEIDER is committed to insure that your equipment-is completely assembled. IMPORTANT: Read all safety precautions and Instructions In this manual carefully before using this...
... bolt tightness and parts wear to providing you direct assistance. Tools required for future reference. E5100 C 0 THE HARDWARE (BOLTS AND NUTS) PACKED IN THIS UNIT IS METRIC AND WILL REQUIRED METRIC WRENCHES TO ASSEMBLE. 0 vvvo..idet 3 0 OWNER'S MANUAL 0 WEIDER is committed to insure that your equipment-is completely assembled. IMPORTANT: Read all safety precautions and Instructions In this manual carefully before using this...
Owners Manual
Page 2
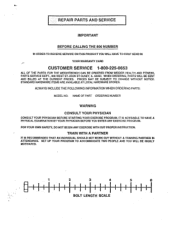
... EXERCISE PROGRAM. SET UP YOUR PROGRAM TO ACCOMMODATE TWO PEOPLE AND YOU WILL BE HIGHLY MOTIVATED. 2 3 4 5 6 BOLT LENGTH SCALE REPAIR PARTS AND SERVICE IMPORTANT BEFORE CALLING THE 800 NUMBER IN ORDER TO RECEIVE SERVICE ON THIS PRODUCT YOU WILL HAVE TO FIRST SEND IN YOUR WARRANTY CARD CUSTOMER SERVICE 1-800-225-0653 ALL OF THE PARTS FOR THE WEIGHTBENCH CAN BE ORDERED FROM WEIDER HEALTH AND FITNESS, PARTS SERVICE...
... EXERCISE PROGRAM. SET UP YOUR PROGRAM TO ACCOMMODATE TWO PEOPLE AND YOU WILL BE HIGHLY MOTIVATED. 2 3 4 5 6 BOLT LENGTH SCALE REPAIR PARTS AND SERVICE IMPORTANT BEFORE CALLING THE 800 NUMBER IN ORDER TO RECEIVE SERVICE ON THIS PRODUCT YOU WILL HAVE TO FIRST SEND IN YOUR WARRANTY CARD CUSTOMER SERVICE 1-800-225-0653 ALL OF THE PARTS FOR THE WEIGHTBENCH CAN BE ORDERED FROM WEIDER HEALTH AND FITNESS, PARTS SERVICE...
Owners Manual
Page 3
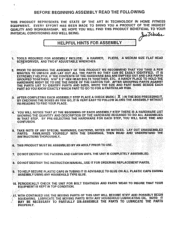
... HOME FITNESS EQUIPMENT. EVERY EFFORT HAS BEEN MADE TO BRING YOU A PRODUCT OF THE HIGHEST QUALITY AND WORKMANSHIP. NAME BESIDE EACH PART SO YOU KNOW EXACTLY WHICH PART TO GO TO FOR A PARTICULAR ITEM. 3. BY PRE-SELECTING THE HARDWARE FOR EACH STEP, YOU WILL SAVE TIME AND CONFUSION. DO NOT DESTROY THE INSTRUCTION MANUAL, USE IT FOR ORDERING REPLACEMENT PARTS...
... HOME FITNESS EQUIPMENT. EVERY EFFORT HAS BEEN MADE TO BRING YOU A PRODUCT OF THE HIGHEST QUALITY AND WORKMANSHIP. NAME BESIDE EACH PART SO YOU KNOW EXACTLY WHICH PART TO GO TO FOR A PARTICULAR ITEM. 3. BY PRE-SELECTING THE HARDWARE FOR EACH STEP, YOU WILL SAVE TIME AND CONFUSION. DO NOT DESTROY THE INSTRUCTION MANUAL, USE IT FOR ORDERING REPLACEMENT PARTS...

Owners Manual
Page 4
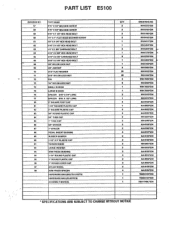
...SEAT 10 LEG EXTENSION 11 SMALL FOAM PADS 21/4• X 6• 12 LARGE FOAM PADS 3• X 5 3/4" 13 3 12• PULLEYS 14 CABLE 15 RIGHT PEDAL 16 LEFT PEDAL 17 PEDAL ROCKER ARM 18 RESISTANCE CYLINDER 19 CYLINDER MOUNTING BRACKET 20 NON-SLIP FOOT PADS 21 ARM PRESS CAP 22 ARM PRESS ASSEMBLY 23 ARM 24 ARM PRESS PAD 4• X 8• 25 ARM PRESS STRAP BRACKET 26 GAS SHOCK 27 RESISTANCE SETTING CAM BAR . 28 LAT BAR...HH-5205•E34 HH-5407•E34 HH-S408•E34 HH-5402•E34 HH-5103•E3.4 HH-5403•E34 PART LIST E5100 DIAGRAM NO.
...SEAT 10 LEG EXTENSION 11 SMALL FOAM PADS 21/4• X 6• 12 LARGE FOAM PADS 3• X 5 3/4" 13 3 12• PULLEYS 14 CABLE 15 RIGHT PEDAL 16 LEFT PEDAL 17 PEDAL ROCKER ARM 18 RESISTANCE CYLINDER 19 CYLINDER MOUNTING BRACKET 20 NON-SLIP FOOT PADS 21 ARM PRESS CAP 22 ARM PRESS ASSEMBLY 23 ARM 24 ARM PRESS PAD 4• X 8• 25 ARM PRESS STRAP BRACKET 26 GAS SHOCK 27 RESISTANCE SETTING CAM BAR . 28 LAT BAR...HH-5205•E34 HH-5407•E34 HH-S408•E34 HH-5402•E34 HH-5103•E3.4 HH-5403•E34 PART LIST E5100 DIAGRAM NO.
Owners Manual
Page 5
PART LIST E5100 DIAGRAM NO. 57 58 59 60 61 62 63 64 65 66 fr.= 68 69 70 71 72 73 74 75 76 77 80 81 82 83 84 85 86 87 88 89 90 91 92 93 94 95 96 97 98 PART NAME 3/16' X 1/2" MACHINE SCREW 3/16' X 3/4" MACHINE SCREW 5/16" X 1 112' HEX HEAD BOLT 1/4' X 1" FLAT HEAD MACHINE SCREW... 1' SPACER PEDAL INSERT BUSHING RUBBER BUMPER 1 112 X 3" PLASTIC CAP TENSION KNOB LARGE WASHER ARM PRESS BUSHING 1 1/4' ROUND PLASTIC CAP 1" ROUND PLASTIC CAP 1' ROUND COVER CAP NYLON WHEEL ARM PRESS SPACER HARDWARE BAG (BOLTS & NUTS) HARDWARE BAG (PLASTICS) ASSEMBLY MANUAL QTY. 2...
PART LIST E5100 DIAGRAM NO. 57 58 59 60 61 62 63 64 65 66 fr.= 68 69 70 71 72 73 74 75 76 77 80 81 82 83 84 85 86 87 88 89 90 91 92 93 94 95 96 97 98 PART NAME 3/16' X 1/2" MACHINE SCREW 3/16' X 3/4" MACHINE SCREW 5/16" X 1 112' HEX HEAD BOLT 1/4' X 1" FLAT HEAD MACHINE SCREW... 1' SPACER PEDAL INSERT BUSHING RUBBER BUMPER 1 112 X 3" PLASTIC CAP TENSION KNOB LARGE WASHER ARM PRESS BUSHING 1 1/4' ROUND PLASTIC CAP 1" ROUND PLASTIC CAP 1' ROUND COVER CAP NYLON WHEEL ARM PRESS SPACER HARDWARE BAG (BOLTS & NUTS) HARDWARE BAG (PLASTICS) ASSEMBLY MANUAL QTY. 2...
Owners Manual
Page 6
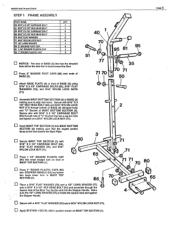
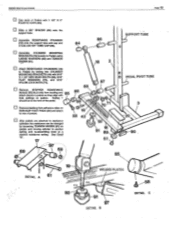
...faced toward the Base Plate. Attach BASE PLATE (4) to front of BASE (3) using 5/16" X 2 1/2" CARRIAGE BOLTS (65), 5/16" FLAT WASHERS (70), and 5/16" NYLON LOCK NUTS (71). 1 40 70 95 81 95 51 77 35 71 70 eL 70 71 50 PAGE 5 Assemble MAST BOTTOM SECTION (2) to ... bottom of BASE (3) (dimpled hole) and "U" Bracket of MAST BOTTOM SECTION (2). WEIDER HEALTH and FITNESS STEP 1 FRAME ASSEMBLY PART NAME 50 5/16" x 21/4' CARRIAGE BOLT 51 6/16" X 21/2" HEX HEAD BOLT 65 5/16' X 21/2' CARRIAGE BOLT 66 5/16' X 21/4' HEX HEAD BOLT 70 5/16" FLAT WASHER 71 6/16' NYLON LOCK NUT 77 1/2" LONG SPACER ...
...faced toward the Base Plate. Attach BASE PLATE (4) to front of BASE (3) using 5/16" X 2 1/2" CARRIAGE BOLTS (65), 5/16" FLAT WASHERS (70), and 5/16" NYLON LOCK NUTS (71). 1 40 70 95 81 95 51 77 35 71 70 eL 70 71 50 PAGE 5 Assemble MAST BOTTOM SECTION (2) to ... bottom of BASE (3) (dimpled hole) and "U" Bracket of MAST BOTTOM SECTION (2). WEIDER HEALTH and FITNESS STEP 1 FRAME ASSEMBLY PART NAME 50 5/16" x 21/4' CARRIAGE BOLT 51 6/16" X 21/2" HEX HEAD BOLT 65 5/16' X 21/2' CARRIAGE BOLT 66 5/16' X 21/4' HEX HEAD BOLT 70 5/16" FLAT WASHER 71 6/16' NYLON LOCK NUT 77 1/2" LONG SPACER ...
Owners Manual
Page 7
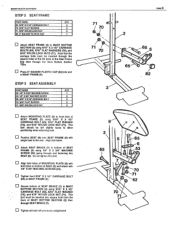
... CAP (82) into SEAT (9). u Secure bottom of SEAT FRAME (5) using 5/16" X 2 1/2" CARRIAGE BOLTS (65), 5/16" FLAT WASHERS (70), and 5/16" NYLON LOCK NUTS (71). Do not tighten this bolt. WEIDER HEALTH and FITNESS STEP 2 SEAT FRAME PART NAME OTY 65 5/16" X 2 1/2" CARRIAGE BOLT 2 70 5/16" FLAT WASHER 2 71 5/16" NYLON LOCK NUT 2 82 2" SQUARE PLASTIC CAP 1 Attach SEAT FRAME (5) to the rear. Note that the carriage...
... CAP (82) into SEAT (9). u Secure bottom of SEAT FRAME (5) using 5/16" X 2 1/2" CARRIAGE BOLTS (65), 5/16" FLAT WASHERS (70), and 5/16" NYLON LOCK NUTS (71). Do not tighten this bolt. WEIDER HEALTH and FITNESS STEP 2 SEAT FRAME PART NAME OTY 65 5/16" X 2 1/2" CARRIAGE BOLT 2 70 5/16" FLAT WASHER 2 71 5/16" NYLON LOCK NUT 2 82 2" SQUARE PLASTIC CAP 1 Attach SEAT FRAME (5) to the rear. Note that the carriage...
Owners Manual
Page 8
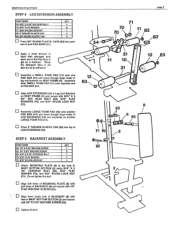
... onto each end of both PAD BARS (31). Do not tighten this bolt. O Align bolt holes of MOUNTING PLATE (6) with bolt holes of PAD BAR (31). Tighten all bolts. 12 83 PAGE 7 70 70 3 71 11 83 82 O 31 11 10 12 83 31 O.) 53 • 0 71 70 2 52 WEIPER HEALTH and FITNESS STEP 4 LEG EXTENSION ASSEMBLY PART NAME OTY 54 5116"X23/4" HEX...
... onto each end of both PAD BARS (31). Do not tighten this bolt. O Align bolt holes of MOUNTING PLATE (6) with bolt holes of PAD BAR (31). Tighten all bolts. 12 83 PAGE 7 70 70 3 71 11 83 82 O 31 11 10 12 83 31 O.) 53 • 0 71 70 2 52 WEIPER HEALTH and FITNESS STEP 4 LEG EXTENSION ASSEMBLY PART NAME OTY 54 5116"X23/4" HEX...
Owners Manual
Page 9
... NUT (73)• Remove ARM PRESS DECAL (42) from the slot in illustration. WEIOER HEALTH and FITNESS STEP 6 ARM PRESS ASSEMBLY PART NAME OTY 60 1/4" X 1' FLAT HEAD MACHINE SCREW 2 63 1/4' X 1 3/4' CARRIAGE BOLT • 2 73 1/4' NYLON LOCK NUT 2 94 1114' ROUND PLASTIC CAP 4 93 ARM PRESS BUSHING 2 98 ARM PRESS SPACER 4 afr 93 93 PAGE 8 Press 1 1/4" ROUND PLASTIC CAPS (94) into the ARM PRESS ASSEMBLY (22) assembling them as complete assembly is dependent on...
... NUT (73)• Remove ARM PRESS DECAL (42) from the slot in illustration. WEIOER HEALTH and FITNESS STEP 6 ARM PRESS ASSEMBLY PART NAME OTY 60 1/4" X 1' FLAT HEAD MACHINE SCREW 2 63 1/4' X 1 3/4' CARRIAGE BOLT • 2 73 1/4' NYLON LOCK NUT 2 94 1114' ROUND PLASTIC CAP 4 93 ARM PRESS BUSHING 2 98 ARM PRESS SPACER 4 afr 93 93 PAGE 8 Press 1 1/4" ROUND PLASTIC CAPS (94) into the ARM PRESS ASSEMBLY (22) assembling them as complete assembly is dependent on...

Owners Manual
Page 10
... the Arm Press Bushing Sections to make sure the Arm Press Assembly swings freely without binding. WEIDER HEALTH and FITNESS STEP 7 ARM PRESS PART NAME OTY 53 1/4' X We MACHINE SCREW 4 73 1/4" NYLON LOCK NUT 4 Lift Arm Press unit over the end of Pivot Tube so that screw hole in cap aligns with the hole in assembly and tightening. u Double check to the bottom using 3/8" JAM NUTS (69). Attach with 3/16' X 3/4" MACHINE SCREW (58). u Press...
... the Arm Press Bushing Sections to make sure the Arm Press Assembly swings freely without binding. WEIDER HEALTH and FITNESS STEP 7 ARM PRESS PART NAME OTY 53 1/4' X We MACHINE SCREW 4 73 1/4" NYLON LOCK NUT 4 Lift Arm Press unit over the end of Pivot Tube so that screw hole in cap aligns with the hole in assembly and tightening. u Double check to the bottom using 3/8" JAM NUTS (69). Attach with 3/16' X 3/4" MACHINE SCREW (58). u Press...
Owners Manual
Page 11
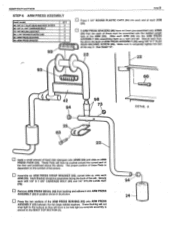
... and attach decals to pedals so they align with hole settings on NON-SLIP FOOT PADS (20) and attach to rear of the pedal. 88 88 59 u Remove backing from adhesive strips on pedals. WELDED PLATES 91 97 DETAIL B 58 DETAIL C Assemble RESISTANCE CYLINDER (18) onto the support tube and cap end 84 of pedals with 1 1/2" X 3" PLASTIC CAPS (90). Setting 1 should be changed by bolting Into...
... and attach decals to pedals so they align with hole settings on NON-SLIP FOOT PADS (20) and attach to rear of the pedal. 88 88 59 u Remove backing from adhesive strips on pedals. WELDED PLATES 91 97 DETAIL B 58 DETAIL C Assemble RESISTANCE CYLINDER (18) onto the support tube and cap end 84 of pedals with 1 1/2" X 3" PLASTIC CAPS (90). Setting 1 should be changed by bolting Into...
Owners Manual
Page 12
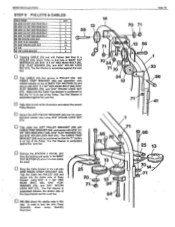
... Arm Press Assembly when doing Butterfly Exercises Take time to first hole In MAST TOP SECTION (1) with 5/16" X 3 1/2" HEX HEAD BOLT (55), 5/16" FLAT WASHER (70), and 5/16" NYLON LOCK NUT (71). Bring the Cable forward to the MAST TOP SECTION (1) about 3 inches below the bend. Trap the Cable into PULLEY (13) and secure into groove in this step...
... Arm Press Assembly when doing Butterfly Exercises Take time to first hole In MAST TOP SECTION (1) with 5/16" X 3 1/2" HEX HEAD BOLT (55), 5/16" FLAT WASHER (70), and 5/16" NYLON LOCK NUT (71). Bring the Cable forward to the MAST TOP SECTION (1) about 3 inches below the bend. Trap the Cable into PULLEY (13) and secure into groove in this step...
Owners Manual
Page 13
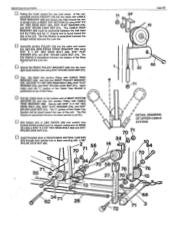
... Washer is assembled between the bolt head and the Pulley and the "L" shaped end is positioned on BASE (3) using a 5/16" X 4 1/2" HEX HEAD BOLT (62) and 5/16" NYLON LOCK NUT (71). WEIDER HEALTH and FITNESS Pulling the Cable toward the rear and center of the unit, assemble another PULLEY (13) into the cable and secure into right-side ARM PRESS STRAP BRACKET (25) using 5/16" X 1 3/4" HEX HEAD BOLT (56...
... Washer is assembled between the bolt head and the Pulley and the "L" shaped end is positioned on BASE (3) using a 5/16" X 4 1/2" HEX HEAD BOLT (62) and 5/16" NYLON LOCK NUT (71). WEIDER HEALTH and FITNESS Pulling the Cable toward the rear and center of the unit, assemble another PULLEY (13) into the cable and secure into right-side ARM PRESS STRAP BRACKET (25) using 5/16" X 1 3/4" HEX HEAD BOLT (56...
Owners Manual
Page 14
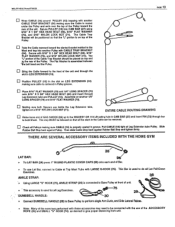
... into CAM BAR (27) using 5/16" X 1 3/4" HEX HEAD BOLT (56), 5/16" FLAT WASHER (70), and 5/16" NYLON LOCK NUT (71). THERE ARE SEVERAL ACCESSORY ITEMS INCLUDED WITH THE HOME GYM 28 LAT BAR: • To LAT BAR (28) press 1' ROUND PLASTIC COVER CAPS (96) onto each end of the Pulley toward the slanted bracket welded to give proper distancing from unit. Assemble on a 5/16...
... into CAM BAR (27) using 5/16" X 1 3/4" HEX HEAD BOLT (56), 5/16" FLAT WASHER (70), and 5/16" NYLON LOCK NUT (71). THERE ARE SEVERAL ACCESSORY ITEMS INCLUDED WITH THE HOME GYM 28 LAT BAR: • To LAT BAR (28) press 1' ROUND PLASTIC COVER CAPS (96) onto each end of the Pulley toward the slanted bracket welded to give proper distancing from unit. Assemble on a 5/16...
Owners Manual
Page 15
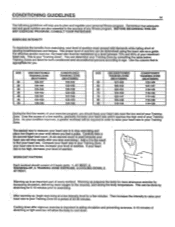
... unconditioned persons according to stop exercising.) Add a 0 to the result to find your heart rate. BEFORE BEGINNING THIS OR ANY EXERCISE PROGRAM, CONSULT YOUR PHYSICIAN! Use the column that adequate rest and good nutrition are listed for you to plan and regulate your personal fitness program. If your heart rate is an important part of exertion. TRAINING ZONE EXERCISE, 4.COOLING-DOWN, 5. Training Zones are also essential...
... unconditioned persons according to stop exercising.) Add a 0 to the result to find your heart rate. BEFORE BEGINNING THIS OR ANY EXERCISE PROGRAM, CONSULT YOUR PHYSICIAN! Use the column that adequate rest and good nutrition are listed for you to plan and regulate your personal fitness program. If your heart rate is an important part of exertion. TRAINING ZONE EXERCISE, 4.COOLING-DOWN, 5. Training Zones are also essential...

Owners Manual
Page 16
... program is recommended. HAM STRING STRETCH Sit with the soles of your back leg straight and back , foot flat on the other and arms out, lean against the wall. Pull your hips toward the wall. Repeat three times. Stretches: Quadriceps, Hip Muscles CALF/ACHILLES STRETCH With .one leg extended. After several months of exercise, the number...
... program is recommended. HAM STRING STRETCH Sit with the soles of your back leg straight and back , foot flat on the other and arms out, lean against the wall. Pull your hips toward the wall. Repeat three times. Stretches: Quadriceps, Hip Muscles CALF/ACHILLES STRETCH With .one leg extended. After several months of exercise, the number...


