
English Manual
Page 1
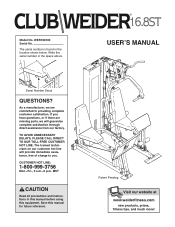
..., prizes, fitness tips, and much more! CUSTOMER HOT LINE: 1-800-999-3756 Mon.ÐFri., 6 a.m.Ð6 p.m. Save this equipment. Write the serial number in the location shown below. TO AVOID UNNECESSARY DELAYS, PLEASE CALL DIRECT TO OUR TOLL-FREE CUSTOMER HOT LINE. The trained technicians on our customer hot line will...
..., prizes, fitness tips, and much more! CUSTOMER HOT LINE: 1-800-999-3756 Mon.ÐFri., 6 a.m.Ð6 p.m. Save this equipment. Write the serial number in the location shown below. TO AVOID UNNECESSARY DELAYS, PLEASE CALL DIRECT TO OUR TOLL-FREE CUSTOMER HOT LINE. The trained technicians on our customer hot line will...
English Manual
Page 2
...defects in material and workmanship. Accordingly, the above limitation may not apply to you. Limited Warranty WHAT IS COVEREDÑThe entire CLUB WEIDER 16.8ST Training System (ÒProductÓ) is authorized to the terms set out in your Product is VERY IMPORTANT THAT YOU READ THE MANUAL...Fitness, Inc. (ÒICONÓ), warrants the product for a particular purpose is covered by warranty. USERÕS MANUALÑIt is located or advise you may have other warranties and any replacement part or component, providing the repairs are authorized by ICON first and are attached in...
...defects in material and workmanship. Accordingly, the above limitation may not apply to you. Limited Warranty WHAT IS COVEREDÑThe entire CLUB WEIDER 16.8ST Training System (ÒProductÓ) is authorized to the terms set out in your Product is VERY IMPORTANT THAT YOU READ THE MANUAL...Fitness, Inc. (ÒICONÓ), warrants the product for a particular purpose is covered by warranty. USERÕS MANUALÑIt is located or advise you may have other warranties and any replacement part or component, providing the repairs are authorized by ICON first and are attached in...

English Manual
Page 3
...protection when exercising. 12. Keep hands and feet away from the training system when performing an exercise that decal number 1 has been placed in the location shown. Make sure the cables remain on page 4. This is the responsibility of this product. The warning decals shown at a time. 8. Warning ... important for personal injury or property damage sustained by only one person at the right have been placed on the training system in two locations. Never release the press arm, leg lever, lat bar, leg press, ab strap, or ankle strap while weights are adequately informed of...
...protection when exercising. 12. Keep hands and feet away from the training system when performing an exercise that decal number 1 has been placed in the location shown. Make sure the cables remain on page 4. This is the responsibility of this product. The warning decals shown at a time. 8. Warning ... important for personal injury or property damage sustained by only one person at the right have been placed on the training system in two locations. Never release the press arm, leg lever, lat bar, leg press, ab strap, or ankle strap while weights are adequately informed of...

English Manual
Page 5
...the leg lever, handles, leg press, and other miscellaneous parts. Set Aside Enough Time Due to read it will be assembled in the location where it ! How to Unpack the Box To make sure to the many features of the training system, the assembly process will also need... for Yourself! Place all parts are found in individual bags. By setting aside plenty of this page; Place the chart on this manual. Select a Location for that stage. Important: Wait until 6 p.m. Mountain Time. Note: Some small parts may want to easily identify parts during each assembly step. Note...
...the leg lever, handles, leg press, and other miscellaneous parts. Set Aside Enough Time Due to read it will be assembled in the location where it ! How to Unpack the Box To make sure to the many features of the training system, the assembly process will also need... for Yourself! Place all parts are found in individual bags. By setting aside plenty of this page; Place the chart on this manual. Select a Location for that stage. Important: Wait until 6 p.m. Mountain Time. Note: Some small parts may want to easily identify parts during each assembly step. Note...
English Manual
Page 6
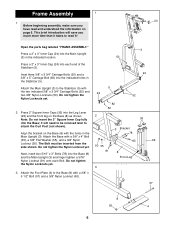
...24 1. Align the bracket on the Base (8) as shown. Press 2Ó Square Inner Caps (33) into the indicated holes in the indicated location. Next, insert two 5/16Ó x 3Ó Bolts (78) into the Main Upright (3) in the Stabilizer (5). Before beginning assembly, make sure you much more time...bag labeled ÒFRAME ASSEMBLY.Ó Press a 2Ó x 3Ó Inner Cap (24) into the Base (8) and the Main Upright (3) and finger tighten a 5/16Ó Nylon Locknut (81) onto each end of the Stabilizer (5). Press a 2Ó x 3Ó Inner Cap (24) into the Base; Note: Do not ...
...24 1. Align the bracket on the Base (8) as shown. Press 2Ó Square Inner Caps (33) into the indicated holes in the indicated location. Next, insert two 5/16Ó x 3Ó Bolts (78) into the Main Upright (3) in the Stabilizer (5). Before beginning assembly, make sure you much more time...bag labeled ÒFRAME ASSEMBLY.Ó Press a 2Ó x 3Ó Inner Cap (24) into the Base (8) and the Main Upright (3) and finger tighten a 5/16Ó Nylon Locknut (81) onto each end of the Stabilizer (5). Press a 2Ó x 3Ó Inner Cap (24) into the Base; Note: Do not ...
English Manual
Page 16
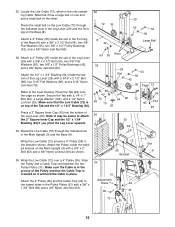
Locate the Low Cable (72), which is oriented so it has a large ball on one end and... Make sure the Cable is in the groove of the Leg Lever (29). Secure the Tab with a 5/16Ó x 2 1/2Ó Bolt (96), two 5/16Ó Flat Washers (80), and a 5/16Ó Nylon Jam Nut (79). Attach the Pulley inside the slot in the Pulley Plates (31) with ...Base (8) with a 3/8Ó x Holes 63 1 3/4Ó Bolt (60) and a 3/8Ó Nylon Jam Nut (63). 60 44 72 35 16 Note: It may be easier to the inset drawing. Wrap the Low Cable (72) around a 4Ó Pulley (35) in the front leg of...
Locate the Low Cable (72), which is oriented so it has a large ball on one end and... Make sure the Cable is in the groove of the Leg Lever (29). Secure the Tab with a 5/16Ó x 2 1/2Ó Bolt (96), two 5/16Ó Flat Washers (80), and a 5/16Ó Nylon Jam Nut (79). Attach the Pulley inside the slot in the Pulley Plates (31) with ...Base (8) with a 3/8Ó x Holes 63 1 3/4Ó Bolt (60) and a 3/8Ó Nylon Jam Nut (63). 60 44 72 35 16 Note: It may be easier to the inset drawing. Wrap the Low Cable (72) around a 4Ó Pulley (35) in the front leg of...
English Manual
Page 18
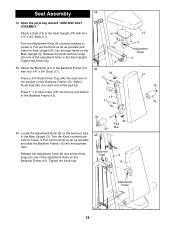
... and slide the Backrest Frame (15) into the top and bottom of the Main Upright (3). Press 1Ó x 2Ó Inner Caps (43) into the backrest tube. Locate the Adjustment Knob (9) on the Main Upright (3). Seat Assembly 38 38. Open the parts bag labeled ÒARM AND SEAT ASSEMBLY.Ó Attach a Seat (13...
... and slide the Backrest Frame (15) into the top and bottom of the Main Upright (3). Press 1Ó x 2Ó Inner Caps (43) into the backrest tube. Locate the Adjustment Knob (9) on the Main Upright (3). Seat Assembly 38 38. Open the parts bag labeled ÒARM AND SEAT ASSEMBLY.Ó Attach a Seat (13...
English Manual
Page 26
... with 3 sets of 8 repetitions for each set . The repetitions in each exercise and moving only the appropriate parts of the body. If you find the locations of the muscles. Once you experience pain or dizziness at least one sit-up . This requires moving through the full range of motion for each...
... with 3 sets of 8 repetitions for each set . The repetitions in each exercise and moving only the appropriate parts of the body. If you find the locations of the muscles. Once you experience pain or dizziness at least one sit-up . This requires moving through the full range of motion for each...
