

User Manual
Page 2
Remove the PART IDENTIFICATION CHART and the PART LIST/EXPLODED DRAWING before beginning assembly. 2 TABLE OF CONTENTS IMPORTANT PRECAUTIONS 3 BEFORE YOU BEGIN 4 ASSEMBLY 5 HOW TO USE THE HOME GYM SYSTEM 17 TROUBLESHOOTING AND MAINTENANCE 19 CABLE DIAGRAM 20 ORDERING REPLACEMENT PARTS 23 LIMITED WARRANTY Back Cover Note: A PART IDENTIFICATION CHART and a PART LIST/EXPLODED DRAWING are attached in the center of this manual.
Remove the PART IDENTIFICATION CHART and the PART LIST/EXPLODED DRAWING before beginning assembly. 2 TABLE OF CONTENTS IMPORTANT PRECAUTIONS 3 BEFORE YOU BEGIN 4 ASSEMBLY 5 HOW TO USE THE HOME GYM SYSTEM 17 TROUBLESHOOTING AND MAINTENANCE 19 CABLE DIAGRAM 20 ORDERING REPLACEMENT PARTS 23 LIMITED WARRANTY Back Cover Note: A PART IDENTIFICATION CHART and a PART LIST/EXPLODED DRAWING are attached in the center of this manual.
User Manual
Page 3
..., leg lever, lat bar or nylon strap while weights are adequately informed of the pulleys. 11. Do not use the lat bar. 6. Replace any exercise program, consult your physician. Always disconnect the lat bar from the home gym system at any time while exercising, stop immediately and ...: Before beginning this product. 3 Always wear athletic shoes for personal injury or property damage sustained by or through the use . 3. If the cables bind while you feel pain or dizziness at all users of this manual and in use of this or any worn parts immediately. 4. Your hand...
..., leg lever, lat bar or nylon strap while weights are adequately informed of the pulleys. 11. Do not use the lat bar. 6. Replace any exercise program, consult your physician. Always disconnect the lat bar from the home gym system at any time while exercising, stop immediately and ...: Before beginning this product. 3 Always wear athletic shoes for personal injury or property damage sustained by or through the use . 3. If the cables bind while you feel pain or dizziness at all users of this manual and in use of this or any worn parts immediately. 4. Your hand...
User Manual
Page 19
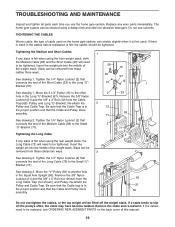
...attach the 2 Pulley and Cable Trap. Remove the cable and re-install it is in the Long "U"-Bracket (57). If there is slack in the proper position and that the Cable trap is in the cables before resistance is felt, the cables should be replaced, see ORDERING REPLACEMENT PARTS on the back ...cover of cable used . See drawing 1. Slack can stretch slightly when it . Be sure that...
...attach the 2 Pulley and Cable Trap. Remove the cable and re-install it is in the Long "U"-Bracket (57). If there is slack in the proper position and that the Cable trap is in the cables before resistance is felt, the cables should be replaced, see ORDERING REPLACEMENT PARTS on the back ...cover of cable used . See drawing 1. Slack can stretch slightly when it . Be sure that...


