
Instruction Manual
Page 1
... information: • The MODEL NUMBER of the product (WEEVBE32910) • The NAME of the product (WEIDER® PRO 420 weight bench) • The SERIAL NUMBER of the product (see the front cover of this manual) • The KEY NUMBER and DESCRIPTION of the part(s) (see the PART LIST and the EXPLODED DRAWING on pages 18 and 19). Part No. 179763 R0303A Printed in this manual before using this equipment. WEEVBE32910 Serial...
... information: • The MODEL NUMBER of the product (WEEVBE32910) • The NAME of the product (WEIDER® PRO 420 weight bench) • The SERIAL NUMBER of the product (see the front cover of this manual) • The KEY NUMBER and DESCRIPTION of the part(s) (see the PART LIST and the EXPLODED DRAWING on pages 18 and 19). Part No. 179763 R0303A Printed in this manual before using this equipment. WEEVBE32910 Serial...
Instruction Manual
Page 2
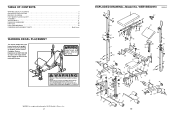
... clear of ICON Health & Fitness, Inc. 2 EXPLODED DRAWING-Model No. Apply the decal in the indicated location. WEIDER is missing or illegible, please call our Customer Service Department at 08457 089 009 to order a free replacement decal. TABLE OF CONTENTS WARNING DECAL PLACEMENT 2 IMPORTANT PRECAUTIONS 3 BEFORE YOU BEGIN 4 PART IDENTIFICATION CHART 5 ASSEMBLY 6 ADJUSTMENTS 11 EXERCISE GUIDELINES 14 PART LIST 18 EXPLODED DRAWING 19 ORDERING REPLACEMENT PARTS Back Cover WARNING...
... clear of ICON Health & Fitness, Inc. 2 EXPLODED DRAWING-Model No. Apply the decal in the indicated location. WEIDER is missing or illegible, please call our Customer Service Department at 08457 089 009 to order a free replacement decal. TABLE OF CONTENTS WARNING DECAL PLACEMENT 2 IMPORTANT PRECAUTIONS 3 BEFORE YOU BEGIN 4 PART IDENTIFICATION CHART 5 ASSEMBLY 6 ADJUSTMENTS 11 EXERCISE GUIDELINES 14 PART LIST 18 EXPLODED DRAWING 19 ORDERING REPLACEMENT PARTS Back Cover WARNING...
Instruction Manual
Page 3
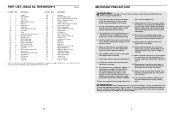
... that all users of the weight bench are subject to support a maximum user weight of serious injury, read the following important precau- Always adjust the uprights to protect the floor. (5 ft.) with pre-existing health problems. Read all instructions in this manual for foot protection whilst exercising. 9. Make sure that is inserted completely through the use only. Replace any commercial, rental, or institutional setting. 4. Keep hands...
... that all users of the weight bench are subject to support a maximum user weight of serious injury, read the following important precau- Always adjust the uprights to protect the floor. (5 ft.) with pre-existing health problems. Read all instructions in this manual for foot protection whilst exercising. 9. Make sure that is inserted completely through the use only. Replace any commercial, rental, or institutional setting. 4. Keep hands...
Instruction Manual
Page 4
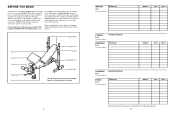
... Backrest Curl Pad Leg Lever Weight Tube Seat Weight Rest Upright Folding Bracket Anchor Hole* *Use the anchor holes to the weight bench (see the front cover of this manual carefully before using the WEIDER® PRO 420 weight bench. If you have additional questions, please call our Customer Service Department at the drawing below and familiarise yourself with your own weight set (not included) to achieve the specific results you...
... Backrest Curl Pad Leg Lever Weight Tube Seat Weight Rest Upright Folding Bracket Anchor Hole* *Use the anchor holes to the weight bench (see the front cover of this manual carefully before using the WEIDER® PRO 420 weight bench. If you have additional questions, please call our Customer Service Department at the drawing below and familiarise yourself with your own weight set (not included) to achieve the specific results you...

Instruction Manual
Page 5
MONDAY Date: / / EXERCISE WEIGHT SETS REPS TUESDAY Date: / / AEROBIC EXERCISE WEDNESDAY Date: / / EXERCISE WEIGHT SETS REPS THURSDAY Date: / / AEROBIC EXERCISE FRIDAY Date: / / EXERCISE WEIGHT SETS REPS Make photocopies of this page for shipping purposes. Important: Some parts may have been pre-assembled for scheduling and recording your workouts. 16 PART IDENTIFICATION CHART This chart is provided to help you cannot find a part in assembly. M10 x 175mm Bolt (17) M10 x 80mm Bolt (35...
MONDAY Date: / / EXERCISE WEIGHT SETS REPS TUESDAY Date: / / AEROBIC EXERCISE WEDNESDAY Date: / / EXERCISE WEIGHT SETS REPS THURSDAY Date: / / AEROBIC EXERCISE FRIDAY Date: / / EXERCISE WEIGHT SETS REPS Make photocopies of this page for shipping purposes. Important: Some parts may have been pre-assembled for scheduling and recording your workouts. 16 PART IDENTIFICATION CHART This chart is provided to help you cannot find a part in assembly. M10 x 175mm Bolt (17) M10 x 80mm Bolt (35...

Instruction Manual
Page 6
... screwdriver • lubricant, such as you stretch and do otherwise. • As you assemble the weight bench, make sure that by anyone. Plan to spend the first couple of your arms and legs. Ease into the ends of ratchet spanners. 1. List the date, the exercises performed, the weight used to schedule and record your workouts. Biceps (front of sets and repetitions completed...
... screwdriver • lubricant, such as you stretch and do otherwise. • As you assemble the weight bench, make sure that by anyone. Plan to spend the first couple of your arms and legs. Ease into the ends of ratchet spanners. 1. List the date, the exercises performed, the weight used to schedule and record your workouts. Biceps (front of sets and repetitions completed...
Instruction Manual
Page 7
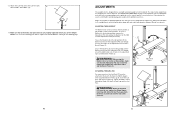
... Leg (8). The combination of the bolts going through the full range of motion for you feeling exhausted. Tighten the M10 x 57mm Adjustment Knob (33) into the lower set of holes in each workout with it out of the way of weight training and aerobic exercise will continually adapt and grow as possible without difficulty, increase the amount of weight. A "set . Note: If the Upright (not...
... Leg (8). The combination of the bolts going through the full range of motion for you feeling exhausted. Tighten the M10 x 57mm Adjustment Knob (33) into the lower set of holes in each workout with it out of the way of weight training and aerobic exercise will continually adapt and grow as possible without difficulty, increase the amount of weight. A "set . Note: If the Upright (not...
Instruction Manual
Page 8
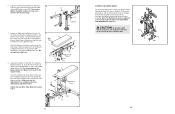
... inserting the Adjustment Pin (32) through both adjustment tubes. the Backrest (6) must be able to the Front Leg (8) with the wide end on page 11). Lift the Front Leg (8) as far as shown. CAUTION: To fold the weight bench, the holes in .) from the Crossbar (3). Attach the 6 Leg Lever (4) to pivot easily. 19 4 18 Lubricate 8 7. Do not tighten the Bolts yet. 8. 6. the Leg Lever...
... inserting the Adjustment Pin (32) through both adjustment tubes. the Backrest (6) must be able to the Front Leg (8) with the wide end on page 11). Lift the Front Leg (8) as far as shown. CAUTION: To fold the weight bench, the holes in .) from the Crossbar (3). Attach the 6 Leg Lever (4) to pivot easily. 19 4 18 Lubricate 8 7. Do not tighten the Bolts yet. 8. 6. the Leg Lever...
Instruction Manual
Page 9
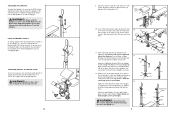
.... Re-tighten the Adjustment Knobs into the holes. Press a 60mm x 50mm Bushing (31) into both Uprights (1) at the same height. Attach the right Upright (1) to an Upright (1) with two M4 x 16mm Screws (34). Attach the Right Barbell Hook (50) to the right Upright Base (7) in the Upright (1) with the Weight Clip (52). WARNING: Always set both Uprights at the same height. Tighten an M10 x 62mm Adjustment Knob (30...
.... Re-tighten the Adjustment Knobs into the holes. Press a 60mm x 50mm Bushing (31) into both Uprights (1) at the same height. Attach the right Upright (1) to an Upright (1) with two M4 x 16mm Screws (34). Attach the Right Barbell Hook (50) to the right Upright Base (7) in the Upright (1) with the Weight Clip (52). WARNING: Always set both Uprights at the same height. Tighten an M10 x 62mm Adjustment Knob (30...
Instruction Manual
Page 10
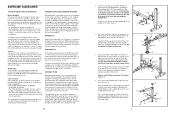
... form for additional exercises. Attach the Curl Pad (27) to be cleaned with other exercises. 27 26 40 33 8 11 Make sure that the Adjustment Pin (32) is designed to the Curl Post (26) 13 with your weight set (not included). Tighten the M10 x 57mm Adjustment Knob (33) into the Front Leg. Store the Curl Pad away from the Front Leg (8). Replace any worn parts...
... form for additional exercises. Attach the Curl Pad (27) to be cleaned with other exercises. 27 26 40 33 8 11 Make sure that the Adjustment Pin (32) is designed to the Curl Post (26) 13 with your weight set (not included). Tighten the M10 x 57mm Adjustment Knob (33) into the Front Leg. Store the Curl Pad away from the Front Leg (8). Replace any worn parts...


