
English Manual
Page 4
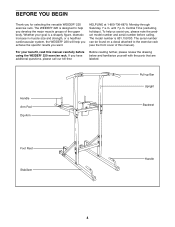
... through Saturday, 7 a.m. The model number is a shapely figure, dramatic increase in muscle size and strength, or a healthier cardiovascular system, the WEIDER® 220 will help you achieve the specific results you develop the major muscle groups of this manual carefully before calling. Handle Arm Pad Dip Arm... Pull-up Bar Upright Backrest Foot Rest Stabilizer Handle 4 The WEIDER® 220 is designed to the exercise rack (see the front cover of the upper body. BEFORE YOU BEGIN...
... through Saturday, 7 a.m. The model number is a shapely figure, dramatic increase in muscle size and strength, or a healthier cardiovascular system, the WEIDER® 220 will help you achieve the specific results you develop the major muscle groups of this manual carefully before calling. Handle Arm Pad Dip Arm... Pull-up Bar Upright Backrest Foot Rest Stabilizer Handle 4 The WEIDER® 220 is designed to the exercise rack (see the front cover of the upper body. BEFORE YOU BEGIN...
English Manual
Page 7
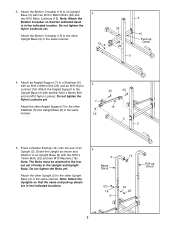
... not tighten the Nylon Locknuts yet. Attach the other Upright Base (3) in the same manner. Note: Attach the Bottom Crossbar so that the name and pull-up decals are in the Upright and Upright Base. Attach the Bottom Crossbar (15) to the Upright Base (3) with two M10 x 19mm Bolts (22... and an M10 Nylon Locknut. Press a Rubber Endcap (14) onto the end of holes in the indicated locations. 5 2 Name Decal 22 18 3 14 18 22 Pull-up Decal 23 3 4. Attach an Angled Support (7) to the other Angled Support (7) to a Stabilizer (5) 4 with two M10 x 68mm Bolts (23) and two M10 ...
... not tighten the Nylon Locknuts yet. Attach the other Upright Base (3) in the same manner. Note: Attach the Bottom Crossbar so that the name and pull-up decals are in the Upright and Upright Base. Attach the Bottom Crossbar (15) to the Upright Base (3) with two M10 x 19mm Bolts (22... and an M10 Nylon Locknut. Press a Rubber Endcap (14) onto the end of holes in the indicated locations. 5 2 Name Decal 22 18 3 14 18 22 Pull-up Decal 23 3 4. Attach an Angled Support (7) to the other Angled Support (7) to a Stabilizer (5) 4 with two M10 x 68mm Bolts (23) and two M10 ...
English Manual
Page 8
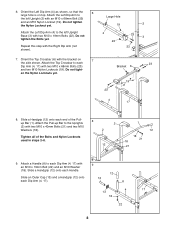
Do not tighten the Bolts yet. Do not tight- Attach the Pull-up Bar (1). Do not tighten the Nylon Locknut yet. Orient the Top Crossbar (6) with an M10 x 68mm Bolt (23) and an M10 Nylon Locknut (19). ... 18 21 9. Attach the Left Dip Arm (4) to the Uprights 2 (2) with two M10 x 40mm Bolts (21) and two M10 Washers (18). 2 Tighten all of the Pull- 8 up Bar to the left Upright (2) with the bracket on top. Attach the Top Crossbar to each Dip Arm (4, 17) with 9 an M10 x 19mm Bolt...
Do not tighten the Bolts yet. Do not tight- Attach the Pull-up Bar (1). Do not tighten the Nylon Locknut yet. Orient the Top Crossbar (6) with an M10 x 68mm Bolt (23) and an M10 Nylon Locknut (19). ... 18 21 9. Attach the Left Dip Arm (4) to the Uprights 2 (2) with two M10 x 40mm Bolts (21) and two M10 Washers (18). 2 Tighten all of the Pull- 8 up Bar to the left Upright (2) with the bracket on top. Attach the Top Crossbar to each Dip Arm (4, 17) with 9 an M10 x 19mm Bolt...
English Manual
Page 14
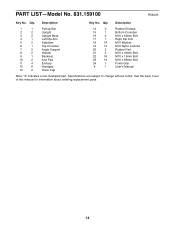
.... Specifications are subject to change without notice. Description Key No. See the back cover of this manual for information about ordering replacement parts. 14 Description 1 1 Pull-up Bar 2 2 Upright 3 2 Upright Base 4 1 Left Dip Arm 5 2 Stabilizer 6 1 Top Crossbar 7 2 Angle Support 8 2 Handle 9 1 Backrest 10 2 Arm Pad 11 4 Endcap 12 8 Handgrip 13 2 Outer Cap...
.... Specifications are subject to change without notice. Description Key No. See the back cover of this manual for information about ordering replacement parts. 14 Description 1 1 Pull-up Bar 2 2 Upright 3 2 Upright Base 4 1 Left Dip Arm 5 2 Stabilizer 6 1 Top Crossbar 7 2 Angle Support 8 2 Handle 9 1 Backrest 10 2 Arm Pad 11 4 Endcap 12 8 Handgrip 13 2 Outer Cap...


