
English Manual
Page 2
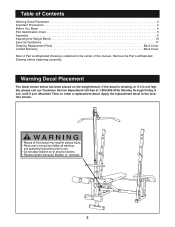
... attached to the center of Contents Warning Decal Placement 2 Important Precautions 3 Before You Begin 4 Part Identification Chart 5 Assembly 6 Adjusting the Weight Bench 13 Exercise Guidelines 17 Ordering Replacement Parts Back Cover Limited Warranty Back Cover Note: A Part List/Exploded Drawing is not legible, please call our ...at 1-800-999-3756, Monday through Friday, 6 a.m. Warning Decal Placement The decal shown below has been placed on the weight bench. Remove the Part List/Exploded Drawing before beginning assembly. Apply the replacement decal to order a replacement decal.
... attached to the center of Contents Warning Decal Placement 2 Important Precautions 3 Before You Begin 4 Part Identification Chart 5 Assembly 6 Adjusting the Weight Bench 13 Exercise Guidelines 17 Ordering Replacement Parts Back Cover Limited Warranty Back Cover Note: A Part List/Exploded Drawing is not legible, please call our ...at 1-800-999-3756, Monday through Friday, 6 a.m. Warning Decal Placement The decal shown below has been placed on the weight bench. Remove the Part List/Exploded Drawing before beginning assembly. Apply the replacement decal to order a replacement decal.
English Manual
Page 3
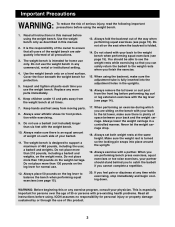
... or institutional setting. 4. Do not place more than 210 pounds, including a barbell and weights, on the weight carriage. Use the weight bench only on each time you cannot complete a repetition. 12. When performing an exercise during which you feel pain or dizziness at any exercise ... barbell and weights. Important Precautions WARNING: To reduce the risk of serious injury, read the following important precautions before using the weight bench. You should stand behind you to the weight rests when you finish the exercise. 15. Inspect and tighten all instructions in the ...
... or institutional setting. 4. Do not place more than 210 pounds, including a barbell and weights, on the weight carriage. Use the weight bench only on each time you cannot complete a repetition. 12. When performing an exercise during which you feel pain or dizziness at any exercise ... barbell and weights. Important Precautions WARNING: To reduce the risk of serious injury, read the following important precautions before using the weight bench. You should stand behind you to the weight rests when you finish the exercise. 15. Inspect and tighten all instructions in the ...

English Manual
Page 4
... figure, dramatic muscle size and strength or a healthier cardiovascular system, the WEIDER¨ 175 Weight Bench will help you achieve the specific results you want. If you for selecting the versatile WEIDER¨ 175 Weight Bench. To help you , please note the product model number and serial number... before using the WEIDER¨ 175 Weight Bench. For your goal is WEBE07790. until 6 p.m. The WEIDER¨ 175 is right and left sideÓ are ...
... figure, dramatic muscle size and strength or a healthier cardiovascular system, the WEIDER¨ 175 Weight Bench will help you achieve the specific results you want. If you for selecting the versatile WEIDER¨ 175 Weight Bench. To help you , please note the product model number and serial number... before using the WEIDER¨ 175 Weight Bench. For your goal is WEBE07790. until 6 p.m. The WEIDER¨ 175 is right and left sideÓ are ...
English Manual
Page 6
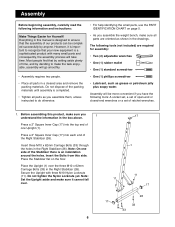
... (1) phillips screwdriver ¥ Lubricant, such as grease or petroleum jelly plus soapy water. Place the Stabilizer flat on page 5. ¥ As you assemble the weight bench, make sure it is important to recognize that your new equipment is completed. ¥ Tighten all parts as shown in the Right Stabilizer (26). Most...
... (1) phillips screwdriver ¥ Lubricant, such as grease or petroleum jelly plus soapy water. Place the Stabilizer flat on page 5. ¥ As you assemble the weight bench, make sure it is important to recognize that your new equipment is completed. ¥ Tighten all parts as shown in the Right Stabilizer (26). Most...

English Manual
Page 7
... Nylon Locknuts (11). Note: On one of the Stabilizer there is holding the Upright (1), slide the bracket on where you plan to place the weight bench, it may be more practical for you to the second Upright (1) in one side of the Support Plates (16) and then through the holes in... this storage tube on the right side of the tube on the floor. Press a 38mm x 38mm Square Inner Cap (31) into the top of the bench.
... Nylon Locknuts (11). Note: On one of the Stabilizer there is holding the Upright (1), slide the bracket on where you plan to place the weight bench, it may be more practical for you to the second Upright (1) in one side of the Support Plates (16) and then through the holes in... this storage tube on the right side of the tube on the floor. Press a 38mm x 38mm Square Inner Cap (31) into the top of the bench.
English Manual
Page 8
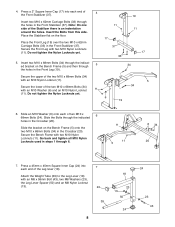
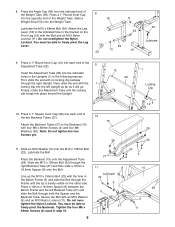
... Leg lever (18). Slide the Bolts through the holes in the Crossbar (20). Insert the Bolts from this side. Place the Stabilizer flat on the Bench Frame (5) and then through the indicated holes in the Front Stabilizer (37). Do not tighten the Nylon Locknuts yet. 5. Slide the bracket on the... Bench Frame (5) onto the two M10 x 68mm Bolts (34) in the Front Leg (19). Secure the Bench Frame with an M10 Nylon Locknut (11). Insert two M10 x 68mm Bolts (34) through 6. 11 11 5 6 34...
... Leg lever (18). Slide the Bolts through the holes in the Crossbar (20). Insert the Bolts from this side. Place the Stabilizer flat on the Bench Frame (5) and then through the indicated holes in the Front Stabilizer (37). Do not tighten the Nylon Locknuts yet. 5. Slide the bracket on the... Bench Frame (5) onto the two M10 x 68mm Bolts (34) in the Front Leg (19). Secure the Bench Frame with an M10 Nylon Locknut (11). Insert two M10 x 68mm Bolts (34) through 6. 11 11 5 6 34...
English Manual
Page 9
... 10. Slide a Weight Stop (53) onto the Weight Tube. Place the Backrest (15) onto the Adjustment Tube (29). Place a 16mm x 18.5mm Spacer (8) between the Bench Frame and the left Upright as far as it will go. Tighten the four M6 x 38mm Screws (4) used in the following manner: First, slide the... Cap (49) onto the indicated end of the two Backrest Tubes (27). 10 15 Attach the Backrest Tubes (27) to the indicated hole in the Bench Frame (5) and slide the Bolt through the right Backrest Tube (27) and then slide a 16mm x 18.5mm Spacer (8) onto the Bolt. 27 11 30 4 4 8 15...
... 10. Slide a Weight Stop (53) onto the Weight Tube. Place the Backrest (15) onto the Adjustment Tube (29). Place a 16mm x 18.5mm Spacer (8) between the Bench Frame and the left Upright as far as it will go. Tighten the four M6 x 38mm Screws (4) used in the following manner: First, slide the... Cap (49) onto the indicated end of the two Backrest Tubes (27). 10 15 Attach the Backrest Tubes (27) to the indicated hole in the Bench Frame (5) and slide the Bolt through the right Backrest Tube (27) and then slide a 16mm x 18.5mm Spacer (8) onto the Bolt. 27 11 30 4 4 8 15...
English Manual
Page 10
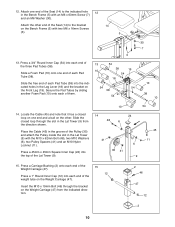
... the Pulley inside the slot in the Leg Lever (18) and the bracket on the Front Leg (19). Attach one end and a ball on the Bench Frame (5) with the M10 x 62mm Bolt (48), two M10 Washers (6), two Pulley Spacers (41) and an M10 Nylon Locknut (11). Insert the M10 x 19mm Bolt...
... the Pulley inside the slot in the Leg Lever (18) and the bracket on the Front Leg (19). Attach one end and a ball on the Bench Frame (5) with the M10 x 62mm Bolt (48), two M10 Washers (6), two Pulley Spacers (41) and an M10 Nylon Locknut (11). Insert the M10 x 19mm Bolt...
English Manual
Page 12
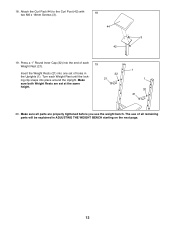
Press a 1Ó Round Inner Cap (32) into the end of all parts are set of holes in ADJUSTING THE WEIGHT BENCH starting on the next page. 12 Make sure all remaining parts will be explained in the Uprights (1). Turn each 19 Weight Rest (21). Make sure ... of each Weight Rest until the locking clip snaps into one set at the same height. 32 21 1 1 32 21 20. The use the weight bench. Attach the Curl Pad (44) to the Curl Post (42) with 18 two M6 x 16mm Screws (3). 44 3 42 19. 18. Insert the Weight Rests (21...
Press a 1Ó Round Inner Cap (32) into the end of all parts are set of holes in ADJUSTING THE WEIGHT BENCH starting on the next page. 12 Make sure all remaining parts will be explained in the Uprights (1). Turn each 19 Weight Rest (21). Make sure ... of each Weight Rest until the locking clip snaps into one set at the same height. 32 21 1 1 32 21 20. The use the weight bench. Attach the Curl Pad (44) to the Curl Post (42) with 18 two M6 x 16mm Screws (3). 44 3 42 19. 18. Insert the Weight Rests (21...

English Manual
Page 13
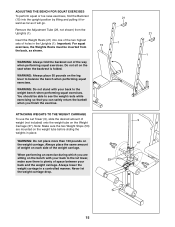
... a different set the Backrest (15) to get the most benefit from the Weight Rests. Replace any worn parts immediately. Do not use the weight bench. To re-insert the Adjustment Tube (29), follow this procedure: First, slide the end with the locking clip out of the Weight Rests (21...), first remove your barbell from your exercise program. Also, refer to the accompanying exercise poster to adjust the weight bench. ADJUSTING THE BACKREST The Backrest (15) can be set of the right Upright. To remove the Adjustment Tube (29), follow this procedure: First,...
... a different set the Backrest (15) to get the most benefit from the Weight Rests. Replace any worn parts immediately. Do not use the weight bench. To re-insert the Adjustment Tube (29), follow this procedure: First, slide the end with the locking clip out of the Weight Rests (21...), first remove your barbell from your exercise program. Also, refer to the accompanying exercise poster to adjust the weight bench. ADJUSTING THE BACKREST The Backrest (15) can be set of the right Upright. To remove the Adjustment Tube (29), follow this procedure: First,...
English Manual
Page 14
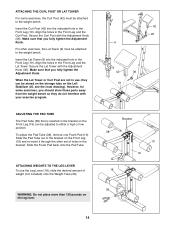
... you fully tighten the Adjustment Knob. Make sure that is inserted in the bracket on the Front Leg (19) can be adjusted to the weight bench. Slide the Foam Pad back onto the Pad Tube. For other set of weight (not included) onto the Weight Tube (39). Align the holes in... Knob (36). Secure the Curl Post with the Adjustment Knob (36). However, for some exercises, the Curl Post (42) must be attached to the weight bench. To adjust the Pad Tube (38), remove one Foam Pad (10). Insert the Lat Tower (9) into the indicated hole in the bracket. When the Lat...
... you fully tighten the Adjustment Knob. Make sure that is inserted in the bracket on the Front Leg (19) can be adjusted to the weight bench. Slide the Foam Pad back onto the Pad Tube. For other set of weight (not included) onto the Weight Tube (39). Align the holes in... Knob (36). Secure the Curl Post with the Adjustment Knob (36). However, for some exercises, the Curl Post (42) must be attached to the weight bench. To adjust the Pad Tube (38), remove one Foam Pad (10). Insert the Lat Tower (9) into the indicated hole in the bracket. When the Lat...
English Manual
Page 15
... can safely return the barbell when you are mounted on the seat when the backrest is plenty of space between your back to the weight bench when performing squat exercises. Note: Make sure the two Weight Stops (53) are sitting on the Weight Carriage (37). Never let the weight carriage drop... 1 15 53 21 1 9 47 15 Always place the same amount of weight on each side of weight (not included) onto the weight tube on the bench with your back and the weight carriage. ATTACHING WEIGHTS TO THE WEIGHT CARRIAGE To use the Lat Tower (9), slide the desired amount of the weight...
... can safely return the barbell when you are mounted on the seat when the backrest is plenty of space between your back to the weight bench when performing squat exercises. Note: Make sure the two Weight Stops (53) are sitting on the Weight Carriage (37). Never let the weight carriage drop... 1 15 53 21 1 9 47 15 Always place the same amount of weight on each side of weight (not included) onto the weight tube on the bench with your back and the weight carriage. ATTACHING WEIGHTS TO THE WEIGHT CARRIAGE To use the Lat Tower (9), slide the desired amount of the weight...
English Manual
Page 20
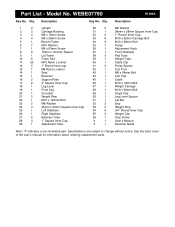
... Washer 2 2 Carriage Bushing 31 1 38mm x 38mm Square Inner Cap 3 4 M6 x 16mm Screw 32 2 1Ó Round Inner Cap 4 4 M6 x 38mm Screw 33 8 M10 x 62mm Carriage Bolt 5 1 Bench Frame 34 9 M10 x 68mm Bolt 6 7 M10 Washer 35 1 Pulley 7 1 M6 x 63mm Screw 36 1 Adjustment Knob 8 2 16mm x 18.5mm Spacer 37 1 Front Stabilizer 9 1 Lat Tower 38...
... Washer 2 2 Carriage Bushing 31 1 38mm x 38mm Square Inner Cap 3 4 M6 x 16mm Screw 32 2 1Ó Round Inner Cap 4 4 M6 x 38mm Screw 33 8 M10 x 62mm Carriage Bolt 5 1 Bench Frame 34 9 M10 x 68mm Bolt 6 7 M10 Washer 35 1 Pulley 7 1 M6 x 63mm Screw 36 1 Adjustment Knob 8 2 16mm x 18.5mm Spacer 37 1 Front Stabilizer 9 1 Lat Tower 38...

English Manual
Page 22
...not allow limitations on how long an implied warranty lasts. ICON HEALTH & FITNESS, INC., 1500 S. 1000 W., LOGAN, UT 84321-9813 WEIDER is authorized by ICON at the center of this warranty is made must be free from state to the original purchaser. The KEY NUMBER... accompanied by ICON. All products for commercial or rental purposes, or products used as store display models. The MODEL NUMBER of the product (WEIDER¨ 175 Weight Bench). 3. The NAME of the product (WEBE07790). 2. Accordingly, the above is a registered trademark of ICON Health & Fitness, Inc. You ...
...not allow limitations on how long an implied warranty lasts. ICON HEALTH & FITNESS, INC., 1500 S. 1000 W., LOGAN, UT 84321-9813 WEIDER is authorized by ICON at the center of this warranty is made must be free from state to the original purchaser. The KEY NUMBER... accompanied by ICON. All products for commercial or rental purposes, or products used as store display models. The MODEL NUMBER of the product (WEIDER¨ 175 Weight Bench). 3. The NAME of the product (WEBE07790). 2. Accordingly, the above is a registered trademark of ICON Health & Fitness, Inc. You ...


