
Download
Page 5
..., unplug the power cord and contact your TV is dropped and the housing is intended to alert the user to leak which can damage the remote control or injure the operator. h• The lightning flash with heavy dust or high humidity may cause fire or electric shock. • Follow instructions for...
..., unplug the power cord and contact your TV is dropped and the housing is intended to alert the user to leak which can damage the remote control or injure the operator. h• The lightning flash with heavy dust or high humidity may cause fire or electric shock. • Follow instructions for...
Download
Page 7
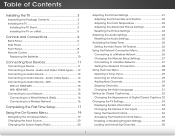
... 3 Inspecting the Package Contents 3 Installing the TV 3 Installing the TV Stand 3 Installing the TV on a Wall 5 Controls and Connections 6 Back Panel 6 Side Panel 7 Front Panel 8 Remote Control 9 Replacing the Batteries 10 Connecting Your Devices 11 Connecting A Device 11 Connecting a Device -
... 3 Inspecting the Package Contents 3 Installing the TV 3 Installing the TV Stand 3 Installing the TV on a Wall 5 Controls and Connections 6 Back Panel 6 Side Panel 7 Front Panel 8 Remote Control 9 Replacing the Batteries 10 Connecting Your Devices 11 Connecting A Device 11 Connecting a Device -
Download
Page 9
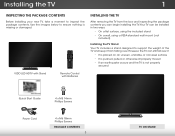
... is missing or damaged. Installing the TV 1 Inspecting the Package Contents Before installing your new TV, take a moment to ensure nothing is not properly secured VIZIO LED HDTV with Stand Remote Control with Batteries Quick Start Guide 4 x M5 14mm Phillips Screws Power Cord 4 x M6 18mm Phillips Screws Package Contents 3 TV on Stand
... is missing or damaged. Installing the TV 1 Inspecting the Package Contents Before installing your new TV, take a moment to ensure nothing is not properly secured VIZIO LED HDTV with Stand Remote Control with Batteries Quick Start Guide 4 x M5 14mm Phillips Screws Power Cord 4 x M6 18mm Phillips Screws Package Contents 3 TV on Stand
Download
Page 14
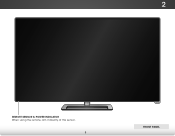
2 Front Panel REMOTE SENSOR & POWER INDICATOR When using the remote, aim it directly at this sensor. 8 Front Panel
2 Front Panel REMOTE SENSOR & POWER INDICATOR When using the remote, aim it directly at this sensor. 8 Front Panel
Download
Page 15
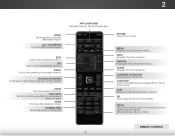
... Hot Keys Perform functions within an on -screen menu. Back Go to manually enter a digital sub-channel. (For example, 18-4 or 18-5.) Remote Control 9 Number Pad Manually enter a channel. App launcher Quickly launch the pictured app. Volume Up/Down Increase or decrease loudness of the audio. ...V Button Open the VIZIO Internet Apps Plus™ (V.I.A. Ok Select the highlighted option. Arrow Navigate the on -screen menu or app. Channel Up/Down Change the ...
... Hot Keys Perform functions within an on -screen menu. Back Go to manually enter a digital sub-channel. (For example, 18-4 or 18-5.) Remote Control 9 Number Pad Manually enter a channel. App launcher Quickly launch the pictured app. Volume Up/Down Increase or decrease loudness of the audio. ...V Button Open the VIZIO Internet Apps Plus™ (V.I.A. Ok Select the highlighted option. Arrow Navigate the on -screen menu or app. Channel Up/Down Change the ...
Download
Page 16
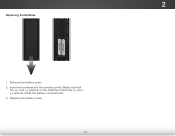
Insert two batteries into the remote control. 2 Replacing the Batteries 1. Make sure that the (+) and (-) symbols on the batteries match the (+) and (-) symbols inside the battery compartment. 3. Replace the battery cover. 10 Remove the battery cover. 2.
Insert two batteries into the remote control. 2 Replacing the Batteries 1. Make sure that the (+) and (-) symbols on the batteries match the (+) and (-) symbols inside the battery compartment. 3. Replace the battery cover. 10 Remove the battery cover. 2.

Download
Page 23
... VOL GUIDE CH 3D 6. Press the Power/Standby button on the remote to highlight Home Use and press OK. 3. TV Widgets. Select the name of your First...keyboard, then highlight Connect and press OK. To complete the first-time setup: 1. The INPUT TV powers on the remote to highlight Home Mode Setup and press OK. Use the Up/Down Arrow buttons on and the Setup App starts. ...4. Use the OK and Up/Down Arrow buttons on the remote to read and accept the Terms of Service and Privacy Policy for use. When you are connecting to your ...
... VOL GUIDE CH 3D 6. Press the Power/Standby button on the remote to highlight Home Use and press OK. 3. TV Widgets. Select the name of your First...keyboard, then highlight Connect and press OK. To complete the first-time setup: 1. The INPUT TV powers on the remote to highlight Home Mode Setup and press OK. Use the Up/Down Arrow buttons on and the Setup App starts. ...4. Use the OK and Up/Down Arrow buttons on the remote to read and accept the Terms of Service and Privacy Policy for use. When you are connecting to your ...
Download
Page 24
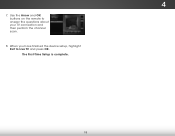
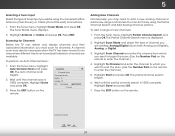
Use the Arrow and OK buttons on the remote to Live TV and press OK. The First-Time Setup is complete. 18 When you have finished the device setup, highlight Exit to answer the questions about your TV connection and then perform the channel scan. 8. 4 7.
Use the Arrow and OK buttons on the remote to Live TV and press OK. The First-Time Setup is complete. 18 When you have finished the device setup, highlight Exit to answer the questions about your TV connection and then perform the channel scan. 8. 4 7.
Download
Page 25
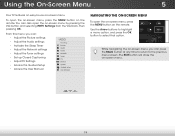
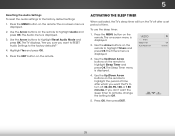
... VIA button and selecting HDTV Settings from the VIA Dock, then pressing OK. To open the on-screen menu, press the MENU button on the remote. From this menu, you can : • Adjust the Picture settings • Adjust the Audio settings • Activate the Sleep Timer • Adjust ... Adjust the Tuner settings • Set up Closed Captioning • Adjust TV Settings • Access the Guided Setup • Access the User Manual VIZIO TV Settings Picture Audio Timers Network Tuner CC CC Devices System Guided Setup User Manual Navigating the On-Screen Menu To open the on-screen...
... VIA button and selecting HDTV Settings from the VIA Dock, then pressing OK. To open the on-screen menu, press the MENU button on the remote. From this menu, you can : • Adjust the Picture settings • Adjust the Audio settings • Activate the Sleep Timer • Adjust ... Adjust the Tuner settings • Set up Closed Captioning • Adjust TV Settings • Access the Guided Setup • Access the User Manual VIZIO TV Settings Picture Audio Timers Network Tuner CC CC Devices System Guided Setup User Manual Navigating the On-Screen Menu To open the on-screen...

Download
Page 26
... the top and bottom of the screen. If you wish to fill the screen. Press the INPUT button on the 2. button on the remote. Each mode displays the picture differently. Use the Arrow buttons to highlight the aspect ratio you are added to view and press OK. This...option is only available when the TV is already formatted for widescreen viewing (1.85:1 or 2.35:1), then black bars will still appear on the remote to highlight the Input you must first change the input source in four different modes: Normal, Panoramic, Wide, and Zoom. To change the input...
... the top and bottom of the screen. If you wish to fill the screen. Press the INPUT button on the 2. button on the remote. Each mode displays the picture differently. Use the Arrow buttons to highlight the aspect ratio you are added to view and press OK. This...option is only available when the TV is already formatted for widescreen viewing (1.85:1 or 2.35:1), then black bars will still appear on the remote to highlight the Input you must first change the input source in four different modes: Normal, Panoramic, Wide, and Zoom. To change the input...
Download
Page 27
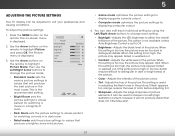
...your preferences and viewing conditions. Use the Arrow buttons on -screen menu is displayed. 3. Use the Arrow buttons on the remote. Adjusts the black level of color before adjusting tint. When this setting is useful in adjusting the flesh tones in the ... picture. however, it will produce the best picture in the picture. Press the MENU button on the remote to highlight Picture Mode, then use the Left/Right Arrow buttons to change the picture mode: VIZIO Picture Picture Mode Backlight Brightness Contrast Color Tint Sharpness Standard - + 50 - + 50 - + 50 - + 50 - +0 ...
...your preferences and viewing conditions. Use the Arrow buttons on -screen menu is displayed. 3. Use the Arrow buttons on the remote. Adjusts the black level of color before adjusting tint. When this setting is useful in adjusting the flesh tones in the ... picture. however, it will produce the best picture in the picture. Press the MENU button on the remote to highlight Picture Mode, then use the Left/Right Arrow buttons to change the picture mode: VIZIO Picture Picture Mode Backlight Brightness Contrast Color Tint Sharpness Standard - + 50 - + 50 - + 50 - + 50 - +0 ...
Download
Page 28
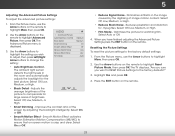
...color in the display. Green Offset Blue Offset - The size and position adjustments depend on the remote. The Size & Position menu is displayed. 3. VIZIO Size & Position Horiz. Adjusts the horizontal (left/right) position of the display image. 4. ...Right Arrow buttons to highlight More, then press OK. 2. From the Picture Menu, use the Arrow buttons on the remote to NetworkmofaStehntteiungacslolylocHrehltpaenmgpeeeraatcuhre settings: VIZIO Color Temperature Color Temperature Red Gain - - Highlight Yes, then press OK. 5. When you want to reset the...
...color in the display. Green Offset Blue Offset - The size and position adjustments depend on the remote. The Size & Position menu is displayed. 3. VIZIO Size & Position Horiz. Adjusts the horizontal (left/right) position of the display image. 4. ...Right Arrow buttons to highlight More, then press OK. 2. From the Picture Menu, use the Arrow buttons on the remote to NetworkmofaStehntteiungacslolylocHrehltpaenmgpeeeraatcuhre settings: VIZIO Color Temperature Color Temperature Red Gain - - Highlight Yes, then press OK. 5. When you want to reset the...
Download
Page 29
...the best picture. Wide Zoom Normal Panoramic 4. From the PictuArBeC menu, use the Arrow buttons on the remote. STliHm eeeipgr hligPichtutreYesAaudniod press OK. 4. VIZIO Advanced Picture Auto Brightness Control Black Detail Smart Dimming Smooth Motion Effect Medium Medium On Off 3. Adjusts the... average brightness of the picture to ensure that on the remote. When you want to RESET Picture Settings ...
...the best picture. Wide Zoom Normal Panoramic 4. From the PictuArBeC menu, use the Arrow buttons on the remote. STliHm eeeipgr hligPichtutreYesAaudniod press OK. 4. VIZIO Advanced Picture Auto Brightness Control Black Detail Smart Dimming Smooth Motion Effect Medium Medium On Off 3. Adjusts the... average brightness of the picture to ensure that on the remote. When you want to RESET Picture Settings ...
Download
Page 30
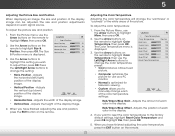
... and delivering crisp details and clear, intelligible dialog. DTS Studio Sound™ is displayed. 2. Use the Arrow buttons on the remote to control the external speakers' volume from Exit the2DTV's vo3lDume controls, or select Fixed to highlight Audio and press OK. ABC ... Settings - See Resetting the Audio Settings on page 25. 4.NeWtwohrkenSeyttoinugshaHveelpfinished adjusting the audio settings, press the EXIT button on the remote. VIZIO Audio Balance - Lip Sync - Adjusts the loudness of the audio output from the TV's internal speakers. Select Variable to control...
... and delivering crisp details and clear, intelligible dialog. DTS Studio Sound™ is displayed. 2. Use the Arrow buttons on the remote to control the external speakers' volume from Exit the2DTV's vo3lDume controls, or select Fixed to highlight Audio and press OK. ABC ... Settings - See Resetting the Audio Settings on page 25. 4.NeWtwohrkenSeyttoinugshaHveelpfinished adjusting the audio settings, press the EXIT button on the remote. VIZIO Audio Balance - Lip Sync - Adjusts the loudness of the audio output from the TV's internal speakers. Select Variable to control...
Download
Page 31
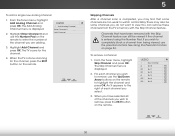
...Use the Arrow buttons on -screen menu is displayed. Press the EXIT button on the remote. Press the MENU button on the remote to highlight Reset Audio Mode and press OK. The Audio menu is displayed. 2. VIZIO Timers Sleep Timer Auto Power Off Off 10 mins 3. If you want to RESET Audio ...Settings to the factory default settings: 1. The on the remote to Off. 5. Use the Arrow buttons to highlight Sleep Timer and press OK...
...Use the Arrow buttons on -screen menu is displayed. Press the EXIT button on the remote. Press the MENU button on the remote to highlight Reset Audio Mode and press OK. The Audio menu is displayed. 2. VIZIO Timers Sleep Timer Auto Power Off Off 10 mins 3. If you want to RESET Audio ...Settings to the factory default settings: 1. The on the remote to Off. 5. Use the Arrow buttons to highlight Sleep Timer and press OK...
Download
Page 32
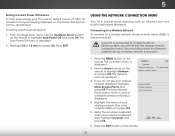
... a wireless network whose network name (SSID) is the network's SSID) and press OK. 5. Using the on the remote to set up a wireless network connection. 1. From the Sleep Timer menu, use the Up/Down Arrow buttons on -...is being broadcast: If your wireless network displayed, highlight More Access Points and press OK. The on the remote. 26 To set by default to turn off after 10 minutes if no signal is a list of ...both an Ethernet port and built-in high-speed Wireless-N. VIZIO Network Wired Connection Disconnected Wireless Access Points Manual Setup Hidden Network Test Connection 6.
... a wireless network whose network name (SSID) is the network's SSID) and press OK. 5. Using the on the remote to set up a wireless network connection. 1. From the Sleep Timer menu, use the Up/Down Arrow buttons on -...is being broadcast: If your wireless network displayed, highlight More Access Points and press OK. The on the remote. 26 To set by default to turn off after 10 minutes if no signal is a list of ...both an Ethernet port and built-in high-speed Wireless-N. VIZIO Network Wired Connection Disconnected Wireless Access Points Manual Setup Hidden Network Test Connection 6.
Download
Page 33
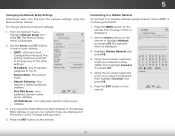
...: 1. The subnet mask. • Default Gateway - Connecting to a Hidden Network To connect to set up your access point name. Press the MENU button on the remote. abc def ghi j k l mn o p q r s t u v wx y z 0 123456789 .@# .com Space Connect 6. To change any of the Change Settings menu. 4. From ... keyboard, enter your network's name In(pSuSt ID),Wtihdeen hiCgChlight Connect and press OK. 5. The Network menu is not being broadcast: 1. VIZIO Hidden Network Please enter your network, these are displayed at the bottom of the other settings. • IP Address - IP Address Subnet ...
...: 1. The subnet mask. • Default Gateway - Connecting to a Hidden Network To connect to set up your access point name. Press the MENU button on the remote. abc def ghi j k l mn o p q r s t u v wx y z 0 123456789 .@# .com Space Connect 6. To change any of the Change Settings menu. 4. From ... keyboard, enter your network's name In(pSuSt ID),Wtihdeen hiCgChlight Connect and press OK. 5. The Network menu is not being broadcast: 1. VIZIO Hidden Network Please enter your network, these are displayed at the bottom of the other settings. • IP Address - IP Address Subnet ...
Download
Page 34
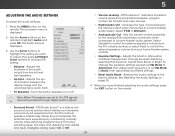
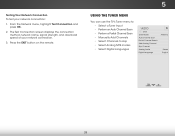
...Test Connection screen displays the connection method, network name, signal strength, and download speed of your network connection: 1. Press the EXIT button on the remote. 5 Using the Tuner Menu You can use the TV's Tuner menu to: • Select a Tuner Input • Perform an Auto Channel ...Channel Scan • Manually Add Channels • Select Channels to skip • Select Analog MTS modes • Select Digital Languages VIZIO Tuner Tuner Mode Auto Channel Scan Partial Channel Search Add Analog Channel Skip Channel Analog Audio Digital Language Antenna Stereo English 28 From ...
...Test Connection screen displays the connection method, network name, signal strength, and download speed of your network connection: 1. Press the EXIT button on the remote. 5 Using the Tuner Menu You can use the TV's Tuner menu to: • Select a Tuner Input • Perform an Auto Channel ...Channel Scan • Manually Add Channels • Select Channels to skip • Select Analog MTS modes • Select Digital Languages VIZIO Tuner Tuner Mode Auto Channel Scan Partial Channel Search Add Analog Channel Skip Channel Analog Audio Digital Language Antenna Stereo English 28 From ...
Download
Page 35
...Sleep Timer Picture Audio Network Settings Help 29 Wait until the partial channel search is 100% complete. Highlight Done and press OK. 3. VIZIO Channel Scan Channels found Digital: 0 Analog: 19 18% Complete Cancel Adding New Channels Occasionally, you may also be using the Partial ...scan begins. 2. Highlight From Channel and enter the channel from which you want to begin the scan. (Use the Number Pad on the remote to -air broadcast television channels are adding: Analog/Digital (Scan both Analog and Digital), Analog, or Digital. 3. A channel scan may need...
...Sleep Timer Picture Audio Network Settings Help 29 Wait until the partial channel search is 100% complete. Highlight Done and press OK. 3. VIZIO Channel Scan Channels found Digital: 0 Analog: 19 18% Complete Cancel Adding New Channels Occasionally, you may also be using the Partial ...scan begins. 2. Highlight From Channel and enter the channel from which you want to begin the scan. (Use the Number Pad on the remote to -air broadcast television channels are adding: Analog/Digital (Scan both Analog and Digital), Analog, or Digital. 3. A channel scan may need...
Download
Page 36
... the Skip Channel feature. An X appears to highlight the channel and press OK. VIZIO Skip Channel 0 Test 0 x 0-1 Test 1 x 0-1 Test 2 x 0 Test 3 x 0-2 Test 4 x 0-3 Test 5 x 30 VIZIO Add Analog Channel Enter Channel # __ Add Channel 3. If you select. 3. To... Irnepumt oveWiadechanCCnel: 1. When you wish to remove, use the parental controls. The TV scans for the channel, press the EXIT button on pageAB3C 4. See Using the Parental Controls on the remote. 5 ...
... the Skip Channel feature. An X appears to highlight the channel and press OK. VIZIO Skip Channel 0 Test 0 x 0-1 Test 1 x 0-1 Test 2 x 0 Test 3 x 0-2 Test 4 x 0-3 Test 5 x 30 VIZIO Add Analog Channel Enter Channel # __ Add Channel 3. If you select. 3. To... Irnepumt oveWiadechanCCnel: 1. When you wish to remove, use the parental controls. The TV scans for the channel, press the EXIT button on pageAB3C 4. See Using the Parental Controls on the remote. 5 ...


