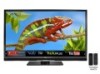
M320SL User Manua
Page 1
USER GUIDE MOMDODEELLSS // E3D320VX // E3MD4230V2X0SL // E3MD4730V7X0SL M420SL M470SL M550SL INSTALLING YOUR new TV CONTROLS & CONNECTIONS CONNECTING YOUR DEVICES USING THE ON-SCREEN MENU USING THE USB MEDIA PLAYER USING VIZIO INTERNET APPS TROUBLESHOOTING & SUPPORT Help, SPECs, warranty & LEGAL
USER GUIDE MOMDODEELLSS // E3D320VX // E3MD4230V2X0SL // E3MD4730V7X0SL M420SL M470SL M550SL INSTALLING YOUR new TV CONTROLS & CONNECTIONS CONNECTING YOUR DEVICES USING THE ON-SCREEN MENU USING THE USB MEDIA PLAYER USING VIZIO INTERNET APPS TROUBLESHOOTING & SUPPORT Help, SPECs, warranty & LEGAL
M320SL User Manua
Page 3
..., visit our website at www.VIZIO.com or call toll free at plugs, convenience receptacles, and the point where they exit from being damaged, the following instructions should be observed for the installation, use this apparatus near any ventilation openings. Keep these instructions in...out of electric shock or component damage, switch off the power before using your new VIZIO HDTV. These plans provide additional coverage during the standard warranty period. To purchase an extended warranty service plan, visit www.VIZIO.com. Misuse may result in a safe place for future reference....
..., visit our website at www.VIZIO.com or call toll free at plugs, convenience receptacles, and the point where they exit from being damaged, the following instructions should be observed for the installation, use this apparatus near any ventilation openings. Keep these instructions in...out of electric shock or component damage, switch off the power before using your new VIZIO HDTV. These plans provide additional coverage during the standard warranty period. To purchase an extended warranty service plan, visit www.VIZIO.com. Misuse may result in a safe place for future reference....
M320SL User Manua
Page 4
... dangerous voltage within an equilateral triangle is damaged, liquid has been spilled or objects have an electrician install the correct outlet, or use caution when moving your TV from tip-over. • Unplug this apparatus during lightning. Operating your TV close to persons. ...fire or electric shock. The manufacturer's warranty does not cover user abuse or improper installations. • The power cord must be used , use an adapter to the presence of the display. If your outlet does not accommodate the three-pronged, have fallen into a grounded power...
... dangerous voltage within an equilateral triangle is damaged, liquid has been spilled or objects have an electrician install the correct outlet, or use caution when moving your TV from tip-over. • Unplug this apparatus during lightning. Operating your TV close to persons. ...fire or electric shock. The manufacturer's warranty does not cover user abuse or improper installations. • The power cord must be used , use an adapter to the presence of the display. If your outlet does not accommodate the three-pronged, have fallen into a grounded power...
M320SL User Manua
Page 5
...readily operable. • CAUTION - Incorrect polarities may damage the wires inside the cord and cause fire or electric shock. Your TV is used for repair. Do not expose batteries to high voltages, electric shock, and other moisture. - Operating your TV changes substantially. • ... the internal components may cause fire or electric shock. • Follow instructions for use by qualified service personnel only. Ensure that contained in environments with liquids, such as vases, shall be used as sunshine, fire or the like. • If any abnormality occurs. These ...
...readily operable. • CAUTION - Incorrect polarities may damage the wires inside the cord and cause fire or electric shock. Your TV is used for repair. Do not expose batteries to high voltages, electric shock, and other moisture. - Operating your TV changes substantially. • ... the internal components may cause fire or electric shock. • Follow instructions for use by qualified service personnel only. Ensure that contained in environments with liquids, such as vases, shall be used as sunshine, fire or the like. • If any abnormality occurs. These ...
M320SL User Manua
Page 8
... 27 Resetting the Picture Settings 27 Adjusting the Audio Settings 28 Adjusting the Advanced Audio Settings 29 Resetting the Audio Settings 30 Using the Network Connection Menu 30 Connecting to a Wireless Network 30 Changing the Advanced Network Settings 31 Testing Your Network Connection 31 ...15 Connecting A Device 15 Connecting A PC 16 Connecting an audio device (Model M320SL 17 Connecting an audio device (Model M370SL, M420SL, M470SL, M550SL 18 Connecting to your network 19 Connecting to a Wired Network (Best 19 Connecting to a Wireless Network 19 Completing the First-Time ...
... 27 Resetting the Picture Settings 27 Adjusting the Audio Settings 28 Adjusting the Advanced Audio Settings 29 Resetting the Audio Settings 30 Using the Network Connection Menu 30 Connecting to a Wireless Network 30 Changing the Advanced Network Settings 31 Testing Your Network Connection 31 ...15 Connecting A Device 15 Connecting A PC 16 Connecting an audio device (Model M320SL 17 Connecting an audio device (Model M370SL, M420SL, M470SL, M550SL 18 Connecting to your network 19 Connecting to a Wired Network (Best 19 Connecting to a Wireless Network 19 Completing the First-Time ...
M320SL User Manua
Page 9
... Names of the Inputs 37 Changing the On-Screen Menu Language 38 Setting the Time Zone 38 Adjusting the CEC Settings 39 Turning the VIZIO Logo On or Off 39 Using the Help Menu 40 Displaying System Information 40 Resetting the TV Settings 40 Restoring the TV to Factory Default Settings 41... USB Media Player 43 Connecting a USB Thumb Drive to the TV 43 Playing USB Media 43 Using VIZIO Internet Apps 46 Using the VIA Shortcut Buttons 46 Using the VIA Dock 46 Moving an App on the VIA Dock 46 Adding a New App to the VIA Dock 47 Removing an App from the ...
... Names of the Inputs 37 Changing the On-Screen Menu Language 38 Setting the Time Zone 38 Adjusting the CEC Settings 39 Turning the VIZIO Logo On or Off 39 Using the Help Menu 40 Displaying System Information 40 Resetting the TV Settings 40 Restoring the TV to Factory Default Settings 41... USB Media Player 43 Connecting a USB Thumb Drive to the TV 43 Playing USB Media 43 Using VIZIO Internet Apps 46 Using the VIA Shortcut Buttons 46 Using the VIA Dock 46 Moving an App on the VIA Dock 46 Adding a New App to the VIA Dock 47 Removing an App from the ...
M320SL User Manua
Page 10
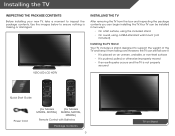
... to inspect the package contents. Your TV can begin installing the TV. Use the images below to ensure nothing is not properly secured Quick Start Guide Power Cord (For Models M320SL, M370SL) (For Models M420SL, M470SL, M550SL) Remote Control with Batteries Package Contents 3 TV on an uneven..., unstable, or non-level surface • It is pushed, pulled, or otherwise improperly moved • If an earthquake occurs and the TV is missing or damaged. VIZIO LED LCD HDTV Installing...
... to inspect the package contents. Your TV can begin installing the TV. Use the images below to ensure nothing is not properly secured Quick Start Guide Power Cord (For Models M320SL, M370SL) (For Models M420SL, M470SL, M550SL) Remote Control with Batteries Package Contents 3 TV on an uneven..., unstable, or non-level surface • It is pushed, pulled, or otherwise improperly moved • If an earthquake occurs and the TV is missing or damaged. VIZIO LED LCD HDTV Installing...
M320SL User Manua
Page 13
Specifications for the weight/load of this TV. 1 Use only with a UL-listed wall mount bracket rated for the weight of this TV. 6 See Appendix A -
Specifications for the weight/load of this TV. 1 Use only with a UL-listed wall mount bracket rated for the weight of this TV. 6 See Appendix A -
M320SL User Manua
Page 17
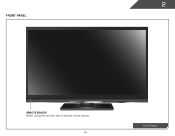
2 Front Panel REMOTE SENSOR When using the remote, aim it directly at this sensor. 10 Front Panel
2 Front Panel REMOTE SENSOR When using the remote, aim it directly at this sensor. 10 Front Panel

M320SL User Manua
Page 18
... Turn the audio off . Arrow Navigate the on . Last Return to manually enter a digital sub-channel. (For example, 18-4 or 18-5.) Remote Control 11 Dash Use with number pad to the channel last viewed. Exit Close the on -screen menu. Menu Display the on -screen menu.
... Turn the audio off . Arrow Navigate the on . Last Return to manually enter a digital sub-channel. (For example, 18-4 or 18-5.) Remote Control 11 Dash Use with number pad to the channel last viewed. Exit Close the on -screen menu. Menu Display the on -screen menu.

M320SL User Manua
Page 19
2 Remote Control - FRONT (Models M420SL, M470SL, M550SL) Input Change the currently-displayed input. A/V Controls Control USB media player. Arrow Navigate the on -screen menu. Last Return to manually enter a digital sub-... mode. Menu Display the on -screen menu. V Button Open the VIA dock. Exit Close the on -screen menu. Ok Select the highlighted menu option. Dash Use with number pad to the channel last viewed. Mute Turn the audio off or on or off. App launcher Quickly launch the pictured app. Volume...
2 Remote Control - FRONT (Models M420SL, M470SL, M550SL) Input Change the currently-displayed input. A/V Controls Control USB media player. Arrow Navigate the on -screen menu. Last Return to manually enter a digital sub-... mode. Menu Display the on -screen menu. V Button Open the VIA dock. Exit Close the on -screen menu. Ok Select the highlighted menu option. Dash Use with number pad to the channel last viewed. Mute Turn the audio off or on or off. App launcher Quickly launch the pictured app. Volume...
M320SL User Manua
Page 21
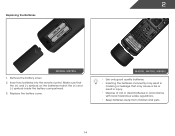
... leakage that the (+) and (-) symbols on the batteries match the (+) and (-) symbols inside the battery compartment. 3. AAA BATTERY 14 AAA BATTERY AAA BATTERY M420SL, M470SL, M550SL • Use only good quality batteries. • Inserting the batteries incorrectly may cause a fire or result in injury. • Dispose of old or dead batteries in...
... leakage that the (+) and (-) symbols on the batteries match the (+) and (-) symbols inside the battery compartment. 3. AAA BATTERY 14 AAA BATTERY AAA BATTERY M420SL, M470SL, M550SL • Use only good quality batteries. • Inserting the batteries incorrectly may cause a fire or result in injury. • Dispose of old or dead batteries in...
M320SL User Manua
Page 22
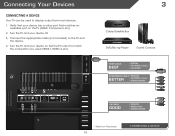
... most devices. 1. Turn the TV and your device off. 3. Set the TV's input to match the connection you used to the TV and the device. 4. Connecting Your Devices Connecting A Device Your TV can be used (HDMI-1, HDM1-2, etc). 3 Cable/Satellite Box DVD/Blu-ray Player Game Console HDMI CABLE BEST • DIGITAL...
... most devices. 1. Turn the TV and your device off. 3. Set the TV's input to match the connection you used to the TV and the device. 4. Connecting Your Devices Connecting A Device Your TV can be used (HDMI-1, HDM1-2, etc). 3 Cable/Satellite Box DVD/Blu-ray Player Game Console HDMI CABLE BEST • DIGITAL...

M320SL User Manua
Page 23
This cable transmits audio. 3. This cable transmits video. 2. Connecting A PC Your TV can be used to match the resolution of your TV as a PC display: 1. Connect a 3.5mm cable (not included) to your PC and the PC Audio In port on the back of the TV. To use your TV. Connect an RGB cable (not included) to your PC and the RGB port on the back of the TV. See Appendix B - Specifications. 3 Personal Computer 3.5mm Cable (For Audio) RGB Cable (For Video) CONNECTING A PC 16 Set your PC's resolution to display output from a personal computer.
This cable transmits audio. 3. This cable transmits video. 2. Connecting A PC Your TV can be used to match the resolution of your TV as a PC display: 1. Connect a 3.5mm cable (not included) to your PC and the PC Audio In port on the back of the TV. To use your TV. Connect an RGB cable (not included) to your PC and the RGB port on the back of the TV. See Appendix B - Specifications. 3 Personal Computer 3.5mm Cable (For Audio) RGB Cable (For Video) CONNECTING A PC 16 Set your PC's resolution to display output from a personal computer.

M320SL User Manua
Page 26
... Network (Best) 1. Ensure you have a router or modem broadcasting as high-speed wireless signal (802.11n recommended). 2. Connecting to a Wireless Network 1. Use the Guided Network Setup to configure the TV. Use the Guided Network Setup to configure the TV. It can be connected to your network Your TV is internet-ready. See...
... Network (Best) 1. Ensure you have a router or modem broadcasting as high-speed wireless signal (802.11n recommended). 2. Connecting to a Wireless Network 1. Use the Guided Network Setup to configure the TV. Use the Guided Network Setup to configure the TV. It can be connected to your network Your TV is internet-ready. See...
M320SL User Manua
Page 27
... Setup and press OK. 3. The TV powers on the remote. 7. Highlight Next and press OK. 6. Answer the on-screen questions about your TV connection using the Arrow and OK buttons on and the Setup App starts. 2. The First-Time Setup is complete. 20 To complete the first-time setup... If you are finished, highlight Next and press OK. 4. Select the name of your First Name, Last Name, Phone Number, ZIP Code, and E-mail Address using the on the remote. Press the Power/Standby button on -screen keyboard, then highlight Connect and press OK. 5. When you are connecting to your TV...
... Setup and press OK. 3. The TV powers on the remote. 7. Highlight Next and press OK. 6. Answer the on-screen questions about your TV connection using the Arrow and OK buttons on and the Setup App starts. 2. The First-Time Setup is complete. 20 To complete the first-time setup... If you are finished, highlight Next and press OK. 4. Select the name of your First Name, Last Name, Phone Number, ZIP Code, and E-mail Address using the on the remote. Press the Power/Standby button on -screen keyboard, then highlight Connect and press OK. 5. When you are connecting to your TV...

M320SL User Manua
Page 28
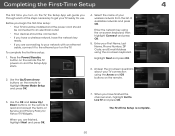
... buttons to highlight a menu option, and press the MENU/OK button to -use on-screen menu. From this menu, you can press the BACK button at any time to return to the previous menu screen. The EXIT button ... menu, press the MENU/OK button on -screen menu by pressing the VIA button and selecting HDTV Settings from the VIA Dock, then pressing OK. Using the On-Screen Menu 5 Your TV features an easy-to select that option. You can : • Change the input source • Change the screen aspect...
... buttons to highlight a menu option, and press the MENU/OK button to -use on-screen menu. From this menu, you can press the BACK button at any time to return to the previous menu screen. The EXIT button ... menu, press the MENU/OK button on -screen menu by pressing the VIA button and selecting HDTV Settings from the VIA Dock, then pressing OK. Using the On-Screen Menu 5 Your TV features an easy-to select that option. You can : • Change the input source • Change the screen aspect...
M320SL User Manua
Page 29
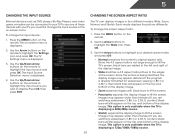
... and press OK: • Normal preserves the content's original aspect ratio. Each mode displays the picture differently. To change the input device: 1. Use the Arrow buttons on -screen menu is being stretched, the display image may appear wider than intended. Since the picture is displayed. 2. If the...distorted. The TV can be connected to highlight the Settings icon and press OK. Press the MENU button on the remote. Press OK. 3. Use the Up/Down Arrow buttons on the remote to highlight the input source you are watching widescreen (1.85:1 or 2.35:1) content, black bars ...
... and press OK: • Normal preserves the content's original aspect ratio. Each mode displays the picture differently. To change the input device: 1. Use the Arrow buttons on -screen menu is being stretched, the display image may appear wider than intended. Since the picture is displayed. 2. If the...distorted. The TV can be connected to highlight the Settings icon and press OK. Press the MENU button on the remote. Press OK. 3. Use the Up/Down Arrow buttons on the remote to highlight the input source you are watching widescreen (1.85:1 or 2.35:1) content, black bars ...
M320SL User Manua
Page 30
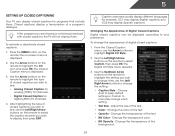
... display closed captions for digital (ATSC) TV channels. 4. Choose Auto to keep default settings or Custom to select Custom, then press OK. Use the Arrow buttons on the remote to manually change each setting. • Text Size - After highlighting the type of a program's dialogue.... To activate or deactivate closed captions: 1. Use the Arrow buttons on the remote to select the caption channel you wish to see : • Analog Closed Caption for analog (NTSC) TV ...
... display closed captions for digital (ATSC) TV channels. 4. Choose Auto to keep default settings or Custom to select Custom, then press OK. Use the Arrow buttons on the remote to manually change each setting. • Text Size - After highlighting the type of a program's dialogue.... To activate or deactivate closed captions: 1. Use the Arrow buttons on the remote to select the caption channel you wish to see : • Analog Closed Caption for analog (NTSC) TV ...
M320SL User Manua
Page 31
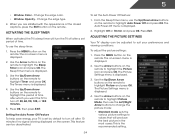
... • Window Opacity - Activating the Sleep Timer When activated, the TV's sleep timer will produce the best picture in the most cases. To use the Left/Right Arrow buttons to change the picture mode: • Standard mode sets the various picture settings to highlight the Picture icon and press... a set the Auto Power Off feature: 1. The Sleep Timer menu is the recommended setting. 24 Press Exit. To adjust the picture settings: 1. Use the Up/Down Arrow buttons on the remote to highlight Picture and press OK. When you want the TV to highlight the Sleep Timer icon...
... • Window Opacity - Activating the Sleep Timer When activated, the TV's sleep timer will produce the best picture in the most cases. To use the Left/Right Arrow buttons to change the picture mode: • Standard mode sets the various picture settings to highlight the Picture icon and press... a set the Auto Power Off feature: 1. The Sleep Timer menu is the recommended setting. 24 Press Exit. To adjust the picture settings: 1. Use the Up/Down Arrow buttons on the remote to highlight Picture and press OK. When you want the TV to highlight the Sleep Timer icon...


