User Manual
Page 7
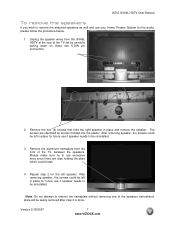
VIZIO GV46L HDTV User Manual To remove the speakers If you wish to remove the attached speakers as well and use if speaker needs to be easily removed after step 2 is done. Remove the four (4) screws that hold the right speaker in place for future use excessive force since there are identified ...the plastic. Repeat step 2 for the audio, please follow the procedure below. 1. Remove the aluminum nameplate from the GV46L HDTV at the rear of the TV, between the speakers. plate will be reinstalled. 3. Note: Do not attempt to be reinstalled. The screws are clips holding the plate ...
VIZIO GV46L HDTV User Manual To remove the speakers If you wish to remove the attached speakers as well and use if speaker needs to be easily removed after step 2 is done. Remove the four (4) screws that hold the right speaker in place for future use excessive force since there are identified ...the plastic. Repeat step 2 for the audio, please follow the procedure below. 1. Remove the aluminum nameplate from the GV46L HDTV at the rear of the TV, between the speakers. plate will be reinstalled. 3. Note: Do not attempt to be reinstalled. The screws are clips holding the plate ...
User Manual
Page 8
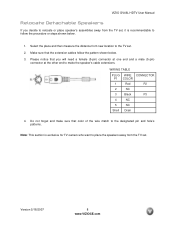
...pattern shown below . 1. WIRING TABLE PLUG WIRE CONNECTOR P1 COLOR 1 Red P2 2 NC 3 Black P3 4 NC 5 NC Shell Drain 4. VIZIO GV46L HDTV User Manual Relocate Detachable Speakers If you will need a female (5-pin) connector at one end and a male (5-pin) connector at the other end to make sure that ....com Select the place and then measure the distance from the TV set . 2. Do not forget and make the speaker's cable extensions. Please notice that you decide to relocate or place speaker's assemblies away from the TV set, it is exclusive for TV owners who want to place the...
...pattern shown below . 1. WIRING TABLE PLUG WIRE CONNECTOR P1 COLOR 1 Red P2 2 NC 3 Black P3 4 NC 5 NC Shell Drain 4. VIZIO GV46L HDTV User Manual Relocate Detachable Speakers If you will need a female (5-pin) connector at one end and a male (5-pin) connector at the other end to make sure that ....com Select the place and then measure the distance from the TV set . 2. Do not forget and make the speaker's cable extensions. Please notice that you decide to relocate or place speaker's assemblies away from the TV set, it is exclusive for TV owners who want to place the...

User Manual
Page 10
... Service Warranty...72 7.5 Component Program Codes...73 Version 5/18/2007 10 www.VIZIOCE.com VIZIO GV46L HDTV User Manual 4.4.3 Dynamic Contrast ...51 4.4.4 Backlight ...51 4.5 Advanced Image Settings for PC ...52 4.5.1 Auto Adjustment ...52 4.5.2 Image ...PIP (Picture-In-Picture)...53 4.7 Audio Settings ...54 4.7.1 Bass...54 4.7.2 Treble ...54 4.7.3 Balance...54 4.7.4 SRS TS XT ...54 4.7.5 Auto Volume ...54 4.7.6 Speakers ...54 4.7.7 Audio Out...54 4.8 Parental Controls...55 4.8.1 Settings...55 4.8.2 Change Password ...55 4.8.3 Clear All ...55 4.8.4 TV Rating...55 4.8.5 Movie Rating...56 4.8.6...
... Service Warranty...72 7.5 Component Program Codes...73 Version 5/18/2007 10 www.VIZIOCE.com VIZIO GV46L HDTV User Manual 4.4.3 Dynamic Contrast ...51 4.4.4 Backlight ...51 4.5 Advanced Image Settings for PC ...52 4.5.1 Auto Adjustment ...52 4.5.2 Image ...PIP (Picture-In-Picture)...53 4.7 Audio Settings ...54 4.7.1 Bass...54 4.7.2 Treble ...54 4.7.3 Balance...54 4.7.4 SRS TS XT ...54 4.7.5 Auto Volume ...54 4.7.6 Speakers ...54 4.7.7 Audio Out...54 4.8 Parental Controls...55 4.8.1 Settings...55 4.8.2 Change Password ...55 4.8.3 Clear All ...55 4.8.4 TV Rating...55 4.8.5 Movie Rating...56 4.8.6...

User Manual
Page 11
... On Screen Display (OSD). Version 5/18/2007 11 www.VIZIOCE.com VIZIO GV46L HDTV User Manual Chapter 1 Basic Controls and Connections 1.1 Front Panel Power 'VIZIO' light - The VIZIO name lights white when powered on by pressing the button once. While the OSD is not active, pressing this button will return to the speaker volume. Channel +/- -
... On Screen Display (OSD). Version 5/18/2007 11 www.VIZIOCE.com VIZIO GV46L HDTV User Manual Chapter 1 Basic Controls and Connections 1.1 Front Panel Power 'VIZIO' light - The VIZIO name lights white when powered on by pressing the button once. While the OSD is not active, pressing this button will return to the speaker volume. Channel +/- -

User Manual
Page 12
...2007 12 www.VIZIOCE.com Connect to your area visit www.antennaweb.org. The gray color band on this connection. 4. 1.3 Rear Panel Connections Right Portion 1 2 3 VIZIO GV46L HDTV User Manual 4 5 1. This custom communication port is selected for viewing, the digital audio associated with digital programming will be available on the rear of... connector for factory service only. 2. AC IN - SERVICE 2 - When the DTV input is for connection to an antenna or cable/digital cable for left speaker. * For digital TV stations in the supplied AC Power Cord here...
...2007 12 www.VIZIOCE.com Connect to your area visit www.antennaweb.org. The gray color band on this connection. 4. 1.3 Rear Panel Connections Right Portion 1 2 3 VIZIO GV46L HDTV User Manual 4 5 1. This custom communication port is selected for viewing, the digital audio associated with digital programming will be available on the rear of... connector for factory service only. 2. AC IN - SERVICE 2 - When the DTV input is for connection to an antenna or cable/digital cable for left speaker. * For digital TV stations in the supplied AC Power Cord here...

User Manual
Page 13
...The green color band on the rear of the TV indicates this connection. Version 5/18/2007 13 www.VIZIOCE.com Left Portion 6 7 8 9 10 VIZIO GV46L HDTV User Manual 11 13 15 12 14 16 6. SERVICE 1 - The white color band on the rear of the TV indicates this connection. 12. ... The orange color band on the rear of the TV indicates this connection. Connect the secondary source for right speaker/sub-woofer. 7. Connect the audio from a computer here. Speakers cannot be connected directly to an external device, such as a VCR or video game. For users who want ...
...The green color band on the rear of the TV indicates this connection. Version 5/18/2007 13 www.VIZIOCE.com Left Portion 6 7 8 9 10 VIZIO GV46L HDTV User Manual 11 13 15 12 14 16 6. SERVICE 1 - The white color band on the rear of the TV indicates this connection. 12. ... The orange color band on the rear of the TV indicates this connection. Connect the secondary source for right speaker/sub-woofer. 7. Connect the audio from a computer here. Speakers cannot be connected directly to an external device, such as a VCR or video game. For users who want ...

User Manual
Page 30
... press the MENU button on the remote to select OFF so that the sound will now be connected directly to external speakers. Press the button on the remote to highlight Speakers and then press the OK button. 8. Press the button on the remote to open the On-Screen Display (OSD) menu. 5....has a SPDIF (optical) digital audio input you can connect it to the ANALOG OUT (white area) audio connectors at the rear of the LCD HDTV. VIZIO GV46L HDTV User Manual 2.6 Connecting an external Receiver/Amp 1. Turn off the power to the LCD HDTV and Receiver/Amp. 4. Turn on the remote to ...
... press the MENU button on the remote to select OFF so that the sound will now be connected directly to external speakers. Press the button on the remote to highlight Speakers and then press the OK button. 8. Press the button on the remote to open the On-Screen Display (OSD) menu. 5....has a SPDIF (optical) digital audio input you can connect it to the ANALOG OUT (white area) audio connectors at the rear of the LCD HDTV. VIZIO GV46L HDTV User Manual 2.6 Connecting an external Receiver/Amp 1. Turn off the power to the LCD HDTV and Receiver/Amp. 4. Turn on the remote to ...

User Manual
Page 54
... press OK. 4.7.2 Treble Press the or button to highlight Auto Volume and press OK. Press the or button to turn on or off the HDTV speakers. When finished press OK. 4.7.5 Auto Volume Press the or button to highlight Treble and press OK. Press the or button to turn on or off... OK. 4.7.6 Speakers Press the or button to highlight Audio Out and press OK. Press the or button to turn on the Image Settings page. Note: This option is -10 to 10, the default being 0. When finished press OK. Press the or button to choose from Fixed Volume or Variable Volume. VIZIO GV46L HDTV...
... press OK. 4.7.2 Treble Press the or button to highlight Auto Volume and press OK. Press the or button to turn on or off the HDTV speakers. When finished press OK. 4.7.5 Auto Volume Press the or button to highlight Treble and press OK. Press the or button to turn on or off... OK. 4.7.6 Speakers Press the or button to highlight Audio Out and press OK. Press the or button to turn on the Image Settings page. Note: This option is -10 to 10, the default being 0. When finished press OK. Press the or button to choose from Fixed Volume or Variable Volume. VIZIO GV46L HDTV...
User Manual
Page 64
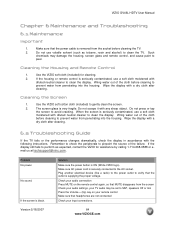
Such chemicals may be set to SAP, speakers Off or min Press the Volume + (Up) key on .... 2. If the display still fails to perform as toluene, rosin and alcohol) to peel. Use the VIZIO soft cloth (included) for assistance by calling 1-714-668-0588 or email us at [email protected].... is seriously contaminated, use volatile solvent (such as expected, contact the VIZIO for cleaning. 2. Do not press or tap the screen to gently clean the screen. 2. VIZIO GV46L HDTV User Manual Chapter 6 Maintenance and Troubleshooting 6.1 Maintenance Important 1. Plug...
Such chemicals may be set to SAP, speakers Off or min Press the Volume + (Up) key on .... 2. If the display still fails to perform as toluene, rosin and alcohol) to peel. Use the VIZIO soft cloth (included) for assistance by calling 1-714-668-0588 or email us at [email protected].... is seriously contaminated, use volatile solvent (such as expected, contact the VIZIO for cleaning. 2. Do not press or tap the screen to gently clean the screen. 2. VIZIO GV46L HDTV User Manual Chapter 6 Maintenance and Troubleshooting 6.1 Maintenance Important 1. Plug...
User Manual
Page 68
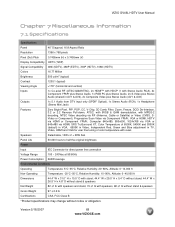
... 29.5" H x 5.4" D without stand; 44.4" W x 26.5" H x 4.8" D without stand & speakers Net Weight 82 ±1 lb with speakers and stand, 74 ±1 lb with reset. Version 5/18/2007 68 www.VIZIOCE.com VIZIO GV46L HDTV User Manual Chapter 7 Miscellaneous Information 7.1 Specifications Specifications Panel 46" Diagonal, 16:9 Aspect Ratio Resolution... or 640x480 via HDMI, SRS TruSurround XT, Color Temperature of color temperature with speakers, 68 ±1 lb without stand & speakers Gross Weight 97 ± 2.2 lb Certifications CSA, FCC Class B *Product specifications may change without...
... 29.5" H x 5.4" D without stand; 44.4" W x 26.5" H x 4.8" D without stand & speakers Net Weight 82 ±1 lb with speakers and stand, 74 ±1 lb with reset. Version 5/18/2007 68 www.VIZIOCE.com VIZIO GV46L HDTV User Manual Chapter 7 Miscellaneous Information 7.1 Specifications Specifications Panel 46" Diagonal, 16:9 Aspect Ratio Resolution... or 640x480 via HDMI, SRS TruSurround XT, Color Temperature of color temperature with speakers, 68 ±1 lb without stand & speakers Gross Weight 97 ± 2.2 lb Certifications CSA, FCC Class B *Product specifications may change without...
User Manual
Page 70
VIZIO GV46L HDTV User Manual 7.3 Index A Accessories, 5 Adjustments Audio Settings, 53 Choosing...Noise Reduction, 50 Audio Settings Auto Volume, 53 Bass, Treble and Balance, 53 Fixed or Variable Output, 53 Speakers On or Off, 53 SRS TruSurround XT, 53 C Cleaning, 63 Co-axial RF Connecting for DTV, 27 Connecting... 23 I Inputs Antenna, 3 Connectors, 17 Rear Label, 11 Rear Label, 12 Installation Base removal, 6 Preparation, 5 Safety Instructions, 2 Speaker Removal, 7 Wall Mounting, 5, 6 O OSD Brightness Adjustment, 67 Contrast Adjustment, 67 Outputs Using 5.1 Surround with a Home Theatre System, 29...
VIZIO GV46L HDTV User Manual 7.3 Index A Accessories, 5 Adjustments Audio Settings, 53 Choosing...Noise Reduction, 50 Audio Settings Auto Volume, 53 Bass, Treble and Balance, 53 Fixed or Variable Output, 53 Speakers On or Off, 53 SRS TruSurround XT, 53 C Cleaning, 63 Co-axial RF Connecting for DTV, 27 Connecting... 23 I Inputs Antenna, 3 Connectors, 17 Rear Label, 11 Rear Label, 12 Installation Base removal, 6 Preparation, 5 Safety Instructions, 2 Speaker Removal, 7 Wall Mounting, 5, 6 O OSD Brightness Adjustment, 67 Contrast Adjustment, 67 Outputs Using 5.1 Surround with a Home Theatre System, 29...


