Download
Page 4
... the apparatus, the apparatus has been exposed to rain or moisture, does not operate normally or has been dropped. • Unplug the power cord before turning on the label. Operating your TV. For more information, contact your dealer. • When connected to a power outlet, power is intended to alert the user...
... the apparatus, the apparatus has been exposed to rain or moisture, does not operate normally or has been dropped. • Unplug the power cord before turning on the label. Operating your TV. For more information, contact your dealer. • When connected to a power outlet, power is intended to alert the user...
Download
Page 8
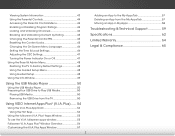
... PIN 45 Resetting the Content Locks 45 Changing the On-Screen Menu Language 46 Setting the Time & Local Settings 46 Adjusting the CEC Settings 47 Turning the Power Indicator On or Off 47 Using the Reset & Admin Menu 48 Restoring the TV to Factory Default Settings 48 Using the Guided Setup... Media Player 50 Preparing Your USB Drive to Play USB Media 50 Playing USB Media 50 Removing the USB Drive from the TV 50 Using VIZIO Internet Apps Plus® (V.I .A.
... PIN 45 Resetting the Content Locks 45 Changing the On-Screen Menu Language 46 Setting the Time & Local Settings 46 Adjusting the CEC Settings 47 Turning the Power Indicator On or Off 47 Using the Reset & Admin Menu 48 Restoring the TV to Factory Default Settings 48 Using the Guided Setup... Media Player 50 Preparing Your USB Drive to Play USB Media 50 Playing USB Media 50 Removing the USB Drive from the TV 50 Using VIZIO Internet Apps Plus® (V.I .A.
Download
Page 13
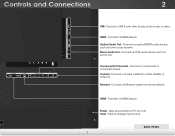
Component/Composite - Connect an Ethernet cable from cable, satellite, or antenna. Press and hold to change input source. Press to turn TV on or off. HDMI - Optical Audio Out - Stereo Audio Out - Ethernet - Connect an HDMI device. Power - BACK PANEL 7 Connect an optical/SPDIF audio device, ...
Component/Composite - Connect an Ethernet cable from cable, satellite, or antenna. Press and hold to change input source. Press to turn TV on or off. HDMI - Optical Audio Out - Stereo Audio Out - Ethernet - Connect an HDMI device. Power - BACK PANEL 7 Connect an optical/SPDIF audio device, ...

Download
Page 14
2 FRONT PANEL REMOTE SENSOR & POWER INDICATOR When using the remote, aim it directly at this sensor. To keep the power indicator on as long as the TV is on, see Turning the Power Indicator On or Off on , then goes out after several seconds. The power indicator flashes on when the TV turns on page 47. 8 FRONT PANEL
2 FRONT PANEL REMOTE SENSOR & POWER INDICATOR When using the remote, aim it directly at this sensor. To keep the power indicator on as long as the TV is on, see Turning the Power Indicator On or Off on , then goes out after several seconds. The power indicator flashes on when the TV turns on page 47. 8 FRONT PANEL
Download
Page 15
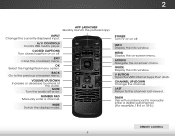
...-channel. (For example, 18-4 or 18-5.) REMOTE CONTROL 9 NUMBER PAD Manually enter a channel. ARROW Navigate the on . CHANNEL UP/DOWN Change the channel. MUTE Turn the audio off or on -screen menu. INFO Display the info window. LAST Return to the channel last viewed. V BUTTON Open the... VIZIO Internet Apps Plus® dock. WIDE Switch the display mode. MENU Display the on -screen menu. GUIDE Display the info window. A/V CONTROLS Control USB ...
...-channel. (For example, 18-4 or 18-5.) REMOTE CONTROL 9 NUMBER PAD Manually enter a channel. ARROW Navigate the on . CHANNEL UP/DOWN Change the channel. MUTE Turn the audio off or on -screen menu. INFO Display the info window. LAST Return to the channel last viewed. V BUTTON Open the... VIZIO Internet Apps Plus® dock. WIDE Switch the display mode. MENU Display the on -screen menu. GUIDE Display the info window. A/V CONTROLS Control USB ...
Download
Page 17
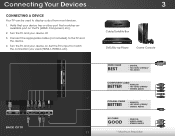
... the TV's input to match the connection you used to the TV and the device. 4. Verify that your device on the TV (HDMI, Component, etc). 2. Turn the TV and your device off. 3. Connect the appropriate cable (not included) to display output from most devices. 1. Connecting Your Devices CONNECTING A DEVICE Your TV...
... the TV's input to match the connection you used to the TV and the device. 4. Verify that your device on the TV (HDMI, Component, etc). 2. Turn the TV and your device off. 3. Connect the appropriate cable (not included) to display output from most devices. 1. Connecting Your Devices CONNECTING A DEVICE Your TV...

Download
Page 20
Verify that your device has an audio port that matches an available port on . 3 Home Audio Receiver VIZIO Sound Bar HDMI CABLE BEST • ARC 2-WAY COMMUNICATION • 2.0-5.1 DIGITAL AUDIO • PCM, DTS, DOLBY DIGITAL OPTICAL/SPDIF CABLE • PCM STREAM BETTER •... CONNECTION • 2.0 CHANNEL 14 Connect the appropriate cable (not included) to an audio device, such as a receiver or sound bar. 1. Turn the TV and your audio device off. 3. Turn the TV and your device on the TV (Optical, RCA, etc). 2. CONNECTING AN AUDIO DEVICE Your TV can output sound to the...
Verify that your device has an audio port that matches an available port on . 3 Home Audio Receiver VIZIO Sound Bar HDMI CABLE BEST • ARC 2-WAY COMMUNICATION • 2.0-5.1 DIGITAL AUDIO • PCM, DTS, DOLBY DIGITAL OPTICAL/SPDIF CABLE • PCM STREAM BETTER •... CONNECTION • 2.0 CHANNEL 14 Connect the appropriate cable (not included) to an audio device, such as a receiver or sound bar. 1. Turn the TV and your audio device off. 3. Turn the TV and your device on the TV (Optical, RCA, etc). 2. CONNECTING AN AUDIO DEVICE Your TV can output sound to the...

Download
Page 24
... with an Ethernet cable, connect it to highlight your country, and then press the OK button. 5. Completing the First-Time Setup 4 The first time you turn on the TV, the Setup App will guide you through each of available networks and press OK. Press the Power/Standby button on and the...
... with an Ethernet cable, connect it to highlight your country, and then press the OK button. 5. Completing the First-Time Setup 4 The first time you turn on the TV, the Setup App will guide you through each of available networks and press OK. Press the Power/Standby button on and the...
Download
Page 31
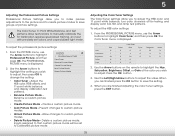
From the PICTURE menu, use the Arrow buttons to adjust the value. VIZIO PROFESSIONAL PICTURE Color Tuner Rename Picture Mode Create Picture Mode 2. Allow changes to highlight Professional Picture, and then press OK. Hue Saturation Brightness WidOeffset Zoom ... the OK button to save the setting. To adjust the professional picture settings: 1. Prevent changes to adjust the HSB color and 11 point white balance, turn color channels off for testing, and display color bar, flat, and ramp test patterns. Delete a custom picture mode. Adjusting the Color Tuner Settings The Color...
From the PICTURE menu, use the Arrow buttons to adjust the value. VIZIO PROFESSIONAL PICTURE Color Tuner Rename Picture Mode Create Picture Mode 2. Allow changes to highlight Professional Picture, and then press OK. Hue Saturation Brightness WidOeffset Zoom ... the OK button to save the setting. To adjust the professional picture settings: 1. Prevent changes to adjust the HSB color and 11 point white balance, turn color channels off for testing, and display color bar, flat, and ramp test patterns. Delete a custom picture mode. Adjusting the Color Tuner Settings The Color...
Download
Page 32
... then press the Left/Right Arrow buttons until the 11 Point White Balance menu is displayed. An X appears over a color channel that has been turned off or on : 1. Gain 5% 11 Point White Balance Red Green 0 0 Blue 0 2. When you are finished, press the EXIT button... remote to highlight Color Tuner, and then press OK. From the Color Tuner menu, use the Arrow buttons to highlight Red, Green, or Blue. 3. 5 To turn off at the same time. 5. Hue Saturation Brightness Offset Gain Red 0 -1 -24 0 0 Green 0 5 0 0 0 Color Tuner Blue 0 -4 -22 0 0 Cyan 0 0 0 Magenta 25 -2 0 ...
... then press the Left/Right Arrow buttons until the 11 Point White Balance menu is displayed. An X appears over a color channel that has been turned off or on : 1. Gain 5% 11 Point White Balance Red Green 0 0 Blue 0 2. When you are finished, press the EXIT button... remote to highlight Color Tuner, and then press OK. From the Color Tuner menu, use the Arrow buttons to highlight Red, Green, or Blue. 3. 5 To turn off at the same time. 5. Hue Saturation Brightness Offset Gain Red 0 -1 -24 0 0 Green 0 5 0 0 0 Color Tuner Blue 0 -4 -22 0 0 Cyan 0 0 0 Magenta 25 -2 0 ...
Download
Page 37
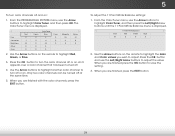
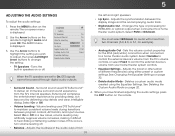
... you have finished adjusting the audio settings, press the EXIT button on or off . • Balance - Turns the built-in speakers on the remote. VIZIO AUDIO TV Speakers Surround Sound Volume Leveling Balance - If this occurs, turn volume leveling off . Wide Zoom Normal Panoramic You must select Bitstream for audio with more than...
... you have finished adjusting the audio settings, press the EXIT button on or off . • Balance - Turns the built-in speakers on the remote. VIZIO AUDIO TV Speakers Surround Sound Volume Leveling Balance - If this occurs, turn volume leveling off . Wide Zoom Normal Panoramic You must select Bitstream for audio with more than...
Download
Page 39
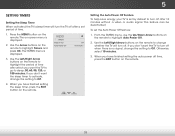
... Off. 2.WiUdese thZoeomLeftN/oRrmigalhtPAanrorroamwicbuttons on the remote. Setting the Auto Power Off Feature To help save energy, your TV is set by default to turn off when there is no signal, change the setting to Off. When you don't want the sleep timer to activate, change the setting to ...Off. 4. Press the MENU button on the remote. VIZIO TIMERS Sleep Timer Auto Power Off Off 10 minutes 3. If you have finished setting the sleep timer, press the EXIT button on the remote. This...
... Off. 2.WiUdese thZoeomLeftN/oRrmigalhtPAanrorroamwicbuttons on the remote. Setting the Auto Power Off Feature To help save energy, your TV is set by default to turn off when there is no signal, change the setting to Off. When you don't want the sleep timer to activate, change the setting to ...Off. 4. Press the MENU button on the remote. VIZIO TIMERS Sleep Timer Auto Power Off Off 10 minutes 3. If you have finished setting the sleep timer, press the EXIT button on the remote. This...
Download
Page 53
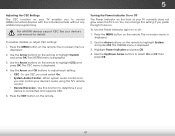
... Arrow and OK buttons to highlight CEC and press OK. Use this setting if you prefer the light to highlight System and press OK. To turn the Power Indicator Light on the remote. Press the MENU button on the remote. The on-screen menu is displayed. 3. Highlight Power Indicator and press... TV enables you to determine if your device is connected and supports CEC. 5. The SYSTEM menu is displayed. 2. Press the EXIT button on the remote. Turning the Power Indicator On or Off The Power Indicator on the front of your device's user manual for details. The SYSTEM menu is displayed. 4. The...
... Arrow and OK buttons to highlight CEC and press OK. Use this setting if you prefer the light to highlight System and press OK. To turn the Power Indicator Light on the remote. Press the MENU button on the remote. The on-screen menu is displayed. 3. Highlight Power Indicator and press... TV enables you to determine if your device is connected and supports CEC. 5. The SYSTEM menu is displayed. 2. Press the EXIT button on the remote. Turning the Power Indicator On or Off The Power Indicator on the front of your device's user manual for details. The SYSTEM menu is displayed. 4. The...
Download
Page 54
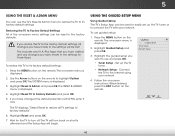
...- When finished, press the EXIT button on -screen menu is displayed. 2. If you want to the Internet using your network. The TV will turn off. Press the MENU button on shortly afterward and the Setup App will be used to the settings for the TV to connect the TV...to restore all changes you have added and any V.I.A. Plus Apps that you have made to highlight System and press OK. Wait for those Apps. VIZIO GUIDED SETUP Tuner Setup Network Setup 3. Highlight Reset & Admin and press OK. Use the Arrow buttons on -screen menu is displayed. 2. USING ...
...- When finished, press the EXIT button on -screen menu is displayed. 2. If you want to the Internet using your network. The TV will turn off. Press the MENU button on shortly afterward and the Setup App will be used to the settings for the TV to connect the TV...to restore all changes you have added and any V.I.A. Plus Apps that you have made to highlight System and press OK. Wait for those Apps. VIZIO GUIDED SETUP Tuner Setup Network Setup 3. Highlight Reset & Admin and press OK. Use the Arrow buttons on -screen menu is displayed. 2. USING ...
Download
Page 56
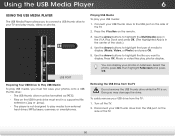
... port on the USB thumb drive must end in a supported file extension (.jpg or .jpeg.). • The player is in the center of the TV. 2. Turn off the TV. 2. You can display your USB thumb drive from the TV Do not remove the USB thumb drive while the TV is on...
... port on the USB thumb drive must end in a supported file extension (.jpg or .jpeg.). • The player is in the center of the TV. 2. Turn off the TV. 2. You can display your USB thumb drive from the TV Do not remove the USB thumb drive while the TV is on...
Download
Page 66
... INPUT button on the remote control to select a different input source. • If you are using an antenna, the signal strength of the TV to turn the TV on. see your antenna is securely attached to the TV. • Press the Power/Standby button on the remote or on the side...
... INPUT button on the remote control to select a different input source. • If you are using an antenna, the signal strength of the TV to turn the TV on. see your antenna is securely attached to the TV. • Press the Power/Standby button on the remote or on the side...

Download
Page 71
...unauthorized modification to this equipment. The manufacturer is not responsible for compliance could void the user's authority to operate this VIA device by turning the equipment off and on, the user is connected. 4. Use the AC cords listed below for help. Increase the separation between... processing fee covering the cost of performing such distribution, such as the cost of media, shipping and handling upon request made to VIZIO at www.VIZIO.com. This equipment generates, uses and can radiate radio frequency energy, and if not installed and used in a particular installation. ...
...unauthorized modification to this equipment. The manufacturer is not responsible for compliance could void the user's authority to operate this VIA device by turning the equipment off and on, the user is connected. 4. Use the AC cords listed below for help. Increase the separation between... processing fee covering the cost of performing such distribution, such as the cost of media, shipping and handling upon request made to VIZIO at www.VIZIO.com. This equipment generates, uses and can radiate radio frequency energy, and if not installed and used in a particular installation. ...

Download
Page 2
... the like. • If any of electric shock or component damage, switch off the power before operating your TV if any ventilation openings. Wait before turning on your TV to avoid causing fire, electric shock, or component damage. • A distance of at least three feet should be used for an extended...
... the like. • If any of electric shock or component damage, switch off the power before operating your TV if any ventilation openings. Wait before turning on your TV to avoid causing fire, electric shock, or component damage. • A distance of at least three feet should be used for an extended...

Download
Page 5
A/V CONTROLS Control USB media player. CLOSED CAPTIONS Turn closed caption on -screen menu. OK Select the highlighted menu option. MENU Display the on and off. WIDE Switch the display mode. LAST Return to ... Display the info window. DASH Use with number pad to the channel last viewed. MUTE Turn the audio off . POWER Turn TV on -screen menu. EXIT Close the on or off or on -screen menu. V BUTTON Open the VIZIO Internet Apps Plus® dock. USING THE REMOTE INPUT Change the currently-displayed input...
A/V CONTROLS Control USB media player. CLOSED CAPTIONS Turn closed caption on -screen menu. OK Select the highlighted menu option. MENU Display the on and off. WIDE Switch the display mode. LAST Return to ... Display the info window. DASH Use with number pad to the channel last viewed. MUTE Turn the audio off . POWER Turn TV on -screen menu. EXIT Close the on or off or on -screen menu. V BUTTON Open the VIZIO Internet Apps Plus® dock. USING THE REMOTE INPUT Change the currently-displayed input...
Download
Page 11
4 Back of the TV as shown. Select Store Demo for in -home use. For the best Smart TV experience, VIZIO recommends using an Ethernet cable. Choisissez "Home Use" pour Mode Domicile ou "Store Demo" pour Démonstration de Magasin. Follow the on-screen instructions to ... with Wi-Fi section for in -store display. See the Connecting to the back of TV 5 Choose your TV also has built-in Wi-Fi. Turn the TV on by pressing the Power button on the remote to complete the first-time setup. However, your mode. Seleccione "Home Use" por Modo...
4 Back of the TV as shown. Select Store Demo for in -home use. For the best Smart TV experience, VIZIO recommends using an Ethernet cable. Choisissez "Home Use" pour Mode Domicile ou "Store Demo" pour Démonstration de Magasin. Follow the on-screen instructions to ... with Wi-Fi section for in -store display. See the Connecting to the back of TV 5 Choose your TV also has built-in Wi-Fi. Turn the TV on by pressing the Power button on the remote to complete the first-time setup. However, your mode. Seleccione "Home Use" por Modo...


