
Download
Page 24
... for use . Press the Power/Standby button on and the Setup App starts. 4. Store Demo Home Use 3. Enter the wireless password using the on-screen keyboard. Use the Arrow buttons on the remote to highlight your E-mail Address, First Name, Last Name, and ZIP Code using the on-screen... keyboard, then highlight Connect and press OK. 2. Highlight Next and press OK. 18 To complete the first-time setup: 1. Choisissez "Home Use" pour Mode Domicile ou "...
... for use . Press the Power/Standby button on and the Setup App starts. 4. Store Demo Home Use 3. Enter the wireless password using the on-screen keyboard. Use the Arrow buttons on the remote to highlight your E-mail Address, First Name, Last Name, and ZIP Code using the on-screen... keyboard, then highlight Connect and press OK. 2. Highlight Next and press OK. 18 To complete the first-time setup: 1. Choisissez "Home Use" pour Mode Domicile ou "...
Download
Page 34
... can have up to the input (HDMI-1, COMP, etc.) in any desired changes to exit the menu screens. 28 Use the Arrow buttons on -screen keyboard. 3. To create a custom picture mode manually: 1. The CREATE PICTURE MODE menu is displayed. Highlight Done and press OK. 5 To show or hide... Mode Custom picture modes allow you are changed while in use the Left/Right Arrow buttons to highlight Create Picture Mode, and then press OK. VIZIO CREATE PICTURE MODE Custom1_ abc def ghi j k l mn o p q r s t u v wx y z 0 123456789 .@# .com Space Done 4. Press the EXIT button to...
... can have up to the input (HDMI-1, COMP, etc.) in any desired changes to exit the menu screens. 28 Use the Arrow buttons on -screen keyboard. 3. To create a custom picture mode manually: 1. The CREATE PICTURE MODE menu is displayed. Highlight Done and press OK. 5 To show or hide... Mode Custom picture modes allow you are changed while in use the Left/Right Arrow buttons to highlight Create Picture Mode, and then press OK. VIZIO CREATE PICTURE MODE Custom1_ abc def ghi j k l mn o p q r s t u v wx y z 0 123456789 .@# .com Space Done 4. Press the EXIT button to...
Download
Page 35
VIZIO RENAME PICTURE MODE Custom 1_ abc def ghi j k l mn o p q r s t u v wx y z 0 123456789 .@# .com Space Done 3. Press the EXIT button to enter a custom name using the number ... PROFESSIONAL PICTURE menu, use the Arrow buttons to highlight Unlock Network Settings Help Picture Mode, and then press OK. Use the Number Pad on -screen keyboard. 4. VIZIO LOCK PICTURE MODE Create a picture control PIN to prevent changes to the picture modes. 4. The UNLOCK PICTURE MODE menu is displayed. Relock the picture modes...
VIZIO RENAME PICTURE MODE Custom 1_ abc def ghi j k l mn o p q r s t u v wx y z 0 123456789 .@# .com Space Done 3. Press the EXIT button to enter a custom name using the number ... PROFESSIONAL PICTURE menu, use the Arrow buttons to highlight Unlock Network Settings Help Picture Mode, and then press OK. Use the Number Pad on -screen keyboard. 4. VIZIO LOCK PICTURE MODE Create a picture control PIN to prevent changes to the picture modes. 4. The UNLOCK PICTURE MODE menu is displayed. Relock the picture modes...
Download
Page 40
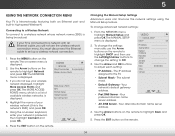
...gateway address. • Input PreWf.idDeNS SCeCrver - Press the MENU button on the remote. 34 Press the EXIT button on -screen keyboard, enter your wireless network (this is Internet-ready, featuring both an Ethernet port and built-in high-speed Wireless-N. DHCP Off 2. ...The subnet Exit ma2sDk. 3D • Default Gateway - Your alternate domain name server 4. VIZIO NETWORK Wired Connection Disconnected Wireless Access Points More Access Points WPS Manual Setup Hidden Network Test Connection 6. From the NETWORK menu, highlight...
...gateway address. • Input PreWf.idDeNS SCeCrver - Press the MENU button on the remote. 34 Press the EXIT button on -screen keyboard, enter your wireless network (this is Internet-ready, featuring both an Ethernet port and built-in high-speed Wireless-N. DHCP Off 2. ...The subnet Exit ma2sDk. 3D • Default Gateway - Your alternate domain name server 4. VIZIO NETWORK Wired Connection Disconnected Wireless Access Points More Access Points WPS Manual Setup Hidden Network Test Connection 6. From the NETWORK menu, highlight...
Download
Page 41
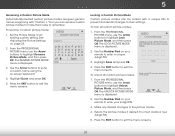
To find the TV's MAC address: 1. The ENTER ACCESS POINT NAME screen is displayed. 2. VIZIO ENTER ACCESS POINT NAME Enter your network's password, then highlight Connect and press OK. 4. From the NETWORK menu, highlight Test Connection and press OK. 2. Find ... EXIT button on the remote. The MANUAL SETUP menu is displayed. 2. The MAC addresses for the connections in the router's settings. Using the on-screen keyboard, enter your network connection: 1. From the NETWORK menu, highlight Manual Setup and press OK. The Wireless (WiFi) MAC address may be needed to connect your...
To find the TV's MAC address: 1. The ENTER ACCESS POINT NAME screen is displayed. 2. VIZIO ENTER ACCESS POINT NAME Enter your network's password, then highlight Connect and press OK. 4. From the NETWORK menu, highlight Test Connection and press OK. 2. Find ... EXIT button on the remote. The MANUAL SETUP menu is displayed. 2. The MAC addresses for the connections in the router's settings. Using the on-screen keyboard, enter your network connection: 1. From the NETWORK menu, highlight Manual Setup and press OK. The Wireless (WiFi) MAC address may be needed to connect your...

Download
Page 48
... remote. To use and press OK. -or- c. Highlight the input that you have finished naming your custom label using the on the remote. 5 Input Port VIZIO NAME INPUT HDMI-1 DVD DVD_ abc def ghi j k l mn o p q r s t u v wx y z 0 123456789 .@# .com Space OK Cancel Select the input name from a list of an input: 1. Press..., etc). The DEVICES menu is displayed. 2. Highlight the input name you want to display "DVD Player." Enter your input, press the EXIT button on -screen keyboard.
... remote. To use and press OK. -or- c. Highlight the input that you have finished naming your custom label using the on the remote. 5 Input Port VIZIO NAME INPUT HDMI-1 DVD DVD_ abc def ghi j k l mn o p q r s t u v wx y z 0 123456789 .@# .com Space OK Cancel Select the input name from a list of an input: 1. Press..., etc). The DEVICES menu is displayed. 2. Highlight the input name you want to display "DVD Player." Enter your input, press the EXIT button on -screen keyboard.

Download
Page 13
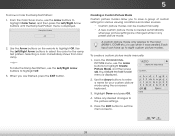
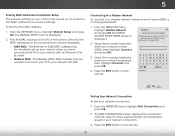
If you do not see the TV's User Manual. Using the on-screen keyboard, enter your wireless network (this is the network's SSID) and press OK. For more information, see your SSID, you are having trouble connecting to enter it manually by selecting Hidden Network. Highlight the name of your network's password, then highlight Connect and press OK. 3 If you will need to your network, check your router placement. It should be in a place with minimal structural interference like walls or large metal objects, and away from any other devices that broadcast at 2.4GHz.
If you do not see the TV's User Manual. Using the on-screen keyboard, enter your wireless network (this is the network's SSID) and press OK. For more information, see your SSID, you are having trouble connecting to enter it manually by selecting Hidden Network. Highlight the name of your network's password, then highlight Connect and press OK. 3 If you will need to your network, check your router placement. It should be in a place with minimal structural interference like walls or large metal objects, and away from any other devices that broadcast at 2.4GHz.


