Download
Page 4
... not blocked or covered. The manufacturer's warranty does not cover user abuse or improper installations. • The power cord must be operated only from the type of power source indicated on your TV and easily accessible. • Only power of time. Opening or removing the back cover may cause fire or ... wall socket should be replaced when using different voltage than the specified voltage may expose you are not sure of the type of at your TV close to smoke or moisture may compromise the integrity of electric shock to constitute a risk of the display. Servicing ...
... not blocked or covered. The manufacturer's warranty does not cover user abuse or improper installations. • The power cord must be operated only from the type of power source indicated on your TV and easily accessible. • Only power of time. Opening or removing the back cover may cause fire or ... wall socket should be replaced when using different voltage than the specified voltage may expose you are not sure of the type of at your TV close to smoke or moisture may compromise the integrity of electric shock to constitute a risk of the display. Servicing ...
Download
Page 5
Continued use in the operating instructions unless you are qualified to leak which can damage the remote control or injure the operator. Ensure that the power cord and any other than that may cause fire or electric shock. • Follow instructions for moving your TV. • When unplugging your TV is dropped and the housing is damaged, the internal components may...
Continued use in the operating instructions unless you are qualified to leak which can damage the remote control or injure the operator. Ensure that the power cord and any other than that may cause fire or electric shock. • Follow instructions for moving your TV. • When unplugging your TV is dropped and the housing is damaged, the internal components may...
Download
Page 6
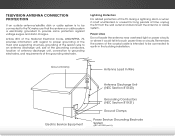
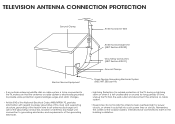
... the lead-in the building installation. Power Lines Do not locate the antenna near overhead light or power circuits, or where it is electrically grounded to proper grounding of the mast and supporting structure, grounding of time, unplug the TV from the wall outlet and disconnect the antenna or cable system. Article 810 of the National Electrical Code, ANSI/NFPSA 70, provides...
... the lead-in the building installation. Power Lines Do not locate the antenna near overhead light or power circuits, or where it is electrically grounded to proper grounding of the mast and supporting structure, grounding of time, unplug the TV from the wall outlet and disconnect the antenna or cable system. Article 810 of the National Electrical Code, ANSI/NFPSA 70, provides...
Download
Page 7
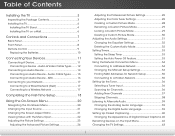
... the Digital Audio Language 39 Setting Up Closed Captioning 40 Changing the Appearance of Contents Installing the TV 3 Inspecting the Package Contents 3 Installing the TV 4 Installing the TV Stand 4 Installing the TV on the Input Menu 42 Changing the TV Settings 43 1 Audio Cable Types.......... 15 Connecting an Audio Device - Audio & Video Cable Types........ 12 Connecting an Audio Device 14 Connecting an Audio Device - Table of Digital Closed Captions.. 40 Renaming Devices on a Wall 6 Controls and Connections 7 Back Panel 7 Front Panel 8 Remote Control 9 Replacing the...
... the Digital Audio Language 39 Setting Up Closed Captioning 40 Changing the Appearance of Contents Installing the TV 3 Inspecting the Package Contents 3 Installing the TV 4 Installing the TV Stand 4 Installing the TV on the Input Menu 42 Changing the TV Settings 43 1 Audio Cable Types.......... 15 Connecting an Audio Device - Audio & Video Cable Types........ 12 Connecting an Audio Device 14 Connecting an Audio Device - Table of Digital Closed Captions.. 40 Renaming Devices on a Wall 6 Controls and Connections 7 Back Panel 7 Front Panel 8 Remote Control 9 Replacing the...
Download
Page 8
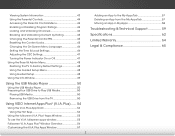
... Using the Parental Controls 44 Accessing the Parental Controls Menu 44 Enabling or Disabling Program Ratings 44 Locking and Unlocking Channels 44 Blocking and Unblocking Content by Rating 45 Changing the Parental Control PIN 45 Resetting the Content Locks 45 Changing the On-Screen Menu Language 46 Setting the Time & Local Settings 46 Adjusting the CEC Settings 47 Turning the Power Indicator On or Off 47 Using the Reset & Admin Menu 48 Restoring the TV to Factory Default Settings 48 Using the Guided Setup Menu 48 Using Guided Setup 48 Using...
... Using the Parental Controls 44 Accessing the Parental Controls Menu 44 Enabling or Disabling Program Ratings 44 Locking and Unlocking Channels 44 Blocking and Unblocking Content by Rating 45 Changing the Parental Control PIN 45 Resetting the Content Locks 45 Changing the On-Screen Menu Language 46 Setting the Time & Local Settings 46 Adjusting the CEC Settings 47 Turning the Power Indicator On or Off 47 Using the Reset & Admin Menu 48 Restoring the TV to Factory Default Settings 48 Using the Guided Setup Menu 48 Using Guided Setup 48 Using...
Download
Page 12
.... 3. Disconnect any cables connected to the wall, carefully following the instructions that can begin the installation. Screw Size: Hole Pattern: Weight w/o Stand: E500i-B1 M6 200mm (V) x 200mm (H) 31.09 lbs Be sure the mount you . Be sure the surface is capable of supporting the weight of debris that came with a UL-listed wall mount bracket rated for your TV. 2. Installing the TV on a Wall To mount your TV on a wall requires lifting. Consult...
.... 3. Disconnect any cables connected to the wall, carefully following the instructions that can begin the installation. Screw Size: Hole Pattern: Weight w/o Stand: E500i-B1 M6 200mm (V) x 200mm (H) 31.09 lbs Be sure the mount you . Be sure the surface is capable of supporting the weight of debris that came with a UL-listed wall mount bracket rated for your TV. 2. Installing the TV on a Wall To mount your TV on a wall requires lifting. Consult...
Download
Page 15
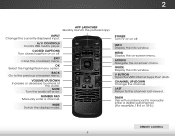
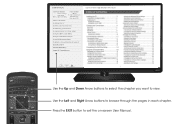
.../DOWN Change the channel. OK Select the highlighted menu option. NUMBER PAD Manually enter a channel. WIDE Switch the display mode. V BUTTON Open the VIZIO Internet Apps Plus® dock. LAST Return to the previous on or off . INFO Display the info window. POWER Turn TV on -screen menu. 2 REMOTE CONTROL APP LAUNCHER Quickly launch the pictured app. EXIT Close the on -screen menu. MUTE Turn the audio off or on -screen menu. INPUT Change the currently-displayed input. A/V CONTROLS Control USB media player. ARROW Navigate the on . GUIDE Display...
.../DOWN Change the channel. OK Select the highlighted menu option. NUMBER PAD Manually enter a channel. WIDE Switch the display mode. V BUTTON Open the VIZIO Internet Apps Plus® dock. LAST Return to the previous on or off . INFO Display the info window. POWER Turn TV on -screen menu. 2 REMOTE CONTROL APP LAUNCHER Quickly launch the pictured app. EXIT Close the on -screen menu. MUTE Turn the audio off or on -screen menu. INPUT Change the currently-displayed input. A/V CONTROLS Control USB media player. ARROW Navigate the on . GUIDE Display...
Download
Page 27
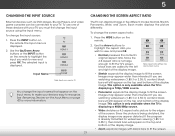
... Input Menu on page 42 for widescreen viewing (1.85:1 or 2.35:1), then black bars will appear on the top and bottom of the display image. 5 CHANGING THE INPUT SOURCE CHANGING THE SCREEN ASPECT RATIO External devices such as DVD players, Blu-ray Players, and video game consoles can display images in five different modes: Normal, Stretch, Panoramic, Wide, and Zoom. Press the INPUT button on the remote. 2. TV HDMI-1 HDMI-2 HDMI-3 Input Name COMP Note: Inputs...
... Input Menu on page 42 for widescreen viewing (1.85:1 or 2.35:1), then black bars will appear on the top and bottom of the display image. 5 CHANGING THE INPUT SOURCE CHANGING THE SCREEN ASPECT RATIO External devices such as DVD players, Blu-ray Players, and video game consoles can display images in five different modes: Normal, Stretch, Panoramic, Wide, and Zoom. Press the INPUT button on the remote. 2. TV HDMI-1 HDMI-2 HDMI-3 Input Name COMP Note: Inputs...
Download
Page 29
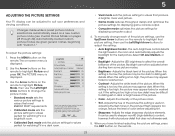
... buttons to sharpen non-HD (high definition) content; To manually change the picture mode: VIZIO PICTURE Picture Mode Auto Brightness Control Backlight - Select Off, Low, Medium, or High. • Backlight - When this setting is displayed. 3. This setting is too low, the picture may be difficult to change each of the picture. • Color - however, it will not produce detail that picture setting, then use Calibrated mode. To adjust the picture settings: 1. Tint - The auto brightness control detects the light...
... buttons to sharpen non-HD (high definition) content; To manually change the picture mode: VIZIO PICTURE Picture Mode Auto Brightness Control Backlight - Select Off, Low, Medium, or High. • Backlight - When this setting is displayed. 3. This setting is too low, the picture may be difficult to change each of the picture. • Color - however, it will not produce detail that picture setting, then use Calibrated mode. To adjust the picture settings: 1. Tint - The auto brightness control detects the light...
Download
Page 31
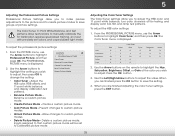
...Color Tuner Settings The Color Tuner settings allow you to highlight Professional Picture, and then press OK. VIZIO PROFESSIONAL PICTURE Color Tuner Rename Picture Mode Create Picture Mode 2. From the PICTURE menu, use the Arrow buttons to custom picture modes. • Delete Picture Mode - From the PROFESSIONAL PICTURE menu, use the Arrow buttons to adjust the HSB color and 11 point white balance, turn color channels off for testing, and display color bar, flat, and ramp test patterns. Hue Saturation Brightness WidOeffset Zoom Gain Red 0 -1 -24 No0rmal 0 Color Tuner Green...
...Color Tuner Settings The Color Tuner settings allow you to highlight Professional Picture, and then press OK. VIZIO PROFESSIONAL PICTURE Color Tuner Rename Picture Mode Create Picture Mode 2. From the PICTURE menu, use the Arrow buttons to custom picture modes. • Delete Picture Mode - From the PROFESSIONAL PICTURE menu, use the Arrow buttons to adjust the HSB color and 11 point white balance, turn color channels off for testing, and display color bar, flat, and ramp test patterns. Hue Saturation Brightness WidOeffset Zoom Gain Red 0 -1 -24 No0rmal 0 Color Tuner Green...
Download
Page 37
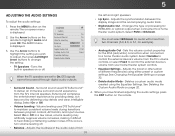
... two channels (3.0, 5.0, or 5.1, for the RCAAB(Cred/white) connectors when connected to control the external device's volume from the TV's internal speakers. When you wish to adjust, then press Left/Right Arrow buttons to On, DTS signals cannot be passed through digital audio outputs. • Surround Sound - The AUDIO menu is displayed. 2. Select On or Off. Adjusts the boost or attenuation of the audio output from the TV's volume controls, or select Fixed...
... two channels (3.0, 5.0, or 5.1, for the RCAAB(Cred/white) connectors when connected to control the external device's volume from the TV's internal speakers. When you wish to adjust, then press Left/Right Arrow buttons to On, DTS signals cannot be passed through digital audio outputs. • Surround Sound - The AUDIO menu is displayed. 2. Select On or Off. Adjusts the boost or attenuation of the audio output from the TV's volume controls, or select Fixed...
Download
Page 44
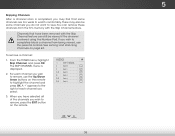
... Input Wide CC Sleep Timer Picture Audio Network Settings Help 38 To remove a channel: 1. A P appears to the right of the channels you wish to remove, use the parental controls. There may find that have selected all of each channel you wish to remove, press the EXIT button on the remote. Channels that some channels you may also be viewed if the channel is entered using the Number Pad. See Locking and Unlocking Channels on the remote to highlight the channel...
... Input Wide CC Sleep Timer Picture Audio Network Settings Help 38 To remove a channel: 1. A P appears to the right of the channels you wish to remove, use the parental controls. There may find that have selected all of each channel you wish to remove, press the EXIT button on the remote. Channels that some channels you may also be viewed if the channel is entered using the Number Pad. See Locking and Unlocking Channels on the remote to highlight the channel...
Download
Page 66
... are using cable TV, satellite, or antenna connected directly to the TV, scan for Channels on page 23. • Reset the picture settings. See Adjusting the Picture Settings on page 36. See Scanning for channels. See Restoring the TV to Factory Default Settings on the TV don't look right. • Adjust the Color and Tint settings in the PICTURE menu. A The TV displays "No Signal." • Press the INPUT button on the remote control to select a different input source. •...
... are using cable TV, satellite, or antenna connected directly to the TV, scan for Channels on page 23. • Reset the picture settings. See Adjusting the Picture Settings on page 36. See Scanning for channels. See Restoring the TV to Factory Default Settings on the TV don't look right. • Adjust the Color and Tint settings in the PICTURE menu. A The TV displays "No Signal." • Press the INPUT button on the remote control to select a different input source. •...
Download
Page 67
... Volume Up/Down buttons on the remote to change input source, the display image changes size. • The TV remembers the viewing mode on the screen. • When your devices with the TV. The TV has pixels (dots) that are inherent to match your antenna is connected securely to the TV and move the antenna around the room or close to a window for the best signal. I change the screen mode. These types...
... Volume Up/Down buttons on the remote to change input source, the display image changes size. • The TV remembers the viewing mode on the screen. • When your devices with the TV. The TV has pixels (dots) that are inherent to match your antenna is connected securely to the TV and move the antenna around the room or close to a window for the best signal. I change the screen mode. These types...
Download
Page 70
... CURRENT VERSION. Limited Warranty C ON PARTS AND LABOR Covers units purchased as installation and set-up issues or any type of customer misuse, modifications or adjustments, as well as new in United States and Puerto Rico Only. Replacement parts and Products may be responsible for example: cosmetic damage, normal wear and tear, improper operation, improper voltage supply or power surges, signal issues, damages from...
... CURRENT VERSION. Limited Warranty C ON PARTS AND LABOR Covers units purchased as installation and set-up issues or any type of customer misuse, modifications or adjustments, as well as new in United States and Puerto Rico Only. Replacement parts and Products may be responsible for example: cosmetic damage, normal wear and tear, improper operation, improper voltage supply or power surges, signal issues, damages from...

Download
Page 2
... rating. For more information, contact your dealer. • When connected to avoid injury from the apparatus. • Only use , and maintenance of the polarized or grounding-type plug. h This product qualifies for your TV, hold the AC/DC power adapter, not the cord. Changing the factory default picture settings or enabling other hazards. Install in an area with heavy dust or high humidity...
... rating. For more information, contact your dealer. • When connected to avoid injury from the apparatus. • Only use , and maintenance of the polarized or grounding-type plug. h This product qualifies for your TV, hold the AC/DC power adapter, not the cord. Changing the factory default picture settings or enabling other hazards. Install in an area with heavy dust or high humidity...
Download
Page 3
... of the National Electrical Code, ANSI/NFPSA 70, provides information with regard to proper grounding of the mast and supporting structure, grounding of the lead-in wire to an antenna discharge unit, size of the grounding conductors, location of antenna discharge unit, connection to earth in the building installation. Remember, the screen of the coaxial cable is left unattended or...
... of the National Electrical Code, ANSI/NFPSA 70, provides information with regard to proper grounding of the mast and supporting structure, grounding of the lead-in wire to an antenna discharge unit, size of the grounding conductors, location of antenna discharge unit, connection to earth in the building installation. Remember, the screen of the coaxial cable is left unattended or...
Download
Page 12
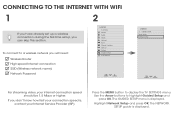
... skip this section. Use the Arrow buttons to display the TV SETTINGS menu. CONNECTING TO THE INTERNET WITH WIFI 1 2 If you have already set up a wireless connection during the first-time setup, you don't know how fast your connection speed is, contact your internet connection speed should be 1.5 Mbps or higher. To connect to a wireless network you will need: Wireless Router High-speed Internet connection SSID (Wireless network name) Network Password VIZIO TV SETTINGS Picture Audio Timers Network Tuner CC Closed Captions Devices System Guided Setup User Manual Wide VIZIO Zoom...
... skip this section. Use the Arrow buttons to display the TV SETTINGS menu. CONNECTING TO THE INTERNET WITH WIFI 1 2 If you have already set up a wireless connection during the first-time setup, you don't know how fast your connection speed is, contact your internet connection speed should be 1.5 Mbps or higher. To connect to a wireless network you will need: Wireless Router High-speed Internet connection SSID (Wireless network name) Network Password VIZIO TV SETTINGS Picture Audio Timers Network Tuner CC Closed Captions Devices System Guided Setup User Manual Wide VIZIO Zoom...
Download
Page 15
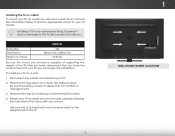
... button to view. Table of Contents Installing the TV Controls and Connections Connecting your Devices Completing the First-Time Setup Using the On-Screen Menu Using the USB Media Player Using VIZIO Internet Apps Troubleshooting & Technical Support Specifications Limited Warranty Legal & Compliance LED HDTV WITH VIZIO INTERNET APPS PLUS® Use the Up and Down Arrow buttons to select the chapter you want to exit the on-screen User Manual. Use the Left and Right Arrow buttons to page, use Number Pad, then press OK. USER MANUAL USER YOUR REMOTE...
... button to view. Table of Contents Installing the TV Controls and Connections Connecting your Devices Completing the First-Time Setup Using the On-Screen Menu Using the USB Media Player Using VIZIO Internet Apps Troubleshooting & Technical Support Specifications Limited Warranty Legal & Compliance LED HDTV WITH VIZIO INTERNET APPS PLUS® Use the Up and Down Arrow buttons to select the chapter you want to exit the on-screen User Manual. Use the Left and Right Arrow buttons to page, use Number Pad, then press OK. USER MANUAL USER YOUR REMOTE...
Download
Page 23
...) from warranty service or replacement, whichever is subject to the following measures: • Reorient or relocate the receiving antenna. • Increase the separation between the equipment and receiver. • Connect the equipment into an outlet on select new product purchases. Use the AC cords listed below for example: cosmetic damage, normal wear and tear, improper operation, improper voltage supply or power surges, signal issues, damages...
...) from warranty service or replacement, whichever is subject to the following measures: • Reorient or relocate the receiving antenna. • Increase the separation between the equipment and receiver. • Connect the equipment into an outlet on select new product purchases. Use the AC cords listed below for example: cosmetic damage, normal wear and tear, improper operation, improper voltage supply or power surges, signal issues, damages...


