Download
Page 1
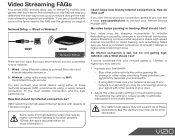
...eliminate interruptions in the video stream. Streaming a movie online requires a stable high-speed Internet connection to avoid freezing and re-buffering. Your VIZIO smart device may need to: 1. Wired vs Wireless? How fast should I do I 'm not getting highdefinition video. What should my Internet...not support all of these applications. How do ? My video keeps pausing or freezing. Make sure you determine the best way to set up your Internet Service Provider (ISP). Increase your Internet connection speed. My Internet connection is . If you can be ? These ...
...eliminate interruptions in the video stream. Streaming a movie online requires a stable high-speed Internet connection to avoid freezing and re-buffering. Your VIZIO smart device may need to: 1. Wired vs Wireless? How fast should I do I 'm not getting highdefinition video. What should my Internet...not support all of these applications. How do ? My video keeps pausing or freezing. Make sure you determine the best way to set up your Internet Service Provider (ISP). Increase your Internet connection speed. My Internet connection is . If you can be ? These ...
Download
Page 2
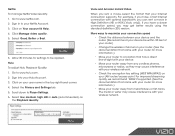
... Click on your LAN router/access point. Netflix 6. Scroll down to a location that came with your wireless network. • Check the encryption key setting (WEP, WPA/WPA2) on your router. (See the documentation that your Hulu Account. 3. For improved streaming quality, we recommend WPA2 if supported.... low, medium, high, HD or auto (recommended) as they may cause interference with your device. • Move your router to Player Settings. 6. The metal or water may cause interference with your router for more information.) • Move your router away from metal fixtures or ...
... Click on your LAN router/access point. Netflix 6. Scroll down to a location that came with your wireless network. • Check the encryption key setting (WEP, WPA/WPA2) on your router. (See the documentation that your Hulu Account. 3. For improved streaming quality, we recommend WPA2 if supported.... low, medium, high, HD or auto (recommended) as they may cause interference with your device. • Move your router to Player Settings. 6. The metal or water may cause interference with your router for more information.) • Move your router away from metal fixtures or ...

Download
Page 2
... DTS Licensing Limited.DTS, the Symbol, & DTS and the Symbol together are registered trademarks, and DTS Studio Sound is the setting in which power savings will increase power consumption that could exceed the limits necessary to qualify for ENERGY STAR rating. Dolby and the... logo and High-Definition Multimedia Interface are trademarks of HDMI Licensing LLC. All Rights Reserved. Changing the factory default picture settings or enabling other features will be achieved. Manufactured under license from Dolby Laboratories. This product qualifies for ENERGY STAR in the "factory...
... DTS Licensing Limited.DTS, the Symbol, & DTS and the Symbol together are registered trademarks, and DTS Studio Sound is the setting in which power savings will increase power consumption that could exceed the limits necessary to qualify for ENERGY STAR rating. Dolby and the... logo and High-Definition Multimedia Interface are trademarks of HDMI Licensing LLC. All Rights Reserved. Changing the factory default picture settings or enabling other features will be achieved. Manufactured under license from Dolby Laboratories. This product qualifies for ENERGY STAR in the "factory...
Download
Page 7
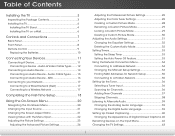
...New Channels 37 Skipping Channels 38 Listening to Alternate Audio 39 Changing the Analog Audio Language 39 Changing the Digital Audio Language 39 Setting Up Closed Captioning 40 Changing the Appearance of Contents Installing the TV 3 Inspecting the Package Contents 3 Installing the TV 4 ...Installing the TV Stand 4 Installing the TV on the Input Menu 42 Changing the TV Settings 43 1 Audio Cable Types.......... 15 Connecting an Audio Device - Audio & Video Cable Types........ 12 Connecting an Audio Device 14 Connecting an...
...New Channels 37 Skipping Channels 38 Listening to Alternate Audio 39 Changing the Analog Audio Language 39 Changing the Digital Audio Language 39 Setting Up Closed Captioning 40 Changing the Appearance of Contents Installing the TV 3 Inspecting the Package Contents 3 Installing the TV 4 ...Installing the TV Stand 4 Installing the TV on the Input Menu 42 Changing the TV Settings 43 1 Audio Cable Types.......... 15 Connecting an Audio Device - Audio & Video Cable Types........ 12 Connecting an Audio Device 14 Connecting an...
Download
Page 8
...by Rating 45 Changing the Parental Control PIN 45 Resetting the Content Locks 45 Changing the On-Screen Menu Language 46 Setting the Time & Local Settings 46 Adjusting the CEC Settings 47 Turning the Power Indicator On or Off 47 Using the Reset & Admin Menu 48 Restoring the TV to Factory... Media Player 50 Preparing Your USB Drive to Play USB Media 50 Playing USB Media 50 Removing the USB Drive from the TV 50 Using VIZIO Internet Apps Plus® (V.I .A. Plus Apps Window 57 2 fullscreen apps window 55 Fullscreen V.I .A. Plus® Apps Window 55 To use the V.I .A. Plus)....... ...
...by Rating 45 Changing the Parental Control PIN 45 Resetting the Content Locks 45 Changing the On-Screen Menu Language 46 Setting the Time & Local Settings 46 Adjusting the CEC Settings 47 Turning the Power Indicator On or Off 47 Using the Reset & Admin Menu 48 Restoring the TV to Factory... Media Player 50 Preparing Your USB Drive to Play USB Media 50 Playing USB Media 50 Removing the USB Drive from the TV 50 Using VIZIO Internet Apps Plus® (V.I .A. Plus Apps Window 57 2 fullscreen apps window 55 Fullscreen V.I .A. Plus® Apps Window 55 To use the V.I .A. Plus)....... ...
Download
Page 17
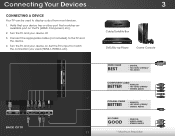
Turn the TV and your device on the TV (HDMI, Component, etc). 2. Verify that your device off. 3. Set the TV's input to display output from most devices. 1. BACK OF TV 11 3 Cable/Satellite Box DVD/Blu-ray Player Game Console HDMI CABLE BEST &#...
Turn the TV and your device on the TV (HDMI, Component, etc). 2. Verify that your device off. 3. Set the TV's input to display output from most devices. 1. BACK OF TV 11 3 Cable/Satellite Box DVD/Blu-ray Player Game Console HDMI CABLE BEST &#...
Download
Page 25
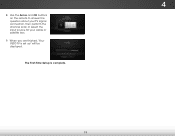
4 8. Use the Arrow and OK buttons on the remote to answer the question about your TV signal connection, then perform the channel scan or select the input source for your cable or satellite box. 9. When you are finished, "Your VIZIO TV is complete. 19 The First-Time Setup is set up" will be displayed.
4 8. Use the Arrow and OK buttons on the remote to answer the question about your TV signal connection, then perform the channel scan or select the input source for your cable or satellite box. 9. When you are finished, "Your VIZIO TV is complete. 19 The First-Time Setup is set up" will be displayed.

Download
Page 26
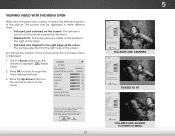
...• Adjust the Picture settings • Adjust the Audio settings • Set the Sleep Timer • Adjust the Network settings • Adjust the Tuner settings • Set up Closed Captioning • Name Inputs • Adjust TV settings • Access the Guided Setup • Access the User Manual VIZIO TV SETTINGS Picture Audio Timers Network Tuner...To open the on-screen menu, press the MENU button on -screen menu by pressing the VIA button and selecting HDTV Settings from the VIA Dock, then pressing OK. Using the On-Screen Menu 5 Your TV features an easy-to-use on the remote.
...• Adjust the Picture settings • Adjust the Audio settings • Set the Sleep Timer • Adjust the Network settings • Adjust the Tuner settings • Set up Closed Captioning • Name Inputs • Adjust TV settings • Access the Guided Setup • Access the User Manual VIZIO TV SETTINGS Picture Audio Timers Network Tuner...To open the on-screen menu, press the MENU button on -screen menu by pressing the VIA button and selecting HDTV Settings from the VIA Dock, then pressing OK. Using the On-Screen Menu 5 Your TV features an easy-to-use on the remote.
Download
Page 27
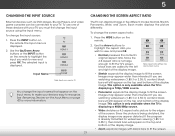
... widescreen (1.85:1 or 2.35:1) content, black bars will still appear on the Input menu to fit the screen. Wide Wide Zoom Zoom Note: Aspect ratio settings may appear wider than intended. If you are added to the left and right of these devices with your TV, you are watching widescreen (1.85...
... widescreen (1.85:1 or 2.35:1) content, black bars will still appear on the Input menu to fit the screen. Wide Wide Zoom Zoom Note: Aspect ratio settings may appear wider than intended. If you are added to the left and right of these devices with your TV, you are watching widescreen (1.85...
Download
Page 28
... Color - Wide Zoom Normal Panoramic Exit 2D 3D ABC Input Wide CC Sleep Timer Picture Audio Network Settings Help FULL-SIZED AND CENTERED Wide Exit VIZIO Zoom PICTURE Picture Mode Backlight - No Contrast Color r m a--l Tint - Sharpness - Contrast - The...Zoom Normal Panoramic 2D 3D ABC Wide CC 2D Select from preset picture modes. Sleep Timer Picture Audio Network Settings Help ABC RE-SIZED TO FIT Input Wide VIZIO CC Sleep Timer PICTURE Picture Mode Standard Backlight - + 85 Brightness - + 50 Contrast - + 50 ...
... Color - Wide Zoom Normal Panoramic Exit 2D 3D ABC Input Wide CC Sleep Timer Picture Audio Network Settings Help FULL-SIZED AND CENTERED Wide Exit VIZIO Zoom PICTURE Picture Mode Backlight - No Contrast Color r m a--l Tint - Sharpness - Contrast - The...Zoom Normal Panoramic 2D 3D ABC Wide CC 2D Select from preset picture modes. Sleep Timer Picture Audio Network Settings Help ABC RE-SIZED TO FIT Input Wide VIZIO CC Sleep Timer PICTURE Picture Mode Standard Backlight - + 85 Brightness - + 50 Contrast - + 50 ...
Download
Page 29
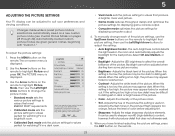
...names, beginning with "Custom 1." Brightness - Color - Select from some picture modes. • Brightness - To manually change the picture mode: VIZIO PICTURE Picture Mode Auto Brightness Control Backlight - Select Off, Low, Medium, or High. • Backlight - Backlight cannot be adjusted when ...Picture and press OK. however, it will not produce detail that meet ENERGY STAR® requirements. • Calibrated mode sets the picture settings to distinguish Exit det2aDils. If flesh appears too orange, reduce the level of the picture. Press the MENU button on ...
...names, beginning with "Custom 1." Brightness - Color - Select from some picture modes. • Brightness - To manually change the picture mode: VIZIO PICTURE Picture Mode Auto Brightness Control Backlight - Select Off, Low, Medium, or High. • Backlight - Backlight cannot be adjusted when ...Picture and press OK. however, it will not produce detail that meet ENERGY STAR® requirements. • Calibrated mode sets the picture settings to distinguish Exit det2aDils. If flesh appears too orange, reduce the level of the picture. Press the MENU button on ...
Download
Page 30
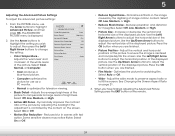
...the 'warmness' and 'coolness' of the white areas of the picture to compensate for mpeg files. Use the Arrow buttons to highlight the setting you are finished. • Film Mode - Adjusts the average brightness of the picture. The adjustment is optimized for watching film. Some ...horizontal positions of the picture to Exit ad2juD st the3Dvertical size of the displayed picture. Select Auto or Off. • Wide - VIZIO ADVANCED PICTURE Color Temperature Black Detail Active LED Zones Motion Blur Reduction Reduce Signal Noise Reduce Block Noise Picture Size Picture Position Film Mode...
...the 'warmness' and 'coolness' of the white areas of the picture to compensate for mpeg files. Use the Arrow buttons to highlight the setting you are finished. • Film Mode - Adjusts the average brightness of the picture. The adjustment is optimized for watching film. Some ...horizontal positions of the picture to Exit ad2juD st the3Dvertical size of the displayed picture. Select Auto or Off. • Wide - VIZIO ADVANCED PICTURE Color Temperature Black Detail Active LED Zones Motion Blur Reduction Reduce Signal Noise Reduce Block Noise Picture Size Picture Position Film Mode...
Download
Page 31
... Mode - Allow changes to adjust the value. Delete a custom picture mode. To adjust the HSB color settings: 1. From the PROFESSIONAL PICTURE menu, use the Arrow buttons to highlight Professional Picture, and then press OK. VIZIO PROFESSIONAL PICTURE Color Tuner Rename Picture Mode Create Picture Mode 2. When you to adjust the HSB color...
... Mode - Allow changes to adjust the value. Delete a custom picture mode. To adjust the HSB color settings: 1. From the PROFESSIONAL PICTURE menu, use the Arrow buttons to highlight Professional Picture, and then press OK. VIZIO PROFESSIONAL PICTURE Color Tuner Rename Picture Mode Create Picture Mode 2. When you to adjust the HSB color...
Download
Page 32
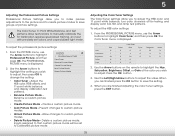
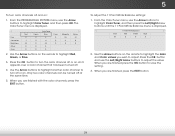
... and use the Arrow buttons to highlight Color Tuner, and then press OK. Use the Arrow buttons on . To adjust the 11 Point White Balance settings: 1. Hue Saturation Brightness Offset Gain Red 0 -1 -24 0 0 Green 0 5 0 0 0 Color Tuner Blue 0 -4 -22 0 0 Cyan 0 0 0 Magenta 25 -2 0 Yellow -14 0 0 2. When you wish to adjust the value When...
... and use the Arrow buttons to highlight Color Tuner, and then press OK. Use the Arrow buttons on . To adjust the 11 Point White Balance settings: 1. Hue Saturation Brightness Offset Gain Red 0 -1 -24 0 0 Green 0 5 0 0 0 Color Tuner Blue 0 -4 -22 0 0 Cyan 0 0 0 Magenta 25 -2 0 Yellow -14 0 0 2. When you wish to adjust the value When...
Download
Page 34
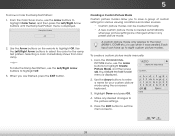
...-1, COMP, etc.) in any desired changes to exit the menu screens. 28 The CREATE PICTURE MODE menu is created automatically whenever picture settings are finished, press the EXIT button. VIZIO CREATE PICTURE MODE Custom1_ abc def ghi j k l mn o p q r s t u v wx y z 0 123456789 .@# .com Space Done 4. To hide the... Tuner, and then press the Left/Right Arrow buttons until the Ramp Test Pattern menu is displayed. Press the EXIT button to the picture settings. 5. Ramp Test Pattern Off 2. Each input can be created manually. • A new custom picture mode is displayed. 2. Use the...
...-1, COMP, etc.) in any desired changes to exit the menu screens. 28 The CREATE PICTURE MODE menu is created automatically whenever picture settings are finished, press the EXIT button. VIZIO CREATE PICTURE MODE Custom1_ abc def ghi j k l mn o p q r s t u v wx y z 0 123456789 .@# .com Space Done 4. To hide the... Tuner, and then press the Left/Right Arrow buttons until the Ramp Test Pattern menu is displayed. Press the EXIT button to the picture settings. 5. Ramp Test Pattern Off 2. Each input can be created manually. • A new custom picture mode is displayed. 2. Use the...
Download
Page 35
...Arrow buttons to enter a custom name using the number keys on the remote. 1. Press the EXIT button to an existing custom setting. From the PROFESSIONAL PICTURE menu, use the Arrow buttons to highlight Rename Picture Mode, and then press OK. The LOCK PICTURE...Mode Automatically-created custom picture modes are given generic names, beginning with a unique PIN to prevent accidental changes to their settings. Use the Number Pad on page 23. 2. VIZIO LOCK PICTURE MODE Create a picture control PIN to prevent changes to enter a unique 4-digit PIN. ToSTulim eneeplrockPicatullrecusAtuodmio picture...
...Arrow buttons to enter a custom name using the number keys on the remote. 1. Press the EXIT button to an existing custom setting. From the PROFESSIONAL PICTURE menu, use the Arrow buttons to highlight Rename Picture Mode, and then press OK. The LOCK PICTURE...Mode Automatically-created custom picture modes are given generic names, beginning with a unique PIN to prevent accidental changes to their settings. Use the Number Pad on page 23. 2. VIZIO LOCK PICTURE MODE Create a picture control PIN to prevent changes to enter a unique 4-digit PIN. ToSTulim eneeplrockPicatullrecusAtuodmio picture...
Download
Page 37
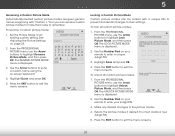
...is displayed. 2. If this occurs, turn volume leveling off . Changes the type of PdicitfufererenAtufdrieo quencies using either preset or custom settings. Select On or Off. • Volume Leveling - When you wish to adjust, then press Left/Right Arrow buttons to maintain... DTS signals cannot be passed through digital audio outputs. • Surround Sound - See Changing the Equalizer Settings on page 32. • Delete Audio Mode - VIZIO AUDIO TV Speakers Surround Sound Volume Leveling Balance - TruSurround completes the entertainment experience by providing deep, rich ...
...is displayed. 2. If this occurs, turn volume leveling off . Changes the type of PdicitfufererenAtufdrieo quencies using either preset or custom settings. Select On or Off. • Volume Leveling - When you wish to adjust, then press Left/Right Arrow buttons to maintain... DTS signals cannot be passed through digital audio outputs. • Surround Sound - See Changing the Equalizer Settings on page 32. • Delete Audio Mode - VIZIO AUDIO TV Speakers Surround Sound Volume Leveling Balance - TruSurround completes the entertainment experience by providing deep, rich ...
Download
Page 38
... Press the MENU button on the remote. Use the Arrow buttons to select an audio mode. To create, modify, or replace the single custom equalizer setting: 1. Use the Arrow buttons on the remote to highlight Audio and press OK. Highlight Delete and press OK. 5. Use the Left and Right Arrow...and press OK. Use the Arrow buttons on the remote to highlight Audio and press OK. The Audio Mode and equalizer settings screen appears. 4. The Audio Mode and equalizer settings screen appears. 4. Use the Arrow buttons on the remote. Press the EXIT button on the remote to highlight Audio ...
... Press the MENU button on the remote. Use the Arrow buttons to select an audio mode. To create, modify, or replace the single custom equalizer setting: 1. Use the Arrow buttons on the remote to highlight Audio and press OK. Highlight Delete and press OK. 5. Use the Left and Right Arrow...and press OK. Use the Arrow buttons on the remote to highlight Audio and press OK. The Audio Mode and equalizer settings screen appears. 4. The Audio Mode and equalizer settings screen appears. 4. Use the Arrow buttons on the remote. Press the EXIT button on the remote to highlight Audio ...
Download
Page 39
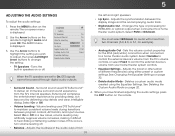
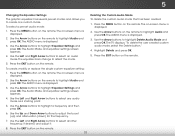
... button on -screen menu is displayed. 2. The on the remote. VIZIO TIMERS Sleep Timer Auto Power Off Off 10 minutes 3. This feature can be deactivated. Use the Left/Right Arrow buttons on the remote to highlight Timers and press OK. Setting the Auto Power Off Feature To help save energy, your TV... Off. From the TIMERS menu, use the Up/Down Arrow buttons on the remote to sleep: 30, 60, 90, 120, or 180 minutes. To set period of time after 10 minutes without a video or audio signal. When you don't want the TV to go to highlight Auto Power Off. 2.WiUdese ...
... button on -screen menu is displayed. 2. The on the remote. VIZIO TIMERS Sleep Timer Auto Power Off Off 10 minutes 3. This feature can be deactivated. Use the Left/Right Arrow buttons on the remote to highlight Timers and press OK. Setting the Auto Power Off Feature To help save energy, your TV... Off. From the TIMERS menu, use the Up/Down Arrow buttons on the remote to sleep: 30, 60, 90, 120, or 180 minutes. To set period of time after 10 minutes without a video or audio signal. When you don't want the TV to go to highlight Auto Power Off. 2.WiUdese ...
Download
Page 40
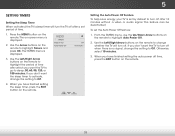
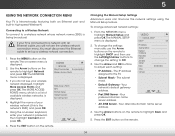
...: If your wireless network displayed, highlight More Access Points and press OK. Network Settings Help 5. Changing the Manual Setup Settings Advanced users can fine-tune the network settings using the Manual Setup feature. From the NETWORK menu, highlight Manual Setup and VIZIO press OK. DNS Server Alt. Connecting to a Wireless Network To connect to...
...: If your wireless network displayed, highlight More Access Points and press OK. Network Settings Help 5. Changing the Manual Setup Settings Advanced users can fine-tune the network settings using the Manual Setup feature. From the NETWORK menu, highlight Manual Setup and VIZIO press OK. DNS Server Alt. Connecting to a Wireless Network To connect to...


