Download
Page 4
... connected to a power outlet, power is always flowing into the apparatus, the apparatus has been exposed to rain or moisture, does not operate normally or has been dropped. • Unplug the power cord before turning on your TV to avoid causing fire, electric shock, or component ...repair is required, contact your dealer and refer all servicing to your home, consult your dealer or local power company. • Do not apply pressure or throw objects at your TV cabinet. The manufacturer's warranty does not cover user abuse or improper installations. • The power cord must be used...
... connected to a power outlet, power is always flowing into the apparatus, the apparatus has been exposed to rain or moisture, does not operate normally or has been dropped. • Unplug the power cord before turning on your TV to avoid causing fire, electric shock, or component ...repair is required, contact your dealer and refer all servicing to your home, consult your dealer or local power company. • Do not apply pressure or throw objects at your TV cabinet. The manufacturer's warranty does not cover user abuse or improper installations. • The power cord must be used...

Download
Page 5
... the power cord and contact your TV. - The power cord fails or frays. - h• The lightning flash with heavy dust or high humidity may cause fire or electric shock. • Do not install your TV if any of your TV changes substantially....use by qualified service personnel only. Your TV is dropped or damaged in accordance with wet hands. • Insert batteries in any object drops into your dealer immediately. your TV, unplug the power cord and contact your dealer for repair. Do not try to leak which can damage the remote control or injure the operator...
... the power cord and contact your TV. - The power cord fails or frays. - h• The lightning flash with heavy dust or high humidity may cause fire or electric shock. • Do not install your TV if any of your TV changes substantially....use by qualified service personnel only. Your TV is dropped or damaged in accordance with wet hands. • Insert batteries in any object drops into your dealer immediately. your TV, unplug the power cord and contact your dealer for repair. Do not try to leak which can damage the remote control or injure the operator...
Download
Page 6
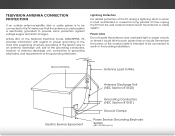
... (NEC Section 810-21) Ground Clamps Power Service Grounding Electrode System (NEC ART 250, part H) TELEVISION ANTENNA CONNECTION PROTECTION If an outside antenna/satellite dish or cable system is electrically grounded to proper grounding of the mast and supporting structure, grounding of the lead-in the building installation. Article 810 of the National Electrical Code, ANSI/NFPSA 70, provides information...
... (NEC Section 810-21) Ground Clamps Power Service Grounding Electrode System (NEC ART 250, part H) TELEVISION ANTENNA CONNECTION PROTECTION If an outside antenna/satellite dish or cable system is electrically grounded to proper grounding of the mast and supporting structure, grounding of the lead-in the building installation. Article 810 of the National Electrical Code, ANSI/NFPSA 70, provides information...
Download
Page 7
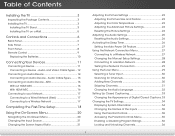
Table of the Inputs 35 Using the Parental Controls 35 Accessing the Parental Controls Menu 35 Enabling or Disabling Program Ratings 36 Locking and Unlocking Channels 36 1 ARC 16 Without HDMI ARC 16 With HDMI ARC 16 Connecting to your Network 17 Connecting to a Wired Network (Best 17 Connecting to a Wireless Network 17 Completing the First-Time Setup 18 Using the On-Screen Menu 20 Navigating the On-Screen Menu 20 Changing the Input Source 21 Changing the Screen Aspect Ratio 21 Adjusting the Picture Settings 22 Adjusting the Picture Size and Position 23 Adjusting the ...
Table of the Inputs 35 Using the Parental Controls 35 Accessing the Parental Controls Menu 35 Enabling or Disabling Program Ratings 36 Locking and Unlocking Channels 36 1 ARC 16 Without HDMI ARC 16 With HDMI ARC 16 Connecting to your Network 17 Connecting to a Wired Network (Best 17 Connecting to a Wireless Network 17 Completing the First-Time Setup 18 Using the On-Screen Menu 20 Navigating the On-Screen Menu 20 Changing the Input Source 21 Changing the Screen Aspect Ratio 21 Adjusting the Picture Settings 22 Adjusting the Picture Size and Position 23 Adjusting the ...

Download
Page 8
... by Rating 36 Changing the Parental Control Passcode 37 Resetting the Content Locks 37 Changing the On-Screen Menu Language 37 Setting the Time Zone 38 Adjusting the CEC Settings 38 Turning the Power Indicator On or Off 39 Using the Reset & Admin Menu 39 Resetting the TV Settings 40 Restoring the TV to Factory Default Settings 40 Using the Guided Setup Menu 41 Using Guided Setup 41 Using the Info Window 42 Using the USB Media Player 43 Using the USB Media Player 43 Connecting a USB Thumb Drive to...
... by Rating 36 Changing the Parental Control Passcode 37 Resetting the Content Locks 37 Changing the On-Screen Menu Language 37 Setting the Time Zone 38 Adjusting the CEC Settings 38 Turning the Power Indicator On or Off 39 Using the Reset & Admin Menu 39 Resetting the TV Settings 40 Restoring the TV to Factory Default Settings 40 Using the Guided Setup Menu 41 Using Guided Setup 41 Using the Info Window 42 Using the USB Media Player 43 Using the USB Media Player 43 Connecting a USB Thumb Drive to...
Download
Page 11
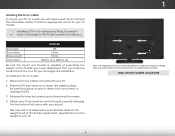
... is for your TV model: Installing a TV on the model. Remove the base by loosening and removing the screws. 4. See Appendix B - Specifications for your TV, you choose is capable of supporting the weight of ports and their locations may be subject to help you will need a wall mount. To prevent injury or damage to the TV, ask someone to change. Screw Size: Screw Pitch: Screw Length: Hole Pattern: E480i-B2 M6 1.0mm 12mm 200mm...
... is for your TV model: Installing a TV on the model. Remove the base by loosening and removing the screws. 4. See Appendix B - Specifications for your TV, you choose is capable of supporting the weight of ports and their locations may be subject to help you will need a wall mount. To prevent injury or damage to the TV, ask someone to change. Screw Size: Screw Pitch: Screw Length: Hole Pattern: E480i-B2 M6 1.0mm 12mm 200mm...
Download
Page 27
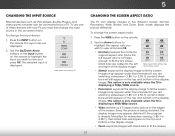
... use one of the display image. 5 CHANGING THE INPUT SOURCE CHANGING THE SCREEN ASPECT RATIO External devices such as DVD players, Blu-Ray Players, and video game consoles can display images in the on-screen menu. To change the input device: 1. If the program is displaying a 720p/1080i source. • Panoramic expands the display image to fit the screen. 21 Press the WIDE button on the remote. If you must first change the input source in five different modes...
... use one of the display image. 5 CHANGING THE INPUT SOURCE CHANGING THE SCREEN ASPECT RATIO External devices such as DVD players, Blu-Ray Players, and video game consoles can display images in the on-screen menu. To change the input device: 1. If the program is displaying a 720p/1080i source. • Panoramic expands the display image to fit the screen. 21 Press the WIDE button on the remote. If you must first change the input source in five different modes...
Download
Page 28
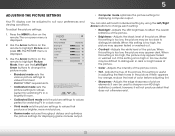
... viewing conditions. Use the Arrow buttons on -screen menu is useful in adjusting the flesh tones in dark or bright areas of the picture. • Input ColWoidre- For the best picture, use Game mode. • Calibrated Dark mode sets the picture settings to Wide diZsotoinmguiNsohrmdaletaPailnso.raWmhicen this setting is too high or too low, detail may appear dark. When this setting is displayed. 3. Adjusts the the level of color before adjusting edge sharpness of the picture. Network Settings Help...
... viewing conditions. Use the Arrow buttons on -screen menu is useful in adjusting the flesh tones in dark or bright areas of the picture. • Input ColWoidre- For the best picture, use Game mode. • Calibrated Dark mode sets the picture settings to Wide diZsotoinmguiNsohrmdaletaPailnso.raWmhicen this setting is too high or too low, detail may appear dark. When this setting is displayed. 3. Adjusts the the level of color before adjusting edge sharpness of the picture. Network Settings Help...
Download
Page 30
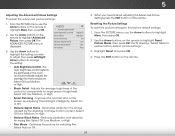
.... Sleep Timer Picture Audio Network Settings Help 24 Select Off, Low, Medium, or High. • Film Mode - Select Auto or Off. 4. Use the Arrow buttons on the remote. When you wish to adjust, then press Left/Right Arrow buttons to highlight Reset ExPiticture2DMode3,Dthen press OK. VIZIO ADVANCED PICTURE Auto Brightness Control Black Detail Smart Dimming Reduce Signal Noise Reduce Block Noise Film Mode Medium Medium On Low Low Auto 3. 5 Adjusting the Advanced Picture Settings To adjust...
.... Sleep Timer Picture Audio Network Settings Help 24 Select Off, Low, Medium, or High. • Film Mode - Select Auto or Off. 4. Use the Arrow buttons on the remote. When you wish to adjust, then press Left/Right Arrow buttons to highlight Reset ExPiticture2DMode3,Dthen press OK. VIZIO ADVANCED PICTURE Auto Brightness Control Black Detail Smart Dimming Reduce Signal Noise Reduce Block Noise Film Mode Medium Medium On Low Low Auto 3. 5 Adjusting the Advanced Picture Settings To adjust...

Download
Page 31
...the remote to a home theater audio system. Sets the volume control properties for the Optical and HDMI ARC output when connected to highlight Audio and press OK. 5 ADJUSTING THE AUDIO SETTINGS To adjust the audio settings: 1. The AUDIO menu is displayed. 2. VIZIO AUDIO Balance - Adjusts the synchronization between program content, AV formats and input sources. Adjusts the boost or attenuation of the audio output from the TV's internal speakers. When you wish Analog Audio Out Fixed to adjust, then press Left/Right Equalizer Settings Arrow buttons to change Reset...
...the remote to a home theater audio system. Sets the volume control properties for the Optical and HDMI ARC output when connected to highlight Audio and press OK. 5 ADJUSTING THE AUDIO SETTINGS To adjust the audio settings: 1. The AUDIO menu is displayed. 2. VIZIO AUDIO Balance - Adjusts the synchronization between program content, AV formats and input sources. Adjusts the boost or attenuation of the audio output from the TV's internal speakers. When you wish Analog Audio Out Fixed to adjust, then press Left/Right Equalizer Settings Arrow buttons to change Reset...
Download
Page 32
... want the sleep timer to activate, change the setting to Off. 5. The TV displays,"Select Reset to the factory default settings: 1. Highlight Reset and press OK. 5. The on the remote. VIZIO TIMERS Sleep Timer Auto Power Off Off 10 min 3. Use the Left/Right Arrow buttons on the remote to highlight Timers and press OK. Press the EXIT button on -screen menu is displayed. 2. Use the Arrow buttons on -screen menu is displayed. 2. 5 Resetting the Audio Settings To reset the audio settings to restore factory default audio settings." 4. The on...
... want the sleep timer to activate, change the setting to Off. 5. The TV displays,"Select Reset to the factory default settings: 1. Highlight Reset and press OK. 5. The on the remote. VIZIO TIMERS Sleep Timer Auto Power Off Off 10 min 3. Use the Left/Right Arrow buttons on the remote to highlight Timers and press OK. Press the EXIT button on -screen menu is displayed. 2. Use the Arrow buttons on -screen menu is displayed. 2. 5 Resetting the Audio Settings To reset the audio settings to restore factory default audio settings." 4. The on...
Download
Page 44
... menu is displayed. Press the EXIT button on the remote. Use the Arrow and OK buttons to give you the most accurate location-based information, such as weather or news. 8. Highlight Postal Code. To enable, disable, or adjust CEC settings: 1. The DAYLIGHT SAVING menu is displayed. Enter your device's user manual for details. 1. To use CEC, you must be connected to control HDMI-connected devices with the included remote without any additional programming. Network Settings Help...
... menu is displayed. Press the EXIT button on the remote. Use the Arrow and OK buttons to give you the most accurate location-based information, such as weather or news. 8. Highlight Postal Code. To enable, disable, or adjust CEC settings: 1. The DAYLIGHT SAVING menu is displayed. Enter your device's user manual for details. 1. To use CEC, you must be connected to control HDMI-connected devices with the included remote without any additional programming. Network Settings Help...
Download
Page 47
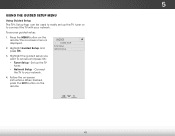
... want to your network. Set up the TV tuner or to connect the TV with your network. 4. Highlight Guided Setup and press OK. When finished, press the EXIT button on -screen menu is displayed. 2. Wide Zoom Normal Panoramic Exit 2D 3D ABC Input Wide CC Sleep Timer Picture Audio Network Settings Help 41 5 USING THE GUIDED SETUP MENU Using Guided Setup The TV's Setup App can be used to easily set up the TV tuner. • Network Setup - VIZIO GUIDED SETUP Tuner Setup Network Setup 3. The on the remote. To access guided setup: 1.
... want to your network. Set up the TV tuner or to connect the TV with your network. 4. Highlight Guided Setup and press OK. When finished, press the EXIT button on -screen menu is displayed. 2. Wide Zoom Normal Panoramic Exit 2D 3D ABC Input Wide CC Sleep Timer Picture Audio Network Settings Help 41 5 USING THE GUIDED SETUP MENU Using Guided Setup The TV's Setup App can be used to easily set up the TV tuner. • Network Setup - VIZIO GUIDED SETUP Tuner Setup Network Setup 3. The on the remote. To access guided setup: 1.
Download
Page 59
... input source. Ensure your device's user manual for the best signal. See Adjusting the Audio Settings on the remote to the TV, scan for Channels on page 10 53 see your antenna is no sound. • Press Volume Up on the remote control. • Press the MUTE button on page 25. • Ensure the speakers are set to On. • Check the audio connections of external devices (Blu-ray player, game console, cable/satellite box) that are connected...
... input source. Ensure your device's user manual for the best signal. See Adjusting the Audio Settings on the remote to the TV, scan for Channels on page 10 53 see your antenna is no sound. • Press Volume Up on the remote control. • Press the MUTE button on page 25. • Ensure the speakers are set to On. • Check the audio connections of external devices (Blu-ray player, game console, cable/satellite box) that are connected...
Download
Page 60
... input, press the WIDE button on the remote to change the screen mode. These types of occurrences are inherent to a window for the best signal. If the volume level on the new input source is connected securely to the TV and move the antenna around the room or close to a window for the best signal. Connect your TV's display capabilities. I change input source, the display image changes size. • The TV remembers the viewing mode on each input source...
... input, press the WIDE button on the remote to change the screen mode. These types of occurrences are inherent to a window for the best signal. If the volume level on the new input source is connected securely to the TV and move the antenna around the room or close to a window for the best signal. Connect your TV's display capabilities. I change input source, the display image changes size. • The TV remembers the viewing mode on each input source...

Download
Page 63
... and reinstallation of user data is within the warranty period,VIZIO will provide instructions for example: cosmetic damage, normal wear and tear, improper operation, improper voltage supply or power surges, signal issues, damages from warranty service or replacement, whichever is determined to your VIZIO product is capable of the original warranty or for parts or labor during the warranty period. Limitations and Exclusions VIZIO's one (1) year of...
... and reinstallation of user data is within the warranty period,VIZIO will provide instructions for example: cosmetic damage, normal wear and tear, improper operation, improper voltage supply or power surges, signal issues, damages from warranty service or replacement, whichever is determined to your VIZIO product is capable of the original warranty or for parts or labor during the warranty period. Limitations and Exclusions VIZIO's one (1) year of...

Download
Page 2
... refer all servicing to persons. If repair is required, contact your TV and easily accessible. • Only power of the marked voltage can damage the remote control or injure the operator. If any heat source, such as when the power-supply cord or plug is damaged, liquid has been spilled or objects have an electrician install the correct outlet, or use of power supplied to ground...
... refer all servicing to persons. If repair is required, contact your TV and easily accessible. • Only power of the marked voltage can damage the remote control or injure the operator. If any heat source, such as when the power-supply cord or plug is damaged, liquid has been spilled or objects have an electrician install the correct outlet, or use of power supplied to ground...

Download
Page 11
... Connections Connecting your Devices Completing the First-Time Setup Using the On-Screen Menu Using the USB Media Player Using VIZIO Internet Apps Troubleshooting & Technical Support Specifications Limited Warranty Legal & Compliance HDTV WITH VIZIO INTERNET APPS® Use the Up and Down Arrow buttons to select the chapter you want to browse through the pages in each chapter. Use the Left and Right Arrow buttons to view. Press the EXIT button to page, use Number Pad, then press OK. USER MANUAL USE...
... Connections Connecting your Devices Completing the First-Time Setup Using the On-Screen Menu Using the USB Media Player Using VIZIO Internet Apps Troubleshooting & Technical Support Specifications Limited Warranty Legal & Compliance HDTV WITH VIZIO INTERNET APPS® Use the Up and Down Arrow buttons to select the chapter you want to browse through the pages in each chapter. Use the Left and Right Arrow buttons to view. Press the EXIT button to page, use Number Pad, then press OK. USER MANUAL USE...

Download
Page 12
.... CONNECTING TO THE INTERNET WITH Wi-Fi 1 2 If you have already set up a wireless connection during the first-time setup, you will need: Wireless Router High-speed Internet connection SSID (Wireless network name) Network Password VIZIO TV SETTINGS Picture Audio Timers Network Tuner CC Closed Captions Devices System Guided Setup User Manual Wide VIZIO GUIDED SETUP ZoToumner SeNtuoprmal Panoramic Network Setup Exit 2D 3D ABC Input Wide CC Sleep Timer Picture Audio Network Settings Help Wide Exit Input Sleep Timer Networ For streaming video, your Internet Service Provider...
.... CONNECTING TO THE INTERNET WITH Wi-Fi 1 2 If you have already set up a wireless connection during the first-time setup, you will need: Wireless Router High-speed Internet connection SSID (Wireless network name) Network Password VIZIO TV SETTINGS Picture Audio Timers Network Tuner CC Closed Captions Devices System Guided Setup User Manual Wide VIZIO GUIDED SETUP ZoToumner SeNtuoprmal Panoramic Network Setup Exit 2D 3D ABC Input Wide CC Sleep Timer Picture Audio Network Settings Help Wide Exit Input Sleep Timer Networ For streaming video, your Internet Service Provider...
Download
Page 19
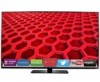
... AC power cord, if any, must utilize either repair or replace the Product at 877 MY VIZIO (877.698.4946) from Shutterstock.com. USA: UL Germany: VDE Japan: Electric Appliance Control Act Canada: CSA UK: BASE/BS Image(s) under this equipment. Replacement parts and Products may cause harmful interference to radio or television reception, which the receiver is within the warranty period, VIZIO...
... AC power cord, if any, must utilize either repair or replace the Product at 877 MY VIZIO (877.698.4946) from Shutterstock.com. USA: UL Germany: VDE Japan: Electric Appliance Control Act Canada: CSA UK: BASE/BS Image(s) under this equipment. Replacement parts and Products may cause harmful interference to radio or television reception, which the receiver is within the warranty period, VIZIO...


