Download
Page 4
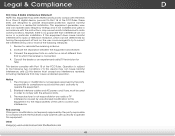
... feet should be maintained between your TV to rain or moisture, does not operate normally or has been dropped. • Unplug the power cord before turning on your TV and to high voltages, electric shock, and other voltage than the voltage specified. Opening or removing the back cover may cause fire...
... feet should be maintained between your TV to rain or moisture, does not operate normally or has been dropped. • Unplug the power cord before turning on your TV and to high voltages, electric shock, and other voltage than the voltage specified. Opening or removing the back cover may cause fire...
Download
Page 7
... Control Passcode 35 Resetting the Content Locks 35 Changing the On-Screen Menu Language 36 Setting the Time Zone 36 Adjusting the CEC Settings 37 Turning the Power Indicator On or Off 37 1 Audio and Video Cable Types.... 12 Connecting an Audio Device 14 Connecting an Audio Device - Audio Cable Types...
... Control Passcode 35 Resetting the Content Locks 35 Changing the On-Screen Menu Language 36 Setting the Time Zone 36 Adjusting the CEC Settings 37 Turning the Power Indicator On or Off 37 1 Audio and Video Cable Types.... 12 Connecting an Audio Device 14 Connecting an Audio Device - Audio Cable Types...
Download
Page 13
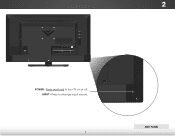
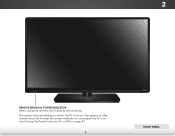
Press and hold to change input source. 7 SIDE PANEL INPUT - Press to turn TV on or off. 2 SIDE PANEL POWER -
Press and hold to change input source. 7 SIDE PANEL INPUT - Press to turn TV on or off. 2 SIDE PANEL POWER -
Download
Page 14
The power indicator flashes on when the TV turns on page 37. 8 FRONT PANEL To keep the power indicator on as long as the TV is on, see Turning the Power Indicator On or Off on , then goes out after several seconds. 2 FRONT PANEL REMOTE SENSOR & POWER INDICATOR When using the remote, aim it directly at this sensor.
The power indicator flashes on when the TV turns on page 37. 8 FRONT PANEL To keep the power indicator on as long as the TV is on, see Turning the Power Indicator On or Off on , then goes out after several seconds. 2 FRONT PANEL REMOTE SENSOR & POWER INDICATOR When using the remote, aim it directly at this sensor.
Download
Page 15
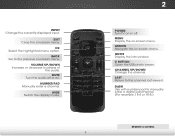
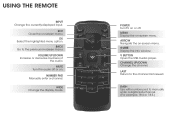
... Display the info window. REMOTE CONTROL INPUT Change the currently-displayed input. OK Select the highlighted menu option. V BUTTON Open the USB photo viewer. MUTE Turn the audio off . POWER Turn TV on or off or on -screen menu. EXIT Close the on .
... Display the info window. REMOTE CONTROL INPUT Change the currently-displayed input. OK Select the highlighted menu option. V BUTTON Open the USB photo viewer. MUTE Turn the audio off . POWER Turn TV on or off or on -screen menu. EXIT Close the on .

Download
Page 17
Turn the TV and your device on the TV (HDMI, Component, etc). 2. BACK OF TV 11 3 Cable/Satellite Box DVD/Blu-ray Player Game Console HDMI ... output from most devices. 1. Verify that your device off. 3. Set the TV's input to match the connection you used to the TV and the device. 4. Turn the TV and your device has a video port that matches an available port on .
Turn the TV and your device on the TV (HDMI, Component, etc). 2. BACK OF TV 11 3 Cable/Satellite Box DVD/Blu-ray Player Game Console HDMI ... output from most devices. 1. Verify that your device off. 3. Set the TV's input to match the connection you used to the TV and the device. 4. Turn the TV and your device has a video port that matches an available port on .
Download
Page 20
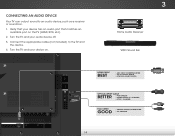
Turn the TV and your device has an audio port that your device on the TV (HDMI, RCA, etc). 2. Verify that matches an available port on . 3 Home Audio Receiver VIZIO Sound Bar HDMI CABLE BEST • ARC 2-WAY COMMUNICATION • 2.0-5.1 DIGITAL AUDIO • PCM, DTS, DOLBY DIGITAL OPTICAL/SPDIF CABLE ...; ANALOG STEREO CONNECTION • 2.0 CHANNEL 14 Connect the appropriate cable (not included) to an audio device, such as a receiver or sound bar. 1. Turn the TV and your audio device off. 3. CONNECTING AN AUDIO DEVICE Your TV can output sound to the TV and the device. 4.
Turn the TV and your device has an audio port that your device on the TV (HDMI, RCA, etc). 2. Verify that matches an available port on . 3 Home Audio Receiver VIZIO Sound Bar HDMI CABLE BEST • ARC 2-WAY COMMUNICATION • 2.0-5.1 DIGITAL AUDIO • PCM, DTS, DOLBY DIGITAL OPTICAL/SPDIF CABLE ...; ANALOG STEREO CONNECTION • 2.0 CHANNEL 14 Connect the appropriate cable (not included) to an audio device, such as a receiver or sound bar. 1. Turn the TV and your audio device off. 3. CONNECTING AN AUDIO DEVICE Your TV can output sound to the TV and the device. 4.
Download
Page 23
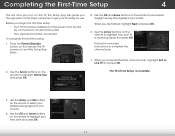
... the Arrow buttons on the remote to set whether daylight saving time applies in your locale. Completing the First-Time Setup 4 The first time you turn on the remote to highlight your time zone and press OK. 1 2 3 4 5 6 7 8 9 WIDE 0 - 17 Use the OK and Arrow buttons on the TV, the Setup App...
... the Arrow buttons on the remote to set whether daylight saving time applies in your locale. Completing the First-Time Setup 4 The first time you turn on the remote to highlight your time zone and press OK. 1 2 3 4 5 6 7 8 9 WIDE 0 - 17 Use the OK and Arrow buttons on the TV, the Setup App...
Download
Page 30
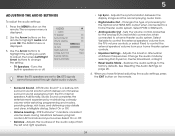
... Exit ext2eDrnal sp3Deakers' volume from the TV's volume controls, or select Fixed to the factory defaults. The on or off. VIZIO AUDIO TV Speakers Surround Sound Volume Leveling Balance - Adjusts the loudness of different frequencies. Adjusts the boost or attenuation of the... TruVolume™ maintains consistent volume levels during transitions between the display image and the accompanying audio track. • Digital Audio Out - Turns the built-in speakers on -screen menu is displayed. 2. DTS Studio Sound™ is displayed. 3. See Resetting the Audio Settings ...
... Exit ext2eDrnal sp3Deakers' volume from the TV's volume controls, or select Fixed to the factory defaults. The on or off. VIZIO AUDIO TV Speakers Surround Sound Volume Leveling Balance - Adjusts the loudness of different frequencies. Adjusts the boost or attenuation of the... TruVolume™ maintains consistent volume levels during transitions between the display image and the accompanying audio track. • Digital Audio Out - Turns the built-in speakers on -screen menu is displayed. 2. DTS Studio Sound™ is displayed. 3. See Resetting the Audio Settings ...
Download
Page 31
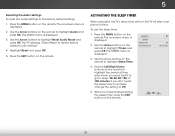
...the remote to highlight Audio and press OK. Highlight Reset and press OK. 5. ACTIVATING THE SLEEP TIMER When activated, the TV's sleep timer will turn the TV off after which you have finished setting the sleep timer, press the EXIT button on the remote to Off. 5. The AUDIO menu ... on -screen menu is displayed. 3. The TIMERS menu is displayed. 2. Use the Arrow buttons to the factory default settings: 1. The on the remote. VIZIO TIMERS Sleep Timer Auto Power Off Off 10 minutes 3. 5 Resetting the Audio Settings To reset the audio settings to highlight Reset Audio Mode and press...
...the remote to highlight Audio and press OK. Highlight Reset and press OK. 5. ACTIVATING THE SLEEP TIMER When activated, the TV's sleep timer will turn the TV off after which you have finished setting the sleep timer, press the EXIT button on the remote to Off. 5. The AUDIO menu ... on -screen menu is displayed. 3. The TIMERS menu is displayed. 2. Use the Arrow buttons to the factory default settings: 1. The on the remote. VIZIO TIMERS Sleep Timer Auto Power Off Off 10 minutes 3. 5 Resetting the Audio Settings To reset the audio settings to highlight Reset Audio Mode and press...
Download
Page 32
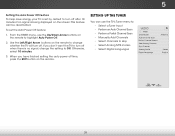
...Perform a Partial Channel Scan • Manually Add Channels • Select channels to skip • Select Analog MTS modes • Select Digital Languages VIZIO TUNER Tuner Mode Auto Channel Scan Partial Channel Search Add Analog Channel Skip Channel Analog Audio Digital Language Antenna Stereo English 26 Use the Left.../Right Arrow buttons on the screen. When you don't want the TV to turn off when there is being displayed on the remote to change the setting to highlight Auto Power Off. 2. 5 Setting the Auto Power...
...Perform a Partial Channel Scan • Manually Add Channels • Select channels to skip • Select Analog MTS modes • Select Digital Languages VIZIO TUNER Tuner Mode Auto Channel Scan Partial Channel Search Add Analog Channel Skip Channel Analog Audio Digital Language Antenna Stereo English 26 Use the Left.../Right Arrow buttons on the screen. When you don't want the TV to turn off when there is being displayed on the remote to change the setting to highlight Auto Power Off. 2. 5 Setting the Auto Power...
Download
Page 43
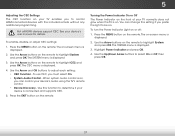
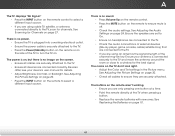
... highlight System and press OK. Use the Arrow buttons on the remote to control HDMI-connected devices with the included remote without any additional programming. Turning the Power Indicator On or Off The Power Indicator on the front of your TV normally does not glow when the TV is connected and... details. See your device's audio using the TV's remote control. • Device Discovery - Use the Arrow and OK buttons to be on or off: 1. To turn the Power Indicator Light on .
... highlight System and press OK. Use the Arrow buttons on the remote to control HDMI-connected devices with the included remote without any additional programming. Turning the Power Indicator On or Off The Power Indicator on the front of your TV normally does not glow when the TV is connected and... details. See your device's audio using the TV's remote control. • Device Discovery - Use the Arrow and OK buttons to be on or off: 1. To turn the Power Indicator Light on .
Download
Page 45
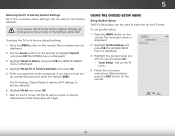
...the settings will begin. USING THE GUIDED SETUP MENU Using Guided Setup The TV's Setup App can be reset to its factory default settings: 1. VIZIO GUIDED SETUP Tuner Setup 3. Highlight the guided setup you have not yet set up the TV tuner. The on -screen menu is displayed. ...Enter your parental control passcode. Wait for the TV to use guided setup: 1. The GUIDED SETUP menu is displayed. 2. The TV will turn off. The on -screen menu is displayed. 4. Set up a parental passcode, enter the default, 0000. If you restore the TV to the factory...
...the settings will begin. USING THE GUIDED SETUP MENU Using Guided Setup The TV's Setup App can be reset to its factory default settings: 1. VIZIO GUIDED SETUP Tuner Setup 3. Highlight the guided setup you have not yet set up the TV tuner. The on -screen menu is displayed. ...Enter your parental control passcode. Wait for the TV to use guided setup: 1. The GUIDED SETUP menu is displayed. 2. The TV will turn off. The on -screen menu is displayed. 4. Set up a parental passcode, enter the default, 0000. If you restore the TV to the factory...

Download
Page 47
... wish to the USB port on the side of media you must end in the list and press OK. 4. You can display your USB media: 1. Turn the TV off. Connect your USB thumb drive to the USB port on the back of the TV to... turn it on . Press OK. Using the USB Media Player 6 USING THE USB MEDIA PLAYER The USB Media Player allows you to connect a USB thumb drive ...
... wish to the USB port on the side of media you must end in the list and press OK. 4. You can display your USB media: 1. Turn the TV off. Connect your USB thumb drive to the USB port on the back of the TV to... turn it on . Press OK. Using the USB Media Player 6 USING THE USB MEDIA PLAYER The USB Media Player allows you to connect a USB thumb drive ...
Download
Page 50
... source. • If you are connected correctly. There is no headphones are connected to the TV. • Check the audio connections of the TV to turn the TV on. Ensure your device's user manual for Channels on page 20. • Check all cables to the TV. • Ensure all cables are...
... source. • If you are connected correctly. There is no headphones are connected to the TV. • Check the audio connections of the TV to turn the TV on. Ensure your device's user manual for Channels on page 20. • Check all cables to the TV. • Ensure all cables are...
Download
Page 55
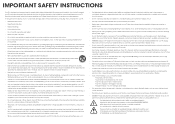
... occur in order to the following measures: 1. Shielded interface cables and AC power cord, if any, must accept any radio or TV interference caused by turning the equipment off and on a circuit different from Shutterstock.com 49 D Reorient or relocate the receiving antenna. 2. Legal & Compliance FCC Class B Radio Interference Statement NOTE...
... occur in order to the following measures: 1. Shielded interface cables and AC power cord, if any, must accept any radio or TV interference caused by turning the equipment off and on a circuit different from Shutterstock.com 49 D Reorient or relocate the receiving antenna. 2. Legal & Compliance FCC Class B Radio Interference Statement NOTE...
Download
Page 2
Read the following occurs, contact the dealer: - Keep these instructions. • Heed all warnings. • Follow all servicing to qualified service personnel. Wait before turning on your TV to avoid causing fire, electric shock, or component damage. • A distance of at your TV cabinet. Do not place your TV in a ...
Read the following occurs, contact the dealer: - Keep these instructions. • Heed all warnings. • Follow all servicing to qualified service personnel. Wait before turning on your TV to avoid causing fire, electric shock, or component damage. • A distance of at your TV cabinet. Do not place your TV in a ...
Download
Page 7
... decrease loudness of the audio. GUIDE Display the info window. DASH Use with number pad to the channel last viewed. MUTE Turn the audio off or on or off. POWER Turn TV on . ARROW Navigate the on -screen menu. V BUTTON Open the USB media player. WIDE Change the display mode. USING THE...
... decrease loudness of the audio. GUIDE Display the info window. DASH Use with number pad to the channel last viewed. MUTE Turn the audio off or on or off. POWER Turn TV on . ARROW Navigate the on -screen menu. V BUTTON Open the USB media player. WIDE Change the display mode. USING THE...
Download
Page 11
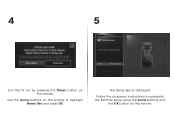
Use the Arrow buttons on the remote. Follow the on-screen instructions to complete the first-time setup using the Arrow buttons and the OK button on the remote to highlight Home Use and press OK. The Setup App is displayed. 4 5 Turn the TV on by pressing the Power button on the remote.
Use the Arrow buttons on the remote. Follow the on-screen instructions to complete the first-time setup using the Arrow buttons and the OK button on the remote to highlight Home Use and press OK. The Setup App is displayed. 4 5 Turn the TV on by pressing the Power button on the remote.
Download
Page 14
Press MENU > Guided Setup. Be sure TV Speakers is the responsibilities of the user to correct such interference. There are turned on. • Press the INPUT button on the remote and select the input to which your connected devices are black bars on the top/bottom/... interference by the party responsible for compliance could void the user's authority to operate this equipment. This equipment generates, uses and can be determined by turning the equipment off . • Press MENU, then select Audio.
Press MENU > Guided Setup. Be sure TV Speakers is the responsibilities of the user to correct such interference. There are turned on. • Press the INPUT button on the remote and select the input to which your connected devices are black bars on the top/bottom/... interference by the party responsible for compliance could void the user's authority to operate this equipment. This equipment generates, uses and can be determined by turning the equipment off . • Press MENU, then select Audio.


