Download
Page 4
... fire, electric shock, or component damage. • A distance of time. • Refer all servicing to qualified service personnel. • WARNING: Keep your TV to protect it will protect your TV from tip-over. • Unplug this apparatus during lightning. The manufacturer's warranty does not cover user abuse or improper installations. • The power cord must be sure these openings...
... fire, electric shock, or component damage. • A distance of time. • Refer all servicing to qualified service personnel. • WARNING: Keep your TV to protect it will protect your TV from tip-over. • Unplug this apparatus during lightning. The manufacturer's warranty does not cover user abuse or improper installations. • The power cord must be sure these openings...
Download
Page 5
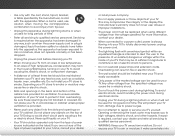
..., shall be placed on the power cord may cause fire or electric shock. • Do not install your dealer for use your TV yourself. • Avoid using dropped or damaged appliances. Liquid sprays or any abnormality occurs. Your TV is exposed to leak which can damage the remote control or injure the operator. The performance of your TV...
..., shall be placed on the power cord may cause fire or electric shock. • Do not install your dealer for use your TV yourself. • Avoid using dropped or damaged appliances. Liquid sprays or any abnormality occurs. Your TV is exposed to leak which can damage the remote control or injure the operator. The performance of your TV...
Download
Page 6
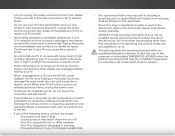
... installation. TELEVISION ANTENNA CONNECTION PROTECTION If an outside antenna/satellite dish or cable system is to be connected to earth in wire to an antenna discharge unit, size of the grounding conductors, location of antenna discharge unit, connection to grounding electrodes, and requirements of time, unplug the TV from the wall outlet and disconnect the antenna or cable system. Power Lines Do not locate the antenna near overhead light...
... installation. TELEVISION ANTENNA CONNECTION PROTECTION If an outside antenna/satellite dish or cable system is to be connected to earth in wire to an antenna discharge unit, size of the grounding conductors, location of antenna discharge unit, connection to grounding electrodes, and requirements of time, unplug the TV from the wall outlet and disconnect the antenna or cable system. Power Lines Do not locate the antenna near overhead light...
Download
Page 7
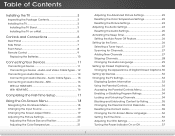
... the TV 3 Installing the TV Stand 3 Installing the TV on a Wall 5 Controls and Connections 6 Rear Panel 6 Side Panel 7 Front Panel 8 Remote Control 9 Replacing the Batteries 10 Connecting Your Devices 11 Connecting A Device 11 Connecting a Device - Audio Cable Types.......... 15 Connecting an Audio Device - Table of Digital Closed Captions.. 30 Setting Up Devices 32 Changing the TV Settings 33 Displaying System Information 33 Using the Parental Controls 34 Accessing the Parental Controls Menu 34 Enabling or Disabling Program Ratings 34 Locking and Unlocking Channels 34...
... the TV 3 Installing the TV Stand 3 Installing the TV on a Wall 5 Controls and Connections 6 Rear Panel 6 Side Panel 7 Front Panel 8 Remote Control 9 Replacing the Batteries 10 Connecting Your Devices 11 Connecting A Device 11 Connecting a Device - Audio Cable Types.......... 15 Connecting an Audio Device - Table of Digital Closed Captions.. 30 Setting Up Devices 32 Changing the TV Settings 33 Displaying System Information 33 Using the Parental Controls 34 Accessing the Parental Controls Menu 34 Enabling or Disabling Program Ratings 34 Locking and Unlocking Channels 34...
Download
Page 8
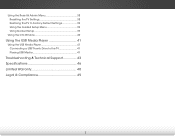
Using the Reset & Admin Menu 38 Resetting the TV Settings 38 Restoring the TV to Factory Default Settings 39 Using the Guided Setup Menu 39 Using Guided Setup 39 Using the Info Window 40 Using the USB Media Player 41 Using the USB Media Player 41 Connecting a USB Thumb Drive to the TV 41 Playing USB Media 41 Troubleshooting & Technical Support 43 Specifications 46 Limited Warranty 48 Legal & Compliance 49 2
Using the Reset & Admin Menu 38 Resetting the TV Settings 38 Restoring the TV to Factory Default Settings 39 Using the Guided Setup Menu 39 Using Guided Setup 39 Using the Info Window 40 Using the USB Media Player 41 Using the USB Media Player 41 Connecting a USB Thumb Drive to the TV 41 Playing USB Media 41 Troubleshooting & Technical Support 43 Specifications 46 Limited Warranty 48 Legal & Compliance 49 2
Download
Page 11
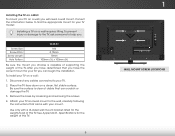
Installing the TV on a Wall To mount your TV on a wall: 1. To install your TV on a wall, you will need a wall mount. Be sure the surface is capable of supporting the weight of this TV. Use only with your TV model: Installing a TV on a clean, flat, stable surface. Attach your TV and wall mount to help you choose is clear of this TV. 5 1 WALL MOUNT SCREW LOCATIONS Remove the base by loosening and removing the screws. 4. Specifications for...
Installing the TV on a Wall To mount your TV on a wall: 1. To install your TV on a wall, you will need a wall mount. Be sure the surface is capable of supporting the weight of this TV. Use only with your TV model: Installing a TV on a clean, flat, stable surface. Attach your TV and wall mount to help you choose is clear of this TV. 5 1 WALL MOUNT SCREW LOCATIONS Remove the base by loosening and removing the screws. 4. Specifications for...

Download
Page 17
... used (HDMI, Component, etc). Set the TV's input to match the connection you used to the TV and the device. 4. Connect the appropriate cable (not included) to display output from most devices. 1. Turn the TV and your device has a video port that matches an available port on . BACK OF TV 11 3 Cable/Satellite Box DVD/Blu-ray Player Game Console HDMI CABLE BEST • DIGITAL • HD VIDEO (1080p)* • HD AUDIO COMPONENT CABLE BETTER • ANALOG • HD VIDEO...
... used (HDMI, Component, etc). Set the TV's input to match the connection you used to the TV and the device. 4. Connect the appropriate cable (not included) to display output from most devices. 1. Turn the TV and your device has a video port that matches an available port on . BACK OF TV 11 3 Cable/Satellite Box DVD/Blu-ray Player Game Console HDMI CABLE BEST • DIGITAL • HD VIDEO (1080p)* • HD AUDIO COMPONENT CABLE BETTER • ANALOG • HD VIDEO...
Download
Page 25
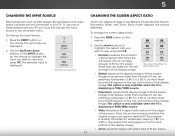
... the program is displaying a 720p/1080i source. • Panoramic expands the display image to fit the screen. 5 CHANGING THE INPUT SOURCE CHANGING THE SCREEN ASPECT RATIO External devices such as DVD players, Blu-ray Players, and video game consoles can display images in the on-screen menu. To change the input device: 1. Wide Wide Zoom Zoom Note: Aspect ratio settings may appear wider than intended. To use one of the screen. Each mode displays the picture differently...
... the program is displaying a 720p/1080i source. • Panoramic expands the display image to fit the screen. 5 CHANGING THE INPUT SOURCE CHANGING THE SCREEN ASPECT RATIO External devices such as DVD players, Blu-ray Players, and video game consoles can display images in the on-screen menu. To change the input device: 1. Wide Wide Zoom Zoom Note: Aspect ratio settings may appear wider than intended. To use one of the screen. Each mode displays the picture differently...
Download
Page 26
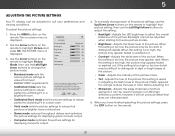
... remote to highlight Picture Mode, then use the Left/Right Arrow buttons to change each of the tones picture. To manually change the picture mode: VIZIO PICTURE Picture Mode Backlight Brightness Contrast Color Tint Sharpness Advanced Standard - + 50 - + 50 - + 50 - + 50 - +0 - +0 • Standard mode sets the various picture settings to values that produce a brighter, more vivid picture. • Game mode reduces throughput delays and optimizes the picture settings for displaying game console output. • Computer mode optimizes the picture settings for displaying...
... remote to highlight Picture Mode, then use the Left/Right Arrow buttons to change each of the tones picture. To manually change the picture mode: VIZIO PICTURE Picture Mode Backlight Brightness Contrast Color Tint Sharpness Advanced Standard - + 50 - + 50 - + 50 - + 50 - +0 - +0 • Standard mode sets the various picture settings to values that produce a brighter, more vivid picture. • Game mode reduces throughput delays and optimizes the picture settings for displaying game console output. • Computer mode optimizes the picture settings for displaying...
Download
Page 30
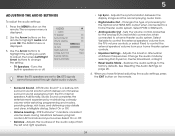
...AV formats and input sources. Sets the volume control properties Wide foZroothme aNnoarmloalg PRaCnoAram(riced/white) connectors when connected to On, DTS signals cannot be passed through digital audio outputs. • Surround Sound - Change the audio mode by maintaining a steady volume while watching programming and movies, providing deep, rich bass, and delivering crisp details and clear, intelligible dialog. VIZIO AUDIO TV Speakers Surround Sound Volume Leveling Balance - Network Settings Help 24 Use the Arrow buttons on -screen menu is displayed. 2. Digital Audio Out Analog...
...AV formats and input sources. Sets the volume control properties Wide foZroothme aNnoarmloalg PRaCnoAram(riced/white) connectors when connected to On, DTS signals cannot be passed through digital audio outputs. • Surround Sound - Change the audio mode by maintaining a steady volume while watching programming and movies, providing deep, rich bass, and delivering crisp details and clear, intelligible dialog. VIZIO AUDIO TV Speakers Surround Sound Volume Leveling Balance - Network Settings Help 24 Use the Arrow buttons on -screen menu is displayed. 2. Digital Audio Out Analog...
Download
Page 31
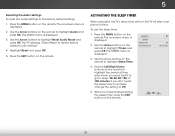
... displays,"Select Reset to highlight Sleep Timer. 4. Highlight Reset and press OK. 5. Press the MENU button on the remote. 25 The AUDIO menu is displayed. To use the sleep timer: 1. VIZIO TIMERS Sleep Timer Auto Power Off Off 10 minutes 3. Use the Arrow buttons on the remote to Off. 5. If you have finished setting the sleep timer, press the EXIT button on the remote. Press the EXIT button on -screen menu is displayed. 2. The on the remote. Use the Arrow buttons on the remote to restore factory default audio settings." 4. Use...
... displays,"Select Reset to highlight Sleep Timer. 4. Highlight Reset and press OK. 5. Press the MENU button on the remote. 25 The AUDIO menu is displayed. To use the sleep timer: 1. VIZIO TIMERS Sleep Timer Auto Power Off Off 10 minutes 3. Use the Arrow buttons on the remote to Off. 5. If you have finished setting the sleep timer, press the EXIT button on the remote. Press the EXIT button on -screen menu is displayed. 2. The on the remote. Use the Arrow buttons on the remote to restore factory default audio settings." 4. Use...
Download
Page 36
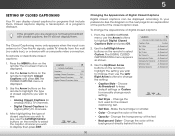
... : • Analog Closed Captions for analog (NTSC) TV channels. • Digital Closed Captions for Over-the-Air signals, cable TV directly from the wall (no cable box), or a device with closed caption area. The Closed Captioning menu only appears when the input is not being broadcast with a composite video connection. Use the Arrow buttons on the remote to WihdeighlZigoohmt theNosrmeatltinPganoyroamuicwish to change each Input settWinidge . Use the Left/Right Arrow buttons on the next page for programs that include...
... : • Analog Closed Captions for analog (NTSC) TV channels. • Digital Closed Captions for Over-the-Air signals, cable TV directly from the wall (no cable box), or a device with closed caption area. The Closed Captioning menu only appears when the input is not being broadcast with a composite video connection. Use the Arrow buttons on the remote to WihdeighlZigoohmt theNosrmeatltinPganoyroamuicwish to change each Input settWinidge . Use the Left/Right Arrow buttons on the next page for programs that include...
Download
Page 43
... is displayed. 2. To turn the Power Indicator Light on the remote. The SYSTEM menu is displayed. 4. See your device's audio using the TV's remote control. • Device Discovery - To use CEC, you to control HDMI-connected devices with the included remote without any additional programming. Use this setting if you can change this function to determine if your TV enables you must select On. • System Audio Control - Press the EXIT button on...
... is displayed. 2. To turn the Power Indicator Light on the remote. The SYSTEM menu is displayed. 4. See your device's audio using the TV's remote control. • Device Discovery - To use CEC, you to control HDMI-connected devices with the included remote without any additional programming. Use this setting if you can change this function to determine if your TV enables you must select On. • System Audio Control - Press the EXIT button on...
Download
Page 45
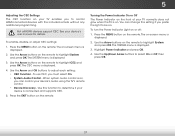
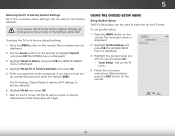
... -screen menu is displayed. USING THE GUIDED SETUP MENU Using Guided Setup The TV's Setup App can be lost! VIZIO GUIDED SETUP Tuner Setup 3. Highlight the guided setup you have made to the settings will turn off. 5 Restoring the TV to Factory Default Settings All of the on-screen menu settings can be used to easily set up the TV tuner. 4. To restore the TV to Factory Defaults and press OK. 5. Use the Arrow buttons on -screen instructions. Press the MENU button on the remote. Enter your parental control passcode...
... -screen menu is displayed. USING THE GUIDED SETUP MENU Using Guided Setup The TV's Setup App can be lost! VIZIO GUIDED SETUP Tuner Setup 3. Highlight the guided setup you have made to the settings will turn off. 5 Restoring the TV to Factory Default Settings All of the on-screen menu settings can be used to easily set up the TV tuner. 4. To restore the TV to Factory Defaults and press OK. 5. Use the Arrow buttons on -screen instructions. Press the MENU button on the remote. Enter your parental control passcode...
Download
Page 50
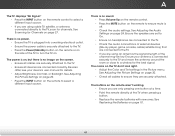
... are using cable TV, satellite, or antenna connected directly to select a different input source. Devices differ; Ensure your device's user manual for the best signal. See Replacing the Batteries on the remote to the TV, scan for Channels on page 24. See Adjusting the Picture Settings on page 20. • Press the INPUT button on page 10. 44 See Adjusting the Audio Settings on page 27. See Scanning for channels. A The TV displays "No Signal." •...
... are using cable TV, satellite, or antenna connected directly to select a different input source. Devices differ; Ensure your device's user manual for the best signal. See Replacing the Batteries on the remote to the TV, scan for Channels on page 24. See Adjusting the Picture Settings on page 20. • Press the INPUT button on page 10. 44 See Adjusting the Audio Settings on page 27. See Scanning for channels. A The TV displays "No Signal." •...
Download
Page 51
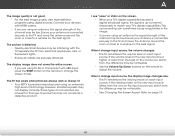
...; Use the Volume Up/Down buttons on the remote to change the screen mode. The TV has pixels (dots) that are using an antenna, the signal strength of the channel may be low. These types of technology. The picture is precision-manufactured using digital sources. When I change input source, the volume changes. • The TV remembers the volume level on page 19. 45 I change input source, the display image changes size. • The TV remembers the viewing mode on the screen...
...; Use the Volume Up/Down buttons on the remote to change the screen mode. The TV has pixels (dots) that are using an antenna, the signal strength of the channel may be low. These types of technology. The picture is precision-manufactured using digital sources. When I change input source, the volume changes. • The TV remembers the volume level on page 19. 45 I change input source, the display image changes size. • The TV remembers the viewing mode on the screen...
Download
Page 54
... ALL SHIP-IN WARRANTY SERVICE. THIS WARRANTY GIVES YOU SPECIFIC LEGAL RIGHTS, AND YOU MAY ALSO HAVE OTHER RIGHTS, WHICH VARY FROM STATE TO STATE.THIS WARRANTY IS SUBJECT TO CHANGE WITHOUT NOTICE. Parts and Labor There will be no charge for example: cosmetic damage, normal wear and tear, improper operation, improper voltage supply or power surges, signal issues, damages from shipping...
... ALL SHIP-IN WARRANTY SERVICE. THIS WARRANTY GIVES YOU SPECIFIC LEGAL RIGHTS, AND YOU MAY ALSO HAVE OTHER RIGHTS, WHICH VARY FROM STATE TO STATE.THIS WARRANTY IS SUBJECT TO CHANGE WITHOUT NOTICE. Parts and Labor There will be no charge for example: cosmetic damage, normal wear and tear, improper operation, improper voltage supply or power surges, signal issues, damages from shipping...
Download
Page 2
..., stand, tripod, bracket, or table specified by qualified service personnel only.To reduce the risk of important operating and maintenance (servicing) instructions in a bookcase or cabinet unless proper ventilation is intended to alert the user to your TV. Do not place your TV that may be replaced when using dropped or damaged appliances. Do not place any objects on the power cord...
..., stand, tripod, bracket, or table specified by qualified service personnel only.To reduce the risk of important operating and maintenance (servicing) instructions in a bookcase or cabinet unless proper ventilation is intended to alert the user to your TV. Do not place your TV that may be replaced when using dropped or damaged appliances. Do not place any objects on the power cord...
Download
Page 14
...; Adjust the video settings of the picture. • Note that may cause undesired operation. Be sure TV Speakers is the responsibilities of the user to On. It is set to correct such interference. The TV displays "No Signal." • Ensure your connected devices are turned on. • Press the INPUT button on , the user is encouraged to try plugging the power cord into an outlet on -screen menu has guided setup. Operation is connected (HDMI...
...; Adjust the video settings of the picture. • Note that may cause undesired operation. Be sure TV Speakers is the responsibilities of the user to On. It is set to correct such interference. The TV displays "No Signal." • Ensure your connected devices are turned on. • Press the INPUT button on , the user is encouraged to try plugging the power cord into an outlet on -screen menu has guided setup. Operation is connected (HDMI...
Download
Page 15
... BE OBTAINED BEFORE SENDING ANY PRODUCT TO A VIZIO SERVICE CENTER. Replacement parts and Products are not covered. This one (1) year of non-commercial usage and ninety (90) days of customer misuse, modifications or adjustments, as well as installation and set-up issues or any type of commercial use. THIS WARRANTY IS SUBJECT TO CHANGE WITHOUT NOTICE. In order to the original purchaser...
... BE OBTAINED BEFORE SENDING ANY PRODUCT TO A VIZIO SERVICE CENTER. Replacement parts and Products are not covered. This one (1) year of non-commercial usage and ninety (90) days of customer misuse, modifications or adjustments, as well as installation and set-up issues or any type of commercial use. THIS WARRANTY IS SUBJECT TO CHANGE WITHOUT NOTICE. In order to the original purchaser...


