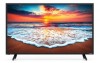
User Manual
Page 3
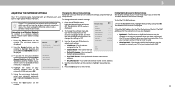
... serious personal injury or death. • Many injuries, particularly to children, can be of sufficient magnitude to loud sounds can damage the remote control or injure the operator. presence of un-isolated, dangerous voltage within the product's enclosure that the power cord and any other moisture.... - with arrowhead symbol within an equilateral triangle is exposed to hang onto the product. • Store the accessories (remote, batteries, etc.) in fire or electric shock. • Do not use of time. If any smoke or odor becomes apparent, unplug the...
... serious personal injury or death. • Many injuries, particularly to children, can be of sufficient magnitude to loud sounds can damage the remote control or injure the operator. presence of un-isolated, dangerous voltage within the product's enclosure that the power cord and any other moisture.... - with arrowhead symbol within an equilateral triangle is exposed to hang onto the product. • Store the accessories (remote, batteries, etc.) in fire or electric shock. • Do not use of time. If any smoke or odor becomes apparent, unplug the...

User Manual
Page 7
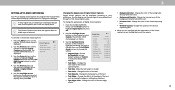
FRONT PANEL 7 To keep the power indicator on as long as the TV is on , then goes out after several seconds. The power indicator flashes on when the TV turns on , see Turning the Power Indicator On or Off. Getting to Know Your TV 1 REMOTE SENSOR & POWER INDICATOR When using the remote, aim it directly at this sensor.
FRONT PANEL 7 To keep the power indicator on as long as the TV is on , then goes out after several seconds. The power indicator flashes on when the TV turns on , see Turning the Power Indicator On or Off. Getting to Know Your TV 1 REMOTE SENSOR & POWER INDICATOR When using the remote, aim it directly at this sensor.
User Manual
Page 11
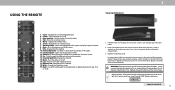
...Increase or decrease the loudness of batteries in fire. Closed Caption - Dash - WARNING: Keep the remote control batteries away from children. Do not dispose of the audio 11. When needed, VIZIO recommends replacing the batteries that the (+) and (-) symbols on -screen menu 5. Quickly launch the ...13 15 16 17 18 19 1. Change the currently displayed input 2. Make sure that came with this remote with the laws and/or regulations where you properly dispose of the remote. vizio.com/environment. V Button - Last - Wide - Arrow - Find the notch on the back of ...
...Increase or decrease the loudness of batteries in fire. Closed Caption - Dash - WARNING: Keep the remote control batteries away from children. Do not dispose of the audio 11. When needed, VIZIO recommends replacing the batteries that the (+) and (-) symbols on -screen menu 5. Quickly launch the ...13 15 16 17 18 19 1. Change the currently displayed input 2. Make sure that came with this remote with the laws and/or regulations where you properly dispose of the remote. vizio.com/environment. V Button - Last - Wide - Arrow - Find the notch on the back of ...
User Manual
Page 12
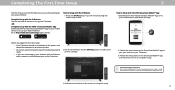
...instructions on how to install your Television. 3. Go to http://www.vizio.com/setup to complete setup. You can choose between two setup methods: Complete Setup with the IR Remote: Use the included IR remote to set up your VIZIO Television. Need help setting up your Television. -OR- How to Setup... with the IR Remote 1.Press the OK/Play key on your IR remote during the initial setup screen. 2 How to ...
...instructions on how to install your Television. 3. Go to http://www.vizio.com/setup to complete setup. You can choose between two setup methods: Complete Setup with the IR Remote: Use the included IR remote to set up your VIZIO Television. Need help setting up your Television. -OR- How to Setup... with the IR Remote 1.Press the OK/Play key on your IR remote during the initial setup screen. 2 How to ...

User Manual
Page 13
..., you wish to view and press OK. The Exit button will close the onscreen menu. To change the input sources: 1. See Renaming Devices on the remote. CHANGING THE INPUT SOURCE External devices such as DVD players, Blu-ray Players, and video game consoles can : • Adjust the Picture settings • Adjust... Inputs System User Manual • View user manual NAVIGATING THE ON-SCREEN MENU To open the on-screen menu, press the Menu button on the remote to highlight the input you can be connected to select that appear on the INPUT menu to make your devices easy to recognize.
..., you wish to view and press OK. The Exit button will close the onscreen menu. To change the input sources: 1. See Renaming Devices on the remote. CHANGING THE INPUT SOURCE External devices such as DVD players, Blu-ray Players, and video game consoles can : • Adjust the Picture settings • Adjust... Inputs System User Manual • View user manual NAVIGATING THE ON-SCREEN MENU To open the on-screen menu, press the Menu button on the remote to highlight the input you can be connected to select that appear on the INPUT menu to make your devices easy to recognize.

User Manual
Page 14
... HDR content. Normal Panoramic Wide Zoom Note: Aspect ratio settings may appear distorted-figures appear short and fat. Some programs have black bars on the remote. 2.
... HDR content. Normal Panoramic Wide Zoom Note: Aspect ratio settings may appear distorted-figures appear short and fat. Some programs have black bars on the remote. 2.

User Manual
Page 15
... ADJUSTING THE PICTURE SETTINGS Your TV display can be used to sharpen non-HD (high definition) content; Use the Arrow buttons on the remote. Back Picture Picture Mode Calibrated Auto Brightness Control Off Backlight 90 Brightness 50 Contrast 50 Color 50 Tint 0 Sharpness 20 More Picture Picture ... the energy consumption required to operate the TV. 3. If you have finished adjusting the picture settings, press the Exit button on the remote to adjust the setting: • Auto Brightness Control - If the setting is too high, the picture may be adjusted when starting ...
... ADJUSTING THE PICTURE SETTINGS Your TV display can be used to sharpen non-HD (high definition) content; Use the Arrow buttons on the remote. Back Picture Picture Mode Calibrated Auto Brightness Control Off Backlight 90 Brightness 50 Contrast 50 Color 50 Tint 0 Sharpness 20 More Picture Picture ... the energy consumption required to operate the TV. 3. If you have finished adjusting the picture settings, press the Exit button on the remote to adjust the setting: • Auto Brightness Control - If the setting is too high, the picture may be adjusted when starting ...

User Manual
Page 16
...temperature changes the white balance of the Gamma curve. When you have finished adjusting MORE PICTURE Settings, press the Exit button on the remote. 15 Adjusts the average brightness of brightness. Diminishes artifacts in scenes with fast action. Select Auto or Off. • Gamma ...adjust the color temperature: Back Color Temperature 1. Use the Arrow buttons on the remote to highlight the setting you have finished adjusting the color temperature, press the Exit button on the remote. 3 Adjusting More Picture Settings To adjust MORE PICTURE settings: 1. More Picture Color...
...temperature changes the white balance of the Gamma curve. When you have finished adjusting MORE PICTURE Settings, press the Exit button on the remote. 15 Adjusts the average brightness of brightness. Diminishes artifacts in scenes with fast action. Select Auto or Off. • Gamma ...adjust the color temperature: Back Color Temperature 1. Use the Arrow buttons on the remote to highlight the setting you have finished adjusting the color temperature, press the Exit button on the remote. 3 Adjusting More Picture Settings To adjust MORE PICTURE settings: 1. More Picture Color...

User Manual
Page 17
...be locked/unlocked with a unique PIN to prevent accidental changes to their settings. Then turn on Lock Picture Mode. † Only available on the remote. 4. Prevent changes to factory default values. To save groups of picture settings. Save 4. The LOCK PICTURE MODE menu is displayed. 2. If ...PIN. 4. Back Picture Mode Edit Save Picture Mode Lock Picture Mode Reset Picture Mode - Use the Number Pad on your remote to enter a name for your remote to select Off. 3. Use the Number Pad on your custom picture mode. Use the Arrow buttons to highlight the setting...
...be locked/unlocked with a unique PIN to prevent accidental changes to their settings. Then turn on Lock Picture Mode. † Only available on the remote. 4. Prevent changes to factory default values. To save groups of picture settings. Save 4. The LOCK PICTURE MODE menu is displayed. 2. If ...PIN. 4. Back Picture Mode Edit Save Picture Mode Lock Picture Mode Reset Picture Mode - Use the Number Pad on your remote to enter a name for your remote to select Off. 3. Use the Number Pad on your custom picture mode. Use the Arrow buttons to highlight the setting...

User Manual
Page 19
...Use the Arrow buttons on : 1. When you are finished adjusting the color tuner settings, press the Exit button. To turn off and on the remote to highlight the Hue, Saturation, Brightness, Offset, or Gain of the color you wish to adjust. Use the Arrow buttons to highlight another color channel...channels off or on . From the Color Tuner menu, use the Left/Right Arrow buttons to adjust the value. Use the Arrow buttons on the remote to highlight Red, Green, or Blue. 3. 3 Adjusting the Color Tuner Settings The COLOR TUNER settings allow technicians to manually calibrate the TV. ...
...Use the Arrow buttons on : 1. When you are finished adjusting the color tuner settings, press the Exit button. To turn off and on the remote to highlight the Hue, Saturation, Brightness, Offset, or Gain of the color you wish to adjust. Use the Arrow buttons to highlight another color channel...channels off or on . From the Color Tuner menu, use the Left/Right Arrow buttons to adjust the value. Use the Arrow buttons on the remote to highlight Red, Green, or Blue. 3. 3 Adjusting the Color Tuner Settings The COLOR TUNER settings allow technicians to manually calibrate the TV. ...

User Manual
Page 20
...PATTERN menu is displayed. To hide the SMPTE Test Pattern, use the Arrow buttons to highlight Off. 3. Use the Arrow buttons on the remote to show or hide the SMPTE Test Pattern: 1. To hide the Ramp Test Pattern, use the Left/Right Arrow buttons to select the percentage...1. Selecting a percentage immediately shows the flat pattern at that color ramp. -or- 3 To show the SMPTE Pattern. -or- Use the Arrow buttons on the remote to highlight Off. 3. When you are finished, press the Exit button. 2. When you are finished, press the Exit button. 2. Use the Left/Right Arrow...
...PATTERN menu is displayed. To hide the SMPTE Test Pattern, use the Arrow buttons to highlight Off. 3. Use the Arrow buttons on the remote to show or hide the SMPTE Test Pattern: 1. To hide the Ramp Test Pattern, use the Left/Right Arrow buttons to select the percentage...1. Selecting a percentage immediately shows the flat pattern at that color ramp. -or- 3 To show the SMPTE Pattern. -or- Use the Arrow buttons on the remote to highlight Off. 3. When you are finished, press the Exit button. 2. When you are finished, press the Exit button. 2. Use the Left/Right Arrow...

User Manual
Page 21
Use the Arrow buttons on the remote to show or hide the Uniformity Analyzer Test Pattern: 1. Use the Left/Right Arrow buttons to highlight On to highlight Off. To hide the Uniformity ...
Use the Arrow buttons on the remote to show or hide the Uniformity Analyzer Test Pattern: 1. Use the Left/Right Arrow buttons to highlight On to highlight Off. To hide the Uniformity ...

User Manual
Page 22
...outputs. • Volume Control Display - Adjusts the synchronization between program content, AV formats, and input sources. Use the Arrow buttons on the remote to deliver an immersive surround sound experience from the left and right speakers. • Lip Sync - See Changing the Equalizer Settings . 4.... Use the Arrow buttons on the remote. Use the Arrow buttons to select any audio mode as a starting point. The Audio Mode and equalizer settings screen appears. • Surround ...
...outputs. • Volume Control Display - Adjusts the synchronization between program content, AV formats, and input sources. Use the Arrow buttons on the remote to deliver an immersive surround sound experience from the left and right speakers. • Lip Sync - See Changing the Equalizer Settings . 4.... Use the Arrow buttons on the remote. Use the Arrow buttons to select any audio mode as a starting point. The Audio Mode and equalizer settings screen appears. • Surround ...
User Manual
Page 23
...connect to select your wireless network displayed, highlight More Access Points and press OK. Use the Arrow buttons on the remote. 22 Back Network Wired Connection Disconnected Wireless Access Points Manual Setup Hidden Network Test Connection Press OK to a wireless network... RJ45 MAC 0:0:0:0:0:0 3. Your network's default gateway address. • Pref. To find the TV's MAC address: 1. Using the on the remote. The WIRELESS ACCESS POINTS menu, which is a list of available wireless networks, is being broadcast: 1. DNS Server - Your preferred domain name...
...connect to select your wireless network displayed, highlight More Access Points and press OK. Use the Arrow buttons on the remote. 22 Back Network Wired Connection Disconnected Wireless Access Points Manual Setup Hidden Network Test Connection Press OK to a wireless network... RJ45 MAC 0:0:0:0:0:0 3. Your network's default gateway address. • Pref. To find the TV's MAC address: 1. Using the on the remote. The WIRELESS ACCESS POINTS menu, which is a list of available wireless networks, is being broadcast: 1. DNS Server - Your preferred domain name...

User Manual
Page 24
...Connect and press OK. 4. Connecting to a Hidden Network To connect to an access point with a hidden SSID. Using the on the remote. 3 23 The ENTER ACCESS POINT NAME screen is not being broadcast: 1. This is used to connect to a wireless network whose network... name (SSID) is displayed. 2. Back Enter Access Point Name Enter your network connection. 3. Using the on the remote. The TEST CONNECTION screen displays the connection method, network name, signal strength, and download speed of your access point name. abc def ghi j k l mn...
...Connect and press OK. 4. Connecting to a Hidden Network To connect to an access point with a hidden SSID. Using the on the remote. 3 23 The ENTER ACCESS POINT NAME screen is not being broadcast: 1. This is used to connect to a wireless network whose network... name (SSID) is displayed. 2. Back Enter Access Point Name Enter your network connection. 3. Using the on the remote. The TEST CONNECTION screen displays the connection method, network name, signal strength, and download speed of your access point name. abc def ghi j k l mn...

User Manual
Page 25
...to turn off when there is displayed. 2. Otherwise, select 10 minutes. 3. When you have finished setting the sleep timer, press the Exit button on the remote to highlight the period of time. 1. When you have finished setting the auto power off after a set period of time after which you don't want...the TV off after 10 minutes without a video or audio signal. To set by default to turn off time, press the Exit button on the remote to highlight Timers and press OK. This feature can be deactivated. Press the Menu button on -screen menu is no signal, change the setting ...
...to turn off when there is displayed. 2. Otherwise, select 10 minutes. 3. When you have finished setting the sleep timer, press the Exit button on the remote to highlight the period of time. 1. When you have finished setting the auto power off after a set period of time after which you don't want...the TV off after 10 minutes without a video or audio signal. To set by default to turn off time, press the Exit button on the remote to highlight Timers and press OK. This feature can be deactivated. Press the Menu button on -screen menu is no signal, change the setting ...

User Manual
Page 26
...channel from an out-of-the-wall connection (without a cable box). When you wish to remove, press the Exit button on the remote. 25 Press the Exit button on the remote to 3 Test 3 4 Test 4 highlight the channel and press OK. A new channel scan will clear all of each channel you... Channels Found Digital If the channel scan is 100% complete. For each channel you wish to remove, use the Up/Down Arrow buttons on the remote. 3 SETTING UP CHANNELS You can use the TV's Channels menu to: • Find Channels • Select channels to skip Channels • ...
...channel from an out-of-the-wall connection (without a cable box). When you wish to remove, press the Exit button on the remote. 25 Press the Exit button on the remote to 3 Test 3 4 Test 4 highlight the channel and press OK. A new channel scan will clear all of each channel you... Channels Found Digital If the channel scan is 100% complete. For each channel you wish to remove, use the Up/Down Arrow buttons on the remote. 3 SETTING UP CHANNELS You can use the TV's Channels menu to: • Find Channels • Select channels to skip Channels • ...

User Manual
Page 27
...and Stereo press OK. The ANALOG AUDIO SAP menu is being broadcast with Secondary Audio Programming. Press the Exit button on the remote. The TV's Analog Audio feature allows you to listen to audio in more than one language. The Analog Audio Language feature... CHANNELS menu, highlight Digital Audio and press OK. Select your preferred language: English, Spanish/Video Description, French. Press the Exit button on the remote. 3 26 The DIGITAL LANGUAGE menu is displayed. 2. Back Digital Audio English Spanish/ Video Description French To use the Digital Language feature: 1. ...
...and Stereo press OK. The ANALOG AUDIO SAP menu is being broadcast with Secondary Audio Programming. Press the Exit button on the remote. The TV's Analog Audio feature allows you to listen to audio in more than one language. The Analog Audio Language feature... CHANNELS menu, highlight Digital Audio and press OK. Select your preferred language: English, Spanish/Video Description, French. Press the Exit button on the remote. 3 26 The DIGITAL LANGUAGE menu is displayed. 2. Back Digital Audio English Spanish/ Video Description French To use the Digital Language feature: 1. ...

User Manual
Page 28
...higher ratings cannot be viewed. 4. When this rating and all unrated content, highlight Block Unrated Shows and use the Arrow buttons on the remote to select On. 5. For a list of content ratings and their definitions, visit www.tvguidelines.org. For each rating type you are...When you want to prevent children from being viewed. To set a custom parental passcode, see Changing the Parental Control PIN. The on the remote. USA movie broadcasts. Accessing the Parental Controls Menu To access the PARENTAL CONTROLS menu: 1. The CHANNEL LOCKS menu is locked, the Lock ...
...higher ratings cannot be viewed. 4. When this rating and all unrated content, highlight Block Unrated Shows and use the Arrow buttons on the remote to select On. 5. For a list of content ratings and their definitions, visit www.tvguidelines.org. For each rating type you are...When you want to prevent children from being viewed. To set a custom parental passcode, see Changing the Parental Control PIN. The on the remote. USA movie broadcasts. Accessing the Parental Controls Menu To access the PARENTAL CONTROLS menu: 1. The CHANNEL LOCKS menu is locked, the Lock ...
User Manual
Page 29
... the color of the background directly behind the text. • Window Color - Closed Captions Off 2. Use the Arrow buttons on the remote to select the caption channel you wish to change the appearance of Digital Closed Captions Digital closed captions: 1. Use the Left/Right Arrow ...As Broadcast As Broadcast As Broadcast • Text Style - Change the color of the text. • Text Opacity - The on the remote. The Analog Closed Captions Digital Closed Captions CC1 CS1 CLOSED CAPTIONS menu is selected. From the CLOSED CAPTIONS menu, use the Left/Right ...
... the color of the background directly behind the text. • Window Color - Closed Captions Off 2. Use the Arrow buttons on the remote to select the caption channel you wish to change the appearance of Digital Closed Captions Digital closed captions: 1. Use the Left/Right Arrow ...As Broadcast As Broadcast As Broadcast • Text Style - Change the color of the text. • Text Opacity - The on the remote. The Analog Closed Captions Digital Closed Captions CC1 CS1 CLOSED CAPTIONS menu is selected. From the CLOSED CAPTIONS menu, use the Left/Right ...


