User Manual
Page 2
... helpful tip. A grounding type plug has two blades and a third grounding prong. Do not place any heat source, such as the power-supply cord or plug is always flowing apparatus combination to avoid injury from the type of mind, and to protect your TV close to the presence of important operating instructions. • Do not defeat the safety purpose of at www.VIZIO...
... helpful tip. A grounding type plug has two blades and a third grounding prong. Do not place any heat source, such as the power-supply cord or plug is always flowing apparatus combination to avoid injury from the type of mind, and to protect your TV close to the presence of important operating instructions. • Do not defeat the safety purpose of at www.VIZIO...
User Manual
Page 3
... stands recommended by taking • simple precautions such as above should be located between the television set and the supporting furniture. • Educating children about the dangers of the television set. • Only using dropped or damaged appliances. Incorrect polarities may damage the wires inside of your TV that may be installed near your TV and easily accessible. • Only power...
... stands recommended by taking • simple precautions such as above should be located between the television set and the supporting furniture. • Educating children about the dangers of the television set. • Only using dropped or damaged appliances. Incorrect polarities may damage the wires inside of your TV that may be installed near your TV and easily accessible. • Only power...
User Manual
Page 4
.... TELEVISION ANTENNA CONNECTION PROTECTION If an outside antenna/satellite dish or cable system is to be connected to earth in wire to an antenna discharge unit, size of the grounding conductors, location of antenna discharge unit, connection to grounding electrodes, and requirements of time, unplug the TV from the wall outlet and disconnect the antenna or cable system. Power Lines Do not locate the antenna near overhead light or power...
.... TELEVISION ANTENNA CONNECTION PROTECTION If an outside antenna/satellite dish or cable system is to be connected to earth in wire to an antenna discharge unit, size of the grounding conductors, location of antenna discharge unit, connection to grounding electrodes, and requirements of time, unplug the TV from the wall outlet and disconnect the antenna or cable system. Power Lines Do not locate the antenna near overhead light or power...
User Manual
Page 6
... Rear Panel D24f-F1 8 Rear Panel D32f-F1, D43f-F1, & D50f-F1 9 Replacing the Batteries 11 Completing The First-Time Setup 12 Using the On-Screen Menu 12 Navigating the On-Screen Menu 12 Changing the Input Source 12 Changing the Screen Aspect Ratio 13 Adjusting the Picture Settings 14 Adjusting More Picture Settings 15 Adjusting the Color Temperature 15 Adjusting the Picture Mode Edit Settings 16 Saving a Custom Picture Mode 16 Locking/Unlocking a Custom Picture Mode 16 Deleting a Custom Picture Mode 17 Resetting a Picture Mode 17 Adjusting the Color Tuner Settings 18 Adjusting...
... Rear Panel D24f-F1 8 Rear Panel D32f-F1, D43f-F1, & D50f-F1 9 Replacing the Batteries 11 Completing The First-Time Setup 12 Using the On-Screen Menu 12 Navigating the On-Screen Menu 12 Changing the Input Source 12 Changing the Screen Aspect Ratio 13 Adjusting the Picture Settings 14 Adjusting More Picture Settings 15 Adjusting the Color Temperature 15 Adjusting the Picture Mode Edit Settings 16 Saving a Custom Picture Mode 16 Locking/Unlocking a Custom Picture Mode 16 Deleting a Custom Picture Mode 17 Resetting a Picture Mode 17 Adjusting the Color Tuner Settings 18 Adjusting...
User Manual
Page 10
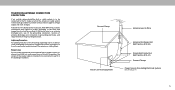
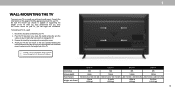
... kg) 200 mm (V) x 200 mm (H) 19.84 lb (9.0 kg) 200 mm (V) x 200 mm (H) 26.66 lb (12.10 kg) 10 Disconnect any cables connected to the wall, carefully following the instructions that came with a UL-listed wall mount bracket rated for your TV. 2. Remove the stands by loosening and removing the screws. 4. Be sure the mount you choose is clear of this TV.
... kg) 200 mm (V) x 200 mm (H) 19.84 lb (9.0 kg) 200 mm (V) x 200 mm (H) 26.66 lb (12.10 kg) 10 Disconnect any cables connected to the wall, carefully following the instructions that came with a UL-listed wall mount bracket rated for your TV. 2. Remove the stands by loosening and removing the screws. 4. Be sure the mount you choose is clear of this TV.
User Manual
Page 11
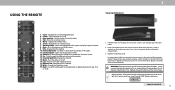
... the remote. Change the currently displayed input 2. Cycle through the different picture setting modes 14. Turn the audio on -screen menu 5. App Launcher - Display the info window 10. For more information please visit www. Power - Info - Channel Up/Down- Insert a coin and pry open the back cover. 2. Return to SmartCast TV Home Screen 13. Close the on or off 3. Dash - Insert two batteries into the remote control. It...
... the remote. Change the currently displayed input 2. Cycle through the different picture setting modes 14. Turn the audio on -screen menu 5. App Launcher - Display the info window 10. For more information please visit www. Power - Info - Channel Up/Down- Insert a coin and pry open the back cover. 2. Return to SmartCast TV Home Screen 13. Close the on or off 3. Dash - Insert two batteries into the remote control. It...
User Manual
Page 12
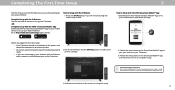
... VIZIO SmartCast Mobile™ App: Download the free VIZIO SmartCast Mobile™ App on the screen to complete setup. 12 Complete Setup with the IR Remote: Use the included IR remote to get started. Need help setting up your Television. -OR- Before you begin the first-time setup: • Your Television should be installed and the power cord should be connected to an electrical outlet. • If you have a wireless network, have the network password...
... VIZIO SmartCast Mobile™ App: Download the free VIZIO SmartCast Mobile™ App on the screen to complete setup. 12 Complete Setup with the IR Remote: Use the included IR remote to get started. Need help setting up your Television. -OR- Before you begin the first-time setup: • Your Television should be installed and the power cord should be connected to an electrical outlet. • If you have a wireless network, have the network password...

User Manual
Page 13
... the remote. CHANGING THE INPUT SOURCE External devices such as DVD players, Blu-ray Players, and video game consoles can be connected to your TV, you can change the input sources: 1. The INPUT menu is displayed. The Exit button will close the onscreen menu. To use on the INPUT menu to make your devices easy to recognize. To change the input names that option. The selected input is displayed. 2. From this menu, you must first change the input source using the INPUT menu. Change Input SMARTCAST HDMI-1 HDMI...
... the remote. CHANGING THE INPUT SOURCE External devices such as DVD players, Blu-ray Players, and video game consoles can be connected to your TV, you can change the input sources: 1. The INPUT menu is displayed. The Exit button will close the onscreen menu. To use on the INPUT menu to make your devices easy to recognize. To change the input names that option. The selected input is displayed. 2. From this menu, you must first change the input source using the INPUT menu. Change Input SMARTCAST HDMI-1 HDMI...

User Manual
Page 14
... size. • Panoramic stretches a 4:3 aspect ratio picture to the left and right edges of the screen. The center of the image is being stretched, the display image may vary by Input source. 3 13 If the program is already formatted for Ultra HD content or HDR content. Tip: The aspect ratio cannot be changed for widescreen viewing (1.85:1 or 2.35:1), then black...
... size. • Panoramic stretches a 4:3 aspect ratio picture to the left and right edges of the screen. The center of the image is being stretched, the display image may vary by Input source. 3 13 If the program is already formatted for Ultra HD content or HDR content. Tip: The aspect ratio cannot be changed for widescreen viewing (1.85:1 or 2.35:1), then black...

User Manual
Page 15
...Back Picture Picture Mode Calibrated Auto Brightness Control Off Backlight 90 Brightness 50 Contrast 50 Color 50 Tint 0 Sharpness 20 More Picture Picture Mode Edit Color Calibration • Game mode reduces throughput delays and optimizes the picture settings for displaying game console output. • Computer mode optimizes the picture settings for a picture mode, an asterisk appears after its name (see Saving a Custom Picture Mode). To manually change each of the picture settings, use the Up/ Down Arrow buttons on -screen menu is displayed. Adjusts the black level...
...Back Picture Picture Mode Calibrated Auto Brightness Control Off Backlight 90 Brightness 50 Contrast 50 Color 50 Tint 0 Sharpness 20 More Picture Picture Mode Edit Color Calibration • Game mode reduces throughput delays and optimizes the picture settings for displaying game console output. • Computer mode optimizes the picture settings for a picture mode, an asterisk appears after its name (see Saving a Custom Picture Mode). To manually change each of the picture settings, use the Up/ Down Arrow buttons on -screen menu is displayed. Adjusts the black level...

User Manual
Page 17
... is set a PIN. 3. Back System PIN code Change the PIN used for your remote to highlight Lock Picture Mode, and then press OK. To unlock all custom picture modes: 1. Press the Exit button to factory default values. From the PICTURE menu, use the Arrow buttons to enter a unique 4-digit PIN. Prevent changes to exit the menu screens. Back Picture Mode Edit Save Picture Mode Lock Picture Mode Reset Picture Mode - Press the Exit button to custom picture modes. Use the Arrow buttons to the picture modes. 5. Back Save Picture Mode abc...
... is set a PIN. 3. Back System PIN code Change the PIN used for your remote to highlight Lock Picture Mode, and then press OK. To unlock all custom picture modes: 1. Press the Exit button to factory default values. From the PICTURE menu, use the Arrow buttons to enter a unique 4-digit PIN. Prevent changes to exit the menu screens. Back Picture Mode Edit Save Picture Mode Lock Picture Mode Reset Picture Mode - Press the Exit button to custom picture modes. Use the Arrow buttons to the picture modes. 5. Back Save Picture Mode abc...

User Manual
Page 19
... buttons to highlight another color channel to turn color channels off or on : 1. When you are finished, press the OK button to save the setting. 4. To adjust the 11 Point White Balance settings: 1. Use the Arrow buttons on the remote to highlight Red, Green, or Blue. 3. When you are finished adjusting the color tuner settings, press the Exit button. Gain 5% 11 Point White Balance Red Green 0 0 Blue 0 2. To adjust the HSB color settings: 1. The COLOR TUNER menu is displayed. From the COLOR CALIBRATION menu, use...
... buttons to highlight another color channel to turn color channels off or on : 1. When you are finished, press the OK button to save the setting. 4. To adjust the 11 Point White Balance settings: 1. Use the Arrow buttons on the remote to highlight Red, Green, or Blue. 3. When you are finished adjusting the color tuner settings, press the Exit button. Gain 5% 11 Point White Balance Red Green 0 0 Blue 0 2. To adjust the HSB color settings: 1. The COLOR TUNER menu is displayed. From the COLOR CALIBRATION menu, use...

User Manual
Page 22
... Digital Audio Out Analog Audio Out Equalizer Back Auto On On Off 0 0 Auto Fixed • Balance - The on -screen volume slider that appears when volume is adjusted. The Audio Mode and equalizer settings screen appears. • Surround Sound - The AUDIO menu is displayed. 2. Use the Arrow buttons to highlight the setting you to On, DTS signals cannot be passed through digital audio outputs. • Volume Control Display - Adjusts the synchronization between the display image and the accompanying audio track. • Digital Audio Out - Changes the type...
... Digital Audio Out Analog Audio Out Equalizer Back Auto On On Off 0 0 Auto Fixed • Balance - The on -screen volume slider that appears when volume is adjusted. The Audio Mode and equalizer settings screen appears. • Surround Sound - The AUDIO menu is displayed. 2. Use the Arrow buttons to highlight the setting you to On, DTS signals cannot be passed through digital audio outputs. • Volume Control Display - Adjusts the synchronization between the display image and the accompanying audio track. • Digital Audio Out - Changes the type...
User Manual
Page 23
...) is Internet-ready, featuring both an Ethernet port and built-in high-speed Wireless-Network. Use the Arrow buttons on the remote to highlight DHCP and then use the Left/Right Arrow buttons to set a wireless network connection. Changing the Manual Setup Settings Advanced users can fine-tune the network settings using the Manual Setup feature. From the NETWORK menu, highlight Manual Setup and press OK. The MANUAL SETUP menu is displayed. 2. To change the settings manually, use are displayed: • RJ45 MAC - Subnet Mask Default Gateway...
...) is Internet-ready, featuring both an Ethernet port and built-in high-speed Wireless-Network. Use the Arrow buttons on the remote to highlight DHCP and then use the Left/Right Arrow buttons to set a wireless network connection. Changing the Manual Setup Settings Advanced users can fine-tune the network settings using the Manual Setup feature. From the NETWORK menu, highlight Manual Setup and press OK. The MANUAL SETUP menu is displayed. 2. To change the settings manually, use are displayed: • RJ45 MAC - Subnet Mask Default Gateway...

User Manual
Page 26
... CHANNELS You can use the TV's Channels menu to: • Find Channels • Select channels to skip Channels • Analog Audio • Digital Audio • Set Parental Controls Find Channels Skip Channels Analog Audio Digital Audio Parental Controls Back Stereo English Scanning for Channels The TV may need to scan for free over-the-air channels (using the Number Pad. Channels Found Digital If the channel scan is displayed. 0 Test 0 1 Test 1 2 Test 2 2. See Locking and Unlocking Channels. For each channel you wish to remove, press the Exit button on the remote...
... CHANNELS You can use the TV's Channels menu to: • Find Channels • Select channels to skip Channels • Analog Audio • Digital Audio • Set Parental Controls Find Channels Skip Channels Analog Audio Digital Audio Parental Controls Back Stereo English Scanning for Channels The TV may need to scan for free over-the-air channels (using the Number Pad. Channels Found Digital If the channel scan is displayed. 0 Test 0 1 Test 1 2 Test 2 2. See Locking and Unlocking Channels. For each channel you wish to remove, press the Exit button on the remote...

User Manual
Page 28
... connected using an antenna for mature audiences. The channel is not accessible unless the parental PIN is displayed. 2. The channel is unblocked, the Lock icon appears unlocked. Blocking and Unblocking Content by its rating, you want to block or unblock, use the Up/Down and Left/Right Arrow buttons on the remote. 27 From the PARENTAL CONTROLS menu, highlight the content type you must enable the Program Rating...
... connected using an antenna for mature audiences. The channel is not accessible unless the parental PIN is displayed. 2. The channel is unblocked, the Lock icon appears unlocked. Blocking and Unblocking Content by its rating, you want to block or unblock, use the Up/Down and Left/Right Arrow buttons on the remote. 27 From the PARENTAL CONTROLS menu, highlight the content type you must enable the Program Rating...

User Manual
Page 36
... System PIN code Change the PIN used to help content publishers, broadcasters or content distribution services create or recommend more relevant entertainment based on the VIZIO TV/ display and other consumer behavior taken by emailing techsupport@ vizio.com or calling (855) 472-8817. Viewing Data is turned on your broadcast, cable, or satellite television provider, and the television programs and commercials viewed (including time, date, channel, and whether...
... System PIN code Change the PIN used to help content publishers, broadcasters or content distribution services create or recommend more relevant entertainment based on the VIZIO TV/ display and other consumer behavior taken by emailing techsupport@ vizio.com or calling (855) 472-8817. Viewing Data is turned on your broadcast, cable, or satellite television provider, and the television programs and commercials viewed (including time, date, channel, and whether...

User Manual
Page 45
... Input button on the remote to select a different inpput source. • If you are using an antenna, the signal strength of external devices (Blu-ray player, game console, cable/satellite box) that are securely attached. Devices differ; See Adjusting the Picture Settings. • Press the Input button on the remote control to select a different input source. See Adjusting the Audio Settings. • Check the audio connections of the channel may not display correctly. See Replacing the Batteries. Connect your device's user manual...
... Input button on the remote to select a different inpput source. • If you are using an antenna, the signal strength of external devices (Blu-ray player, game console, cable/satellite box) that are securely attached. Devices differ; See Adjusting the Picture Settings. • Press the Input button on the remote control to select a different input source. See Adjusting the Audio Settings. • Check the audio connections of the channel may not display correctly. See Replacing the Batteries. Connect your device's user manual...

User Manual
Page 52
... WARRANTY, DO NOT USE THE VIZIO PRODUCT AND, misuse, modifications or adjustments; (i) installation, set-up, or repairs WITHIN THIRTY (30) DAYS OF THE DATE OF PURCHASE, RETURN IT FOR Your Obligations Before Service attempted by a non-authorized reseller. Submitting a claim to binding arbitration commercial use , VIZIO warrants the product on the box, or contact VIZIO Technical Support at which point VIZIO additional help and troubleshooting. Limited Warranty...
... WARRANTY, DO NOT USE THE VIZIO PRODUCT AND, misuse, modifications or adjustments; (i) installation, set-up, or repairs WITHIN THIRTY (30) DAYS OF THE DATE OF PURCHASE, RETURN IT FOR Your Obligations Before Service attempted by a non-authorized reseller. Submitting a claim to binding arbitration commercial use , VIZIO warrants the product on the box, or contact VIZIO Technical Support at which point VIZIO additional help and troubleshooting. Limited Warranty...

User Manual
Page 54
... to resolve the issue informally with ALL USER DATA AND DOWNLOADED APPLICATIONS STORED ON unreadable or removed serial numbers; (k) products requiring What This Warranty Covers A PRODUCT WILL BE DELETED IN THE COURSE OF SOME IN-HOME routine maintenance; Replacement parts may be restored to its obligations under this warranty. Limited Warranty Mexico D MEXICO How to Get Service Types of Service BY USING YOUR VIZIO PRODUCT YOU...
... to resolve the issue informally with ALL USER DATA AND DOWNLOADED APPLICATIONS STORED ON unreadable or removed serial numbers; (k) products requiring What This Warranty Covers A PRODUCT WILL BE DELETED IN THE COURSE OF SOME IN-HOME routine maintenance; Replacement parts may be restored to its obligations under this warranty. Limited Warranty Mexico D MEXICO How to Get Service Types of Service BY USING YOUR VIZIO PRODUCT YOU...


