
Quick Start Guide
Page 1
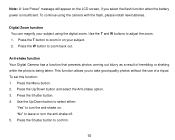
Know your camera you to be purchased separately. Quick Start Guide Vivitar ViviCam 5018 Digital Camera 1. Memory cards are not included and need to insert an SD Memory card (up to 8GB). Open and install 2 AAA alkaline batteries into the battery compartment on the bottom of the camera: 3. In order for you will need to capture images with your camera: 2.
Know your camera you to be purchased separately. Quick Start Guide Vivitar ViviCam 5018 Digital Camera 1. Memory cards are not included and need to insert an SD Memory card (up to 8GB). Open and install 2 AAA alkaline batteries into the battery compartment on the bottom of the camera: 3. In order for you will need to capture images with your camera: 2.
Quick Start Guide
Page 2
...computer The application will appear in the LCD screen Use the zoom in (T) zoom out (W) button to focus your shot Holding the camera steady press the "Shutter" button with your right index finger The image is automatically saved to the memory card For other... camera features and how to change to install the software on your computer Once the software is installed simply double-click the Photags Express icon...
...computer The application will appear in the LCD screen Use the zoom in (T) zoom out (W) button to focus your shot Holding the camera steady press the "Shutter" button with your right index finger The image is automatically saved to the memory card For other... camera features and how to change to install the software on your computer Once the software is installed simply double-click the Photags Express icon...
Quick Start Guide
Page 3
...Me How tutorial in the package Wait a few seconds for choosing our ViviCam 5018 5.1 Mega-Pixel Digital Camera. All rights reserved. 195 Carter Drive Edison, NJ 08817 www.sakar.com Download and edit the images Vivitar makes it easier to download the images Click the "Get Photos" button on... the top of the Photags Express main menu Follow the download wizard step-by-step instructions The images on your camera will appear in the Select ...
...Me How tutorial in the package Wait a few seconds for choosing our ViviCam 5018 5.1 Mega-Pixel Digital Camera. All rights reserved. 195 Carter Drive Edison, NJ 08817 www.sakar.com Download and edit the images Vivitar makes it easier to download the images Click the "Get Photos" button on... the top of the Photags Express main menu Follow the download wizard step-by-step instructions The images on your camera will appear in the Select ...
Camera Manual
Page 1
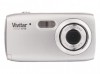
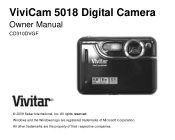
All other trademarks are registered trademarks of their respective companies. Windows and the Windows logo are the property of Microsoft Corporation. All rights reserved. ViviCam 5018 Digital Camera Owner Manual CD310DVGF © 2009 Sakar International, Inc.
All other trademarks are registered trademarks of their respective companies. Windows and the Windows logo are the property of Microsoft Corporation. All rights reserved. ViviCam 5018 Digital Camera Owner Manual CD310DVGF © 2009 Sakar International, Inc.
Camera Manual
Page 2
...Windows XP 3 Computer System Requirements for Windows Vista 3 Computer System Requirements for Macintosh 3 A Quick Look at Your Camera...4 Preparing Your Camera for Use...5 Installing SD Memory Card...6 Starting Your Camera ...8 Camera Mode ...8 Taking photos ...8 Video Mode ...12 Playback Mode...13 Installing PhoTags Express Software...15 Everything you need to get... and videos to your PC manually 27 Transferring photos and videos to your MAC manually 28 Maintenance of Your Digital Camera ...29 Sakar Warranty Card...29 Appendix A: Specifications ...30 Appendix B: Troubleshooting...31 1
...Windows XP 3 Computer System Requirements for Windows Vista 3 Computer System Requirements for Macintosh 3 A Quick Look at Your Camera...4 Preparing Your Camera for Use...5 Installing SD Memory Card...6 Starting Your Camera ...8 Camera Mode ...8 Taking photos ...8 Video Mode ...12 Playback Mode...13 Installing PhoTags Express Software...15 Everything you need to get... and videos to your PC manually 27 Transferring photos and videos to your MAC manually 28 Maintenance of Your Digital Camera ...29 Sakar Warranty Card...29 Appendix A: Specifications ...30 Appendix B: Troubleshooting...31 1
Camera Manual
Page 3
... your life. Everything you for managing and enhancing your photos, add captions, send E-mail, printing and much more. Your digital camera can also be used as a removable disk. Key Features Digital Image Resolution- 5M, 3M, 2M, VGA. SD RAM 8MB. &#...61623; Support s SD/MMC memory card (not included) up to take quality digital photos and videos is included with your digital camera. It enriches your camera includes Digital Camera PhoTags Express software Installation CD USB cable User's manual Strap 2 Please read this manual ...
... your life. Everything you for managing and enhancing your photos, add captions, send E-mail, printing and much more. Your digital camera can also be used as a removable disk. Key Features Digital Image Resolution- 5M, 3M, 2M, VGA. SD RAM 8MB. &#...61623; Support s SD/MMC memory card (not included) up to take quality digital photos and videos is included with your digital camera. It enriches your camera includes Digital Camera PhoTags Express software Installation CD USB cable User's manual Strap 2 Please read this manual ...
Camera Manual
Page 5
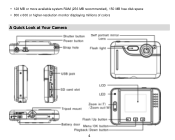
128 MB or more available system RAM (256 MB recommended), 150 MB free disk space 800 x 600 or higher-resolution monitor displaying millions of colors A Quick Look at Your Camera 4
128 MB or more available system RAM (256 MB recommended), 150 MB free disk space 800 x 600 or higher-resolution monitor displaying millions of colors A Quick Look at Your Camera 4
Camera Manual
Page 6
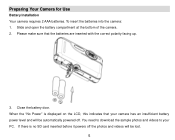
You need to download the sample photos and videos to your camera has an insufficient battery power level and will be automatically powered off the photos and videos will be lost. 5 If there is displayed on the ... polarity facing up. 3. Close the battery door. To insert the batteries into the camera: 1. Slide and open the battery compartment at the bottom of the camera. 2. Please make sure that your PC. Preparing Your Camera for Use Battery Installation Your camera requires 2 AAA batteries. When the "No Power" is no SD card inserted before...
You need to download the sample photos and videos to your camera has an insufficient battery power level and will be automatically powered off the photos and videos will be lost. 5 If there is displayed on the ... polarity facing up. 3. Close the battery door. To insert the batteries into the camera: 1. Slide and open the battery compartment at the bottom of the camera. 2. Please make sure that your PC. Preparing Your Camera for Use Battery Installation Your camera requires 2 AAA batteries. When the "No Power" is no SD card inserted before...
Camera Manual
Page 7
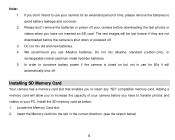
... the capacity of time, please remove the batteries to insert any "SD" compatible memory card. Please don't remove the batteries or power off your camera for 60s it will automatically shut off . Install the SD memory card as below ) 6 The test images will allow you have not inserted an... shut down or powered off . Insert the Memory card into the slot in use Alkaline batteries. If you don't intend to use your camera before the camera is tuned on but not in the correct direction. (see the sketch below : 1. Do not mix alkaline, standard (carbon-zinc), or rechargeable (nickel...
... the capacity of time, please remove the batteries to insert any "SD" compatible memory card. Please don't remove the batteries or power off your camera for 60s it will automatically shut off . Install the SD memory card as below ) 6 The test images will allow you have not inserted an... shut down or powered off . Insert the Memory card into the slot in use Alkaline batteries. If you don't intend to use your camera before the camera is tuned on but not in the correct direction. (see the sketch below : 1. Do not mix alkaline, standard (carbon-zinc), or rechargeable (nickel...
Camera Manual
Page 8
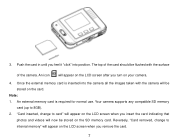
..., change to internal memory" will appear on the card. An external memory card is inserted into position. An icon will now be flushed with the camera will be stored on the LCD screen when you insert the card indicating that photos and videos will appear on the LCD screen when you... remove the card. 7 Your camera supports any compatible SD memory card (up to card" will appear on the LCD screen after you feel it "click" into the...
..., change to internal memory" will appear on the card. An external memory card is inserted into position. An icon will now be flushed with the camera will be stored on the LCD screen when you insert the card indicating that photos and videos will appear on the LCD screen when you... remove the card. 7 Your camera supports any compatible SD memory card (up to card" will appear on the LCD screen after you feel it "click" into the...
Camera Manual
Page 9
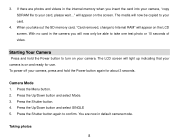
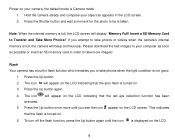
... the Shutter button. 4. When you take one test photo or 10 seconds of video. Taking photos 8 3. With no card in the camera you insert the card into your camera, "copy SDRAM file to Internal RAM" will now only be copied to confirm. If there are now in the internal memory when... take out the SD memory card, "Card removed, change to your camera. Camera Mode 1. To power off your card. 4. You are photos and videos in default camera mode. Press the Up/Down button and select Mode. 3. Starting Your Camera Press and hold the Power button again for use. Press the Up/...
... the Shutter button. 4. When you take one test photo or 10 seconds of video. Taking photos 8 3. With no card in the camera you insert the card into your camera, "copy SDRAM file to Internal RAM" will now only be copied to confirm. If there are now in the internal memory when... take out the SD memory card, "Card removed, change to your camera. Camera Mode 1. To power off your card. 4. You are photos and videos in default camera mode. Press the Up/Down button and select Mode. 3. Starting Your Camera Press and hold the Power button again for use. Press the Up/...
Camera Manual
Page 10
...off the flash function, press the Up button again until you to take photos or videos when the camera's internal memory is taken. Press the Shutter button and wait a moment for the photo to take more until the icon... is Camera mode. 1. Please download the test images to your object as possible or insert an SD memory card ... eye reduction function has been activated. 5. The icon will appear on . 3. Hold the camera steady and compose your computer as soon as appears in order to be is full, the...
...off the flash function, press the Up button again until you to take photos or videos when the camera's internal memory is taken. Press the Shutter button and wait a moment for the photo to take more until the icon... is Camera mode. 1. Please download the test images to your object as possible or insert an SD memory card ... eye reduction function has been activated. 5. The icon will appear on . 3. Hold the camera steady and compose your computer as soon as appears in order to be is full, the...
Camera Manual
Page 11
Press the T button to zoom back out. Press the W button to zoom in on your subject using the camera with the flash, please install new batteries. Press the Shutter button. 4. Press the Shutter button to adjust the zoom. 1. Note: A "Low Power" message will ...function when the battery power is being taken. To set this function: 1. Digital Zoom function You can magnify your subject. 2. Anti-shake function Your Digital Camera has a function that prevents photos coming out blurry as a result of a tripod. To continue using the digital zoom. Press the Menu button. 2.
Press the T button to zoom back out. Press the W button to zoom in on your subject using the camera with the flash, please install new batteries. Press the Shutter button. 4. Press the Shutter button to adjust the zoom. 1. Note: A "Low Power" message will ...function when the battery power is being taken. To set this function: 1. Digital Zoom function You can magnify your subject. 2. Anti-shake function Your Digital Camera has a function that prevents photos coming out blurry as a result of a tripod. To continue using the digital zoom. Press the Menu button. 2.
Camera Manual
Page 12
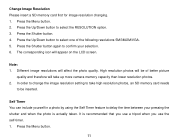
... the self-timer. 1. High resolution photos will be inserted. It is actually taken. In order to change the image resolution setting to take up more camera memory capacity than lower resolution photos. 2. Note: 1. Press the Menu button. 11 Press the Up/Down button to delay the time between your selection. 6. Different...
... the self-timer. 1. High resolution photos will be inserted. It is actually taken. In order to change the image resolution setting to take up more camera memory capacity than lower resolution photos. 2. Note: 1. Press the Menu button. 11 Press the Up/Down button to delay the time between your selection. 6. Different...
Camera Manual
Page 13
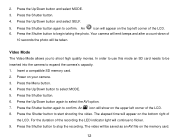
... button. 4. The elapsed time will be saved as an AVI file on the bottom right of 10 seconds the photo will continue to expand the camera's capacity. 1. Press the Shutter button to begin taking the photo. The video will appear on the memory card. 12 Press the Shutter button to stop.... In order to use this mode an SD card needs to be taken. Press the Shutter button. 6. Press the Shutter button to select MODE. 5. Your camera will emit beeps and after a count-down of the LCD. Power on the top left corner of the recording the LED indicator light will be...
... button. 4. The elapsed time will be saved as an AVI file on the bottom right of 10 seconds the photo will continue to expand the camera's capacity. 1. Press the Shutter button to begin taking the photo. The video will appear on the memory card. 12 Press the Shutter button to stop.... In order to use this mode an SD card needs to be taken. Press the Shutter button. 6. Press the Shutter button to select MODE. 5. Your camera will emit beeps and after a count-down of the LCD. Power on the top left corner of the recording the LED indicator light will be...
Camera Manual
Page 14
... button where no photos/videos in your SD memory card by using Quick Time or Windows Media Player once it has been downloaded to the camera mode. "JPG" will appear on your photos and videos. Press the Menu button. 3. Note: 1. Press the Down button to the standby mode. Press the Shutter... appear on the LCD when there is no SD memory was previously inserted. 2. Preview photos Press the Up/Down button to select and view your camera. 2. "AVI" will appear on the LCD if you select an AVI file. Note: "NO FILE" will appear on the upper left corner of the LCD...
... button where no photos/videos in your SD memory card by using Quick Time or Windows Media Player once it has been downloaded to the camera mode. "JPG" will appear on your photos and videos. Press the Menu button. 3. Note: 1. Press the Down button to the standby mode. Press the Shutter... appear on the LCD when there is no SD memory was previously inserted. 2. Preview photos Press the Up/Down button to select and view your camera. 2. "AVI" will appear on the LCD if you select an AVI file. Note: "NO FILE" will appear on the upper left corner of the LCD...
Camera Manual
Page 15
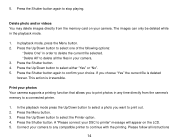
... printer. 1. Press the Up/Down button to any time directly from the memory card on the LCD. 5. Press the Shutter button again to confirm your camera to select one of the following options: "Delete One" in the playback mode. 1. A "Please connect your DSC to print out. 2. In the ...to select the Printer option. 4. This action is deleted forever. Press the Up/Down button to select either "Yes" or "No". 5. Print your camera. 3. The images can only be deleted while in order to delete all instructions 14 Please follow all the files in any compatible printer to stop...
... printer. 1. Press the Up/Down button to any time directly from the memory card on the LCD. 5. Press the Shutter button again to confirm your camera to select one of the following options: "Delete One" in the playback mode. 1. A "Please connect your DSC to print out. 2. In the ...to select the Printer option. 4. This action is deleted forever. Press the Up/Down button to select either "Yes" or "No". 5. Print your camera. 3. The images can only be deleted while in order to delete all instructions 14 Please follow all the files in any compatible printer to stop...
Camera Manual
Page 16
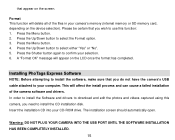
... cable attached to confirm your CD-ROM drive. The installation screen should automatically open. Warning: DO NOT PLUG YOUR CAMERA INTO THE USB PORT UNTIL THE SOFTWARE INSTALLATION HAS BEEN COMPLETELY INSTALLED. 15 that appear on the LCD once the format has completed. Press the ... cause a failed installation of the files in your computer. Please be certain that you need to use this function: 1. This will delete all of the camera software and drivers. In order to install the Software and drivers to download and edit the photos and videos captured using this...
... cable attached to confirm your CD-ROM drive. The installation screen should automatically open. Warning: DO NOT PLUG YOUR CAMERA INTO THE USB PORT UNTIL THE SOFTWARE INSTALLATION HAS BEEN COMPLETELY INSTALLED. 15 that appear on the LCD once the format has completed. Press the ... cause a failed installation of the files in your computer. Please be certain that you need to use this function: 1. This will delete all of the camera software and drivers. In order to install the Software and drivers to download and edit the photos and videos captured using this...
Camera Manual
Page 17
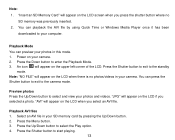
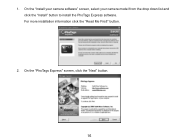
On the "PhoTags Express" screen, click the "Next" button. 16 button. 2. For more installation information click the "Read Me First!" 1. On the "Install your camera software" screen, select your camera model from the drop down list and click the "Install" button to install the PhoTags Express software.
On the "PhoTags Express" screen, click the "Next" button. 16 button. 2. For more installation information click the "Read Me First!" 1. On the "Install your camera software" screen, select your camera model from the drop down list and click the "Install" button to install the PhoTags Express software.
Camera Manual
Page 21
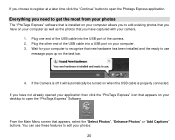
... on your desktop to edit existing photos that you have captured with your computer. 3. Plug one end of the camera. 2. Plug the other end of the USB cable into the USB port of the USB cable into a USB ...port on your computer as well as the photos that you have on your camera. 1. Everything you to open the Photags Express application. You can use message pops up on the task bar. ...4. If the Camera is properly connected. From the Main Menu screen that is installed on when the USB cable...
... on your desktop to edit existing photos that you have captured with your computer. 3. Plug one end of the camera. 2. Plug the other end of the USB cable into the USB port of the USB cable into a USB ...port on your computer as well as the photos that you have on your camera. 1. Everything you to open the Photags Express application. You can use message pops up on the task bar. ...4. If the Camera is properly connected. From the Main Menu screen that is installed on when the USB cable...


