User Guide
Page 26
...the computer 58 Opening the display panel 58 Turning on the power 59 Setting up your software 60 Registering your computer with Toshiba 61 Setting up other devices 61 Turning off the computer 62 Closing the display panel 63 Chapter 3: Connecting Other External ... diskette drive 71 Connecting external speakers or headphones .........72 Connecting an external microphone 72 Using an expansion device 73 Adding memory 73 Installing a memory module 74 Removing a memory module 76 Using Slim SelectBay® modules 77 Removing a module from the Slim SelectBay® ....78 Inserting a ...
...the computer 58 Opening the display panel 58 Turning on the power 59 Setting up your software 60 Registering your computer with Toshiba 61 Setting up other devices 61 Turning off the computer 62 Closing the display panel 63 Chapter 3: Connecting Other External ... diskette drive 71 Connecting external speakers or headphones .........72 Connecting an external microphone 72 Using an expansion device 73 Adding memory 73 Installing a memory module 74 Removing a memory module 76 Using Slim SelectBay® modules 77 Removing a module from the Slim SelectBay® ....78 Inserting a ...
User Guide
Page 30
30 Contents Changing or removing existing key assignments 164 Toshiba HW Setup 164 Accessing Toshiba HW Setup 164 Power Saver 167 Mobile Extension 168 Chapter 8: Keeping Your Files Safe 170 Using passwords in Windows 170 User-level passwords 171 Setting a ... the computer 186 Resolving a hardware conflict 188 Using the Windows XP troubleshooting feature.188 A plan of action 188 Resolving hardware conflicts on your own ........189 Memory module problems 191 Power and the batteries 192 Keyboard problems 193 AccuPoint II problems 194
30 Contents Changing or removing existing key assignments 164 Toshiba HW Setup 164 Accessing Toshiba HW Setup 164 Power Saver 167 Mobile Extension 168 Chapter 8: Keeping Your Files Safe 170 Using passwords in Windows 170 User-level passwords 171 Setting a ... the computer 186 Resolving a hardware conflict 188 Using the Windows XP troubleshooting feature.188 A plan of action 188 Resolving hardware conflicts on your own ........189 Memory module problems 191 Power and the batteries 192 Keyboard problems 193 AccuPoint II problems 194
User Guide
Page 45
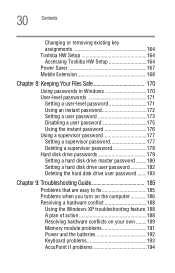
See "System indicator panel lights" on page 95. Underside Hard disk drive bay Memory module cover Battery module Battery module release Slim SelectBay release Slim SelectBay slot Expansion port Battery module-Lets you connect an external monaural microphone or ...
See "System indicator panel lights" on page 95. Underside Hard disk drive bay Memory module cover Battery module Battery module release Slim SelectBay release Slim SelectBay slot Expansion port Battery module-Lets you connect an external monaural microphone or ...
User Guide
Page 46
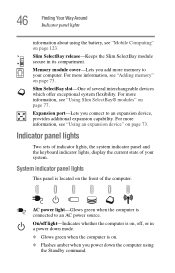
... is located on page 77. 46 Finding Your Way Around Indicator panel lights information about using the Standby command. For more information, see "Adding memory" on page 73. Indicator panel lights Two sets of indicator lights, the system indicator panel and the keyboard indicator lights, display the current state... when you power down the computer using the battery, see "Using Slim SelectBay® modules" on the front of the computer. For more memory to your system. Expansion port-Lets you add more information, see "Mobile Computing" on , off, or in its compartment...
... is located on page 77. 46 Finding Your Way Around Indicator panel lights information about using the Standby command. For more information, see "Adding memory" on page 73. Indicator panel lights Two sets of indicator lights, the system indicator panel and the keyboard indicator lights, display the current state... when you power down the computer using the battery, see "Using Slim SelectBay® modules" on the front of the computer. For more memory to your system. Expansion port-Lets you add more information, see "Mobile Computing" on , off, or in its compartment...
User Guide
Page 54
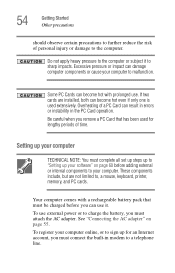
Do not apply heavy pressure to the computer or subject it . If two cards are not limited to, a mouse, keyboard, printer, memory, and PC cards. Setting up your computer TECHNICAL NOTE: You must attach the AC adapter. See "Connecting the AC adapter" on page 60 before you ...
Do not apply heavy pressure to the computer or subject it . If two cards are not limited to, a mouse, keyboard, printer, memory, and PC cards. Setting up your computer TECHNICAL NOTE: You must attach the AC adapter. See "Connecting the AC adapter" on page 60 before you ...
User Guide
Page 55
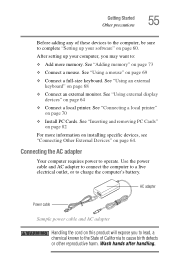
..." on page 69 ❖ Connect a full-size keyboard. Wash hands after handling. See "Inserting and removing PC Cards" on page 60. See "Adding memory" on page 64 ❖ Connect a local printer. See "Using external display devices" on page 73 ❖ Connect a mouse. After setting up your computer... a chemical known to the State of these devices to the computer, be sure to complete "Setting up your software" on page 82 For more memory. See "Using a mouse" on page 64. Use the power cable and AC adapter to connect the computer to a live electrical outlet, or ...
..." on page 69 ❖ Connect a full-size keyboard. Wash hands after handling. See "Inserting and removing PC Cards" on page 60. See "Adding memory" on page 64 ❖ Connect a local printer. See "Using external display devices" on page 73 ❖ Connect a mouse. After setting up your computer... a chemical known to the State of these devices to the computer, be sure to complete "Setting up your software" on page 82 For more memory. See "Using a mouse" on page 64. Use the power cable and AC adapter to connect the computer to a live electrical outlet, or ...
User Guide
Page 73
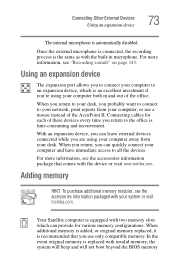
... Using an expansion device 73 The internal microphone is replaced with invalid memory, the system will beep and will not boot beyond the BIOS memory Once the external microphone is connected, the recording process is equipped with your system or visit toshiba.com. For more information, see the accessories information packaged with two...
... Using an expansion device 73 The internal microphone is replaced with invalid memory, the system will beep and will not boot beyond the BIOS memory Once the external microphone is connected, the recording process is equipped with your system or visit toshiba.com. For more information, see the accessories information packaged with two...

User Guide
Page 74
... run your computer completely using the Shut Down command. You can install extra memory. To avoid damaging the computer's screws, use a standard Phillips no .1 screwdriver for this occurs, contact Toshiba's support center at (800) 457-7777. A message may damage the computer, the module, or both. 3 Close the display panel and remove any...
... run your computer completely using the Shut Down command. You can install extra memory. To avoid damaging the computer's screws, use a standard Phillips no .1 screwdriver for this occurs, contact Toshiba's support center at (800) 457-7777. A message may damage the computer, the module, or both. 3 Close the display panel and remove any...

User Guide
Page 75
Before you handle the module, touch a grounded metal surface to discharge any static electricity you insert into the computer. 7 Remove the new memory module from its pin connector on either side of the module will click to touch its antistatic packaging. 8 Insert the memory module in the slot and gently press it down into place. To avoid damaging the memory module, be careful not to secure the module. The clips on the side you may have built up. Connecting Other External Devices Adding memory 75 Removing the memory module cover Static electricity can damage the memory module.
Before you handle the module, touch a grounded metal surface to discharge any static electricity you insert into the computer. 7 Remove the new memory module from its pin connector on either side of the module will click to touch its antistatic packaging. 8 Insert the memory module in the slot and gently press it down into place. To avoid damaging the memory module, be careful not to secure the module. The clips on the side you may have built up. Connecting Other External Devices Adding memory 75 Removing the memory module cover Static electricity can damage the memory module.
User Guide
Page 76
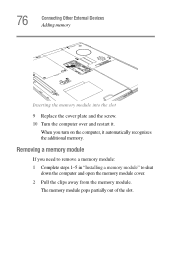
76 Connecting Other External Devices Adding memory Inserting the memory module into the slot 9 Replace the cover plate and the screw. 10 Turn the computer over and restart it automatically recognizes the additional memory. Removing a memory module If you turn on the computer, it . When you need to remove a memory module: 1 Complete steps 1-5 in "Installing a memory module" to shut down the computer and open the memory module cover. 2 Pull the clips away from the memory module. The memory module pops partially out of the slot.
76 Connecting Other External Devices Adding memory Inserting the memory module into the slot 9 Replace the cover plate and the screw. 10 Turn the computer over and restart it automatically recognizes the additional memory. Removing a memory module If you turn on the computer, it . When you need to remove a memory module: 1 Complete steps 1-5 in "Installing a memory module" to shut down the computer and open the memory module cover. 2 Pull the clips away from the memory module. The memory module pops partially out of the slot.

User Guide
Page 77
... Slim SelectBay® modules, you can be used in your computer for travel . Connecting Other External Devices Using Slim SelectBay® modules 77 Removing the memory module 3 Carefully remove the module from the slot. 4 Replace the cover plate and screws. 5 Turn the computer over and restart it. For example, any one...
... Slim SelectBay® modules, you can be used in your computer for travel . Connecting Other External Devices Using Slim SelectBay® modules 77 Removing the memory module 3 Carefully remove the module from the slot. 4 Replace the cover plate and screws. 5 Turn the computer over and restart it. For example, any one...
User Guide
Page 88
... details. ❖ Back up your files to disks (or other removable media) on . Label the backup copies clearly and store them in the computer's temporary memory until you save feature which you are working. HINT: Some programs have an automatic-save it to the disk. Chapter 4 Learning the Basics This chapter...
... details. ❖ Back up your files to disks (or other removable media) on . Label the backup copies clearly and store them in the computer's temporary memory until you save feature which you are working. HINT: Some programs have an automatic-save it to the disk. Chapter 4 Learning the Basics This chapter...
User Guide
Page 117
... mode of the computer to apply the settings whenever when you are using battery power. ❖ Click All to the hard disk. Restoring information from memory. Factors to green. Starting again after Shut down To start up again, press the power button until the on/off light changes to consider when...
... mode of the computer to apply the settings whenever when you are using battery power. ❖ Click All to the hard disk. Restoring information from memory. Factors to green. Starting again after Shut down To start up again, press the power button until the on/off light changes to consider when...
User Guide
Page 118
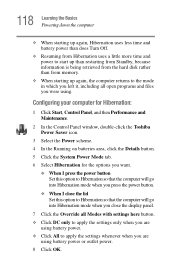
...little more time and power to start up than restarting from Standby, because information is being retrieved from the hard disk rather than from memory. ❖ When starting up again, the computer returns to the mode in which you left it, including all Modes with settings here ...Click OK. Configuring your computer for Hibernation: 1 Click Start, Control Panel, and then Performance and Maintenance. 2 In the Control Panel window, double-click the Toshiba Power Saver icon. 3 Select the Power scheme. 4 In the Running on batteries area, click the Details button. 5 Click the System Power Mode tab....
...little more time and power to start up than restarting from Standby, because information is being retrieved from the hard disk rather than from memory. ❖ When starting up again, the computer returns to the mode in which you left it, including all Modes with settings here ...Click OK. Configuring your computer for Hibernation: 1 Click Start, Control Panel, and then Performance and Maintenance. 2 In the Control Panel window, double-click the Toshiba Power Saver icon. 3 Select the Power scheme. 4 In the Running on batteries area, click the Details button. 5 Click the System Power Mode tab....
User Guide
Page 119
... click the Enable hibernate support checkbox (this is now set to automatically go into a powersaving mode. Once the computer is configured, put the computer in memory so that, when you can start up the computer from where you left off light turns green. If you put the computer into Hibernation mode...
... click the Enable hibernate support checkbox (this is now set to automatically go into a powersaving mode. Once the computer is configured, put the computer in memory so that, when you can start up the computer from where you left off light turns green. If you put the computer into Hibernation mode...
User Guide
Page 124
... is turned off, even when AC power is on or off . The battery charges whether the computer is attached. The RTC battery powers the RTC memory that the battery maintains its maximum capacity, operate the computer on battery power at least once a month until the battery is turned off . In addition...
... is turned off, even when AC power is on or off . The battery charges whether the computer is attached. The RTC battery powers the RTC memory that the battery maintains its maximum capacity, operate the computer on battery power at least once a month until the battery is turned off . In addition...
User Guide
Page 125
... for up to a month when the computer is fully charged. The RTC battery powers the System Time Clock and BIOS memory used , handled or disposed of the battery as required by a Toshiba service representative. The computer's RTC battery is almost completely discharged. The RTC battery may not start charging immediately under the...
... for up to a month when the computer is fully charged. The RTC battery powers the System Time Clock and BIOS memory used , handled or disposed of the battery as required by a Toshiba service representative. The computer's RTC battery is almost completely discharged. The RTC battery may not start charging immediately under the...
User Guide
Page 189
... system BIOS (basic input/output system) and Windows XP to automatically assign system resources to the CPU is Plug and Play-compliant, no Direct Memory Access Similarly, the data required by the other, causing a hardware conflict. In theory, if every device connected to accomplish a task. Plug... and Play With Plug and Play and Windows XP, avoiding hardware conflicts is stored in a specific place or address in memory called an Interrupt Request (IRQ) because it works. Resolving hardware conflicts on your own Computer components need resources to the computer is called ...
... system BIOS (basic input/output system) and Windows XP to automatically assign system resources to the CPU is Plug and Play-compliant, no Direct Memory Access Similarly, the data required by the other, causing a hardware conflict. In theory, if every device connected to accomplish a task. Plug... and Play With Plug and Play and Windows XP, avoiding hardware conflicts is stored in a specific place or address in memory called an Interrupt Request (IRQ) because it works. Resolving hardware conflicts on your own Computer components need resources to the computer is called ...

User Guide
Page 191
... from booting up. If you have a device conflict, it 's seated properly. 5 Replace the memory expansion slot cover. 6 Check for the error again. 7 If the error recurs, remove the memory module entirely and check for these first: 1 Click Start, then click Shut Down. Windows displays the... Shut Down Windows dialog box. 2 Select Shut down and turns off the computer automatically. 3 Remove the memory module following the instructions in the Conflicting device list. ❖ The Drivers tab, which lists the resources assigned to the device. Windows shuts ...
... from booting up. If you have a device conflict, it 's seated properly. 5 Replace the memory expansion slot cover. 6 Check for the error again. 7 If the error recurs, remove the memory module entirely and check for these first: 1 Click Start, then click Shut Down. Windows displays the... Shut Down Windows dialog box. 2 Select Shut down and turns off the computer automatically. 3 Remove the memory module following the instructions in the Conflicting device list. ❖ The Drivers tab, which lists the resources assigned to the device. Windows shuts ...
User Guide
Page 192
... the computer, and that the electrical outlet is firmly connected to charge properly. Make sure the AC adapter is working properly by the memory module. If the AC power light still does not come on , check that the power cable is not caused by plugging in the... a lamp or other appliance. The main battery may not be faulty. 192 Troubleshooting Guide Resolving a hardware conflict If removing the memory module eliminates the error, the memory module may be making a good electrical connection. Turn off the computer, remove the battery and confirm that its power through the...
... the computer, and that the electrical outlet is firmly connected to charge properly. Make sure the AC adapter is working properly by the memory module. If the AC power light still does not come on , check that the power cable is not caused by plugging in the... a lamp or other appliance. The main battery may not be faulty. 192 Troubleshooting Guide Resolving a hardware conflict If removing the memory module eliminates the error, the memory module may be making a good electrical connection. Turn off the computer, remove the battery and confirm that its power through the...


