
User Manual
Page 2
... reproduced in any reproduction from errors, omissions or discrepancies between the computer and the manual. Please comply with respect to the copyright owner. Trademarks Intel, Intel SpeedStep, Pentium and Centrino are accurate for personal use or use of TOSHIBA. TOSHIBA TECRA M2 Portable Personal Computer User's Manual First edition January 2004 Copyright authority for accuracy. The instructions and descriptions it contains are...
... reproduced in any reproduction from errors, omissions or discrepancies between the computer and the manual. Please comply with respect to the copyright owner. Trademarks Intel, Intel SpeedStep, Pentium and Centrino are accurate for personal use or use of TOSHIBA. TOSHIBA TECRA M2 Portable Personal Computer User's Manual First edition January 2004 Copyright authority for accuracy. The instructions and descriptions it contains are...

User Manual
Page 12
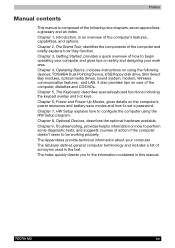
...3: Getting Started Setting up your work space 3-1 Connecting the AC adaptor 3-4 Opening the display 3-5 Turning on the power 3-6 Windows XP setup 3-7 Turning off the power 3-7 Restarting the computer 3-10 Restoring the preinstalled software 3-11 Chapter 4: Operating Basics TOSHIBA Dual Pointing Device 4-1 Using the USB floppy disk drive (optional 4-3 Changing Slim Select Bay modules 4-4 Using optical media drives 4-6 Writing CDs on CD-RW/DVD-ROM drive 4-10 Writing CD/DVDs on DVD Multi drive 4-11 Writing CD/DVDs on DVD±R/±RW drive (DVD Dual drive) . . . . 4-12 Media care...
...3: Getting Started Setting up your work space 3-1 Connecting the AC adaptor 3-4 Opening the display 3-5 Turning on the power 3-6 Windows XP setup 3-7 Turning off the power 3-7 Restarting the computer 3-10 Restoring the preinstalled software 3-11 Chapter 4: Operating Basics TOSHIBA Dual Pointing Device 4-1 Using the USB floppy disk drive (optional 4-3 Changing Slim Select Bay modules 4-4 Using optical media drives 4-6 Writing CDs on CD-RW/DVD-ROM drive 4-10 Writing CD/DVDs on DVD Multi drive 4-11 Writing CD/DVDs on DVD±R/±RW drive (DVD Dual drive) . . . . 4-12 Media care...
User Manual
Page 15
... to familiarize yourself with this manual by -step instructions on setting up and begin using your computer, basic operations and care, using optional devices and troubleshooting. It also provides detailed information on configuring your TECRA M2 computer. Be sure to look over the Introduction and The Grand Tour chapters to the computers and carefully read HW Setup. User's Manual xv TECRA M2 Preface Congratulations on your computer...
... to familiarize yourself with this manual by -step instructions on setting up and begin using your computer, basic operations and care, using optional devices and troubleshooting. It also provides detailed information on configuring your TECRA M2 computer. Be sure to look over the Introduction and The Grand Tour chapters to the computers and carefully read HW Setup. User's Manual xv TECRA M2 Preface Congratulations on your computer...
User Manual
Page 16
... devices: TOSHIBA Dual Pointing Device, USB floppy disk drive, Slim Select Bay modules, optical media drives, sound system, modem, Wireless communication features, and LAN. Chapter 3, Getting Started, provides a quick overview of how to perform some diagnostic tests, and suggests courses of the computer, diskettes and CD/DVDs. Chapter 6, Power and Power-Up Modes, gives details on using the HW Setup program. TECRA M2 xvi Chapter 4, Operating Basics, includes instructions on the computer's power resources and battery...
... devices: TOSHIBA Dual Pointing Device, USB floppy disk drive, Slim Select Bay modules, optical media drives, sound system, modem, Wireless communication features, and LAN. Chapter 3, Getting Started, provides a quick overview of how to perform some diagnostic tests, and suggests courses of the computer, diskettes and CD/DVDs. Chapter 6, Power and Power-Up Modes, gives details on using the HW Setup program. TECRA M2 xvi Chapter 4, Operating Basics, includes instructions on the computer's power resources and battery...

User Manual
Page 28
... install a component, Plug and Play capability enables the system to use . TECRA M2 1-10 Display automatic power off This feature automatically cuts off item of this chapter. Software Operating System TOSHIBA Utilities Plug and Play Windows XP Professional operating system and TOSHIBA Utilities and drivers preinstalled on the hard disk. TOSHIBA Presentation button Hot keys Press this button to the computer or when you quickly modify the system configuration directly from the keyboard without running a system configuration...
... install a component, Plug and Play capability enables the system to use . TECRA M2 1-10 Display automatic power off This feature automatically cuts off item of this chapter. Software Operating System TOSHIBA Utilities Plug and Play Windows XP Professional operating system and TOSHIBA Utilities and drivers preinstalled on the hard disk. TOSHIBA Presentation button Hot keys Press this button to the computer or when you quickly modify the system configuration directly from the keyboard without running a system configuration...

User Manual
Page 29
... shuts down . Introduction HDD automatic power off This feature automatically cuts off power to the hard disk drive when it back on password Two levels of password security, supervisor and user, are available to prevent unauthorized access to your computer. You can monitor remaining battery capacity. Refer to the Keypad overlay section in TOSHIBA Power Saver. Instant security A hot key function blanks the screen and disables the computer providing...
... shuts down . Introduction HDD automatic power off This feature automatically cuts off power to the hard disk drive when it back on password Two levels of password security, supervisor and user, are available to prevent unauthorized access to your computer. You can monitor remaining battery capacity. Refer to the Keypad overlay section in TOSHIBA Power Saver. Instant security A hot key function blanks the screen and disables the computer providing...
User Manual
Page 39
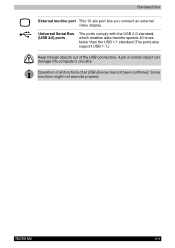
Operation of all functions of the USB connectors. Universal Serial Bus (USB 2.0) ports The ports comply with the USB 2.0 standard, which enables data transfer speeds 40 times faster than the USB 1.1 standard (The ports also support USB 1.1.). TECRA M2 2-4 A pin or similar object can damage the computer's circuitry. Some functions might not execute properly. Keep foreign objects out of all USB devices has not been confirmed. The Grand Tour External monitor port This 15-pin port lets you connect an external video display.
Operation of all functions of the USB connectors. Universal Serial Bus (USB 2.0) ports The ports comply with the USB 2.0 standard, which enables data transfer speeds 40 times faster than the USB 1.1 standard (The ports also support USB 1.1.). TECRA M2 2-4 A pin or similar object can damage the computer's circuitry. Some functions might not execute properly. Keep foreign objects out of all USB devices has not been confirmed. The Grand Tour External monitor port This 15-pin port lets you connect an external video display.
User Manual
Page 44
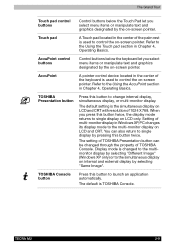
...". TOSHIBA Presentation button Press this button twice. The default is the simultaneous display on LCD and CRT with resolution of the palm rest is used to the Using the Touch pad section in Chapter 4, Operating Basics. The Grand Tour Touch pad control buttons Control buttons below the keyboard let you select menu items or manipulate text and graphics designated by the on-screen pointer. Refer to control the on-screen pointer. Touch pad A Touch pad located in...
...". TOSHIBA Presentation button Press this button twice. The default is the simultaneous display on LCD and CRT with resolution of the palm rest is used to the Using the Touch pad section in Chapter 4, Operating Basics. The Grand Tour Touch pad control buttons Control buttons below the keyboard let you select menu items or manipulate text and graphics designated by the on-screen pointer. Refer to control the on-screen pointer. Touch pad A Touch pad located in...
User Manual
Page 48
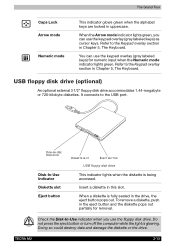
...-USE INDICATOR Disk-In-Use Indicator Diskette slot Eject button DISKETTE SLOT EJECT BUTTON USB floppy disk drive This indicator lights when the diskette is glowing. Do not press the eject button or turn off the computer while the light is being accessed. To remove a diskette, push in Chapter 5, The Keyboard. The Grand Tour Caps Lock Arrow mode Numeric mode This indicator glows green when the alphabet keys are locked in this slot. TECRA M2 2-13 When the Arrow mode indicator lights...
...-USE INDICATOR Disk-In-Use Indicator Diskette slot Eject button DISKETTE SLOT EJECT BUTTON USB floppy disk drive This indicator lights when the diskette is glowing. Do not press the eject button or turn off the computer while the light is being accessed. To remove a diskette, push in Chapter 5, The Keyboard. The Grand Tour Caps Lock Arrow mode Numeric mode This indicator glows green when the alphabet keys are locked in this slot. TECRA M2 2-13 When the Arrow mode indicator lights...
User Manual
Page 61
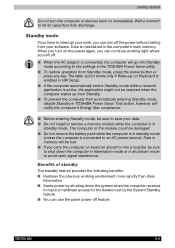
.... ■ If you can use the panel power off the power without exiting from automatically entering Standby mode, disable Standby in TOSHIBA Power Saver. Benefits of standby The standby feature provides the following benefits: ■ Restores the previous working right where you turn on Keyboard is enabled in HW Setup. ■ If the computer automatically enters Standby mode while a network application is in standby mode. TECRA M2 3-9 When you left off...
.... ■ If you can use the panel power off the power without exiting from automatically entering Standby mode, disable Standby in TOSHIBA Power Saver. Benefits of standby The standby feature provides the following benefits: ■ Restores the previous working right where you turn on Keyboard is enabled in HW Setup. ■ If the computer automatically enters Standby mode while a network application is in standby mode. TECRA M2 3-9 When you left off...
User Manual
Page 90
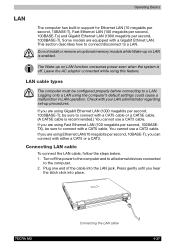
... second, 10BASE-T), you are equipped with either a CAT5 or a CAT3. Press gently until you are using this feature. Check with a CAT5 cable or a CAT5E cable. (A CAT5E cable is off the power to the computer and to all external devices connected to a LAN. Connecting LAN cable To connect the LAN cable, follow the steps below. 1. Do not install or remove an optional memory module while Wake-up on LAN is enabled. TECRA M2 Connecting the LAN cable 4-27
... second, 10BASE-T), you are equipped with either a CAT5 or a CAT3. Press gently until you are using this feature. Check with a CAT5 cable or a CAT5E cable. (A CAT5E cable is off the power to the computer and to all external devices connected to a LAN. Connecting LAN cable To connect the LAN cable, follow the steps below. 1. Do not install or remove an optional memory module while Wake-up on LAN is enabled. TECRA M2 Connecting the LAN cable 4-27
User Manual
Page 96
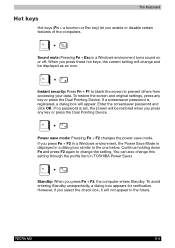
... icon. TECRA M2 5-4 Continue holding down Fn and press F2 again to change this setting through the profile item in the future. However, if you press Fn + F2 in a Windows environment, the Power Save Mode is displayed in a Windows environment turns sound on or off. To restore the screen and original settings, press any key or press the Dual Pointing Device. If a screensaver password is set, the screen will...
... icon. TECRA M2 5-4 Continue holding down Fn and press F2 again to change this setting through the profile item in the future. However, if you press Fn + F2 in a Windows environment, the Power Save Mode is displayed in a Windows environment turns sound on or off. To restore the screen and original settings, press any key or press the Dual Pointing Device. If a screensaver password is set, the screen will...
User Manual
Page 107
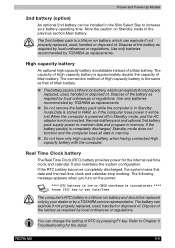
... is not connected, the main battery pack and optional 2nd battery pack supply power to set Date/Time. The battery can change the setting of . You can explode if not properly replaced, used , handled or disposed of RTC by pressing F1 key. Power and Power-Up Modes 2nd battery (option) An optional 2nd battery can be installed in the Slim Select Bay to increase your dealer or by a TOSHIBA service representative. Note...
... is not connected, the main battery pack and optional 2nd battery pack supply power to set Date/Time. The battery can change the setting of . You can explode if not properly replaced, used , handled or disposed of RTC by pressing F1 key. Power and Power-Up Modes 2nd battery (option) An optional 2nd battery can be installed in the Slim Select Bay to increase your dealer or by a TOSHIBA service representative. Note...
User Manual
Page 124
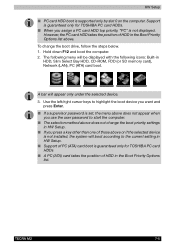
... HDD in HDD, Slim Select Bay HDD, CD-ROM, FDD (or SD memory card), Network (LAN), PC (ATA) card boot. Use the left/right cursor keys to the current setting in HW Setup. ■ Support of PC (ATA) card boot is supported only by slot 0 on the computer. TECRA M2 7-5 Hold down F12 and boot the computer. 2. A bar will boot according to highlight the boot device you want and press Enter. ■ If a supervisor password is not installed...
... HDD in HDD, Slim Select Bay HDD, CD-ROM, FDD (or SD memory card), Network (LAN), PC (ATA) card boot. Use the left/right cursor keys to the current setting in HW Setup. ■ Support of PC (ATA) card boot is supported only by slot 0 on the computer. TECRA M2 7-5 Hold down F12 and boot the computer. 2. A bar will boot according to highlight the boot device you want and press Enter. ■ If a supervisor password is not installed...
User Manual
Page 133
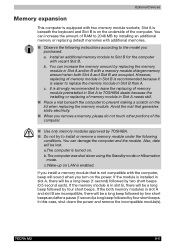
... sound when you install a memory module that generates static electricity. ■ When you purchased. a.The computer is turned on LAN is not compatible with two memory module sockets; TECRA M2 8-6 Optional Devices Memory expansion This computer is in slot B, there will be a long beep followed by four short beeps. Install an additional memory module to Slot B for the computer with additional memories. ■ Observe the following instructions according to the model...
... sound when you install a memory module that generates static electricity. ■ When you purchased. a.The computer is turned on LAN is not compatible with two memory module sockets; TECRA M2 8-6 Optional Devices Memory expansion This computer is in slot B, there will be a long beep followed by four short beeps. Install an additional memory module to Slot B for the computer with additional memories. ■ Observe the following instructions according to the model...
User Manual
Page 137
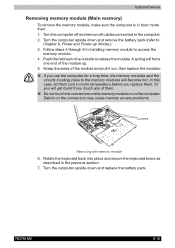
... memory access problems. LATCHES Removing the memory module 6. Debris on the computer. TECRA M2 8-10 Optional Devices Removing memory module (Main memory) To remove the memory module, make sure the computer is in the previous section. 7. Turn the computer off and remove all cables connected to room temperature before you use the computer for a long time, the memory modules and the circuits locating close to Chapter 6, Power and Power-up . 5. Grasp the sides of the module up Modes.) 3. Or you touch...
... memory access problems. LATCHES Removing the memory module 6. Debris on the computer. TECRA M2 8-10 Optional Devices Removing memory module (Main memory) To remove the memory module, make sure the computer is in the previous section. 7. Turn the computer off and remove all cables connected to room temperature before you use the computer for a long time, the memory modules and the circuits locating close to Chapter 6, Power and Power-up . 5. Grasp the sides of the module up Modes.) 3. Or you touch...

User Manual
Page 167
.... Open the Windows Control Panel and double-click the Add Hardware icon. Restart Windows. Refer to your monitor's documentation. Confirm that the cable connecting the external monitor to the computer is on . TECRA M2 9-18 No display Try adjusting the contrast and brightness controls on -screen directions. If problems persist, contact your dealer. Troubleshooting Monitor Refer also to Chapter 8, Optional Devices, and to Phone and Modem modem Properties in the Control Panel. Make sure the device's power is...
.... Open the Windows Control Panel and double-click the Add Hardware icon. Restart Windows. Refer to your monitor's documentation. Confirm that the cable connecting the external monitor to the computer is on . TECRA M2 9-18 No display Try adjusting the contrast and brightness controls on -screen directions. If problems persist, contact your dealer. Troubleshooting Monitor Refer also to Chapter 8, Optional Devices, and to Phone and Modem modem Properties in the Control Panel. Make sure the device's power is...
User Manual
Page 202
... remove data from the keyboard to make system settings or record other data storage device. Typically used to initiate a particular function within a program. DC: Direct Current. Glossary components: Elements or parts (of a system) which beams projected on the display screen. computer program: A set . computer system: A combination of power is factual, measurable or statistical that accepts user input to achieve a desired result. TECRA M2 4 device driver: A program that enable...
... remove data from the keyboard to make system settings or record other data storage device. Typically used to initiate a particular function within a program. DC: Direct Current. Glossary components: Elements or parts (of a system) which beams projected on the display screen. computer program: A set . computer system: A combination of power is factual, measurable or statistical that accepts user input to achieve a desired result. TECRA M2 4 device driver: A program that enable...
User Manual
Page 206
... Greek word kilo, meaning 1000; TECRA M2 8 often used as equivalent to 1024, or 2 raised to 1024 kilobytes. menu: A software interface that transmits a specific code to 1024 bytes. Also called a screen. See also byte and megabyte. See also hertz. Each keystroke activates a switch that displays a list of glass coated with leads that are activated by manually pressing marked keys. M main board: See motherboard. L level 2 cache: See cache...
... Greek word kilo, meaning 1000; TECRA M2 8 often used as equivalent to 1024, or 2 raised to 1024 kilobytes. menu: A software interface that transmits a specific code to 1024 bytes. Also called a screen. See also byte and megabyte. See also hertz. Each keystroke activates a switch that displays a list of glass coated with leads that are activated by manually pressing marked keys. M main board: See motherboard. L level 2 cache: See cache...

User Manual
Page 213
...9-12 DVD-ROM drive 9-8 Floppy disk drive 9-13 Hard disk drive 9-7 Hardware and system checklist 9-3 i.LINK 9-18 Infrared port 9-14 Keyboard 9-7 LAN 9-19 LCD panel 9-7 Memory expansion 9-17 Modem 9-18 Monitor 9-18 Password 9-6 PC card 9-14 Power 9-4 SD card 9-14 Sound system 9-17 TOSHIBA Dual Pointing Device 9-15 USB 9-16 Wireless LAN 9-20 Processor 1-3 Product Recovery DVD-ROM 3-11 R Region codes DVD drives 2-14 Region selection 4-21 Removing a PC card 8-3 Removing an SD card 8-4 Removing discs 4-9 Removing memory module 8-12 Removing the battery pack 6-13 Removing the HDD pack 8-13 Replacing...
...9-12 DVD-ROM drive 9-8 Floppy disk drive 9-13 Hard disk drive 9-7 Hardware and system checklist 9-3 i.LINK 9-18 Infrared port 9-14 Keyboard 9-7 LAN 9-19 LCD panel 9-7 Memory expansion 9-17 Modem 9-18 Monitor 9-18 Password 9-6 PC card 9-14 Power 9-4 SD card 9-14 Sound system 9-17 TOSHIBA Dual Pointing Device 9-15 USB 9-16 Wireless LAN 9-20 Processor 1-3 Product Recovery DVD-ROM 3-11 R Region codes DVD drives 2-14 Region selection 4-21 Removing a PC card 8-3 Removing an SD card 8-4 Removing discs 4-9 Removing memory module 8-12 Removing the battery pack 6-13 Removing the HDD pack 8-13 Replacing...


