

User Guide
Page 45
... software NOTE The names of Microsoft's End User License Agreement and click Next. 3 Select the appropriate option from the Help protect your computer screen and click Next. 4 Enter the computer name and description and click Next or Skip. 5 Select how your computer will connect to the Internet.... See "Setting up for communications" on your computer, the Setup Wizard guides you through steps to set up your software. 1 From the welcome screen click Next to enter the Setup Wizard. 2 Confirm acceptance of windows displayed, and the order in modem to a telephone line or establish a Local...
... software NOTE The names of Microsoft's End User License Agreement and click Next. 3 Select the appropriate option from the Help protect your computer screen and click Next. 4 Enter the computer name and description and click Next or Skip. 5 Select how your computer will connect to the Internet.... See "Setting up for communications" on your computer, the Setup Wizard guides you through steps to set up your software. 1 From the welcome screen click Next to enter the Setup Wizard. 2 Confirm acceptance of windows displayed, and the order in modem to a telephone line or establish a Local...

User Guide
Page 46
...6 Follow the remaining screen prompts to complete the setup process. Product registration can either double-click the icon on your desktop or go to the Toshiba Web site at www.register.toshiba.com at a later time. Once you click the final screen, your computer restarts ...automatically. 46 Getting Started Registering your computer with Toshiba Product registration is strongly recommended, and allows Toshiba to send you periodic updates...
...6 Follow the remaining screen prompts to complete the setup process. Product registration can either double-click the icon on your desktop or go to the Toshiba Web site at www.register.toshiba.com at a later time. Once you click the final screen, your computer restarts ...automatically. 46 Getting Started Registering your computer with Toshiba Product registration is strongly recommended, and allows Toshiba to send you periodic updates...

User Guide
Page 54
...product Series. Over a period of time, and depending on the usage of the computer, the brightness of the screen technology. This is also an intrinsic characteristic of the screen will dim and you turn on the notebook chassis, unless you have all the features and specifications corresponding to ...be able to increase the brightness of the icons or switches shown on your PC. This information applies to all of the screen while on your screen display when you may not have selected all the features and icons described in this guide. When the computer is manufactured using...
...product Series. Over a period of time, and depending on the usage of the computer, the brightness of the screen technology. This is also an intrinsic characteristic of the screen will dim and you turn on the notebook chassis, unless you have all the features and specifications corresponding to ...be able to increase the brightness of the icons or switches shown on your PC. This information applies to all of the screen while on your screen display when you may not have selected all the features and icons described in this guide. When the computer is manufactured using...
User Guide
Page 66
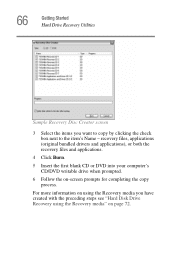
... for completing the copy process. 66 Getting Started Hard Drive Recovery Utilities Sample Recovery Disc Creator screen 3 Select the items you have created with the preceding steps see "Hard Disk Drive Recovery using the Recovery media you want to copy by clicking ...
... for completing the copy process. 66 Getting Started Hard Drive Recovery Utilities Sample Recovery Disc Creator screen 3 Select the items you have created with the preceding steps see "Hard Disk Drive Recovery using the Recovery media you want to copy by clicking ...

User Guide
Page 67
Sample TOSHIBA Recovery Wizard screen To recover your hard disk drive using the Hard Drive Recovery partition to the factory-set default, or recovering just your C: drive and leaving other ... the computer is turned off. 2 Press and hold the 0 (zero) key on your C: drive and then recovering it. When the computer powers on, the TOSHIBA Recovery Wizard screen displays. Getting Started Hard Drive Recovery Utilities 67 Hard Disk Drive Recovery using the recovery partition You have the options of your keyboard while...
Sample TOSHIBA Recovery Wizard screen To recover your hard disk drive using the Hard Drive Recovery partition to the factory-set default, or recovering just your C: drive and leaving other ... the computer is turned off. 2 Press and hold the 0 (zero) key on your C: drive and then recovering it. When the computer powers on, the TOSHIBA Recovery Wizard screen displays. Getting Started Hard Drive Recovery Utilities 67 Hard Disk Drive Recovery using the recovery partition You have the options of your keyboard while...
User Guide
Page 68
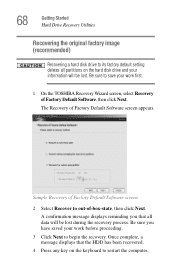
The Recovery of -box-state, then click Next. A confirmation message displays reminding you have saved your work first. 1 On the TOSHIBA Recovery Wizard screen, select Recovery of Factory Default Software screen 2 Select Recover to save your information will be lost during the recovery process. Sample Recovery of Factory Default Software, then click Next. Be... image (recommended) Recovering a hard disk drive to its factory default setting deletes all data will be lost . Be sure to out-of Factory Default Software screen appears.
The Recovery of -box-state, then click Next. A confirmation message displays reminding you have saved your work first. 1 On the TOSHIBA Recovery Wizard screen, select Recovery of Factory Default Software screen 2 Select Recover to save your information will be lost during the recovery process. Sample Recovery of Factory Default Software, then click Next. Be... image (recommended) Recovering a hard disk drive to its factory default setting deletes all data will be lost . Be sure to out-of Factory Default Software screen appears.

User Guide
Page 69
... sure you have saved your work to delete all sectors on the size of your hard disk: 1 On the TOSHIBA Recovery Wizard screen, select Erase the hard disk, then click Next. 2 The next screen lists the two methods you can choose: ❖ Delete all data will be lost. A confirmation message displays reminding you...
... sure you have saved your work to delete all sectors on the size of your hard disk: 1 On the TOSHIBA Recovery Wizard screen, select Erase the hard disk, then click Next. 2 The next screen lists the two methods you can choose: ❖ Delete all data will be lost. A confirmation message displays reminding you...

User Guide
Page 70
... recovered. 3 Press any key on them will not be affected and will remain intact. If you that all information on the keyboard when the TOSHIBA HDD Recovery Utility screen displays. A confirmation message appears, reminding you have created other partitions (for example, a D: drive) those partitions and any key on the recovered drive will...
... recovered. 3 Press any key on them will not be affected and will remain intact. If you that all information on the keyboard when the TOSHIBA HDD Recovery Utility screen displays. A confirmation message appears, reminding you have created other partitions (for example, a D: drive) those partitions and any key on the recovered drive will...

User Guide
Page 71
... to specify the size of the C: drive will be lost during the recovery process) and your information will display on the keyboard when the TOSHIBA HDD Recovery Utility screen displays. Once complete, a message displays that all partitions will be reformatted and all partitions on your keyboard to restart the computer. NOTE The...
... to specify the size of the C: drive will be lost during the recovery process) and your information will display on the keyboard when the TOSHIBA HDD Recovery Utility screen displays. Once complete, a message displays that all partitions will be reformatted and all partitions on your keyboard to restart the computer. NOTE The...
User Guide
Page 72
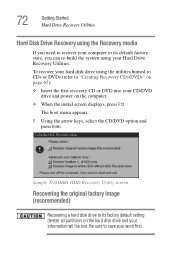
The boot menu appears. 5 Using the arrow keys, select the CD/DVD option and press Enter. Sample TOSHIBA HDD Recovery Utility screen Recovering the original factory image (recommended) Recovering a hard disk drive to its default factory state, you need to recover your computer to its ...factory default setting deletes all partitions on the computer. ❖ When the initial screen displays, press F12. Be sure to save your work first. To recover your hard disk drive using your Hard Drive Recovery Utilities. 72 Getting...
The boot menu appears. 5 Using the arrow keys, select the CD/DVD option and press Enter. Sample TOSHIBA HDD Recovery Utility screen Recovering the original factory image (recommended) Recovering a hard disk drive to its default factory state, you need to recover your computer to its ...factory default setting deletes all partitions on the computer. ❖ When the initial screen displays, press F12. Be sure to save your work first. To recover your hard disk drive using your Hard Drive Recovery Utilities. 72 Getting...

User Guide
Page 73
... intact. A confirmation message displays, reminding you have saved your work first. Once complete, a message displays that all information on the keyboard when the TOSHIBA HDD Recovery Utility screen displays. If you that the HDD has been recovered. 3 Press any key on the recovered drive will be affected and will not be lost...
... intact. A confirmation message displays, reminding you have saved your work first. Once complete, a message displays that all information on the keyboard when the TOSHIBA HDD Recovery Utility screen displays. If you that the HDD has been recovered. 3 Press any key on the recovered drive will be affected and will not be lost...

User Guide
Page 74
... recovery process) and your information will be lost during the recovery process. Once complete, a message displays that all partitions will increase the size of the screen. 74 Getting Started Hard Drive Recovery Utilities Recovering the entire HDD without the HDD Recovery Area This option recovers your C: drive without the recovery partition...
... recovery process) and your information will be lost during the recovery process. Once complete, a message displays that all partitions will increase the size of the screen. 74 Getting Started Hard Drive Recovery Utilities Recovering the entire HDD without the HDD Recovery Area This option recovers your C: drive without the recovery partition...

User Guide
Page 75
... the appropriate drive letter (for example, E: drive) for the extra space and formats the drive. Sample Delete Hard Disk Recovery Utility screen 2 Click OK to continue. 3 When the following warning screen displays, click Yes to confirm. Getting Started Hard Drive Recovery Utilities 75 Deleting the Hard Disk Recovery Utility You can delete...
... the appropriate drive letter (for example, E: drive) for the extra space and formats the drive. Sample Delete Hard Disk Recovery Utility screen 2 Click OK to continue. 3 When the following warning screen displays, click Yes to confirm. Getting Started Hard Drive Recovery Utilities 75 Deleting the Hard Disk Recovery Utility You can delete...
User Guide
Page 76
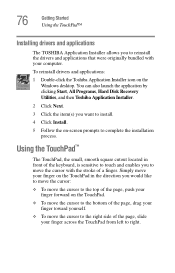
...the right side of the page, slide your computer. 76 Getting Started Using the TouchPad™ Installing drivers and applications The TOSHIBA Application Installer allows you to reinstall the drivers and applications that were originally bundled with the stroke of a finger. To reinstall... drivers and applications: 1 Double-click the Toshiba Application Installer icon on -screen prompts to complete the installation process. You can also launch the application by clicking Start, All Programs, Hard Disk ...
...the right side of the page, slide your computer. 76 Getting Started Using the TouchPad™ Installing drivers and applications The TOSHIBA Application Installer allows you to reinstall the drivers and applications that were originally bundled with the stroke of a finger. To reinstall... drivers and applications: 1 Double-click the Toshiba Application Installer icon on -screen prompts to complete the installation process. You can also launch the application by clicking Start, All Programs, Hard Disk ...

User Guide
Page 77
... item, then press and release the primary (left-hand) button. Check your program's documentation to move your finger several times across the screen often means having to find whether it uses the right mouse button. This feature can click it into place by either double-tapping the ...TouchPad or clicking the control buttons. NOTE Because the TouchPad is much smaller than the display screen, moving your cursor across the TouchPad in the preferred direction. To scroll horizontally, run your cursor, you are using. Getting Started Using ...
... item, then press and release the primary (left-hand) button. Check your program's documentation to move your finger several times across the screen often means having to find whether it uses the right mouse button. This feature can click it into place by either double-tapping the ...TouchPad or clicking the control buttons. NOTE Because the TouchPad is much smaller than the display screen, moving your cursor across the TouchPad in the preferred direction. To scroll horizontally, run your cursor, you are using. Getting Started Using ...

User Guide
Page 78
The TouchPad On/Off tab view window appears. Sample TouchPad On/Off screen 5 Select Disable or Enable, whichever is enabled by default. You can also use the following steps to enable/disable TouchPad setting: 1 Click Start, and then ...
The TouchPad On/Off tab view window appears. Sample TouchPad On/Off screen 5 Select Disable or Enable, whichever is enabled by default. You can also use the following steps to enable/disable TouchPad setting: 1 Click Start, and then ...
User Guide
Page 79
... device's power cable to disable or enable the TouchPad. Using external display devices Your computer comes with a built-in LCD display, but you need a larger screen.
... device's power cable to disable or enable the TouchPad. Using external display devices Your computer comes with a built-in LCD display, but you need a larger screen.

User Guide
Page 82
... Windows key to return it to its documentation. Read the documentation that came with your Toshiba sales representative for more information. Connecting a printer NOTE Your printer documentation may move to the upper-right side of the screen. Follow the manufacturer's instructions when connecting a local printer. You can connect a USB-compatible printer to...
... Windows key to return it to its documentation. Read the documentation that came with your Toshiba sales representative for more information. Connecting a printer NOTE Your printer documentation may move to the upper-right side of the screen. Follow the manufacturer's instructions when connecting a local printer. You can connect a USB-compatible printer to...

User Guide
Page 84
84 Getting Started Connecting an optional external diskette drive Sample Add Printer Wizard 3 Follow the on-screen instructions to one of the computer's USB ports. Connecting an optional external diskette drive Some operations, such as creating a password service diskette, require a diskette drive designed for use with 3.5inch diskettes. Sample optional external USB diskette drive To connect an optional external USB diskette drive, connect the cable to set up your printer.
84 Getting Started Connecting an optional external diskette drive Sample Add Printer Wizard 3 Follow the on-screen instructions to one of the computer's USB ports. Connecting an optional external diskette drive Some operations, such as creating a password service diskette, require a diskette drive designed for use with 3.5inch diskettes. Sample optional external USB diskette drive To connect an optional external USB diskette drive, connect the cable to set up your printer.

User Guide
Page 90
... off the computer Turning off the computer more quickly You can also turn off the computer by pressing the power button. Sample setup action settings screen 4 Select the options you want from the drop-down lists. ❖ When I press the power button Set this option to Shut down if you ...want the computer to activate it using Toshiba's Power Saver utility. 1 Click Start, Control Panel, then click Performance and Maintenance. 2 Click the Toshiba Power Saver icon. 3 Click on the Setup Action tab.
... off the computer Turning off the computer more quickly You can also turn off the computer by pressing the power button. Sample setup action settings screen 4 Select the options you want from the drop-down lists. ❖ When I press the power button Set this option to Shut down if you ...want the computer to activate it using Toshiba's Power Saver utility. 1 Click Start, Control Panel, then click Performance and Maintenance. 2 Click the Toshiba Power Saver icon. 3 Click on the Setup Action tab.


