
User Guide
Page 27
... for the first time 53 Opening the display panel 53 Your computer's features and specifications ....54 Turning on the power 55 Adding memory (optional 56 Installing a memory module 56 Removing a memory module 62 Hard Drive Recovery Utilities 64 Creating Recovery CDs/DVDs 65 Hard Disk Drive Recovery using the recovery partition 67 Hard Disk...
... for the first time 53 Opening the display panel 53 Your computer's features and specifications ....54 Turning on the power 55 Adding memory (optional 56 Installing a memory module 56 Removing a memory module 62 Hard Drive Recovery Utilities 64 Creating Recovery CDs/DVDs 65 Hard Disk Drive Recovery using the recovery partition 67 Hard Disk...
User Guide
Page 31
... Protect & Fix 166 Optimize 166 TOSHIBA Application Installer 167 Using a supervisor password 168 Setting a supervisor password 168 Deleting a supervisor password 170 Setting user passwords 170 Using an instant password 171 Setting a user password 171 Disabling a user password 172 PC Diagnostic Tool 172 TOSHIBA Power Saver 173 SD Memory Card Format 175 Mouse Utility 177...
... Protect & Fix 166 Optimize 166 TOSHIBA Application Installer 167 Using a supervisor password 168 Setting a supervisor password 168 Deleting a supervisor password 170 Setting user passwords 170 Using an instant password 171 Setting a user password 171 Disabling a user password 172 PC Diagnostic Tool 172 TOSHIBA Power Saver 173 SD Memory Card Format 175 Mouse Utility 177...

User Guide
Page 47
...external devices NOTE Before adding external devices or memory, Toshiba recommends setting up your software" on page 159) After starting your software. See "Setting up your computer for the first time you may want to: ❖ Add more memory (see "Adding memory (optional)" on page 56) ❖ ... ❖ Connect an optional external diskette drive (see "Connecting an optional external diskette drive" on page 84) ❖ Install PC Cards (see "Inserting and removing PC Cards" on page 156) ❖ Install flash memory cards (see "Using the Bridge Media Adapter Slot" on page 45.
...external devices NOTE Before adding external devices or memory, Toshiba recommends setting up your software" on page 159) After starting your software. See "Setting up your computer for the first time you may want to: ❖ Add more memory (see "Adding memory (optional)" on page 56) ❖ ... ❖ Connect an optional external diskette drive (see "Connecting an optional external diskette drive" on page 84) ❖ Install PC Cards (see "Inserting and removing PC Cards" on page 156) ❖ Install flash memory cards (see "Using the Bridge Media Adapter Slot" on page 45.
User Guide
Page 56
.... You will need a standard Phillips No. 1 screwdriver for a long time, the memory module will become hot. An additional memory module can be installed in the memory module slot on memory options, check the accessories information that came with your software. 56 Getting Started Adding... notebook's keyboard. Your computer comes with enough memory to room temperature before you use complex software or process large amounts of data. Installing a memory module The main memory module is under your system or visit accessories.toshiba.com. If you replace it. For more...
.... You will need a standard Phillips No. 1 screwdriver for a long time, the memory module will become hot. An additional memory module can be installed in the memory module slot on memory options, check the accessories information that came with your software. 56 Getting Started Adding... notebook's keyboard. Your computer comes with enough memory to room temperature before you use complex software or process large amounts of data. Installing a memory module The main memory module is under your system or visit accessories.toshiba.com. If you replace it. For more...

User Guide
Page 57
...connected to step 3. 1 If the computer is in good condition. If the computer is in Standby or Hibernation mode, data will be lost. Installing a memory module with the computer's power on page 135. 5 Close the display panel and turn off the computer using the Start menu. Before you... install or remove a memory module while the computer is on, click Start, then Turn off. (or shut down to locate the memory module slot cover. For information on removing the main battery, see "Changing the main battery...
...connected to step 3. 1 If the computer is in good condition. If the computer is in Standby or Hibernation mode, data will be lost. Installing a memory module with the computer's power on page 135. 5 Close the display panel and turn off the computer using the Start menu. Before you... install or remove a memory module while the computer is on, click Start, then Turn off. (or shut down to locate the memory module slot cover. For information on removing the main battery, see "Changing the main battery...
User Guide
Page 61
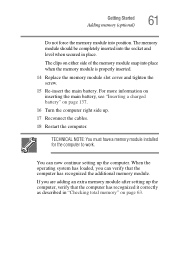
... computer. You can verify that the computer has recognized it correctly as described in place. TECHNICAL NOTE: You must have a memory module installed for the computer to work. If you can now continue setting up the computer, verify that the computer has recognized the additional... memory module. For more information on inserting the main battery, see "Inserting a charged battery" on either side of the memory module snap into position. ...
... computer. You can verify that the computer has recognized it correctly as described in place. TECHNICAL NOTE: You must have a memory module installed for the computer to work. If you can now continue setting up the computer, verify that the computer has recognized the additional... memory module. For more information on inserting the main battery, see "Inserting a charged battery" on either side of the memory module snap into position. ...
User Guide
Page 62
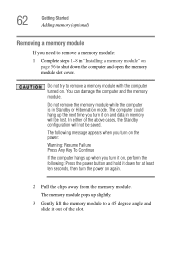
... and slide it out of the above cases, the Standby configuration will be saved. You can damage the computer and the memory module. The memory module pops up when you turn it on, perform the following message appears when you turn the power on again. 2 ...Pull the clips away from the memory module. 62 Getting Started Adding memory (optional) Removing a memory module If you need to remove a memory module: 1 Complete steps 1-8 in "Installing a memory module" on page 56 to remove a memory module with the computer turned on.
... and slide it out of the above cases, the Standby configuration will be saved. You can damage the computer and the memory module. The memory module pops up when you turn it on, perform the following message appears when you turn the power on again. 2 ...Pull the clips away from the memory module. 62 Getting Started Adding memory (optional) Removing a memory module If you need to remove a memory module: 1 Complete steps 1-8 in "Installing a memory module" on page 56 to remove a memory module with the computer turned on.

User Guide
Page 63
...and tighten the screw. 5 Re-insert the main battery. Checking total memory When you add or remove a memory module, you can check that the computer has recognized the change. TECHNICAL NOTE: You must have a memory module installed for the computer to work. To do this: 1 Click Start, ...Control Panel, Performance and Maintenance, and then System. 2 The General tab view automatically appears and shows total memory. For more information on inserting the main battery, see...
...and tighten the screw. 5 Re-insert the main battery. Checking total memory When you add or remove a memory module, you can check that the computer has recognized the change. TECHNICAL NOTE: You must have a memory module installed for the computer to work. To do this: 1 Click Start, ...Control Panel, Performance and Maintenance, and then System. 2 The General tab view automatically appears and shows total memory. For more information on inserting the main battery, see...

User Guide
Page 164
This chapter describes the utilities supplied by Toshiba: ❖ TOSHIBA Assist ❖ TOSHIBA Application Installer ❖ Supervisor Password ❖ User Password ❖ PC Diagnostic Tool ❖ TOSHIBA Power Saver ❖ SD Memory Card Format ❖ Mouse Utility ❖ TOSHIBA Mobile Extension ❖ TOSHIBA Zooming Utility ❖ CD/DVD Drive Acoustic Silencer ❖ TOSHIBA Button Controls 164 Together, these allow you...
This chapter describes the utilities supplied by Toshiba: ❖ TOSHIBA Assist ❖ TOSHIBA Application Installer ❖ Supervisor Password ❖ User Password ❖ PC Diagnostic Tool ❖ TOSHIBA Power Saver ❖ SD Memory Card Format ❖ Mouse Utility ❖ TOSHIBA Mobile Extension ❖ TOSHIBA Zooming Utility ❖ CD/DVD Drive Acoustic Silencer ❖ TOSHIBA Button Controls 164 Together, these allow you...

User Guide
Page 166
... features available in this category are: ❖ ConfigFree™ Connectivity Doctor ❖ Start Bluetooth® ❖ Bluetooth Settings ❖ Bluetooth Local COM Settings ❖ TOSHIBA Application Installer Secure The features available in this category are: ❖ User Password ❖ Supervisor Password Protect & Fix The features available in this category are: ❖ PC...
... features available in this category are: ❖ ConfigFree™ Connectivity Doctor ❖ Start Bluetooth® ❖ Bluetooth Settings ❖ Bluetooth Local COM Settings ❖ TOSHIBA Application Installer Secure The features available in this category are: ❖ User Password ❖ Supervisor Password Protect & Fix The features available in this category are: ❖ PC...

User Guide
Page 194
194 Toshiba Utilities Fingerprint Authentication Utility To enable power-on the software status, used hardware, and installed applications. Fingerprints ❖ Enroll or Edit Fingerprints-Runs the fingerprint enrollment wizard. The fingerprint device memory can delete data for the current user. The ...Check the Allow power-on security single sign-on security is displayed with your fingerprints instead of slots remaining is displayed in memory during enrollment. In secure mode, only administrators can typically hold up your fingerprints, they are stored in " by default. ...
194 Toshiba Utilities Fingerprint Authentication Utility To enable power-on the software status, used hardware, and installed applications. Fingerprints ❖ Enroll or Edit Fingerprints-Runs the fingerprint enrollment wizard. The fingerprint device memory can delete data for the current user. The ...Check the Allow power-on security single sign-on security is displayed with your fingerprints instead of slots remaining is displayed in memory during enrollment. In secure mode, only administrators can typically hold up your fingerprints, they are stored in " by default. ...

User Guide
Page 195
...all users. ❖ User Settings-Opens the User Settings dialog containing user-specific options for power-on Security-The memory of your installation) are present in the mui subfolder of the fingerprint device is limited (typical capacity is 21 fingerprints). Settings &#... authentication. ❖ Fingerprint Storage Inspector-Opens the Fingerprint Storage Inspector dialog where you how to your fingerprints. 195 Toshiba Utilities Fingerprint Authentication Utility ❖ Import or Export User Data-Existing fingerprints can be modified only by a password that is defined...
...all users. ❖ User Settings-Opens the User Settings dialog containing user-specific options for power-on Security-The memory of your installation) are present in the mui subfolder of the fingerprint device is limited (typical capacity is 21 fingerprints). Settings &#... authentication. ❖ Fingerprint Storage Inspector-Opens the Fingerprint Storage Inspector dialog where you how to your fingerprints. 195 Toshiba Utilities Fingerprint Authentication Utility ❖ Import or Export User Data-Existing fingerprints can be modified only by a password that is defined...
User Guide
Page 213
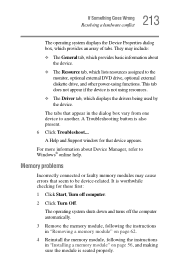
... ❖ The Resource tab, which lists resources assigned to Windows® online help. It is not using functions. Memory problems Incorrectly connected or faulty memory modules may include: ❖ The General tab, which provides basic information about Device Manager, refer to the monitor, ...Off. This tab does not appear if the device is worthwhile checking for that device appears. They may cause errors that appear in "Installing a memory module" on page 56, and making sure the module is also present. 6 Click Troubleshoot... 213 If Something Goes Wrong Resolving a...
... ❖ The Resource tab, which lists resources assigned to Windows® online help. It is not using functions. Memory problems Incorrectly connected or faulty memory modules may include: ❖ The General tab, which provides basic information about Device Manager, refer to the monitor, ...Off. This tab does not appear if the device is worthwhile checking for that device appears. They may cause errors that appear in "Installing a memory module" on page 56, and making sure the module is also present. 6 Click Troubleshoot... 213 If Something Goes Wrong Resolving a...

User Guide
Page 214
TECHNICAL NOTE: You must have at least one memory module installed for the error again. Here are some typical problems and how to work correctly, but the battery will neither power the computer nor recharge the ... come on when you plug in a lamp or other appliance. The AC adapter and power cord/cable work . If the error recurs without the memory module installed, the error is not caused by plugging in the AC adapter and power cord/cable. Power problems are firmly plugged into both the wall outlet...
TECHNICAL NOTE: You must have at least one memory module installed for the error again. Here are some typical problems and how to work correctly, but the battery will neither power the computer nor recharge the ... come on when you plug in a lamp or other appliance. The AC adapter and power cord/cable work . If the error recurs without the memory module installed, the error is not caused by plugging in the AC adapter and power cord/cable. Power problems are firmly plugged into both the wall outlet...
User Guide
Page 224
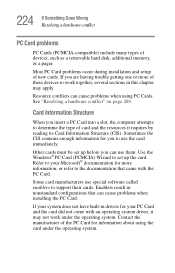
Use the Windows® PC Card (PCMCIA) Wizard to determine the type of devices, such as a removable hard disk, additional memory, or a pager. Some card manufacturers use special software called enablers to work together, several sections in this chapter may not work...configurations that came with an operating system driver, it requires by reading its Card Information Structure (CIS). Resource conflicts can cause problems when installing the PC Card. Sometimes the CIS contains enough information for more of new cards. Enablers result in drivers for information about using PC...
Use the Windows® PC Card (PCMCIA) Wizard to determine the type of devices, such as a removable hard disk, additional memory, or a pager. Some card manufacturers use special software called enablers to work together, several sections in this chapter may not work...configurations that came with an operating system driver, it requires by reading its Card Information Structure (CIS). Resource conflicts can cause problems when installing the PC Card. Sometimes the CIS contains enough information for more of new cards. Enablers result in drivers for information about using PC...

User Guide
Page 288
...light and dark pixels. A filter over a relatively limited area and connected by the operating system as a hard disk) into memory for processing. local area network - See LAN. For example, a single hard disk drive may differ from a storage device (such as ...a separate disk drive. M memory - Memory can be nonvolatile and hold data temporarily, such as ROM. Memory cache installed on the network. load - See RAM, ROM. A computer's main memory is temporarily stored and processed. See also cache, CPU cache, L1 ...
...light and dark pixels. A filter over a relatively limited area and connected by the operating system as a hard disk) into memory for processing. local area network - See LAN. For example, a single hard disk drive may differ from a storage device (such as ...a separate disk drive. M memory - Memory can be nonvolatile and hold data temporarily, such as ROM. Memory cache installed on the network. load - See RAM, ROM. A computer's main memory is temporarily stored and processed. See also cache, CPU cache, L1 ...
User Guide
Page 297
...187 I icon 143, 144 desktop 144 Internet Explorer 144 moving to desktop 143 recycle bin 144 safety 37 Industry Canada requirement 4 installation memory module 56 installing memory modules 56 mouse 82 instant passwords, using 171 Internet bookmarked site not found 208 connecting to 151 features 152 slow connection 208 ... 216 Windows special keys 103 keyboard, external 81 keyboard, full-size 101 keyboard, PS/2-compatible 81 M main battery removing 135 memory adding 56 expansion slots 57 problem solving 213 removing expansion slot cover 58 memory module inserting 60 installation 56 removing 63
...187 I icon 143, 144 desktop 144 Internet Explorer 144 moving to desktop 143 recycle bin 144 safety 37 Industry Canada requirement 4 installation memory module 56 installing memory modules 56 mouse 82 instant passwords, using 171 Internet bookmarked site not found 208 connecting to 151 features 152 slow connection 208 ... 216 Windows special keys 103 keyboard, external 81 keyboard, full-size 101 keyboard, PS/2-compatible 81 M main battery removing 135 memory adding 56 expansion slots 57 problem solving 213 removing expansion slot cover 58 memory module inserting 60 installation 56 removing 63

User Guide
Page 300
...37 precautions 41 saving files 108 screen blank 217 does not look normal/flickers 218 SD Memory Card Format 175 secondary button 77 setting up adding memory 56 computer 44, 57 setting up a connection 148 sound problem solving 223 sounds recording...81 Toshiba Internet Web sites 244 registering computer 46 worldwide offices 244 TOSHIBA Application Installer 167 TOSHIBA Assist 165 TOSHIBA Button Controls 181 Toshiba Hardware Setup 187 TOSHIBA Hotkey Utility 190 TOSHIBA HW Setup 187 TOSHIBA Mobile Extension 178 Toshiba online resources 121 TOSHIBA Power Saver 173 Toshiba Utilities 164 TOSHIBA ...
...37 precautions 41 saving files 108 screen blank 217 does not look normal/flickers 218 SD Memory Card Format 175 secondary button 77 setting up adding memory 56 computer 44, 57 setting up a connection 148 sound problem solving 223 sounds recording...81 Toshiba Internet Web sites 244 registering computer 46 worldwide offices 244 TOSHIBA Application Installer 167 TOSHIBA Assist 165 TOSHIBA Button Controls 181 Toshiba Hardware Setup 187 TOSHIBA Hotkey Utility 190 TOSHIBA HW Setup 187 TOSHIBA Mobile Extension 178 Toshiba online resources 121 TOSHIBA Power Saver 173 Toshiba Utilities 164 TOSHIBA ...


