
User Guide
Page 29
... Adding memory 56 Installing a memory module 57 Removing a memory module 60 Hard Drive Recovery Utilities 62 Creating Recovery CDs/DVDs 63 Hard Disk Drive Recovery using the recovery partition 65 Hard Disk Drive Recovery using the Recovery media 68 Deleting the Hard Disk Recovery Utility 71 Installing drivers and applications 72 Using the TouchPad 72 Scrolling with the...
... Adding memory 56 Installing a memory module 57 Removing a memory module 60 Hard Drive Recovery Utilities 62 Creating Recovery CDs/DVDs 63 Hard Disk Drive Recovery using the recovery partition 65 Hard Disk Drive Recovery using the Recovery media 68 Deleting the Hard Disk Recovery Utility 71 Installing drivers and applications 72 Using the TouchPad 72 Scrolling with the...
User Guide
Page 62
...and Maintenance. 3 Click System. 4 The General tab view automatically appears and shows total memory. For more information on creating Recovery media, see "Creating Recovery CDs/DVDs" on page 63 If the computer does not recognize the memory configuration, turn off the computer, remove the memory... memory module is strongly recommended that the computer has recognized the change. Hard Drive Recovery Utilities Your computer has been configured with a hard disk partition to allow you create recovery CDs/ DVDs before using your hard disk drive or reinstall selected applications and software ...
...and Maintenance. 3 Click System. 4 The General tab view automatically appears and shows total memory. For more information on creating Recovery media, see "Creating Recovery CDs/DVDs" on page 63 If the computer does not recognize the memory configuration, turn off the computer, remove the memory... memory module is strongly recommended that the computer has recognized the change. Hard Drive Recovery Utilities Your computer has been configured with a hard disk partition to allow you create recovery CDs/ DVDs before using your hard disk drive or reinstall selected applications and software ...
User Guide
Page 63
... and reclaim additional hard disk space used to store the Hard Drive Recovery Utilities on your hard disk drive recovery partition without the HDD Recovery partition. ❖ Delete your computer. If your optical disk drive is not writable, contact TOSHIBA Customer Support to obtain the Recovery media for example, a D: drive. ❖ Recover your hard disk drive to...
... and reclaim additional hard disk space used to store the Hard Drive Recovery Utilities on your hard disk drive recovery partition without the HDD Recovery partition. ❖ Delete your computer. If your optical disk drive is not writable, contact TOSHIBA Customer Support to obtain the Recovery media for example, a D: drive. ❖ Recover your hard disk drive to...
User Guide
Page 65
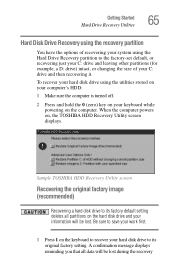
...your information will be lost during the recovery Be sure to save your work first. 1 Press 1 on the keyboard to recover your hard disk drive to the factory-set default, or recovering just your C: drive and leaving other partitions (for example, a D: drive)...your hard disk drive using the Hard Drive Recovery partition to its factory default setting deletes all data will be lost . A confirmation message displays reminding you that all partitions on , the TOSHIBA HDD Recovery Utility screen displays. Sample TOSHIBA HDD Recovery Utility screen Recovering the original factory image (...
...your information will be lost during the recovery Be sure to save your work first. 1 Press 1 on the keyboard to recover your hard disk drive to the factory-set default, or recovering just your C: drive and leaving other partitions (for example, a D: drive)...your hard disk drive using the Hard Drive Recovery partition to its factory default setting deletes all data will be lost . A confirmation message displays reminding you that all partitions on , the TOSHIBA HDD Recovery Utility screen displays. Sample TOSHIBA HDD Recovery Utility screen Recovering the original factory image (...

User Guide
Page 66
... sure to restart the computer. Be sure you have saved your information on the keyboard when the TOSHIBA HDD Recovery Utility screen displays. Be sure you have created other partitions (for example, a D: drive) those partitions and any key on the keyboard to begin the restoration. If you that the HDD has been recovered. 3 Press...
... sure to restart the computer. Be sure you have saved your information on the keyboard when the TOSHIBA HDD Recovery Utility screen displays. Be sure you have created other partitions (for example, a D: drive) those partitions and any key on the keyboard to begin the restoration. If you that the HDD has been recovered. 3 Press...

User Guide
Page 67
... to begin the restoration and to specify the size of the C: drive will display on the keyboard when the TOSHIBA HDD Recovery Utility screen displays. Getting Started Hard Drive Recovery Utilities 67 Recovering the C: partition with a user specified size Resizing and recovering your C: drive to its factory default setting reformats all information will be...
... to begin the restoration and to specify the size of the C: drive will display on the keyboard when the TOSHIBA HDD Recovery Utility screen displays. Getting Started Hard Drive Recovery Utilities 67 Recovering the C: partition with a user specified size Resizing and recovering your C: drive to its factory default setting reformats all information will be...
User Guide
Page 68
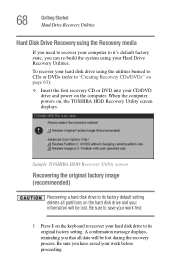
... sure you that all partitions on the keyboard to recover your hard disk drive to its original factory setting. A confirmation message displays, reminding you have saved your work first. 1 Press 1 on the hard disk drive and your information will be lost during the recovery process. Sample TOSHIBA HDD Recovery Utility screen Recovering the original...
... sure you that all partitions on the keyboard to recover your hard disk drive to its original factory setting. A confirmation message displays, reminding you have saved your work first. 1 Press 1 on the hard disk drive and your information will be lost during the recovery process. Sample TOSHIBA HDD Recovery Utility screen Recovering the original...

User Guide
Page 69
... your keyboard to begin the restoration. Once complete, a message displays that the HDD has been recovered. 3 Press any key on the keyboard when the TOSHIBA HDD Recovery Utility screen displays. To recover only your C: drive without creating the HDD Recovery Utilities partition. Getting Started Hard Drive Recovery Utilities 69 2 Click Yes to restart the computer.
... your keyboard to begin the restoration. Once complete, a message displays that the HDD has been recovered. 3 Press any key on the keyboard when the TOSHIBA HDD Recovery Utility screen displays. To recover only your C: drive without creating the HDD Recovery Utilities partition. Getting Started Hard Drive Recovery Utilities 69 2 Click Yes to restart the computer.
User Guide
Page 70
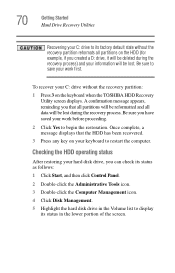
... the recovery partition reformats all data will be lost . A confirmation message appears, reminding you have saved your work before proceeding. 2 Click Yes to begin the restoration. Be sure you that the HDD has been recovered. 3 Press any key on the keyboard when the TOSHIBA HDD Recovery Utility ...screen displays. Once complete, a message displays that all partitions will be reformatted and all partitions on the HDD (for example, if you can check its status as follows: 1 ...
... the recovery partition reformats all data will be lost . A confirmation message appears, reminding you have saved your work before proceeding. 2 Click Yes to begin the restoration. Be sure you that the HDD has been recovered. 3 Press any key on the keyboard when the TOSHIBA HDD Recovery Utility ...screen displays. Once complete, a message displays that all partitions will be reformatted and all partitions on the HDD (for example, if you can check its status as follows: 1 ...

User Guide
Page 71
... and formats the drive. When the computer powers on, the Delete Hard Disk Recovery Utility warning screen displays. Sample Delete Hard Disk Recovery Utility confirmation screen Getting Started Hard Drive Recovery Utilities 71 Deleting the Hard Disk Recovery Utility You can delete the HDD recovery partition without losing your data. 1 Click Start, All Programs, Hard Disk...
... and formats the drive. When the computer powers on, the Delete Hard Disk Recovery Utility warning screen displays. Sample Delete Hard Disk Recovery Utility confirmation screen Getting Started Hard Drive Recovery Utilities 71 Deleting the Hard Disk Recovery Utility You can delete the HDD recovery partition without losing your data. 1 Click Start, All Programs, Hard Disk...

User Manual
Page 78
...Select either CD or DVDs, select the one you use a third-party partitioning program to reconfigure partitions on your hard disk, it may use the HDD Recovery installation to create recovery CDs/DVD including: CD-R, CD-RW, DVD-R, DVD-RW, DVD+R, ...Recovery HDD For models only with the Optical Drive of media and the title you choose. 3. If preinstalled files are using the following steps: 1. When you reinstall the Windows operating system, the hard disk will be reformatted and all data will allow you perform a complete system recovery. Otherwise, space for recovery partition. TECRA A3...
...Select either CD or DVDs, select the one you use a third-party partitioning program to reconfigure partitions on your hard disk, it may use the HDD Recovery installation to create recovery CDs/DVD including: CD-R, CD-RW, DVD-R, DVD-RW, DVD+R, ...Recovery HDD For models only with the Optical Drive of media and the title you choose. 3. If preinstalled files are using the following steps: 1. When you reinstall the Windows operating system, the hard disk will be reformatted and all data will allow you perform a complete system recovery. Otherwise, space for recovery partition. TECRA A3...

User Manual
Page 79
...to restore them. Restoring from your created Recovery Media If preinstalled files are damaged, use the your created Recovery Media to keep your current partitions intact and restore. Use the cursor key to restore Recovery tool. 5. Press the "3" key to...Recovery Media in Chapter 7, HW Setup. 4. TECRA A3/S2 3-14 Press the "3" key to the Boot Priority section in the optional optical media drive and turn on the power. For details, refer to specify partitions and restore. 4. Press the "2" key to restore all hard disk. A menu appears. When In Touch with Tomorrow TOSHIBA...
...to restore them. Restoring from your created Recovery Media If preinstalled files are damaged, use the your created Recovery Media to keep your current partitions intact and restore. Use the cursor key to restore Recovery tool. 5. Press the "3" key to...Recovery Media in Chapter 7, HW Setup. 4. TECRA A3/S2 3-14 Press the "3" key to the Boot Priority section in the optional optical media drive and turn on the power. For details, refer to specify partitions and restore. 4. Press the "2" key to restore all hard disk. A menu appears. When In Touch with Tomorrow TOSHIBA...


