

User Guide
Page 1
...page will appear on the right side of your screen.) ❖ To print, specify a range of this guide. C496-1200M1 choose freedomTM TOSHIBA Click the Print button or choose File > Print. For more information, select Help > Reader Guide from outside the United States (949) 859-4273 For more ... want to display topics in the Acrobat Print dialog box, or specify noncontiguous pages or a particular page before opening the dialog box. Tecra® 8200 Series User's Guide Tips for viewing PDFs: ❖ To use thumbnails, click the Thumbnails tab, and double click on the page number...
...page will appear on the right side of your screen.) ❖ To print, specify a range of this guide. C496-1200M1 choose freedomTM TOSHIBA Click the Print button or choose File > Print. For more information, select Help > Reader Guide from outside the United States (949) 859-4273 For more ... want to display topics in the Acrobat Print dialog box, or specify noncontiguous pages or a particular page before opening the dialog box. Tecra® 8200 Series User's Guide Tips for viewing PDFs: ❖ To use thumbnails, click the Thumbnails tab, and double click on the page number...

User Guide
Page 19
... another computer 141 Setting up for communications 142 Connecting the modem to a telephone line 145 Connecting your computer to a network 145 Toshiba's online resources 147 An overview of using the Internet 147 The Internet 147 The World Wide Web 147 Internet Service Providers 148 Connecting... Using the WinDVD toolbar 155 Using the WinDVD status bar 155 Using the WinDVD control panel 156 Using the control panel playback buttons 157 Maximizing the video window 159 Using Playlists 160 Creating playlists 160 Loading and playing Playlists 161 Resuming normal playback after using ...
... another computer 141 Setting up for communications 142 Connecting the modem to a telephone line 145 Connecting your computer to a network 145 Toshiba's online resources 147 An overview of using the Internet 147 The Internet 147 The World Wide Web 147 Internet Service Providers 148 Connecting... Using the WinDVD toolbar 155 Using the WinDVD status bar 155 Using the WinDVD control panel 156 Using the control panel playback buttons 157 Maximizing the video window 159 Using Playlists 160 Creating playlists 160 Loading and playing Playlists 161 Resuming normal playback after using ...
User Guide
Page 30
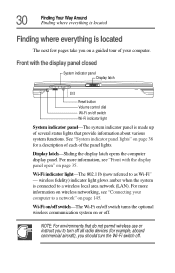
For more information on wireless networking, see "Front with the display panel closed System indicator panel Display latch Reset button Volume control dial Wi-Fi on/off switch Wi-Fi indicator light System indicator panel-The system indicator panel is located The next few pages ...
For more information on wireless networking, see "Front with the display panel closed System indicator panel Display latch Reset button Volume control dial Wi-Fi on/off switch Wi-Fi indicator light System indicator panel-The system indicator panel is located The next few pages ...

User Guide
Page 31
Pencil lead can use an optional Y-cable to connect both a mouse and a keyboard to press the reset button. Instead, use a pencil to the port. You can break off inside the computer and damage it. USB allows "hot swapping" of up ...Finding where everything is a single-cabling and connection standard that supports a data transfer rate of peripherals, which means that Reset button-Pressing the reset button restarts the computer. Use this button when other methods of the system speakers. USB ports-The USB (Universal Serial Bus) ports provide a connection for peripherals such...
Pencil lead can use an optional Y-cable to connect both a mouse and a keyboard to press the reset button. Instead, use a pencil to the port. You can break off inside the computer and damage it. USB allows "hot swapping" of up ...Finding where everything is a single-cabling and connection standard that supports a data transfer rate of peripherals, which means that Reset button-Pressing the reset button restarts the computer. Use this button when other methods of the system speakers. USB ports-The USB (Universal Serial Bus) ports provide a connection for peripherals such...

User Guide
Page 34
... Your Way Around Finding where everything is located Left side PC Card ejection tabs PC Card slots Speaker Headphone jack Microphone jack Cooling vent Power button Power button cover PC Card ejection tabs-Allow easy removal of the computer's processor, make sure you hear stereo sound from overheating.
... Your Way Around Finding where everything is located Left side PC Card ejection tabs PC Card slots Speaker Headphone jack Microphone jack Cooling vent Power button Power button cover PC Card ejection tabs-Allow easy removal of the computer's processor, make sure you hear stereo sound from overheating.
User Guide
Page 35
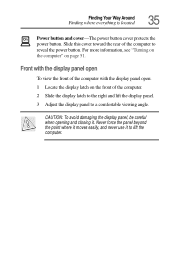
... damaging the display panel, be careful when opening and closing it to reveal the power button. Finding Your Way Around Finding where everything is located 35 On Power button and cover-The power button cover protects the power button. Slide this cover toward the rear of the computer with the display panel open To...
... damaging the display panel, be careful when opening and closing it to reveal the power button. Finding Your Way Around Finding where everything is located 35 On Power button and cover-The power button cover protects the power button. Slide this cover toward the rear of the computer with the display panel open To...

User Guide
Page 36
.... 36 Finding Your Way Around Finding where everything is located Screen Keyboard Keyboard indicator panel AccuPoint II pointing device Microphone System indicator panel AccuPoint II buttons Screen-The computer's screen is a liquid crystal display (LCD) that provides clear, sharp images. Microphone-The built-in microphone lets you record sounds. For more...
.... 36 Finding Your Way Around Finding where everything is located Screen Keyboard Keyboard indicator panel AccuPoint II pointing device Microphone System indicator panel AccuPoint II buttons Screen-The computer's screen is a liquid crystal display (LCD) that provides clear, sharp images. Microphone-The built-in microphone lets you record sounds. For more...
User Guide
Page 51
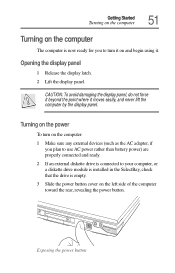
Getting Started Turning on the computer 51 Turning on the computer The computer is empty. 3 Slide the power button cover on and begin using it. CAUTION: To avoid damaging the display panel, do not force it beyond the point where it on the left ...side of the computer toward the rear, revealing the power button. Opening the display panel 1 Release the display latch. 2 Lift the display panel. Exposing the power button Turning on the power To turn on the computer: 1 Make sure any external devices (such as the...
Getting Started Turning on the computer 51 Turning on the computer The computer is empty. 3 Slide the power button cover on and begin using it. CAUTION: To avoid damaging the display panel, do not force it beyond the point where it on the left ...side of the computer toward the rear, revealing the power button. Opening the display panel 1 Release the display latch. 2 Lift the display panel. Exposing the power button Turning on the power To turn on the computer: 1 Make sure any external devices (such as the...
User Guide
Page 52
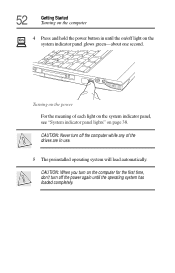
CAUTION: When you turn on the computer for the first time, don't turn off light on the system indicator panel glows green-about one second. CAUTION: Never turn off the power again until the on/off the computer while any of each light on the system indicator panel, see "System indicator panel lights" on page 38. Turning on the power For the meaning of the drives are in until the operating system has loaded completely. 52 Getting Started Turning on the computer On 4 Press and hold the power button in use. 5 The preinstalled operating system will load automatically.
CAUTION: When you turn on the computer for the first time, don't turn off light on the system indicator panel glows green-about one second. CAUTION: Never turn off the power again until the on/off the computer while any of each light on the system indicator panel, see "System indicator panel lights" on page 38. Turning on the power For the meaning of the drives are in until the operating system has loaded completely. 52 Getting Started Turning on the computer On 4 Press and hold the power button in use. 5 The preinstalled operating system will load automatically.

User Guide
Page 63
... of interface. Doing so may come with the AccuPoint II: 1 Click Start, select Programs, then select Toshiba Utilities. 2 Click Hardware Setup, click the Hardware Options button, then select the Pointing Devices tab. 3 Select the Simultaneous radio button, then click OK. You also need to know whether it is on. Connecting Other External Devices...
... of interface. Doing so may come with the AccuPoint II: 1 Click Start, select Programs, then select Toshiba Utilities. 2 Click Hardware Setup, click the Hardware Options button, then select the Pointing Devices tab. 3 Select the Simultaneous radio button, then click OK. You also need to know whether it is on. Connecting Other External Devices...

User Guide
Page 84
... injuries and eyestrain. ❖ Don't turn off your computer using the Shut Down or Standby command in Windows 98 Second Edition, or using the Power button. If you have a separate backup copy. ❖ Use ScanDisk, Disk Defragmenter, and the Maintenance Wizard regularly to conserve disk space and help your desktop setup...
... injuries and eyestrain. ❖ Don't turn off your computer using the Shut Down or Standby command in Windows 98 Second Edition, or using the Power button. If you have a separate backup copy. ❖ Use ScanDisk, Disk Defragmenter, and the Maintenance Wizard regularly to conserve disk space and help your desktop setup...

User Guide
Page 85
..., refer to the operating system documentation that came with your computer, or access your computer is over the power button, slide the cover to the rear to reveal the power button. A screen appears prompting you to select the operating system option in which you 'll find Windows 98 Second ... installed in many ways. See "Connecting the AC adapter" on /off light glows green. Then press and hold the power button until the on page 48. 4 If the power button cover is not connected to a network. Logging on to Windows NT A major difference between Windows NT and other external device...
..., refer to the operating system documentation that came with your computer, or access your computer is over the power button, slide the cover to the rear to reveal the power button. A screen appears prompting you to select the operating system option in which you 'll find Windows 98 Second ... installed in many ways. See "Connecting the AC adapter" on /off light glows green. Then press and hold the power button until the on page 48. 4 If the power button cover is not connected to a network. Logging on to Windows NT A major difference between Windows NT and other external device...

User Guide
Page 88
... pressed. Used in Windows: ❖ Start key-Opens the Start menu ❖ Application key-Has the same function as the secondary mouse (or AccuPoint II) button For more information, see "Fn-esse" on page 176, or "Hot Keys" on the program you are the 12 keys at the top of the...
... pressed. Used in Windows: ❖ Start key-Opens the Start menu ❖ Application key-Has the same function as the secondary mouse (or AccuPoint II) button For more information, see "Fn-esse" on page 176, or "Hot Keys" on the program you are the 12 keys at the top of the...

User Guide
Page 91
...move the cursor, gently push the pointing device in the task tray. 2 Select the Buttons tab. 3 Under Button Assignments, choose the button to be programmed to perform a function you select. The button is now programmed with the function you want the cursor to move. Learning the Basics Using... the AccuPoint II Using the AccuPoint II AccuPoint II pointing device 91 Programmable button Programmable button Primary button Secondary button The AccuPoint II keys Accupoint II pointing device-Enables you to move the cursor and to select items on the screen...
...move the cursor, gently push the pointing device in the task tray. 2 Select the Buttons tab. 3 Under Button Assignments, choose the button to be programmed to perform a function you select. The button is now programmed with the function you want the cursor to move. Learning the Basics Using... the AccuPoint II Using the AccuPoint II AccuPoint II pointing device 91 Programmable button Programmable button Primary button Secondary button The AccuPoint II keys Accupoint II pointing device-Enables you to move the cursor and to select items on the screen...

User Guide
Page 92
... even when you to click or choose an item, move the cursor to see if they have four options. To double-click, press the primary button twice in rapid succession. To find the file, use My Computer or Windows Explorer. This is to the hard disk drive or a diskette. Check your... you want to start a program is one of the most important rules of the file that saves documents at regular intervals, such as the right button on . You can: ❖ Double-click the icon for the program on your desktop ❖ Use the Start menu ❖ Use Windows Explorer or My...
... even when you to click or choose an item, move the cursor to see if they have four options. To double-click, press the primary button twice in rapid succession. To find the file, use My Computer or Windows Explorer. This is to the hard disk drive or a diskette. Check your... you want to start a program is one of the most important rules of the file that saves documents at regular intervals, such as the right button on . You can: ❖ Double-click the icon for the program on your desktop ❖ Use the Start menu ❖ Use Windows Explorer or My...

User Guide
Page 94
Using diskettes Eject button Diskette in-use indicator light Sample diskette drive Eject button-Press to print. A sample Print dialog box 3 Click OK to eject a diskette from the drive. 94 Learning the Basics Using diskettes To print a file: 1 If your printer is not on, turn it on now. 2 In the File menu of the program you are using, click Print. The program displays a Print dialog box.
Using diskettes Eject button Diskette in-use indicator light Sample diskette drive Eject button-Press to print. A sample Print dialog box 3 Click OK to eject a diskette from the drive. 94 Learning the Basics Using diskettes To print a file: 1 If your printer is not on, turn it on now. 2 In the File menu of the program you are using, click Print. The program displays a Print dialog box.

User Guide
Page 95
...so could destroy data and damage the diskette or the drive. CAUTION: Do not press the eject button or turn off the computer while the diskette in-use indicator light is in place, the eject button pops out. Inserting and removing a diskette To insert a diskette: 1 Hold the diskette so ...that the arrow on a diskette. ❖ Do not twist or bend a diskette. To remove a diskette: ❖ Push the eject button and the diskette pops out for easy removal. Diskette care ❖ Store your diskettes in their boxes or other containers to protect them and keep...
...so could destroy data and damage the diskette or the drive. CAUTION: Do not press the eject button or turn off the computer while the diskette in-use indicator light is in place, the eject button pops out. Inserting and removing a diskette To insert a diskette: 1 Hold the diskette so ...that the arrow on a diskette. ❖ Do not twist or bend a diskette. To remove a diskette: ❖ Push the eject button and the diskette pops out for easy removal. Diskette care ❖ Store your diskettes in their boxes or other containers to protect them and keep...

User Guide
Page 97
...instructions in -use indicator light Eject button Manual eject hole A DVD-ROM drive Drive in "Using SelectBay modules" on page 163. Learning the Basics Using a compact disc drive 97 6 Click the icon for the diskette drive (drive A:). Using a compact disc drive Your Tecra 8200 Series computer may have a CD-...ROM drive or DVD-ROM drive that can also back up a file to a diskette by clicking the file (or files) you want to back up, click the secondary button, then point to play Region 1 (North America...
...instructions in -use indicator light Eject button Manual eject hole A DVD-ROM drive Drive in "Using SelectBay modules" on page 163. Learning the Basics Using a compact disc drive 97 6 Click the icon for the diskette drive (drive A:). Using a compact disc drive Your Tecra 8200 Series computer may have a CD-...ROM drive or DVD-ROM drive that can also back up a file to a diskette by clicking the file (or files) you want to back up, click the secondary button, then point to play Region 1 (North America...

User Guide
Page 98
... turn off the computer while the Drive in -use indicator light is off . Doing so could cause the drive to press the eject button. When the disc tray is glowing. Doing so could damage the disc or the drive. CAUTION: Never use indicator light is open, be careful not ... to malfunction. The disc tray slides partially out of the drive (about 1 inch). Manual eject hole-Use if you need to press the manual eject button located inside the computer and damage it fully open if the computer's power is off . 3 Press the DVD-ROM or CD-ROM drive's eject...
... turn off the computer while the Drive in -use indicator light is off . Doing so could cause the drive to press the eject button. When the disc tray is glowing. Doing so could damage the disc or the drive. CAUTION: Never use indicator light is open, be careful not ... to malfunction. The disc tray slides partially out of the drive (about 1 inch). Manual eject hole-Use if you need to press the manual eject button located inside the computer and damage it fully open if the computer's power is off . 3 Press the DVD-ROM or CD-ROM drive's eject...

User Guide
Page 100
... DVD For information on playing a disc, see "Playing an audio CDROM" on page 140, or "WinDVD" on the tray. CAUTION: Do not press the eject button while the in by pressing gently on the drive. Doing so could damage the disc or the drive. CAUTION: If you insert the disc incorrectly... disc is completely on the spindle and is lying flat on page 153. To remove a compact disc with the computer turned on: 1 Press the eject button on the center of the tray until it is fully open, remove the disc, and place it clicks into place. Removing compact discs To remove...
... DVD For information on playing a disc, see "Playing an audio CDROM" on page 140, or "WinDVD" on the tray. CAUTION: Do not press the eject button while the in by pressing gently on the drive. Doing so could damage the disc or the drive. CAUTION: If you insert the disc incorrectly... disc is completely on the spindle and is lying flat on page 153. To remove a compact disc with the computer turned on: 1 Press the eject button on the center of the tray until it is fully open, remove the disc, and place it clicks into place. Removing compact discs To remove...


