
User Guide
Page 5
... Act of 1991 makes it unlawful for any person to use a computer or other entity, or individual. (The telephone number provided may not be necessary for repair or standard limited warranty information, please contact Toshiba Corporation, Toshiba America Information Systems, Inc. Contact the state public utility commission, public service commission or corporation commission for which charges exceed local or...
... Act of 1991 makes it unlawful for any person to use a computer or other entity, or individual. (The telephone number provided may not be necessary for repair or standard limited warranty information, please contact Toshiba Corporation, Toshiba America Information Systems, Inc. Contact the state public utility commission, public service commission or corporation commission for which charges exceed local or...
User Guide
Page 30
... to a custom size partition 64 Recovering without changing the internal storage drive partitions 67 Creating recovery DVDs/media 69 Restoring from recovery DVDs/media 72 Erasing the Internal Storage Drive 74 Checking the internal storage drive operating status 75 Installing drivers and applications 76 Using the TouchPad 76 Adjusting TouchPad™ settings 79 Disabling or enabling the TouchPad 80 Using external display devices 80 Selecting video cables 81 Connecting an HDMI™-compatible television or display device 81 Connecting an external monitor or projector.....81...
... to a custom size partition 64 Recovering without changing the internal storage drive partitions 67 Creating recovery DVDs/media 69 Restoring from recovery DVDs/media 72 Erasing the Internal Storage Drive 74 Checking the internal storage drive operating status 75 Installing drivers and applications 76 Using the TouchPad 76 Adjusting TouchPad™ settings 79 Disabling or enabling the TouchPad 80 Using external display devices 80 Selecting video cables 81 Connecting an HDMI™-compatible television or display device 81 Connecting an external monitor or projector.....81...
User Guide
Page 34
... Enabling/Disabling USB Sleep and Charge......165 Power supply mode settings 166 TOSHIBA Zooming Utility 167 TOSHIBA Button Support 168 TOSHIBA Accessibility 169 Fingerprint Authentication Utility 170 Fingerprint utility limitations 170 Using the Fingerprint Authentication Utility.....170 Fingerprint Logon 171 Care and maintenance of your fingerprint reader 171 Fingerprint reader limitations 173 TOSHIBA eco Utility 174 TOSHIBA Service Station 175 TOSHIBA PC Health Monitor 175 Chapter 6: If Something Goes Wrong 177 Problems that are easy to fix 177 Problems when you turn...
... Enabling/Disabling USB Sleep and Charge......165 Power supply mode settings 166 TOSHIBA Zooming Utility 167 TOSHIBA Button Support 168 TOSHIBA Accessibility 169 Fingerprint Authentication Utility 170 Fingerprint utility limitations 170 Using the Fingerprint Authentication Utility.....170 Fingerprint Logon 171 Care and maintenance of your fingerprint reader 171 Fingerprint reader limitations 173 TOSHIBA eco Utility 174 TOSHIBA Service Station 175 TOSHIBA PC Health Monitor 175 Chapter 6: If Something Goes Wrong 177 Problems that are easy to fix 177 Problems when you turn...
User Guide
Page 52
... this procedure. You will be hot. You can be hot. If you install or remove a memory module, turn off the computer using the Start menu. The surrounding area may damage the computer, the module, or both. See "Setting up your software" on may also be installed in Sleep or Hibernation mode, data will need a small Phillips screwdriver for this model, Slot A is the top slot. Failure to follow these directions...
... this procedure. You will be hot. You can be hot. If you install or remove a memory module, turn off the computer using the Start menu. The surrounding area may damage the computer, the module, or both. See "Setting up your software" on may also be installed in Sleep or Hibernation mode, data will need a small Phillips screwdriver for this model, Slot A is the top slot. Failure to follow these directions...
User Guide
Page 54
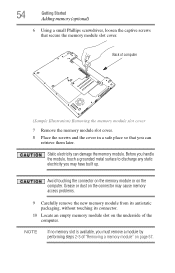
... surface to discharge any static electricity you may cause memory access problems. 9 Carefully remove the new memory module from its antistatic packaging, without touching its connector. 10 Locate an empty memory module slot on page 57. Back of "Removing a memory module" on the underside of the computer. Grease or dust on the computer. 54 Getting Started Adding memory (optional) 6 Using a small Phillips screwdriver, loosen the captive screws that you...
... surface to discharge any static electricity you may cause memory access problems. 9 Carefully remove the new memory module from its antistatic packaging, without touching its connector. 10 Locate an empty memory module slot on page 57. Back of "Removing a memory module" on the underside of the computer. Grease or dust on the computer. 54 Getting Started Adding memory (optional) 6 Using a small Phillips screwdriver, loosen the captive screws that you...

User Guide
Page 57
... the computer. Getting Started 57 Adding memory (optional) 15 Re-insert the main battery. Removing a memory module If you can block the vents located at least one memory module installed for the computer to remove the soft cloth from overheating when the power is turned on page 60. Make sure to work surface before restarting the computer. When the operating system has loaded, you need to remove a memory module: 1 Complete steps...
... the computer. Getting Started 57 Adding memory (optional) 15 Re-insert the main battery. Removing a memory module If you can block the vents located at least one memory module installed for the computer to remove the soft cloth from overheating when the power is turned on page 60. Make sure to work surface before restarting the computer. When the operating system has loaded, you need to remove a memory module: 1 Complete steps...

User Guide
Page 59
.... 5 Re-insert the main battery. Using your computer on a carpet or other soft material can block the vents located at the base of computer Slot B (Sample Illustration) Removing the memory module 4 Replace the memory module slot cover and secure it out of the computer. Back of the computer. ❖ Always operate your computer on a hard flat surface. Make sure to a power outlet (even if your computer...
.... 5 Re-insert the main battery. Using your computer on a carpet or other soft material can block the vents located at the base of computer Slot B (Sample Illustration) Removing the memory module 4 Replace the memory module slot cover and secure it out of the computer. Back of the computer. ❖ Always operate your computer on a hard flat surface. Make sure to a power outlet (even if your computer...

User Guide
Page 81
... the external display device. Refer to your computer if you first need a larger screen. Getting Started 81 Using external display devices Selecting video cables To connect a device to the HDMI™ Out port, you can easily attach an external monitor or projector to a live electrical outlet. 4 Turn on the side of the cable to the manual that came with the monitor to see if you need to install new software. 2 Connect the monitor's video cable to the RGB (monitor) port on the external device.
... the external display device. Refer to your computer if you first need a larger screen. Getting Started 81 Using external display devices Selecting video cables To connect a device to the HDMI™ Out port, you can easily attach an external monitor or projector to a live electrical outlet. 4 Turn on the side of the cable to the manual that came with the monitor to see if you need to install new software. 2 Connect the monitor's video cable to the RGB (monitor) port on the external device.
User Guide
Page 110
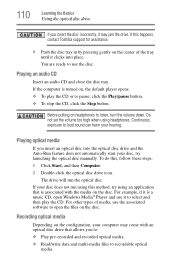
... exposure to listen, turn the volume down. The drive will run using headphones. Recording optical media Depending on the disc. If this , follow these steps: 1 Click Start, and then Computer. 2 Double-click the optical disc drive icon. You are ready to open Windows Media® Player and use the disc. Do not set the volume too high when using this method, try launching the optical disc manually. 110 Learning...
... exposure to listen, turn the volume down. The drive will run using headphones. Recording optical media Depending on the disc. If this , follow these steps: 1 Click Start, and then Computer. 2 Double-click the optical disc drive icon. You are ready to open Windows Media® Player and use the disc. Do not set the volume too high when using this method, try launching the optical disc manually. 110 Learning...
User Guide
Page 154
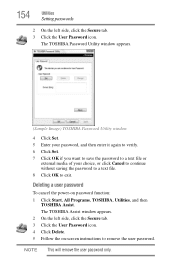
... -screen instructions to exit. NOTE This will remove the user password only. The TOSHIBA Assist window appears. 2 On the left side, click the Secure tab. 3 Click the User Password icon. 154 Utilities Setting passwords 2 On the left side, click the Secure tab. 3 Click the User Password icon. 4 Click Delete. 5 Follow the on password function: 1 Click Start, All Programs, TOSHIBA, Utilities, and then TOSHIBA Assist. The TOSHIBA Password Utility window appears. (Sample Image) TOSHIBA Password Utility window 4 Click Set. 5 Enter your password...
... -screen instructions to exit. NOTE This will remove the user password only. The TOSHIBA Assist window appears. 2 On the left side, click the Secure tab. 3 Click the User Password icon. 154 Utilities Setting passwords 2 On the left side, click the Secure tab. 3 Click the User Password icon. 4 Click Delete. 5 Follow the on password function: 1 Click Start, All Programs, TOSHIBA, Utilities, and then TOSHIBA Assist. The TOSHIBA Password Utility window appears. (Sample Image) TOSHIBA Password Utility window 4 Click Set. 5 Enter your password...
User Guide
Page 175
... is used to the examples specified here. TOSHIBA PC Health Monitor The TOSHIBA PC Health Monitor software program monitors computer system functions such as required by notifying you when updated software, firmware, documentation or other information is available for your computer. The collected information includes device operation time and number of actuations or status changes (e.g.: number of power button and Fn key combination uses, and AC adaptor, battery, LCD, fan, HDD, sound volume, docking and USB information...
... is used to the examples specified here. TOSHIBA PC Health Monitor The TOSHIBA PC Health Monitor software program monitors computer system functions such as required by notifying you when updated software, firmware, documentation or other information is available for your computer. The collected information includes device operation time and number of actuations or status changes (e.g.: number of power button and Fn key combination uses, and AC adaptor, battery, LCD, fan, HDD, sound volume, docking and USB information...
User Guide
Page 181
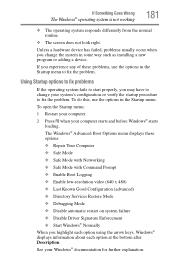
... options: ❖ Repair Your Computer ❖ Safe Mode ❖ Safe Mode with Networking ❖ Safe Mode with Command Prompt ❖ Enable Boot Logging ❖ Enable low-resolution video (640 x 480) ❖ Last Known Good Configuration (advanced) ❖ Directory Services Restore Mode ❖ Debugging Mode ❖ Disable automatic restart on system failure ❖ Disable Driver Signature Enforcement ❖ Start Windows® Normally When you may have to fix the problem. Using Startup options to fix problems If the operating system fails to fix...
... options: ❖ Repair Your Computer ❖ Safe Mode ❖ Safe Mode with Networking ❖ Safe Mode with Command Prompt ❖ Enable Boot Logging ❖ Enable low-resolution video (640 x 480) ❖ Last Known Good Configuration (advanced) ❖ Directory Services Restore Mode ❖ Debugging Mode ❖ Disable automatic restart on system failure ❖ Disable Driver Signature Enforcement ❖ Start Windows® Normally When you may have to fix the problem. Using Startup options to fix problems If the operating system fails to fix...
User Guide
Page 186
.... If no password is registered, press any key, type the password and press Enter. You may be on , press Fn + F10 to turn off the cursor control overlay light, or Fn + F11 to turn off , make sure the software you are using the built-in screen, make of the keys. If this , press Fn and F5 simultaneously (once). 186 If Something Goes Wrong Keyboard problems Keyboard problems If, when...
.... If no password is registered, press any key, type the password and press Enter. You may be on , press Fn + F10 to turn off the cursor control overlay light, or Fn + F11 to turn off , make sure the software you are using the built-in screen, make of the keys. If this , press Fn and F5 simultaneously (once). 186 If Something Goes Wrong Keyboard problems Keyboard problems If, when...

User Guide
Page 191
...; problems (Available on certain models.) ExpressCards® include many types of new cards. ExpressCards® that machine. Contact the manufacturer of these devices to be defective. Resolving ExpressCard® problems Here are some common problems and their solutions: The slot appears to work together, several sections in this chapter may apply. Most ExpressCard problems occur during installation and setup of devices, such as a removable hard disk, additional memory...
...; problems (Available on certain models.) ExpressCards® include many types of new cards. ExpressCards® that machine. Contact the manufacturer of these devices to be defective. Resolving ExpressCard® problems Here are some common problems and their solutions: The slot appears to work together, several sections in this chapter may apply. Most ExpressCard problems occur during installation and setup of devices, such as a removable hard disk, additional memory...
User Guide
Page 231
... work , including all open files and programs, when you use to perform a task instead of using this function, if connected with the Fn key can set system options or control system parameters, such as a mouse. K keyboard shortcut-A key or combination of keys that you turn on the screen that activates a memory resident program. Compare non-interlaced. It is running and have the operating system automatically recognize the change. 231 Glossary HDMI...
... work , including all open files and programs, when you use to perform a task instead of using this function, if connected with the Fn key can set system options or control system parameters, such as a mouse. K keyboard shortcut-A key or combination of keys that you turn on the screen that activates a memory resident program. Compare non-interlaced. It is running and have the operating system automatically recognize the change. 231 Glossary HDMI...

User Guide
Page 238
Index A AC adaptor 46 AC power 115 AC power light 46 accessing network 136 adding memory check total memory 60 memory (optional) 51 optional external devices 51 adequate ventilation cooling fan 45 adjusting TouchPad™ settings 79 Application Cards 209 audio features 138 B backing up files 98, 106 battery battery life 114 Call2Recycle™ 130 care 128, 129 changing 125 238 charge indicator light 48 charge time 116 charger 116 charging 48, 116 charging the real-time clock...
Index A AC adaptor 46 AC power 115 AC power light 46 accessing network 136 adding memory check total memory 60 memory (optional) 51 optional external devices 51 adequate ventilation cooling fan 45 adjusting TouchPad™ settings 79 Application Cards 209 audio features 138 B backing up files 98, 106 battery battery life 114 Call2Recycle™ 130 care 128, 129 changing 125 238 charge indicator light 48 charge time 116 charger 116 charging 48, 116 charging the real-time clock...
User Guide
Page 239
Index 239 running computer on battery power 114 safety precautions 128 setting notifications 120 battery indicator light 119 BIOS Setup see TOSHIBA Hardware Setup button eco Utility™ 124 eject, optical disc drive 108 power 50 Shut down 53, 87 start 134 C Call2Recycle™ battery 130 caring for your computer 95 changing battery 125 character keys 99 charging the battery 48 cleaning the computer 95 communications network connection 136 set up 135 computer caring for 95 cleaning...
Index 239 running computer on battery power 114 safety precautions 128 setting notifications 120 battery indicator light 119 BIOS Setup see TOSHIBA Hardware Setup button eco Utility™ 124 eject, optical disc drive 108 power 50 Shut down 53, 87 start 134 C Call2Recycle™ battery 130 caring for your computer 95 changing battery 125 character keys 99 charging the battery 48 cleaning the computer 95 communications network connection 136 set up 135 computer caring for 95 cleaning...

User Guide
Page 241
disabling or enabling wireless devices 218 display brightness 217 Hibernation mode 215 keyboard overlays 221 Lock (Instant security) 212 Output (Display switch) 216 power plan 213 Sleep mode 214 using to set a power plan 123 volume mute 211 Zoom (Display resolution) 221 zooming in 221 zooming out 221 Hot Key Cards 207 Hot key functions 211 I icon desktop 133 moving to desktop 133 recycle bin 133 safety 40 inserting ExpressCard® 140 installation memory module 52 installing a charged battery 127 battery 125 memory modules 51...
disabling or enabling wireless devices 218 display brightness 217 Hibernation mode 215 keyboard overlays 221 Lock (Instant security) 212 Output (Display switch) 216 power plan 213 Sleep mode 214 using to set a power plan 123 volume mute 211 Zoom (Display resolution) 221 zooming in 221 zooming out 221 Hot Key Cards 207 Hot key functions 211 I icon desktop 133 moving to desktop 133 recycle bin 133 safety 40 inserting ExpressCard® 140 installation memory module 52 installing a charged battery 127 battery 125 memory modules 51...
User Guide
Page 244
... video cables 81 setting low battery notifications 120 setting up AC adaptor 46 adding memory (optional) 51 communications 135 computer 45 software Setup Wizard 50 work environment 42 setting up a connection 136 settings customize computer settings 95 display output 82 Shut down button 53, 87 command 87 computer 53, 87 Hibernation mode 90 Sleep mode 92 Sleep mode 86 configuring 92 configuring options 92 hot key 214 powering down 92 Shut down 92 starting again from 95 using 92 software Setup...
... video cables 81 setting low battery notifications 120 setting up AC adaptor 46 adding memory (optional) 51 communications 135 computer 45 software Setup Wizard 50 work environment 42 setting up a connection 136 settings customize computer settings 95 display output 82 Shut down button 53, 87 command 87 computer 53, 87 Hibernation mode 90 Sleep mode 92 Sleep mode 86 configuring 92 configuring options 92 hot key 214 powering down 92 Shut down 92 starting again from 95 using 92 software Setup...
User Guide
Page 246
... quickly 87 options 85 turning on power 50 U USB Sleep and Charge cannot use 202 USB Sleep and Charge Utility 163 USB Wakeup function does not work 203 USB-compatible printer 83 user password, deleting 154 user password, setting 153 using a microphone 138 computer lock 96 DVDs 107 expansion port 143 ExpressCard® 140 Hibernation mode 89 hot key to set a power plan 123 Memory card reader 141 optical disc drive 107 Shut down command 87 Sleep mode 92 TOSHIBA eco power plan 124 TouchPad™ 76 Web Camera 139 using the keyboard 98 using...
... quickly 87 options 85 turning on power 50 U USB Sleep and Charge cannot use 202 USB Sleep and Charge Utility 163 USB Wakeup function does not work 203 USB-compatible printer 83 user password, deleting 154 user password, setting 153 using a microphone 138 computer lock 96 DVDs 107 expansion port 143 ExpressCard® 140 Hibernation mode 89 hot key to set a power plan 123 Memory card reader 141 optical disc drive 107 Shut down command 87 Sleep mode 92 TOSHIBA eco power plan 124 TouchPad™ 76 Web Camera 139 using the keyboard 98 using...


