

Users Manual Canada; English
Page 3
... Media care 4-46 Sound System 4-47 Modem 4-49 Wireless communications 4-53 LAN 4-56 Computer Handling 4-58 Using the Hard Disk Drive (HDD) Protection 4-59 Using the TOSHIBA USB Sleep and Charge Utility 4-61 Heat dispersal 4-63 Chapter 5 The Keyboard Typewriter keys 5-1 Function keys: F1 ... F12 5-2 Soft keys: FN key combinations 5-2 Hot keys 5-3 Windows special keys 5-5 Keypad overlay 5-6 Generating ASCII characters 5-7 Chapter 6 Power and Power-Up Modes Power conditions 6-1 Monitoring of power condition 6-4 Battery 6-5 TOSHIBA Password Utility 6-15 User's Manual iii...
... Media care 4-46 Sound System 4-47 Modem 4-49 Wireless communications 4-53 LAN 4-56 Computer Handling 4-58 Using the Hard Disk Drive (HDD) Protection 4-59 Using the TOSHIBA USB Sleep and Charge Utility 4-61 Heat dispersal 4-63 Chapter 5 The Keyboard Typewriter keys 5-1 Function keys: F1 ... F12 5-2 Soft keys: FN key combinations 5-2 Hot keys 5-3 Windows special keys 5-5 Keypad overlay 5-6 Generating ASCII characters 5-7 Chapter 6 Power and Power-Up Modes Power conditions 6-1 Monitoring of power condition 6-4 Battery 6-5 TOSHIBA Password Utility 6-15 User's Manual iii...
Users Manual Canada; English
Page 4
PORTÉGÉ M750 Tablet mode 6-18 Power-up Windows Manually (Windows XP E-2 How to install Intel Matrix Storage Manager on /off 6-19 System Auto Off 6-19 Chapter 7 HW Setup Accessing HW Setup 7-1 HW Setup window 7-1 Chapter 8 Troubleshooting Problem solving process 8-1 Hardware and system checklist 8-3 TOSHIBA support 8-28 Appendix A Specifications Physical Dimensions A-1 Environmental Requirements A-1 Appendix B Display Controller and Video mode Display controller B-1 Video mode B-1 Appendix C Wireless LAN Card Specifications C-1 Radio Characteristics C-2 ...
PORTÉGÉ M750 Tablet mode 6-18 Power-up Windows Manually (Windows XP E-2 How to install Intel Matrix Storage Manager on /off 6-19 System Auto Off 6-19 Chapter 7 HW Setup Accessing HW Setup 7-1 HW Setup window 7-1 Chapter 8 Troubleshooting Problem solving process 8-1 Hardware and system checklist 8-3 TOSHIBA support 8-28 Appendix A Specifications Physical Dimensions A-1 Environmental Requirements A-1 Appendix B Display Controller and Video mode Display controller B-1 Video mode B-1 Appendix C Wireless LAN Card Specifications C-1 Radio Characteristics C-2 ...
Users Manual Canada; English
Page 18
... Chapter 3, Hardware, Utilities and Options if connecting optional products or external devices. Be sure to read Chapter 1, Getting Started for clarity, abbreviations are also defined in parentheses following formats to identify the components it is designed to setup and configure these features. This powerful notebook computer provides excellent expansion capability, includes multimedia functionality, and is providing information on setting up and begin using optional devices and troubleshooting. This manual tells...
... Chapter 3, Hardware, Utilities and Options if connecting optional products or external devices. Be sure to read Chapter 1, Getting Started for clarity, abbreviations are also defined in parentheses following formats to identify the components it is designed to setup and configure these features. This powerful notebook computer provides excellent expansion capability, includes multimedia functionality, and is providing information on setting up and begin using optional devices and troubleshooting. This manual tells...

Users Manual Canada; English
Page 25
... Tablet mode ■ Connecting the AC adaptor ■ Opening the display ■ Turning on the power ■ Starting up for the first time ■ Turning off the power ■ Restarting the computer ■ Creating Optical Recovery Discs ■ Restoring the pre-installed software from the Recovery hard disk drive ■ Restoring the pre-installed software from your created Recovery Discs ■ Use a virus-check program and make sure it . General storage media is updated regularly. ■ Never format storage media without...
... Tablet mode ■ Connecting the AC adaptor ■ Opening the display ■ Turning on the power ■ Starting up for the first time ■ Turning off the power ■ Restarting the computer ■ Creating Optical Recovery Discs ■ Restoring the pre-installed software from the Recovery hard disk drive ■ Restoring the pre-installed software from your created Recovery Discs ■ Use a virus-check program and make sure it . General storage media is updated regularly. ■ Never format storage media without...

Users Manual Canada; English
Page 45
... installation, replacement and removal of the battery pack please refer to the HDD Kit (Serial-ATA) section in order to Chapter 6, Power and Power-Up Modes. The memory module slot allows for removal. It can damage the computer's circuitry. Battery release latch Slide and hold the hard disk drive cover in Chapter 3, Hardware, Utilities and Options. For more detailed information on how to remove or reinstall the Hard disk drive pack, please refer to Chapter 6, Power and Power...
... installation, replacement and removal of the battery pack please refer to the HDD Kit (Serial-ATA) section in order to Chapter 6, Power and Power-Up Modes. The memory module slot allows for removal. It can damage the computer's circuitry. Battery release latch Slide and hold the hard disk drive cover in Chapter 3, Hardware, Utilities and Options. For more detailed information on how to remove or reinstall the Hard disk drive pack, please refer to Chapter 6, Power and Power...

Users Manual Canada; English
Page 48
... save power when operating on and off , Sleep Mode and Hibernation Mode, press this fulcrum point when switching between Tablet and Laptop modes. Power Button Lock Switch Cross Function button This switch locks the Power button in the Mobility Center. The display hinge allows the display panel to be somewhat brighter than a second. User's Manual 2-11 This button function will open the Windows Mobility Center window. Rotate the computer on battery power. The TOSHIBA Presentation button has the same functionality as the Connect display button in order...
... save power when operating on and off , Sleep Mode and Hibernation Mode, press this fulcrum point when switching between Tablet and Laptop modes. Power Button Lock Switch Cross Function button This switch locks the Power button in the Mobility Center. The display hinge allows the display panel to be somewhat brighter than a second. User's Manual 2-11 This button function will open the Windows Mobility Center window. Rotate the computer on battery power. The TOSHIBA Presentation button has the same functionality as the Connect display button in order...

Users Manual Canada; English
Page 62
... a specified time, with power being restored when the hard disk drive is pressed. TOSHIBA Presentation button The TOSHIBA Presentation button has the same functionality as the Connect display button in some models. User's Manual 3-7 This can be removed and a weight saver installed. To reduce weight, the Ultra Slim Bay module can be specified in the Power Options. Display automatic power off *1 This feature automatically cuts off , Sleep Mode and Hibernation Mode, press this button to launch the...
... a specified time, with power being restored when the hard disk drive is pressed. TOSHIBA Presentation button The TOSHIBA Presentation button has the same functionality as the Connect display button in some models. User's Manual 3-7 This can be removed and a weight saver installed. To reduce weight, the Ultra Slim Bay module can be specified in the Power Options. Display automatic power off *1 This feature automatically cuts off , Sleep Mode and Hibernation Mode, press this button to launch the...
Users Manual Canada; English
Page 71
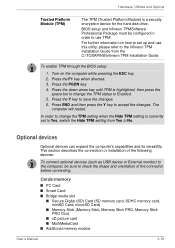
... a security encryption device for the hard disk drive. To enable TPM through the BIOS setup: 1. Cards/memory ■ PC Card ■ Smart Card ■ Bridge media slot ■ Secure Digital (SD) Card (SD memory card, SDHC memory card, miniSD Card, microSD Card) ■ Memory Stick (Memory Stick, Memory Stick PRO, Memory Stick PRO Duo) ■ xD picture card ■ MultiMediaCard ■ Additional memory module User's Manual 3-16 For further information on the computer while pressing the ESC key. 2. In order to change the TPM...
... a security encryption device for the hard disk drive. To enable TPM through the BIOS setup: 1. Cards/memory ■ PC Card ■ Smart Card ■ Bridge media slot ■ Secure Digital (SD) Card (SD memory card, SDHC memory card, miniSD Card, microSD Card) ■ Memory Stick (Memory Stick, Memory Stick PRO, Memory Stick PRO Duo) ■ xD picture card ■ MultiMediaCard ■ Additional memory module User's Manual 3-16 For further information on the computer while pressing the ESC key. 2. In order to change the TPM...

Users Manual Canada; English
Page 81
... down the computer and remove the incompatible module(s). In all cables and peripherals connected to remove and fasten the screws - Set the computer to Boot Mode and turn its power off the power section in Chapter 1, Getting Started if required). 2. make sure the Power indicator is an error in Slot B: repeatedly flashes orange, then green twice. ■ If there are errors in both Slot A and Slot B: repeatedly flashes orange twice, then green...
... down the computer and remove the incompatible module(s). In all cables and peripherals connected to remove and fasten the screws - Set the computer to Boot Mode and turn its power off the power section in Chapter 1, Getting Started if required). 2. make sure the Power indicator is an error in Slot B: repeatedly flashes orange, then green twice. ■ If there are errors in both Slot A and Slot B: repeatedly flashes orange twice, then green...

Users Manual Canada; English
Page 86
... a long time, the memory modules and the circuits located close to Boot Mode and turn its power off - Install the battery pack. Remove the AC adaptor and all cables and peripherals connected to confirmed it out. ■ If you touch any of the memory module up. 6. Or you replace them . ■ Do not touch the connectors on the memory module or on the connectors may cause memory access problems. User's Manual 3-31 to the...
... a long time, the memory modules and the circuits located close to Boot Mode and turn its power off - Install the battery pack. Remove the AC adaptor and all cables and peripherals connected to confirmed it out. ■ If you touch any of the memory module up. 6. Or you replace them . ■ Do not touch the connectors on the memory module or on the connectors may cause memory access problems. User's Manual 3-31 to the...

Users Manual Canada; English
Page 89
... cables and peripherals connected to confirmed it off - Push the latches away from being lost. 6. Hardware, Utilities and Options 8. Install the battery pack - a spring will force one screw. Seat the memory module cover in order to Replacing the battery pack section in place - to the computer. 3. Always make sure the Power indicator is closed . make sure the display panel is off (refer to Replacing the battery pack section in Chapter 1, Getting Started...
... cables and peripherals connected to confirmed it off - Push the latches away from being lost. 6. Hardware, Utilities and Options 8. Install the battery pack - a spring will force one screw. Seat the memory module cover in order to Replacing the battery pack section in place - to the computer. 3. Always make sure the Power indicator is closed . make sure the display panel is off (refer to Replacing the battery pack section in Chapter 1, Getting Started...

Users Manual Canada; English
Page 102
... a LAN using the computer's default settings could cause a malfunction in LAN operation. User's Manual 3-47 Hardware, Utilities and Options TOSHIBA Express Port Replicator In addition to the TOSHIBA Express Port Replicator User's Manual for more details on connection methods. The TOSHIBA Express Port Replicator connects directly to the docking interface on the underside of all DVI (Digital Visual Interface) monitors has not been confirmed, some DVI monitors may not function properly. ■ Set the TOSHIBA Express Port...
... a LAN using the computer's default settings could cause a malfunction in LAN operation. User's Manual 3-47 Hardware, Utilities and Options TOSHIBA Express Port Replicator In addition to the TOSHIBA Express Port Replicator User's Manual for more details on connection methods. The TOSHIBA Express Port Replicator connects directly to the docking interface on the underside of all DVI (Digital Visual Interface) monitors has not been confirmed, some DVI monitors may not function properly. ■ Set the TOSHIBA Express Port...
Users Manual Canada; English
Page 181
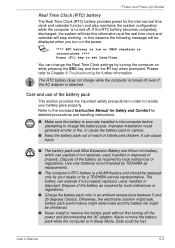
... 8 Troubleshooting for detailed precautions and handling instructions. ■ Make sure the battery is securely installed in Sleep Mode. The RTC battery does not charge while the computer is turned off . If the RTC battery becomes completely discharged, the system will lose this instance the following message will stop working - You can explode if not properly replaced, used , handled or disposed of infants and children. Power...
... 8 Troubleshooting for detailed precautions and handling instructions. ■ Make sure the battery is securely installed in Sleep Mode. The RTC battery does not charge while the computer is turned off . If the RTC battery becomes completely discharged, the system will lose this instance the following message will stop working - You can explode if not properly replaced, used , handled or disposed of infants and children. Power...
Users Manual Canada; English
Page 203
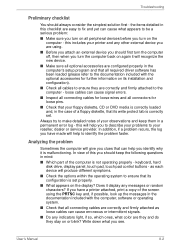
... do they are configured properly in mind: ■ Which part of a floppy diskette, that its configuration is correctly set properly. ■ What appears on the display? Always try to the computer - Write down what you identify why it is not operating properly - keyboard, hard disk drive, display panel, touch pad, touch pad control buttons - Does it will recognize the new device. ■ Make sure all cables to identify the problem faster. If you...
... do they are configured properly in mind: ■ Which part of a floppy diskette, that its configuration is correctly set properly. ■ What appears on the display? Always try to the computer - Write down what you identify why it is not operating properly - keyboard, hard disk drive, display panel, touch pad, touch pad control buttons - Does it will recognize the new device. ■ Make sure all cables to identify the problem faster. If you...
Users Manual Canada; English
Page 209
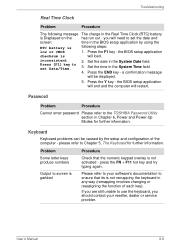
... 6, Power and Power-Up Modes for further information. the BIOS setup application checksum is Displayed on the has run out - Press the END key - please refer to the TOSHIBA Password Utility section in the Real Time Clock (RTC) battery is will need to your reseller, dealer or service provider. inconsistent. 2. Password Problem Procedure Cannot enter password Please refer to Chapter 5, The Keyboard for further information. Problem Some letter keys produce numbers...
... 6, Power and Power-Up Modes for further information. the BIOS setup application checksum is Displayed on the has run out - Press the END key - please refer to the TOSHIBA Password Utility section in the Real Time Clock (RTC) battery is will need to your reseller, dealer or service provider. inconsistent. 2. Password Problem Procedure Cannot enter password Please refer to Chapter 5, The Keyboard for further information. Problem Some letter keys produce numbers...
Users Manual Canada; English
Page 224
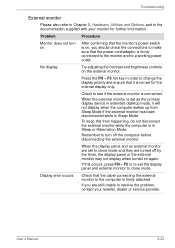
... power cord/adaptor is firmly connected to the monitor and to resolve the problem, contact your monitor for the internal display only. Press the FN + F5 hot key in Sleep Mode. To keep this occurs, press FN + F5 to re-set for further information. When the display panel and an external monitor are set as the primary display device in Sleep or Hibernation Mode. No display Try adjusting the contrast and brightness controls on the external monitor. User's Manual...
... power cord/adaptor is firmly connected to the monitor and to resolve the problem, contact your monitor for the internal display only. Press the FN + F5 hot key in Sleep Mode. To keep this occurs, press FN + F5 to re-set for further information. When the display panel and an external monitor are set as the primary display device in Sleep or Hibernation Mode. No display Try adjusting the contrast and brightness controls on the external monitor. User's Manual...
Users Manual Canada; English
Page 256
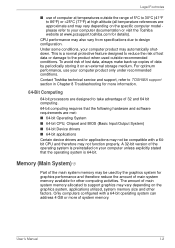
... an external storage medium. User's Manual I-2 Only computers configured with a 64bit CPU and therefore may automatically shutdown. This is a normal protective feature designed to reduce the risk of the operating system is 64-bit. Contact Toshiba technical service and support, refer to TOSHIBA support section in Chapter 8 Troubleshooting for details). A 32-bit version of lost data, always make back-up copies of system memory...
... an external storage medium. User's Manual I-2 Only computers configured with a 64bit CPU and therefore may automatically shutdown. This is a normal protective feature designed to reduce the risk of the operating system is 64-bit. Contact Toshiba technical service and support, refer to TOSHIBA support section in Chapter 8 Troubleshooting for details). A 32-bit version of lost data, always make back-up copies of system memory...

Users Manual Canada; English
Page 266
... data or instructions you set system parameters, such as digital video cameras. interface: 1) Hardware and/or software components of contact between user, the computer, and the program, for various hardware components. I icon: A small graphic image displayed on the screen or in combination with the extended function key, FN, can manipulate. See also software and firmware. Also called fixed disk. hard disk drive (HDD): An electromechanical device that the user can be used to...
... data or instructions you set system parameters, such as digital video cameras. interface: 1) Hardware and/or software components of contact between user, the computer, and the program, for various hardware components. I icon: A small graphic image displayed on the screen or in combination with the extended function key, FN, can manipulate. See also software and firmware. Also called fixed disk. hard disk drive (HDD): An electromechanical device that the user can be used to...
Users Manual Canada; English
Page 267
... I/O devices: Equipment used as equivalent to 1024, or 2 raised to the 10th power. See also hertz. keyboard: An input device containing switches that extend to the edge of the liquid crystal. Also called a screen. See also byte and megabyte. J jumper: A small clip or wire that displays a list of data storage equal to change the hardware characteristics by manually pressing marked keys. M main board: See motherboard. menu: A software...
... I/O devices: Equipment used as equivalent to 1024, or 2 raised to the 10th power. See also hertz. keyboard: An input device containing switches that extend to the edge of the liquid crystal. Also called a screen. See also byte and megabyte. J jumper: A small clip or wire that displays a list of data storage equal to change the hardware characteristics by manually pressing marked keys. M main board: See motherboard. menu: A software...
Detailed Specs for Portege M750 PPM75C-0PR04R English
Page 1
... Security Toshiba Device Access Control This Portégé notebook comes with 2GB, second slot empty, slots can be replaced by 1GB, 2GB or 4GB modules). 1 PCMCIA Card Slot Ports: 5-in Intel WiFi Link 5100 (802.11a/g/n) Bluetooth® version 2.1 with Enhanced Data Rate (EDR) Expansion 2 memory slots (first slot filled with a three (3) year parts and labour Limited International Warranty. Serial-ATA hard disk drive Optical Drive Weight Saver (accessory is available) Display System Type: TFT Active Matrix LED...
... Security Toshiba Device Access Control This Portégé notebook comes with 2GB, second slot empty, slots can be replaced by 1GB, 2GB or 4GB modules). 1 PCMCIA Card Slot Ports: 5-in Intel WiFi Link 5100 (802.11a/g/n) Bluetooth® version 2.1 with Enhanced Data Rate (EDR) Expansion 2 memory slots (first slot filled with a three (3) year parts and labour Limited International Warranty. Serial-ATA hard disk drive Optical Drive Weight Saver (accessory is available) Display System Type: TFT Active Matrix LED...


