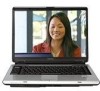
A135 S4527 Windows 7 - Toshiba A135S4527 Satellite Pentium Dual Core 1 73 GHz
A135 S4527 Windows 7
Related Manual Pages


Similar Questions

Microphone Driver For U400-10j Running Windows 7
I have just installed Windows 7 on my Toshiba U400-10J (previously running XP) and everything appear...
I have just installed Windows 7 on my Toshiba U400-10J (previously running XP) and everything appear...
(Posted by bradbury105 10 years ago)

Toshiba M45-s359 Touch And Launch Software For Windows 7
I installed a windows 7 on my lap top and it has more problem on sound card & controls\tfnckey.e...
I installed a windows 7 on my lap top and it has more problem on sound card & controls\tfnckey.e...
(Posted by alighodousi 10 years ago)

Cursor Disappears On Windows Screen
I have windows 8... My cursor disappears on the windows screen
I have windows 8... My cursor disappears on the windows screen
(Posted by Bondamia 11 years ago)
Related Terms
The following terms were also used when searching for A135 S4527 Windows 7 - Toshiba A135S4527 Satellite Pentium Dual Core 1 73 GHz:- a135 s4527
- toshiba a135 s4527
- toshiba satellite a135 s4527
- satellite a135 s4527
- a135-s4527 xp
- satellite a135s4527
- a135 s4527 drivers
- a135-s4527 drivers
- a135 s4527 memory
- a135-s4527 memory
- toshiba satellite a135 s4527 notebook
- toshiba satellite a135s4527
- a135 s4527 toshiba
- a135 s4527 windows xp
- toshiba laptop a135 s4527
- a135 s4527 review
- a135s4527 drivers
- toshiba a135s4527 laptop
- a135 s4527 motherboard
- a135-s4527 motherboard
- toshiba laptop a135s4527
- a135 s4527 ac adapter
- a135 s4527 specs
- a135 s4527 xp drivers
- a135-s4527 specs
- a135-s4527 xp drivers
- toshiba a135-s4527 memory
- a135 s4527 battery
- a135 s4527 reviews
- a135s4527 dvd
- a135s4527 intel pentium
- a135s4527 laptop
- a135s4527 memory
- a135s4527 toshiba satellite
- toshiba a135 s4527 review
- a135-s4527 battery
- a135s4527 specs
- toshiba a135s4527 drivers
- toshiba a135s4527 intel pentium
- a135-s4527 bios reset
- a135-s4527 screen replacement
- a135s4527 laptop replacement motherboard
- a135s4527 no internet
- a135s4527 notebook
- a135s4527 ram
- a135s4527 reviews
- a135s4527 screen size
- toshiba a135s4527 ram
- a135 s4527 all win xp drivers
- a135 s4527 backlight
- a135 s4527 battery number
- a135 s4527 bios battery removal
- a135 s4527 bluetooth windows seven
- a135 s4527 dc port
- a135 s4527 disassembly
- a135 s4527 driver
- a135 s4527 driver download package
- a135 s4527 drivers xp
- a135 s4527 hard drive
- a135 s4527 lan driver
- a135 s4527 laptop
- a135 s4527 lcd
- a135 s4527 manual
- a135 s4527 max ram
- a135 s4527 owners manual
- a135 s4527 part
- a135 s4527 parts
- a135 s4527 password
- a135 s4527 ram
- a135 s4527 recovery
- a135 s4527 replacement battery
- a135 s4527 reset
- a135 s4527 restore disc
- a135 s4527 satellite
- a135 s4527 screen
- a135 s4527 service manual
- a135 s4527 specifications
- a135 s4527 support
- a135 s4527 to xp
- a135 s4527 toshiba satellite
- a135 s4527 windows 7
- a135 s4527 windows xp drivers
- a135 s4527 wireless driver
- a135 s4527 wireless driver xp
- a135 s4527 xp
- a135 s4527 xp drivers download
- a135 s4527 xp video driver
- a135-s4527
- a135-s4527 ac adapter
- a135-s4527 ac adapter free s&h
- a135-s4527 audio driver
- a135-s4527 audio xp
- a135-s4527 bios
- a135-s4527 bios battery
- a135-s4527 bios password
- a135-s4527 bios update
- a135-s4527 charger
- a135-s4527 cooling fan
- a135-s4527 cpu upgrade
- a135-s4527 disassembly
- a135-s4527 downloads
- a135-s4527 drivers for windows xp
- a135-s4527 drivers for xp
- a135-s4527 drivers windows 7
- a135-s4527 drivers xp
- a135-s4527 dvd drive won't work
- a135-s4527 ethernet controller
- a135-s4527 factory restore
- a135-s4527 fan
- a135-s4527 fan replacement
- a135-s4527 graphic drivers
- a135-s4527 hard drive
- a135-s4527 inverter
- a135-s4527 keyboard
- a135-s4527 keyboard replacement
- a135-s4527 lan card
- a135-s4527 laptop
- a135-s4527 laptop jack
- a135-s4527 laptop screen
- a135-s4527 lcd
- a135-s4527 manual
- a135-s4527 max memory
- a135-s4527 max ram
- a135-s4527 maximum hard drive
- a135-s4527 maximum memory
- a135-s4527 memory capacity
- a135-s4527 memory upgrade
- a135-s4527 modem driver
- a135-s4527 motherboard part
- a135-s4527 no display
- a135-s4527 no power
- a135-s4527 not charging
- a135-s4527 parts
- a135-s4527 plugged in - not charging
- a135-s4527 power button board
- a135-s4527 power cord
- a135-s4527 power supply
- a135-s4527 power switch
- a135-s4527 power switch board
- a135-s4527 price
- a135-s4527 ram
- a135-s4527 ram upgrade
- a135-s4527 recovery
- a135-s4527 recovery discs
- a135-s4527 recovery disk
- a135-s4527 replacement screen
- a135-s4527 restore disk
- a135-s4527 restore disk download
- a135-s4527 restore disk iso
- a135-s4527 review
- a135-s4527 reviews
- a135-s4527 screen
- a135-s4527 screen goes black
- a135-s4527 sd driver
- a135-s4527 sound driver
- a135-s4527 specifications
- a135-s4527 specs battery
- a135-s4527 support
- a135-s4527 system recovery
- a135-s4527 system restore
- a135-s4527 tech spec
- a135-s4527 toshiba
- a135-s4527 touchpad not working
- a135-s4527 video
- a135-s4527 video card
- a135-s4527 video driver
- a135-s4527 where is the ram
- a135-s4527 wifi card
- a135-s4527 will not boot
- a135-s4527 windows vista recovery
- a135-s4527 windows xp drivers
- a135-s4527 wireless driver
- a135-s4527 won't boot to windows
- a135-s4527 won't come on
- a135-s4527 won't start
- a135-s4527 wont come on
- a135-s4527 xp driver
- a135-s4527 xp installation
- a135-s4527 xp sound driver
- a135s4527 battery
- a135s4527 dvd drive
- a135s4527 manual
- a135s4527 memory upgrade
- a135s4527 parts
- a135s4527 recovery disc
- a135s4527 toshiba laptop
- a135s4527 user manual
- a135s4527 wifi driver
- psad0u 05400p laptop
- psad0u 05400p parts
- psad0u-05400p ac adapter
- psad0u-05400p batteries
- psad0u-05400p drivers
- psad0u-05400p keyboard
- psad0u-05400p lcd
- psad0u-05400p max ram
- psad0u-05400p memory
- psad0u-05400p motherboard
- psad0u-05400p ram
- psad0u-05400p specifications
- psad0u-05400p specs
- satellite a135-s4527
- satellite a135-s4527 drivers
- satellite a135-s4527 factory reset
- satellite a135-s4527 memory upgrade
- satellite a135-s4527 specs
- satellite a135-s4527 windows 10
- satellite a135s4527 battery
- satellite a135s4527 charger
- satellite a135s4527 drivers
- satellite a135s4527 manual
- satellite a135s4527 memory
- satellite a135s4527 specs
- toshiba a135 s4527 all win xp drivers
- toshiba a135 s4527 backlight
- toshiba a135 s4527 battery
- toshiba a135 s4527 battery number
- toshiba a135 s4527 driver
- toshiba a135 s4527 driver download package
- toshiba a135 s4527 drivers
- toshiba a135 s4527 laptop
- toshiba a135 s4527 manual
- toshiba a135 s4527 memory
- toshiba a135 s4527 motherboard
- toshiba a135 s4527 parts
- toshiba a135 s4527 reset
- toshiba a135 s4527 restore disc
- toshiba a135 s4527 screen
- toshiba a135 s4527 specifications
- toshiba a135 s4527 specs
- toshiba a135 s4527 support
- toshiba a135 s4527 to xp
- toshiba a135 s4527 xp drivers
- toshiba a135 s4527 xp drivers download
- toshiba a135-s4527
- toshiba a135-s4527 ac adapter
- toshiba a135-s4527 audio driver
- toshiba a135-s4527 battery
- toshiba a135-s4527 bios battery
- toshiba a135-s4527 bios reset
- toshiba a135-s4527 bios update
- toshiba a135-s4527 charger
- toshiba a135-s4527 cooling fan
- toshiba a135-s4527 cpu upgrade
- toshiba a135-s4527 downloads
- toshiba a135-s4527 drivers
- toshiba a135-s4527 drivers for windows xp
- toshiba a135-s4527 drivers windows 7
- toshiba a135-s4527 dvd drive won't work
- toshiba a135-s4527 ethernet controller
- toshiba a135-s4527 factory restore
- toshiba a135-s4527 fan
- toshiba a135-s4527 fan replacement
- toshiba a135-s4527 graphic drivers
- toshiba a135-s4527 hard drive
- toshiba a135-s4527 keyboard
- toshiba a135-s4527 laptop
- toshiba a135-s4527 laptop jack
- toshiba a135-s4527 laptop screen
- toshiba a135-s4527 lcd
- toshiba a135-s4527 manual
- toshiba a135-s4527 maximum hard drive
- toshiba a135-s4527 memory capacity
- toshiba a135-s4527 memory upgrade
- toshiba a135-s4527 motherboard
- toshiba a135-s4527 no display
- toshiba a135-s4527 no power
- toshiba a135-s4527 not charging
- toshiba a135-s4527 parts
- toshiba a135-s4527 power cord
- toshiba a135-s4527 power supply
- toshiba a135-s4527 price
- toshiba a135-s4527 ram
- toshiba a135-s4527 ram upgrade
- toshiba a135-s4527 recovery
- toshiba a135-s4527 recovery discs
- toshiba a135-s4527 recovery disk
- toshiba a135-s4527 restore disk
- toshiba a135-s4527 restore disk iso
- toshiba a135-s4527 review
- toshiba a135-s4527 screen goes black
- toshiba a135-s4527 screen replacement
- toshiba a135-s4527 specifications
- toshiba a135-s4527 specs
- toshiba a135-s4527 support
- toshiba a135-s4527 system restore
- toshiba a135-s4527 tech spec
- toshiba a135-s4527 video card
- toshiba a135-s4527 video driver
- toshiba a135-s4527 where is the ram
- toshiba a135-s4527 wifi card
- toshiba a135-s4527 windows xp drivers
- toshiba a135-s4527 wireless driver
- toshiba a135-s4527 won't boot to windows
- toshiba a135-s4527 won't come on
- toshiba a135-s4527 won't start
- toshiba a135-s4527 wont come on
- toshiba a135-s4527 xp drivers
- toshiba a135-s4527 xp installation
- toshiba a135-s4527 xp sound driver
- toshiba a135s4527 battery
- toshiba a135s4527 dvd
- toshiba a135s4527 laptop replacement motherboard
- toshiba a135s4527 manual
- toshiba a135s4527 no internet
- toshiba a135s4527 notebook
- toshiba a135s4527 parts
- toshiba a135s4527 ram upgrade
- toshiba a135s4527 recovery disc
- toshiba a135s4527 reviews
- toshiba a135s4527 screen size
- toshiba a135s4527 specs
- toshiba a135s4527 wifi driver
- toshiba laptop a135-s4527
- toshiba laptop psad0u 05400p
- toshiba laptop psad0u-05400p
- toshiba notebook a135s4527
- toshiba psad0u 05400p driver
- toshiba psad0u 05400p specs
- toshiba psad0u-05400p driver
- toshiba satellite a135 psad0u 05400p
- toshiba satellite a135 s4527 drivers
- toshiba satellite a135 s4527 hard drive
- toshiba satellite a135 s4527 laptop computer
- toshiba satellite a135-s4527
- toshiba satellite a135-s4527 factory reset
- toshiba satellite a135-s4527 laptop computer
- toshiba satellite a135-s4527 notebook
- toshiba satellite a135-s4527 ram
- toshiba satellite a135s4527 battery
- toshiba satellite a135s4527 charger
- toshiba satellite a135s4527 drivers
- toshiba satellite a135s4527 manual
- toshiba satellite a135s4527 max memory
- toshiba satellite a135s4527 memory
- toshiba satellite a135s4527 power cord
- toshiba satellite a135s4527 specs
- toshiba satellite psad0u 05400p
- toshiba satellite psad0u-05400p