User's Guide
Page 7
... Center Utility: Describes ways on your purchase of this User's Guide Introduction: Describes the 300Mbps Wireless N Dual Band Gigabit Router with USB Port. Purpose This manual discusses how to use the utility for every user. ABOUT THIS GUIDE Congratulations on how to install the 300Mbps Wireless N Dual Band Gigabit Router with...
... Center Utility: Describes ways on your purchase of this User's Guide Introduction: Describes the 300Mbps Wireless N Dual Band Gigabit Router with USB Port. Purpose This manual discusses how to use the utility for every user. ABOUT THIS GUIDE Congratulations on how to install the 300Mbps Wireless N Dual Band Gigabit Router with...
User's Guide
Page 32
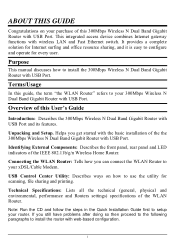
.... User: Type the password the User will use to log in the text boxes. WAN IP: Select whether user wants to specify an IP address manually, or want to view settings and cannot apply any setting changes. 26 The password must be typed again for confirmation. User's ISP will provide this...
.... User: Type the password the User will use to log in the text boxes. WAN IP: Select whether user wants to specify an IP address manually, or want to view settings and cannot apply any setting changes. 26 The password must be typed again for confirmation. User's ISP will provide this...
User's Guide
Page 33
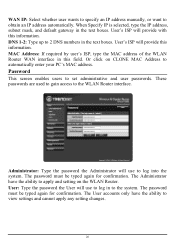
...The Simple Network Time Protocol (SNTP) server allows the WLAN Router to synchronize the system clock to update the system time. Set the time: Manually setting the WLAN Router system time, press the Set Time button to the global Internet through the SNTP Server. Daylight Saving: Enables users to ...Synchronize the clock with: Select the clock adjustment method form the dropdown list. Time Zone: Select the time zone from an entered NTP Server Manual: Manually adjust the system time when you press the Set Time button. Time This screen enables users to set the time and date for daylight saving...
...The Simple Network Time Protocol (SNTP) server allows the WLAN Router to synchronize the system clock to update the system time. Set the time: Manually setting the WLAN Router system time, press the Set Time button to the global Internet through the SNTP Server. Daylight Saving: Enables users to ...Synchronize the clock with: Select the clock adjustment method form the dropdown list. Time Zone: Select the time zone from an entered NTP Server Manual: Manually adjust the system time when you press the Set Time button. Time This screen enables users to set the time and date for daylight saving...
User's Guide
Page 38
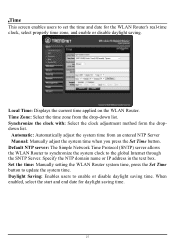
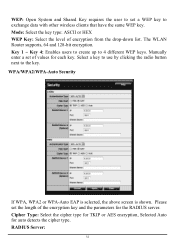
... 1 ~ Key 4: Enables users to create up to the key. WEP: Open System and Shared Key requires the user to set of values for each key. Manually enter a set a WEP key to exchange data with other wireless clients that have the same WEP key. Mode: Select the key type: ASCII or HEX...
... 1 ~ Key 4: Enables users to create up to the key. WEP: Open System and Shared Key requires the user to set of values for each key. Manually enter a set a WEP key to exchange data with other wireless clients that have the same WEP key. Mode: Select the key type: ASCII or HEX...
User's Guide
Page 56
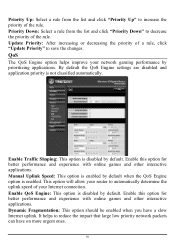
... list and click "Priority Up" to increase the priority of your network gaming performance by default. Enable Traffic Shaping: This option is not classified automatically. Manual Uplink Speed: This option is enabled by default when the QoS Engine option is disabled by prioritizing applications. Enable this option for better performance and...
... list and click "Priority Up" to increase the priority of your network gaming performance by default. Enable Traffic Shaping: This option is not classified automatically. Manual Uplink Speed: This option is enabled by default when the QoS Engine option is disabled by prioritizing applications. Enable this option for better performance and...
User's Guide
Page 78
... or attempt to the customer. Upon proper submission of TRENDnet. TRENDNET NEITHER ASSUMES NOR AUTHORIZES ANY OTHER PERSON TO ASSUME FOR IT ANY OTHER LIABILITY IN CONNECTION WITH THE SALE, INSTALLATION MAINTENANCE OR USE OF TRENDNET'S PRODUCTS. TEW‐673GRU - 3 Years Warranty AC/DC Power Adapter, Cooling... unauthorized service center, (ii) the product was subject to conditions more severe than those specified in the manual. There are responsible for all TRENDnet products. TRENDnet does not issue refunds or credit. This warranty is required in , stored on the outside of the ...
... or attempt to the customer. Upon proper submission of TRENDnet. TRENDNET NEITHER ASSUMES NOR AUTHORIZES ANY OTHER PERSON TO ASSUME FOR IT ANY OTHER LIABILITY IN CONNECTION WITH THE SALE, INSTALLATION MAINTENANCE OR USE OF TRENDNET'S PRODUCTS. TEW‐673GRU - 3 Years Warranty AC/DC Power Adapter, Cooling... unauthorized service center, (ii) the product was subject to conditions more severe than those specified in the manual. There are responsible for all TRENDnet products. TRENDnet does not issue refunds or credit. This warranty is required in , stored on the outside of the ...
Quick Installation Guide
Page 4
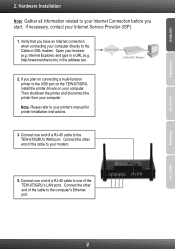
...manual for printer installation instructions. 3. Internet Explorer) and type in the address bar. Note: Please refer to your Internet Service Provider (ISP). 1. Connect one of a RJ-45 cable to the TEW-673GRU's WAN port. http://www.trendnet.com) in a URL (e.g. Connect one end of a RJ-45 cable to one end of the TEW-673GRU...computer. Open your Internet Connection before you plan on connecting a multi-function printer to the USB port on the TEW-673GRU, install the printer drivers on your computer directly to the computer's Ethernet port. ENGLISH FRANÇAIS DEUTSCH 2. ...
...manual for printer installation instructions. 3. Internet Explorer) and type in the address bar. Note: Please refer to your Internet Service Provider (ISP). 1. Connect one of a RJ-45 cable to the TEW-673GRU's WAN port. http://www.trendnet.com) in a URL (e.g. Connect one end of a RJ-45 cable to one end of the TEW-673GRU...computer. Open your Internet Connection before you plan on connecting a multi-function printer to the USB port on the TEW-673GRU, install the printer drivers on your computer directly to the computer's Ethernet port. ENGLISH FRANÇAIS DEUTSCH 2. ...
Quick Installation Guide
Page 10
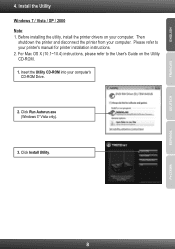
Install the Utility Windows 7 / Vista / XP / 2000 Note: 1. Please refer to the User's Guide on your computer's CD-ROM Drive. 2. For Mac OS X (10.1~10.4) instructions, please refer to your computer. Click Install Utility. 8 ESPAÑOL ENGLISH FRANÇAIS DEUTSCH 4. Then shutdown the printer and disconnect the printer from your printer's manual for printer installation instructions. 2. Before installing the utility, install the printer drivers on the Utility CD-ROM. 1. Insert the Utility CD-ROM into your computer. Click Run Autorun.exe (Windows 7/ Vista only). 3.
Install the Utility Windows 7 / Vista / XP / 2000 Note: 1. Please refer to the User's Guide on your computer's CD-ROM Drive. 2. For Mac OS X (10.1~10.4) instructions, please refer to your computer. Click Install Utility. 8 ESPAÑOL ENGLISH FRANÇAIS DEUTSCH 4. Then shutdown the printer and disconnect the printer from your printer's manual for printer installation instructions. 2. Before installing the utility, install the printer drivers on the Utility CD-ROM. 1. Insert the Utility CD-ROM into your computer. Click Run Autorun.exe (Windows 7/ Vista only). 3.


