User's Guide
Page 2
...antenna. - Connect the equipment into an outlet on , the user is connected. - This device complies with FCC radiation exposure limits set forth for an uncontrolled environment. Europe - This equipment generates, uses and can be required to which can radiate radio frequency energy and...of some specific channels and/or operational frequency bands are country dependent and are designed to match the intended destination. The firmware setting is subject to radio communications. For operation within 5.15 ~ 5.25GHz frequency range, it is operated in conjunction with any...
...antenna. - Connect the equipment into an outlet on , the user is connected. - This device complies with FCC radiation exposure limits set forth for an uncontrolled environment. Europe - This equipment generates, uses and can be required to which can radiate radio frequency energy and...of some specific channels and/or operational frequency bands are country dependent and are designed to match the intended destination. The firmware setting is subject to radio communications. For operation within 5.15 ~ 5.25GHz frequency range, it is operated in conjunction with any...
User's Guide
Page 3
... spectrum Matters (ERM); ElectroMagnetic Compatibility (EMC) standard for radio equipment and services; Wideband transmission systems; This device may be used for setting up outdoor radio links and/or for supplying public access to demonstrate the compliance of radio base stations and fixed terminal stations for a ... RLAN; In Italy the end-user should contact the national spectrum authority in France and Italy where restrictive use the device for setting up outdoor radio links in France and in some areas the RF output power may not be limited to use applies. The following...
... spectrum Matters (ERM); ElectroMagnetic Compatibility (EMC) standard for radio equipment and services; Wideband transmission systems; This device may be used for setting up outdoor radio links and/or for supplying public access to demonstrate the compliance of radio base stations and fixed terminal stations for a ... RLAN; In Italy the end-user should contact the national spectrum authority in France and Italy where restrictive use the device for setting up outdoor radio links in France and in some areas the RF output power may not be limited to use applies. The following...
User's Guide
Page 5
... UNPACKING AND SETUP 4 Unpacking ...4 Setup ...4 Wireless Performance Considerations ...5 HARDWARE INSTALLATION 6 Front Panel and Top Panel ...6 Rear Panel ...7 Side Panel ...8 Hardware connections...9 PC NETWORK TCP/IP SETTING 10 Windows 95/98/ME ...10 Windows 2000 ...11 Windows XP / Vista...12 CONFIGURATION 13 Login to the WLAN Router through Wireless LAN...13 Login...27 Dynamic DNS ...28 Wireless ...28 Basic...28 Security ...31 Advanced ...34 WIFI Protected Setup...35 Status...36 Device Information ...36 Log ...37 Log Setting...38 Statistic...39 Wireless ...40 Routing ...40 Static ...40 v
... UNPACKING AND SETUP 4 Unpacking ...4 Setup ...4 Wireless Performance Considerations ...5 HARDWARE INSTALLATION 6 Front Panel and Top Panel ...6 Rear Panel ...7 Side Panel ...8 Hardware connections...9 PC NETWORK TCP/IP SETTING 10 Windows 95/98/ME ...10 Windows 2000 ...11 Windows XP / Vista...12 CONFIGURATION 13 Login to the WLAN Router through Wireless LAN...13 Login...27 Dynamic DNS ...28 Wireless ...28 Basic...28 Security ...31 Advanced ...34 WIFI Protected Setup...35 Status...36 Device Information ...36 Log ...37 Log Setting...38 Statistic...39 Wireless ...40 Routing ...40 Static ...40 v
User's Guide
Page 6
Dynamic...41 Routing Table...41 Access ...43 Filter...43 Virtual Server...46 Special AP...47 DMZ...48 Firewall Settings ...49 QoS ...50 Management...51 Remote Management ...51 Tools ...52 Restart ...52 Settings...52 Firmware ...53 Ping ...53 USING THE LCD PANEL 55 Main Menu...55 Navigation Keys ...55 ...Device Info Menu ...56 General...56 Internet ...57 Wireless ...57 Wired ...58 Performance Menu...58 Settings Menu ...59 Restart ...60 Reset...60 Date/Time ...61 Connected Devices...61 WPS Menu ...62 WPS ...62 Current PIN ...64 USB CONTROL CENTER...
Dynamic...41 Routing Table...41 Access ...43 Filter...43 Virtual Server...46 Special AP...47 DMZ...48 Firewall Settings ...49 QoS ...50 Management...51 Remote Management ...51 Tools ...52 Restart ...52 Settings...52 Firmware ...53 Ping ...53 USING THE LCD PANEL 55 Main Menu...55 Navigation Keys ...55 ...Device Info Menu ...56 General...56 Internet ...57 Wireless ...57 Wired ...58 Performance Menu...58 Settings Menu ...59 Restart ...60 Reset...60 Date/Time ...61 Connected Devices...61 WPS Menu ...62 WPS ...62 Current PIN ...64 USB CONTROL CENTER...
User's Guide
Page 7
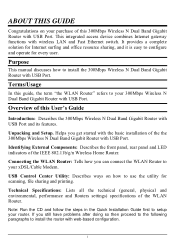
... the front panel, rear panel and LED indicators of the WLAN Router. Technical Specifications: Lists all the technical (general, physical and environmental, performance and Routers settings) specifications of the IEEE 802.11b/g/n Wireless Home Router. Purpose This manual discusses how to your purchase of this guide, the term "the WLAN Router...
... the front panel, rear panel and LED indicators of the WLAN Router. Technical Specifications: Lists all the technical (general, physical and environmental, performance and Routers settings) specifications of the IEEE 802.11b/g/n Wireless Home Router. Purpose This manual discusses how to your purchase of this guide, the term "the WLAN Router...

User's Guide
Page 13
...: Plug the power adapter to this power jack RESET: Use a pin-shaped item to push to reset this device to default settings. 7 WAN: One 10/100/1000Mbps WAN port that connects to share either USB storage devices or printers over the network. USB: Two USB ports to ...
...: Plug the power adapter to this power jack RESET: Use a pin-shaped item to push to reset this device to default settings. 7 WAN: One 10/100/1000Mbps WAN port that connects to share either USB storage devices or printers over the network. USB: Two USB ports to ...
User's Guide
Page 16
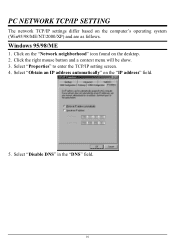
Click the right mouse button and a context menu will be show. 3. Select "Disable DNS" in the "DNS" field. 10 Click on the "Network neighborhood" icon found on the computer's operating system (Win95/98/ME/NT/2000/XP) and are as follows. Select "Properties" to enter the TCP/IP setting screen. 4. PC NETWORK TCP/IP SETTING The network TCP/IP settings differ based on the desktop. 2. Select "Obtain an IP address automatically" on the "IP address" field. 5. Windows 95/98/ME 1.
Click the right mouse button and a context menu will be show. 3. Select "Disable DNS" in the "DNS" field. 10 Click on the "Network neighborhood" icon found on the computer's operating system (Win95/98/ME/NT/2000/XP) and are as follows. Select "Properties" to enter the TCP/IP setting screen. 4. PC NETWORK TCP/IP SETTING The network TCP/IP settings differ based on the desktop. 2. Select "Obtain an IP address automatically" on the "IP address" field. 5. Windows 95/98/ME 1.

User's Guide
Page 17
6. When "My Computer" window opens, open the "Control Panel" and then open the "Network dialup connection" applet. Select "Properties" to enter the TCP/IP setting window. 1. Windows 2000 Double click on the "My Computer" icon on "Properties." 2. In the "Local area network status" window, click on the desktop. In the "Local area network connection" window, first select TCP/IP setting and then select "Properties." 11 Double click on the "Local area network connection" icon. Select "None" for the "Gateway address" field.
6. When "My Computer" window opens, open the "Control Panel" and then open the "Network dialup connection" applet. Select "Properties" to enter the TCP/IP setting window. 1. Windows 2000 Double click on the "My Computer" icon on "Properties." 2. In the "Local area network status" window, click on the desktop. In the "Local area network connection" window, first select TCP/IP setting and then select "Properties." 11 Double click on the "Local area network connection" icon. Select "None" for the "Gateway address" field.
User's Guide
Page 18
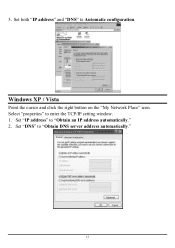
Select "properties" to "Obtain an IP address automatically." 2. Set "IP address" to enter the TCP/IP setting window. 1. Set "DNS" to Automatic configuration. Windows XP / Vista Point the cursor and click the right button on the "My Network Place" icon. Set both "IP address" and "DNS" to "Obtain DNS server address automatically." 12 3.
Select "properties" to "Obtain an IP address automatically." 2. Set "IP address" to enter the TCP/IP setting window. 1. Set "DNS" to Automatic configuration. Windows XP / Vista Point the cursor and click the right button on the "My Network Place" icon. Set both "IP address" and "DNS" to "Obtain DNS server address automatically." 12 3.
User's Guide
Page 19
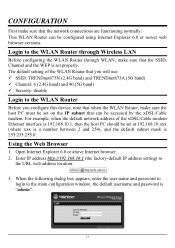
...(5G band) 9 Channel: 6 (2.4G band) and 40 (5G band) 9 Security: disable Login to the main configuration window, the default username and password is set at 192.168.10.xxx (where xxx is a number between 2 and 254), and the default subnet mask is 255.255.255.0. This WLAN Router can...Using the Web Browser 1. For example, when the default network address of the WLAN Router that the network connections are functioning normally. The default setting of the xDSL/Cable modem Ethernet interface is 192.168.10.1, then the host PC should be configured using Internet Explorer 6.0 or newer web...
...(5G band) 9 Channel: 6 (2.4G band) and 40 (5G band) 9 Security: disable Login to the main configuration window, the default username and password is set at 192.168.10.xxx (where xxx is a number between 2 and 254), and the default subnet mask is 255.255.255.0. This WLAN Router can...Using the Web Browser 1. For example, when the default network address of the WLAN Router that the network connections are functioning normally. The default setting of the xDSL/Cable modem Ethernet interface is 192.168.10.1, then the host PC should be configured using Internet Explorer 6.0 or newer web...

User's Guide
Page 20
Please click "Next" to continue. 14 Step 1: Set your new password Set a new admin password of the web configuration utility. Please click "Next" to continue. Users can simply follow the step-by-step process to get the wireless Router configuration ready to continue. Setup Wizard Setup wizard is provided as part of the WLAN Router. Please click "Next" to run in 6 easy steps by clicking on` the "Wizard" button on the function menu. The following screen will appear. Step 2: Choose time zone Select the time zone from the drop down list.
Please click "Next" to continue. 14 Step 1: Set your new password Set a new admin password of the web configuration utility. Please click "Next" to continue. Users can simply follow the step-by-step process to get the wireless Router configuration ready to continue. Setup Wizard Setup wizard is provided as part of the WLAN Router. Please click "Next" to run in 6 easy steps by clicking on` the "Wizard" button on the function menu. The following screen will appear. Step 2: Choose time zone Select the time zone from the drop down list.
User's Guide
Page 21
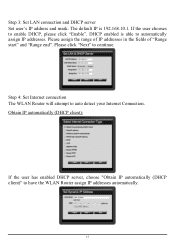
The default IP is able to automatically assign IP addresses. Step 4: Set Internet connection The WLAN Router will attempt to continue. DHCP enabled is 192.168.10.1. Please assign the range of IP addresses in the fields ... IP automatically (DHCP client)" to enable DHCP, please click "Enable". If the user chooses to have the WLAN Router assign IP addresses automatically. 15 Step 3: Set LAN connection and DHCP server Set user's IP address and mask.
The default IP is able to automatically assign IP addresses. Step 4: Set Internet connection The WLAN Router will attempt to continue. DHCP enabled is 192.168.10.1. Please assign the range of IP addresses in the fields ... IP automatically (DHCP client)" to enable DHCP, please click "Enable". If the user chooses to have the WLAN Router assign IP addresses automatically. 15 Step 3: Set LAN connection and DHCP server Set user's IP address and mask.

User's Guide
Page 29
The new settings will be the same as wireless devices attempting to connect to quit without any changes, please click "Exit" to the WLAN Router. If user does .... User also can go back to reboot the WLAN Router. Step 6: Setup completed The Setup wizard is now completed. Please click "Restart" to modify the settings by clicking "Back". 23 If user enables the Wireless LAN, type the SSID in the text box and select a channel. Step...
The new settings will be the same as wireless devices attempting to connect to quit without any changes, please click "Exit" to the WLAN Router. If user does .... User also can go back to reboot the WLAN Router. Step 6: Setup completed The Setup wizard is now completed. Please click "Restart" to modify the settings by clicking "Back". 23 If user enables the Wireless LAN, type the SSID in the text box and select a channel. Step...
User's Guide
Page 30
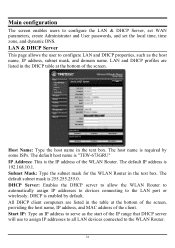
... range that DHCP server will use to assign IP addresses to all LAN devices connected to configure the LAN & DHCP Server, set WAN parameters, create Administrator and User passwords, and set the local time, time zone, and dynamic DNS. Host Name: Type the host name in the text box. LAN & DHCP ... automatically assign IP addresses to devices connecting to configure LAN and DHCP properties, such as the start of the screen. The default host name is "TEW-673GRU" IP Address: This is the IP address of the client. The default IP address is 255.255.255.0. Start IP: Type an IP address to...
... range that DHCP server will use to assign IP addresses to all LAN devices connected to configure the LAN & DHCP Server, set WAN parameters, create Administrator and User passwords, and set the local time, time zone, and dynamic DNS. Host Name: Type the host name in the text box. LAN & DHCP ... automatically assign IP addresses to devices connecting to configure LAN and DHCP properties, such as the start of the screen. The default host name is "TEW-673GRU" IP Address: This is the IP address of the client. The default IP address is 255.255.255.0. Start IP: Type an IP address to...
User's Guide
Page 31
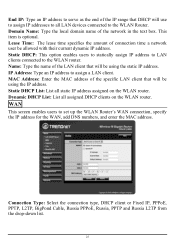
IP Address: Type an IP address to set up the WLAN Router's WAN connection, specify the IP address for the WAN, add DNS numbers, and enter the MAC address. WAN This screen enables ...
IP Address: Type an IP address to set up the WLAN Router's WAN connection, specify the IP address for the WAN, add DNS numbers, and enter the MAC address. WAN This screen enables ...
User's Guide
Page 32
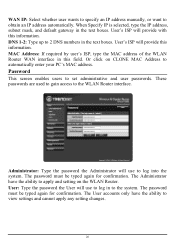
..., type the MAC address of the WLAN Router WAN interface in the text boxes. The Administrator have the ability to apply and setting on CLONE MAC Address to obtain an IP address automatically. The password must be typed again for confirmation. The password must be ... will use to the system. Password This screen enables users to the WLAN Router interface. These passwords are used to gain access to set administrative and user passwords. Administrator: Type the password the Administrator will provide with this information. When Specify IP is selected, type the IP...
..., type the MAC address of the WLAN Router WAN interface in the text boxes. The Administrator have the ability to apply and setting on CLONE MAC Address to obtain an IP address automatically. The password must be typed again for confirmation. The password must be ... will use to the system. Password This screen enables users to the WLAN Router interface. These passwords are used to gain access to set administrative and user passwords. Administrator: Type the password the Administrator will provide with this information. When Specify IP is selected, type the IP...
User's Guide
Page 33
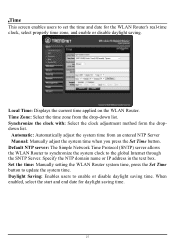
Time Zone: Select the time zone from an entered NTP Server Manual: Manually adjust the system time when you press the Set Time button. Specify the NTP domain name or IP address in the text box. Default NTP server: The Simple Network Time Protocol (SNTP) server allows... time and date for daylight saving time. 27 Automatic: Automatically adjust the system time from the drop-down list. Set the time: Manually setting the WLAN Router system time, press the Set Time button to update the system time. Local Time: Displays the current time applied on the WLAN Router. When enabled, ...
Time Zone: Select the time zone from an entered NTP Server Manual: Manually adjust the system time when you press the Set Time button. Specify the NTP domain name or IP address in the text box. Default NTP server: The Simple Network Time Protocol (SNTP) server allows... time and date for daylight saving time. 27 Automatic: Automatically adjust the system time from the drop-down list. Set the time: Manually setting the WLAN Router system time, press the Set Time button to update the system time. Local Time: Displays the current time applied on the WLAN Router. When enabled, ...
User's Guide
Page 35
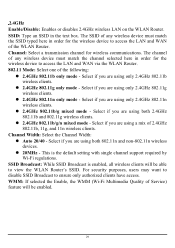
... via the WLAN Router. 802.11 Mode: Select one of the following: z 2.4GHz 802.11b only mode - SSID Broadcast: While SSID Broadcast is the default setting with single channel support required by Wi-Fi regulations. The channel of any wireless device must match the channel selected here in the text box...
... via the WLAN Router. 802.11 Mode: Select one of the following: z 2.4GHz 802.11b only mode - SSID Broadcast: While SSID Broadcast is the default setting with single channel support required by Wi-Fi regulations. The channel of any wireless device must match the channel selected here in the text box...
User's Guide
Page 36
...: z Auto 20/40 - Select if you are using both 802.11n and non-802.11n wireless devices. SSID Broadcast: While SSID Broadcast is the default setting with single channel support required by Wi-Fi regulations.
...: z Auto 20/40 - Select if you are using both 802.11n and non-802.11n wireless devices. SSID Broadcast: While SSID Broadcast is the default setting with single channel support required by Wi-Fi regulations.

User's Guide
Page 37
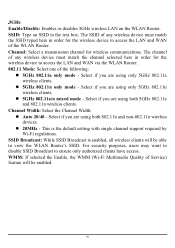
WEP Encryption 31 There are four options: Disabled, WEP, WPA, WPA2 and WPA-Auto. Security This page allows users to set to Disable by default. Authentication Type: The authentication type is set the wireless security of the WLAN router for a secure wireless communication.
WEP Encryption 31 There are four options: Disabled, WEP, WPA, WPA2 and WPA-Auto. Security This page allows users to set to Disable by default. Authentication Type: The authentication type is set the wireless security of the WLAN router for a secure wireless communication.


