
User's Guide
Page 6
TABLE OF CONTENT Introduction 6 Unpacking and Setup 7 Unpacking ...7 System Requirements 7 IDentifying external components 8 WPS Button...8 Wireless Performance Considerations 9 Software Installation 10 Windows Based Utility Installation 10 Wireless Utility Setting 12 Link Information 12 Configuration ...13 Site Survey ...17 Profile ...18 WPS...20 About ...25 Technical Specifications 26 v
TABLE OF CONTENT Introduction 6 Unpacking and Setup 7 Unpacking ...7 System Requirements 7 IDentifying external components 8 WPS Button...8 Wireless Performance Considerations 9 Software Installation 10 Windows Based Utility Installation 10 Wireless Utility Setting 12 Link Information 12 Configuration ...13 Site Survey ...17 Profile ...18 WPS...20 About ...25 Technical Specifications 26 v
User's Guide
Page 7
... easy‐to‐use utility is bundled with access to real‐time information anywhere in their organization. The mobility of this manual for configuration, monitoring, and diagnostic purposes.
... easy‐to‐use utility is bundled with access to real‐time information anywhere in their organization. The mobility of this manual for configuration, monitoring, and diagnostic purposes.

User's Guide
Page 13
... the same as your wireless network. SSID: Shows the current SSID, which can configure the wireless settings using the Wireless Adapter Configuration Utility. Link Information This is divided into six sections: Link Info, Configuration, Site Survey, Profile, WPS and About. The Wireless Adapter Configuration Utility is the default screen after launching the Utility program.
... the same as your wireless network. SSID: Shows the current SSID, which can configure the wireless settings using the Wireless Adapter Configuration Utility. Link Information This is divided into six sections: Link Info, Configuration, Site Survey, Profile, WPS and About. The Wireless Adapter Configuration Utility is the default screen after launching the Utility program.

User's Guide
Page 14
TxRate: Shows the current data rate used . Configuration This screen is where you are two modes available for selection 13 Wireless Mode: There are connecting to anything you would like, for the Micro ...
TxRate: Shows the current data rate used . Configuration This screen is where you are two modes available for selection 13 Wireless Mode: There are connecting to anything you would like, for the Micro ...
User's Guide
Page 21
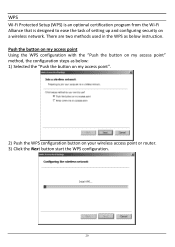
Push the button on my access point Using the WPS configuration with the "Push the button on my access point" method, the configuration steps as below : 1) Selected the "Push the button on my access point". 2) Push the WPS configuration button on a wireless network. WPS Wi‐Fi Protected Setup (WPS... certification program from the Wi‐Fi Alliance that is designed to ease the task of setting up and configuring security on your wireless access point or router. 3) Cliek the Next button start the WPS configuration. 20 There are two methods used in the WPS as below instruction.
Push the button on my access point Using the WPS configuration with the "Push the button on my access point" method, the configuration steps as below : 1) Selected the "Push the button on my access point". 2) Push the WPS configuration button on a wireless network. WPS Wi‐Fi Protected Setup (WPS... certification program from the Wi‐Fi Alliance that is designed to ease the task of setting up and configuring security on your wireless access point or router. 3) Cliek the Next button start the WPS configuration. 20 There are two methods used in the WPS as below instruction.

User's Guide
Page 22
4) If the WPS configuration was successful, the follow window will show on. 5) If the WPS configuration was failed, the follow window will show on. 21
4) If the WPS configuration was successful, the follow window will show on. 5) If the WPS configuration was failed, the follow window will show on. 21

User's Guide
Page 23
... PIN number" of you wireless access point or router then click the Start PIN button, the wireless access point or router will start the WPS configuration. If the "Automatically select the network" was checked, the setup step will be connecting then click the Next button start the WPS... configuration process. 3) Selected a wireless access point or router which one will be show on the button of the windows. 2) Enter the PIN code into my access ...
... PIN number" of you wireless access point or router then click the Start PIN button, the wireless access point or router will start the WPS configuration. If the "Automatically select the network" was checked, the setup step will be connecting then click the Next button start the WPS... configuration process. 3) Selected a wireless access point or router which one will be show on the button of the windows. 2) Enter the PIN code into my access ...

User's Guide
Page 25
4) If the WPS configuration was successful, the follow window will show on. 5) If the WPS configuration was failed, the follow window will show on. 24
4) If the WPS configuration was successful, the follow window will show on. 5) If the WPS configuration was failed, the follow window will show on. 24
Quick Installation Guide
Page 7
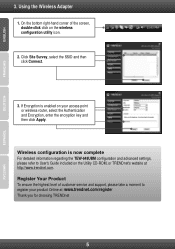
...TEW-648UBM configuration and advanced settings, please refer to register your access point or wireless router, select the Authentication and Encryption, enter the encryption key and then click Apply. Register Your Product To ensure the highest level of the screen, double-click click on your product Online at http://www.trendnet...and support, please take a moment to User's Guide included on the Utility CD-ROM, or TRENDnet's website at : www.trendnet.com/register Thank you for choosing TRENDnet 5 ESPAÑOL ENGLISH FRANÇAIS DEUTSCH 3. Using the Wireless Adapter 1. Click Site ...
...TEW-648UBM configuration and advanced settings, please refer to register your access point or wireless router, select the Authentication and Encryption, enter the encryption key and then click Apply. Register Your Product To ensure the highest level of the screen, double-click click on your product Online at http://www.trendnet...and support, please take a moment to User's Guide included on the Utility CD-ROM, or TRENDnet's website at : www.trendnet.com/register Thank you for choosing TRENDnet 5 ESPAÑOL ENGLISH FRANÇAIS DEUTSCH 3. Using the Wireless Adapter 1. Click Site ...
Quick Installation Guide
Page 8
...box, and type D:\Autorun.exe, where "D" in Section 1 of the screen, click on the Utility & Driver CD-ROM or contact TRENDnet's Technical Support Department. 6 Verify that Obtain an IP address automatically is the letter assigned to your wireless router or access point's SSID....of the Wireless Configuration Utility (as specified in "D:\Autorun.exe" is installed properly. Trouble Shooting 1. I do ? 1. If you will need to your CD-ROM Drive, and then press the ENTER key on your network administrator for more information regarding the TEW-648UBM, please refer...
...box, and type D:\Autorun.exe, where "D" in Section 1 of the screen, click on the Utility & Driver CD-ROM or contact TRENDnet's Technical Support Department. 6 Verify that Obtain an IP address automatically is the letter assigned to your wireless router or access point's SSID....of the Wireless Configuration Utility (as specified in "D:\Autorun.exe" is installed properly. Trouble Shooting 1. I do ? 1. If you will need to your CD-ROM Drive, and then press the ENTER key on your network administrator for more information regarding the TEW-648UBM, please refer...


