
Data Sheet
Page 1
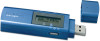
...Play Installation, No CD Required & Diagnostics Utilities • 3-Year Warranty HotSpots Detected Scan Mode Wireless Mode Signal Strength Encryption Type TEW-503PI (07-28-2005) Channel SSID On/Off Switch TEW-429UF rev:11.15.2005 FEATURES • Wi-Fi Compliant with IEEE 802.11g and IEEE 802....; Built-in -one mobile solution. HotFlash 802.11g Wireless & 512MB Flash Memory Combo USB Adapter with HotSpot Detector TEW-429UF The 802.11g Wireless & 512MB Flash Memory Combo USB Adapter with HotSpot Detector incorporates a Wi-Fi Detector, a wireless adapter, and a USB flash drive into an all-in...
...Play Installation, No CD Required & Diagnostics Utilities • 3-Year Warranty HotSpots Detected Scan Mode Wireless Mode Signal Strength Encryption Type TEW-503PI (07-28-2005) Channel SSID On/Off Switch TEW-429UF rev:11.15.2005 FEATURES • Wi-Fi Compliant with IEEE 802.11g and IEEE 802....; Built-in -one mobile solution. HotFlash 802.11g Wireless & 512MB Flash Memory Combo USB Adapter with HotSpot Detector TEW-429UF The 802.11g Wireless & 512MB Flash Memory Combo USB Adapter with HotSpot Detector incorporates a Wi-Fi Detector, a wireless adapter, and a USB flash drive into an all-in...
Data Sheet
Page 2
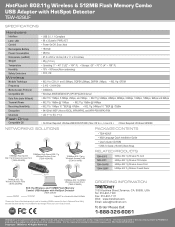
...) 108Mbps 802.11g MIMO Wireless Access Point (TEW-610APB) 802.11g Wireless and 512MB Flash Memory Combo USB Adapter with HotSpot Detector (TEW-429UF) detected connected *Laptop/PC is not required to detect HotSpots *Please note: Some of their respective holders. For the most recent product information please visit http://www.trendnet.com. USA Tel: 310...
...) 108Mbps 802.11g MIMO Wireless Access Point (TEW-610APB) 802.11g Wireless and 512MB Flash Memory Combo USB Adapter with HotSpot Detector (TEW-429UF) detected connected *Laptop/PC is not required to detect HotSpots *Please note: Some of their respective holders. For the most recent product information please visit http://www.trendnet.com. USA Tel: 310...

User Guide
Page 2
Click download, click the Vista driver link and save the driver to uncompress the drivers after you find TEW-429UF. Follow the InstallShield Wizard instructions and then click Finish. 4. Microsoft Windows Vista Installation Important! DO NOT install the adapter in the computer until you download the drivers. 2. Double click the Setup icon. 3. 1. Note: You will need to your Windows Vista computer. 1 Go to http://www.trendnet.com/ support/vista.htm and scroll down until instructed to an available USB port of your computer. Connect the wireless adapter to do so. 1.
Click download, click the Vista driver link and save the driver to uncompress the drivers after you find TEW-429UF. Follow the InstallShield Wizard instructions and then click Finish. 4. Microsoft Windows Vista Installation Important! DO NOT install the adapter in the computer until you download the drivers. 2. Double click the Setup icon. 3. 1. Note: You will need to your Windows Vista computer. 1 Go to http://www.trendnet.com/ support/vista.htm and scroll down until instructed to an available USB port of your computer. Connect the wireless adapter to do so. 1.

User Guide
Page 4
Wireless Configuration Connecting to a network. 2. Select the desired network and then click Connect. 3. Click Connect Anyway. 4. Click Close. 3 On the bottom right-hand corner of the screen, right click the wireless network connection icon and select Connect to an Unsecured Wireless Connection 1.
Wireless Configuration Connecting to a network. 2. Select the desired network and then click Connect. 3. Click Connect Anyway. 4. Click Close. 3 On the bottom right-hand corner of the screen, right click the wireless network connection icon and select Connect to an Unsecured Wireless Connection 1.

User Guide
Page 5
Connecting to a Secured Wireless Connection (WEP-PSK and WPA-PSK) Note: Make sure you are not sure, contact the network administrator or log on to a network. 2. Enter the security key and then click Connect. 4 If you know the wireless encryption key before proceeding. Select the desired network and then click Connect. 3. On the bottom right-hand corner of the screen, right click the wireless network connection icon and select Connect to your wireless router. 1.
Connecting to a Secured Wireless Connection (WEP-PSK and WPA-PSK) Note: Make sure you are not sure, contact the network administrator or log on to a network. 2. Enter the security key and then click Connect. 4 If you know the wireless encryption key before proceeding. Select the desired network and then click Connect. 3. On the bottom right-hand corner of the screen, right click the wireless network connection icon and select Connect to your wireless router. 1.

User Guide
Page 6
4. Click Close. Wireless configuration is now complete. For detailed information regarding the TEW-429UF configuration and advanced settings, please refer to the User's Guide included on the Utility & Driver CDROM or TRENDnet's website at www.trendnet.com 5
4. Click Close. Wireless configuration is now complete. For detailed information regarding the TEW-429UF configuration and advanced settings, please refer to the User's Guide included on the Utility & Driver CDROM or TRENDnet's website at www.trendnet.com 5

User Guide
Page 4
... 802.1X - Table of Contents Getting Started with the TEW-429UF 1 Overview of the Wireless Client Utility 2 Working with Profiles ...3 Creating a Profile ...3 Modifying Profiles ...6 Checking for Available Access Points 10 Disabling the Wireless Client Utility 12 Exploring the Wireless Client Utility Screens 13 The Network Screen 13 Wireless Setting ...13 TCP/IP Setting ...14 Link Information...
... 802.1X - Table of Contents Getting Started with the TEW-429UF 1 Overview of the Wireless Client Utility 2 Working with Profiles ...3 Creating a Profile ...3 Modifying Profiles ...6 Checking for Available Access Points 10 Disabling the Wireless Client Utility 12 Exploring the Wireless Client Utility Screens 13 The Network Screen 13 Wireless Setting ...13 TCP/IP Setting ...14 Link Information...

User Guide
Page 5
Appendix ...31 Maintenance ...31 Checking the Wireless Client Utility Version 32 Uninstalling the Wireless Client Utility 33 Upgrading the Wireless Client Utility 34 Troubleshooting ...35 Problems Starting the 802.11 Wireless Client Utility Program Problems with the Link Status 35 Problems with Security Settings Specifications ...36 Wi-Fi Radio: ...36 Hardware: ...36 Software: ...36 iv --
Appendix ...31 Maintenance ...31 Checking the Wireless Client Utility Version 32 Uninstalling the Wireless Client Utility 33 Upgrading the Wireless Client Utility 34 Troubleshooting ...35 Problems Starting the 802.11 Wireless Client Utility Program Problems with the Link Status 35 Problems with Security Settings Specifications ...36 Wi-Fi Radio: ...36 Hardware: ...36 Software: ...36 iv --

User Guide
Page 7
... NOT BE OVERLOOKED. 1 LIKE NOTES AND TIPS, THE IMPORTANT SYMBOL INDICATES INFORMATION THAT CAN IMPROVE NETWORKING. This manual provides information for your TEW-429UF tells you how to install the Wireless Client Utility and how to operate the Hotspot Finder feature of the more technical information in this manual to read some of...
... NOT BE OVERLOOKED. 1 LIKE NOTES AND TIPS, THE IMPORTANT SYMBOL INDICATES INFORMATION THAT CAN IMPROVE NETWORKING. This manual provides information for your TEW-429UF tells you how to install the Wireless Client Utility and how to operate the Hotspot Finder feature of the more technical information in this manual to read some of...

User Guide
Page 8
...The other functions (20MB is reserved for User's Guide and Driver Utility) and thus is not available for data storage. Double-click the TEW-429UF icon in -one advantage. One of the partitions is included on the adapter. Please see User's Guide for normal flash disk usage. ...512MB. When you start driver/utility installation. This two partitions share the total memory of the Wireless Client Utility The Wireless Client Utility is emulated as an USB flash disk, the TEW-429UF contains two disk partitions at default. Working as a CD-ROM drive that contains WLAN adapter ...
...The other functions (20MB is reserved for User's Guide and Driver Utility) and thus is not available for data storage. Double-click the TEW-429UF icon in -one advantage. One of the partitions is included on the adapter. Please see User's Guide for normal flash disk usage. ...512MB. When you start driver/utility installation. This two partitions share the total memory of the Wireless Client Utility The Wireless Client Utility is emulated as an USB flash disk, the TEW-429UF contains two disk partitions at default. Working as a CD-ROM drive that contains WLAN adapter ...

User Guide
Page 9
Working with Profiles A profile is a record of the configuration you can configure the TEW-429UF to access your home network and your connection status. NOTE YOU CAN CHANGE PROFILES WITHOUT REBOOTING YOUR COMPUTER. (PERHAPS WHEN WALKING FROM ONE ACCESS POINT ... REBOOT THE COMPUTER WHEN CHANGING ACCESS POINTS. Click Profile. 3 NOTE WHEN THE TEW-429UF IS NOT CONNECTED TO YOUR COMPUTER, MOST SETTINGS IN THE WIRELESS CLIENT UTILITY ARE UNAVAILABLE. Using the Profile screen you use to connect to reconfigure the TEW-429UF each time you are always aware of all screens so you change access...
Working with Profiles A profile is a record of the configuration you can configure the TEW-429UF to access your home network and your connection status. NOTE YOU CAN CHANGE PROFILES WITHOUT REBOOTING YOUR COMPUTER. (PERHAPS WHEN WALKING FROM ONE ACCESS POINT ... REBOOT THE COMPUTER WHEN CHANGING ACCESS POINTS. Click Profile. 3 NOTE WHEN THE TEW-429UF IS NOT CONNECTED TO YOUR COMPUTER, MOST SETTINGS IN THE WIRELESS CLIENT UTILITY ARE UNAVAILABLE. Using the Profile screen you use to connect to reconfigure the TEW-429UF each time you are always aware of all screens so you change access...

User Guide
Page 10
... or Ad-Hoc. You can type anything for the profile such as the same SSID is used on the computer you want to connect to a wireless Wi-Fi network. 2. The utility performs a site survey and displays the results. Type a descriptive name for the SSID as long as Home or Office 4. All... case-sensitive name, which is the name assigned to and click Add To Profile. 4 Choose Ad-Hoc when connecting directly to an access point or wireless router. In the SSID pane click Browse. Select the SSID you are connecting to know the SSID of the access point. The...
... or Ad-Hoc. You can type anything for the profile such as the same SSID is used on the computer you want to connect to a wireless Wi-Fi network. 2. The utility performs a site survey and displays the results. Type a descriptive name for the SSID as long as Home or Office 4. All... case-sensitive name, which is the name assigned to and click Add To Profile. 4 Choose Ad-Hoc when connecting directly to an access point or wireless router. In the SSID pane click Browse. Select the SSID you are connecting to know the SSID of the access point. The...

User Guide
Page 12
9. Click Next 10. Refer to the following to modify settings for a profile, for example, if you purchase a new router, or if your office administrator provides you with new security settings. Open the Wireless Client Utility and click Profile. 6 Click Save to complete the wizard and save the new profile. (If you do not want to activate the profile, uncheck the Apply this profile now checkbox.) MODIFYING PROFILES You may need to modify a profile. 1.
9. Click Next 10. Refer to the following to modify settings for a profile, for example, if you purchase a new router, or if your office administrator provides you with new security settings. Open the Wireless Client Utility and click Profile. 6 Click Save to complete the wizard and save the new profile. (If you do not want to activate the profile, uncheck the Apply this profile now checkbox.) MODIFYING PROFILES You may need to modify a profile. 1.

User Guide
Page 13
Unless you have a thorough understanding of wireless networking, it is recommended that you want to modify and click Properties. 3. Make the changes you want to the Basic Settings and click Advanced Settings. 2. Select the profile you leave these settings at the defaults. 7
Unless you have a thorough understanding of wireless networking, it is recommended that you want to modify and click Properties. 3. Make the changes you want to the Basic Settings and click Advanced Settings. 2. Select the profile you leave these settings at the defaults. 7

User Guide
Page 14
...) All data sent between the access point and the client is a compromise between WPA/WPA2 and WEP. Depending on the authentication protocol selected, each other wireless devices. Click the drop-down arrow at Security Mode to send and receive data. WPA-PSK/WPA2-PSK WPA-PSK or WPA2-PSK is left...
...) All data sent between the access point and the client is a compromise between WPA/WPA2 and WEP. Depending on the authentication protocol selected, each other wireless devices. Click the drop-down arrow at Security Mode to send and receive data. WPA-PSK/WPA2-PSK WPA-PSK or WPA2-PSK is left...

User Guide
Page 15
This allows you want and click TCP/IP Config. Make the changes you to bypass your router is set to enter a static IP address. 9 Check this radio button if you have to DHCP. Use static IP below Check this radio button if your existing wireless TCP/ IP settings and configure TCP/IP settings for each profile. Select the Use IP Changer checkbox. Use DHCP DHCP (Dynamic Host Configuration Protocol) automatically assign IP addresses. 5.
This allows you want and click TCP/IP Config. Make the changes you to bypass your router is set to enter a static IP address. 9 Check this radio button if you have to DHCP. Use static IP below Check this radio button if your existing wireless TCP/ IP settings and configure TCP/IP settings for each profile. Select the Use IP Changer checkbox. Use DHCP DHCP (Dynamic Host Configuration Protocol) automatically assign IP addresses. 5.

User Guide
Page 16
... Points The number of an access point, you can use is constantly increasing in major cities. Open the Wireless Client Utility and click SiteSurvey. 10 To scan for access points using the TEW-429UF, refer to the following Web sites for updated information for public use the hot spot finder functionality of hot... of access points or hot spots for your computer to find access points. Remember, you do not have to turn on the locations of the TEW-429UF to list the ones available. You can use the SiteSurvey screen to locate access points while you are walking around.
... Points The number of an access point, you can use is constantly increasing in major cities. Open the Wireless Client Utility and click SiteSurvey. 10 To scan for access points using the TEW-429UF, refer to the following Web sites for updated information for public use the hot spot finder functionality of hot... of access points or hot spots for your computer to find access points. Remember, you do not have to turn on the locations of the TEW-429UF to list the ones available. You can use the SiteSurvey screen to locate access points while you are walking around.

User Guide
Page 17
2. Select the network you want and click Connect. Or click Add To Profile if you want to connect later. Available wireless networks are listed. Click Refresh anytime to view the Detailed Info screen. 11 For details about any of the listed access points, select it from the list and click Detailed Info to see the following screen. (You can also double-click an access point to update the list. 3.
2. Select the network you want and click Connect. Or click Add To Profile if you want to connect later. Available wireless networks are listed. Click Refresh anytime to view the Detailed Info screen. 11 For details about any of the listed access points, select it from the list and click Detailed Info to see the following screen. (You can also double-click an access point to update the list. 3.

User Guide
Page 18
In that case, you should disable the Wireless Client Utility. To disable the Wireless Client Utility refer to have Windows manage your wireless network settings. Open the Wireless Client Utility and click Options. 2. Select the Let Windows manage this wireless adapter check box and click Apply Now. 12 Disabling the Wireless Client Utility You may need to the following. 1.
In that case, you should disable the Wireless Client Utility. To disable the Wireless Client Utility refer to have Windows manage your wireless network settings. Open the Wireless Client Utility and click Options. 2. Select the Let Windows manage this wireless adapter check box and click Apply Now. 12 Disabling the Wireless Client Utility You may need to the following. 1.

User Guide
Page 19
Double-click the TEW-429UF icon in the system tray, the following Network screen opens: WIRELESS SETTING The Wireless Setting pane settings are for the current profile. Click the drop down arrow to the current access point. Reconnect (button) Press to reconnect to select ... settings shown in the system tray at the bottom-right corner of your computer. Shows the security status. Infrastructure or ad-hoc mode. Exploring the Wireless Client Utility Screens The Network Screen When the TEW-429UF is installed, it is configured to automatically load when you start your screen.
Double-click the TEW-429UF icon in the system tray, the following Network screen opens: WIRELESS SETTING The Wireless Setting pane settings are for the current profile. Click the drop down arrow to the current access point. Reconnect (button) Press to reconnect to select ... settings shown in the system tray at the bottom-right corner of your computer. Shows the security status. Infrastructure or ad-hoc mode. Exploring the Wireless Client Utility Screens The Network Screen When the TEW-429UF is installed, it is configured to automatically load when you start your screen.

