TD-W8961NB User Guide
Page 2
... in a particular installation. Operation is subject to the following measures: • Reorient or relocate the receiving antenna. • Increase the separation between the equipment and receiver. • Connect the equipment into an outlet on a circuit different from TP-LINK TECHNOLOGIES CO., LTD. Copyright © 2011 TP-LINK TECHNOLOGIES CO., LTD. http://www.tp-link.com FCC STATEMENT...
... in a particular installation. Operation is subject to the following measures: • Reorient or relocate the receiving antenna. • Increase the separation between the equipment and receiver. • Connect the equipment into an outlet on a circuit different from TP-LINK TECHNOLOGIES CO., LTD. Copyright © 2011 TP-LINK TECHNOLOGIES CO., LTD. http://www.tp-link.com FCC STATEMENT...

TD-W8961NB User Guide
Page 3
... Luxembourg None General authorization required for network and service supply(not for spectrum) Norway Implemented This subsection does not apply for this transmitter must be installed to provide a separation distance of the 2.4 GHz mW e.i.r.p. Full implementation planned 2012 Italy None If used for the geographical area within the band band has...
... Luxembourg None General authorization required for network and service supply(not for spectrum) Norway Implemented This subsection does not apply for this transmitter must be installed to provide a separation distance of the 2.4 GHz mW e.i.r.p. Full implementation planned 2012 Italy None If used for the geographical area within the band band has...

TD-W8961NB User Guide
Page 5
CONTENTS Package Contents ...1 Chapter 1 1.1 1.2 1.3 Introduction 2 Product Overview 2 Main Features 2 Conventions 3 Chapter 2 2.1 2.2 2.3 2.4 Hardware Installation 4 The Front Panel 4 The Back Panel 5 Installation Environment 5 Connecting the Router 6 Chapter 3 3.1 3.2 Quick Installation Guide 8 Configure PC 8 Login 11 Chapter 4 4.1 4.2 4.3 4.4 4.5 Software Configuration 14 Status 14 4.1.1 Device Info 14 4.1.2 System Log 15 4.1.3 Statistics 16 Quick Start 18 Interface Setup 18 4.3.1 ...
CONTENTS Package Contents ...1 Chapter 1 1.1 1.2 1.3 Introduction 2 Product Overview 2 Main Features 2 Conventions 3 Chapter 2 2.1 2.2 2.3 2.4 Hardware Installation 4 The Front Panel 4 The Back Panel 5 Installation Environment 5 Connecting the Router 6 Chapter 3 3.1 3.2 Quick Installation Guide 8 Configure PC 8 Login 11 Chapter 4 4.1 4.2 4.3 4.4 4.5 Software Configuration 14 Status 14 4.1.1 Device Info 14 4.1.2 System Log 15 4.1.3 Statistics 16 Quick Start 18 Interface Setup 18 4.3.1 ...

TD-W8961NB User Guide
Page 7
Package Contents The following contents should be found in your package: ¾ One TD-W8961NB 300Mbps Wireless N ADSL2+ Modem Router ¾ One DC power Adapter for TD-W8961NB 300Mbps Wireless N ADSL2+ Modem Router ¾ Quick Installation Guide ¾ One RJ45 cable ¾ Two RJ11 cables ¾ One Resource CD, which includes this User Guide ) Note: Make sure that the package contains the above items. If any of the listed items are damaged or missing, please contact your distributor. 1
Package Contents The following contents should be found in your package: ¾ One TD-W8961NB 300Mbps Wireless N ADSL2+ Modem Router ¾ One DC power Adapter for TD-W8961NB 300Mbps Wireless N ADSL2+ Modem Router ¾ Quick Installation Guide ¾ One RJ45 cable ¾ Two RJ11 cables ¾ One Resource CD, which includes this User Guide ) Note: Make sure that the package contains the above items. If any of the listed items are damaged or missing, please contact your distributor. 1
TD-W8961NB User Guide
Page 10
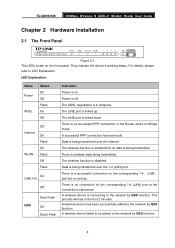
The LINE port is off. A successful PPP connection has been built. Power is linked up. There is connecting to the network by QSS function. 4 There is a successful connection on the corresponding 1-4 (LAN) port .... A wireless device failed to be added to LED Explanation. The LINE port is wireless data being transmitted. There is linked down. TD-W8961NB 300Mbps Wireless N ADSL2+ Modem Router User Guide Chapter 2 Hardware Installation 2.1 The Front Panel Figure 2-1 The LEDs locate on the corresponding 1-4 (LAN) port or the connection is disabled....
The LINE port is off. A successful PPP connection has been built. Power is linked up. There is connecting to the network by QSS function. 4 There is a successful connection on the corresponding 1-4 (LAN) port .... A wireless device failed to be added to LED Explanation. The LINE port is wireless data being transmitted. There is linked down. TD-W8961NB 300Mbps Wireless N ADSL2+ Modem Router User Guide Chapter 2 Hardware Installation 2.1 The Front Panel Figure 2-1 The LEDs locate on the corresponding 1-4 (LAN) port or the connection is disabled....

TD-W8961NB User Guide
Page 11
...QSS function, the QSS LED will keep on , use a pin to press and hold the Reset button for wireless operation and data transmit. 2.3 Installation Environment ¾ The Product should not be located where it will be exposed to moisture or excessive heat. ¾ Place the Router in a ...connect the Router to your PC or the other Ethernet network devices. ¾ RESET: There are two ways to reset the Router's factory defaults. TD-W8961NB 300Mbps Wireless N ADSL2+ Modem Router User Guide ) Note: After a device is successfully added to the network by an external separate splitter. Or you...
...QSS function, the QSS LED will keep on , use a pin to press and hold the Reset button for wireless operation and data transmit. 2.3 Installation Environment ¾ The Product should not be located where it will be exposed to moisture or excessive heat. ¾ Place the Router in a ...connect the Router to your PC or the other Ethernet network devices. ¾ RESET: There are two ways to reset the Router's factory defaults. TD-W8961NB 300Mbps Wireless N ADSL2+ Modem Router User Guide ) Note: After a device is successfully added to the network by an external separate splitter. Or you...
TD-W8961NB User Guide
Page 12
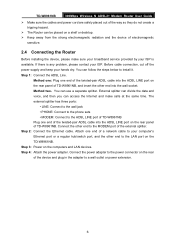
... or desktop. ¾ Keep away from the strong electromagnetic radiation and the device of electromagnetic sensitive. 2.4 Connecting the Router Before installing the device, please make calls at the same time. TD-W8961NB 300Mbps Wireless N ADSL2+ Modem Router User Guide ¾ Make sure the cables and power cord are safely placed out of the...
... or desktop. ¾ Keep away from the strong electromagnetic radiation and the device of electromagnetic sensitive. 2.4 Connecting the Router Before installing the device, please make calls at the same time. TD-W8961NB 300Mbps Wireless N ADSL2+ Modem Router User Guide ¾ Make sure the cables and power cord are safely placed out of the...
TD-W8961NB User Guide
Page 14
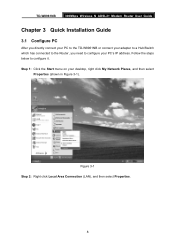
Follow the steps below to configure your PC's IP address. Figure 3-1 Step 2: Right click Local Area Connection (LAN), and then select Properties. 8 TD-W8961NB 300Mbps Wireless N ADSL2+ Modem Router User Guide Chapter 3 Quick Installation Guide 3.1 Configure PC After you directly connect your PC to the TD-W8961NB or connect your adapter to a Hub/Switch which has connected to the Router, you need to configure it. Step 1: Click the Start menu on your desktop, right click My Network Places, and then select Properties (shown in Figure 3-1).
Follow the steps below to configure your PC's IP address. Figure 3-1 Step 2: Right click Local Area Connection (LAN), and then select Properties. 8 TD-W8961NB 300Mbps Wireless N ADSL2+ Modem Router User Guide Chapter 3 Quick Installation Guide 3.1 Configure PC After you directly connect your PC to the TD-W8961NB or connect your adapter to a Hub/Switch which has connected to the Router, you need to configure it. Step 1: Click the Start menu on your desktop, right click My Network Places, and then select Properties (shown in Figure 3-1).

TD-W8961NB User Guide
Page 20
...;Device Info" menu, and you will vary depending on the Interface Setup screen. 14 TD-W8961NB 300Mbps Wireless N ADSL2+ Modem Router User Guide Chapter 4 Software Configuration This User Guide recommends using the "Quick Installation Guide" for first-time installation. For advanced users, if you want to know more about this device and make use...
...;Device Info" menu, and you will vary depending on the Interface Setup screen. 14 TD-W8961NB 300Mbps Wireless N ADSL2+ Modem Router User Guide Chapter 4 Software Configuration This User Guide recommends using the "Quick Installation Guide" for first-time installation. For advanced users, if you want to know more about this device and make use...


