

SR-LX5i Manual
Page 2
...periods of time. 14) Refer all instructions. 5) Do not use this apparatus during lightning storms or when unused for replacement of the ...user to qualified service personnel. A grounding type plug has two blades and a third grounding prong. When a cart is damaged, liquid has been spilled or objects have fallen into your safety. CAUTION: TO REDUCE THE RISK OF ELECTRIC SHOCK, DO NOT REMOVE COVER (OR BACK). Install...such as power-supply cord or plug is used, use attachments/accessories specified by the manufacturer. 12) Use only with the cart, stand, tripod, bracket, or table specified ...
...periods of time. 14) Refer all instructions. 5) Do not use this apparatus during lightning storms or when unused for replacement of the ...user to qualified service personnel. A grounding type plug has two blades and a third grounding prong. When a cart is damaged, liquid has been spilled or objects have fallen into your safety. CAUTION: TO REDUCE THE RISK OF ELECTRIC SHOCK, DO NOT REMOVE COVER (OR BACK). Install...such as power-supply cord or plug is used, use attachments/accessories specified by the manufacturer. 12) Use only with the cart, stand, tripod, bracket, or table specified ...

SR-LX5i Manual
Page 3
... OR CABINETS TO EXPOSE THE ELECTRONICS. NO USER SERVICEABLE PARTS ARE WITHIN! < IF YOU ARE EXPERIENCING PROBLEMS WITH THIS PRODUCT, CONTACT TEAC FOR A SERVICE REFERRAL. This equipment has been tested and found to comply with the instructions, may cause harmful interference to which can radiate radio frequency energy and, if not installed and used as sunshine, fire or the like...
... OR CABINETS TO EXPOSE THE ELECTRONICS. NO USER SERVICEABLE PARTS ARE WITHIN! < IF YOU ARE EXPERIENCING PROBLEMS WITH THIS PRODUCT, CONTACT TEAC FOR A SERVICE REFERRAL. This equipment has been tested and found to comply with the instructions, may cause harmful interference to which can radiate radio frequency energy and, if not installed and used as sunshine, fire or the like...

SR-LX5i Manual
Page 4
... to the Radio 18 Preset Tuning 19 Timer 20 Troubleshooting 22 Specifications 23 Read this might result in a safe place for choosing TEAC. Avoid placing it in direct sunlight or close to a source of your dealer or service company. < When removing the power plug from the wall outlet, always pull directly on the plug, never yank the cord. < Do not...
... to the Radio 18 Preset Tuning 19 Timer 20 Troubleshooting 22 Specifications 23 Read this might result in a safe place for choosing TEAC. Avoid placing it in direct sunlight or close to a source of your dealer or service company. < When removing the power plug from the wall outlet, always pull directly on the plug, never yank the cord. < Do not...

SR-LX5i Manual
Page 5
... digital clock, sleep time or preset channels or current DBSS level. 1. H Lights when the timer is exhausted. When operating the remote control unit, point it may operate incorrectly. E Lights when the snooze function is on the front panel of old batteries by throwing them in the timer source selection. 5 Close the cover. Put in preset tuning mode. B Lights when video output...
... digital clock, sleep time or preset channels or current DBSS level. 1. H Lights when the timer is exhausted. When operating the remote control unit, point it may operate incorrectly. E Lights when the snooze function is on the front panel of old batteries by throwing them in the timer source selection. 5 Close the cover. Put in preset tuning mode. B Lights when video output...
SR-LX5i Manual
Page 6
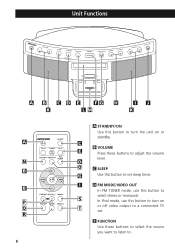
C B VOLUME E Press these buttons to select the source you want to listen to. D O C SLEEP G Use this button to select stereo or monaural. Unit Functions A B CDE FG H K LM IJ K A N B B P Q R 6 A STANDBY/ON Use this button to turn on or standby. S In iPod mode, use this button to adjust the volume level. E FUNCTION Use these buttons to turn the unit on T or off video output to a connected TV set sleep timer. I D FM MODE/VIDEO OUT In FM TUNER mode, use this button to set .
C B VOLUME E Press these buttons to select the source you want to listen to. D O C SLEEP G Use this button to select stereo or monaural. Unit Functions A B CDE FG H K LM IJ K A N B B P Q R 6 A STANDBY/ON Use this button to turn on or standby. S In iPod mode, use this button to adjust the volume level. E FUNCTION Use these buttons to turn the unit on T or off video output to a connected TV set sleep timer. I D FM MODE/VIDEO OUT In FM TUNER mode, use this button to set .

SR-LX5i Manual
Page 7
... sound. After the TIMER ON time is reached, use this button to start or pause playback of the buttons and controls on the display. In iPod mode, use this button to turn on the remote control will also operate similarly. 7 ENGLISH H ALARM 1, ALARM 2 Hold down this button to search for 10 minutes. J CLOCK ADJ Hold down the menu. Insert an iPod mobile digital device into this button to enter clock setting mode...
... sound. After the TIMER ON time is reached, use this button to start or pause playback of the buttons and controls on the display. In iPod mode, use this button to turn on the remote control will also operate similarly. 7 ENGLISH H ALARM 1, ALARM 2 Hold down this button to search for 10 minutes. J CLOCK ADJ Hold down the menu. Insert an iPod mobile digital device into this button to enter clock setting mode...
SR-LX5i Manual
Page 8
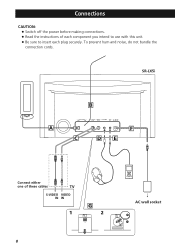
To prevent hum and noise, do not bundle the connection cords. Connections CAUTION: < Switch off the power before making connections. < Read the instructions of each component you intend to use with this unit. < Be sure to insert each plug securely. SR-LX5i B A F C DE CCoonnnneecctteeiitthheerr oonneeoofftthheessee ccaabblles TV S-VIDEO VIDEO IN IN 1 G 2 8 AC wall socket
To prevent hum and noise, do not bundle the connection cords. Connections CAUTION: < Switch off the power before making connections. < Read the instructions of each component you intend to use with this unit. < Be sure to insert each plug securely. SR-LX5i B A F C DE CCoonnnneecctteeiitthheerr oonneeoofftthheessee ccaabblles TV S-VIDEO VIDEO IN IN 1 G 2 8 AC wall socket

SR-LX5i Manual
Page 9
... E AUX IN You can connect a portable audio player to an AC outlet that supplies the correct voltage. See page 17 for the reception. Battery installation 1. D PHONES For private listening, insert the headphones plug into this jack, and adjust the volume using a commercially available S-Video or composite video cable. Then connect the AC adapter's plug to avoid fire, electric shock, etc. The life of your TV set using the VOLUME button...
... E AUX IN You can connect a portable audio player to an AC outlet that supplies the correct voltage. See page 17 for the reception. Battery installation 1. D PHONES For private listening, insert the headphones plug into this jack, and adjust the volume using a commercially available S-Video or composite video cable. Then connect the AC adapter's plug to avoid fire, electric shock, etc. The life of your TV set using the VOLUME button...

SR-LX5i Manual
Page 10
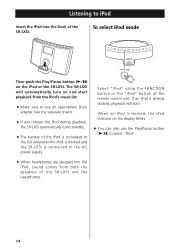
... remote control unit, software update may solve the problem. Remove the adapter from your iPod touch, select any problem.) If Video is inserted correctly. 1 2 Docking an iPod to this menu. Choose the Dock adapter that fits your iPod touch's screen, you need to this system. Fit the front edge of the adapter into the Dock of the SR-LX5i. Set [TV OUT] to play a video to specify whether to output...
... remote control unit, software update may solve the problem. Remove the adapter from your iPod touch, select any problem.) If Video is inserted correctly. 1 2 Docking an iPod to this menu. Choose the Dock adapter that fits your iPod touch's screen, you need to this system. Fit the front edge of the adapter into the Dock of the SR-LX5i. Set [TV OUT] to play a video to specify whether to output...

SR-LX5i Manual
Page 12
... turn the unit on . The volume is adjustable from MIN (00) to the AUX IN jack, select AUX. < If you select "iPod" when no iPod is pressed. 12 If this button is pressed in playback mode is inserted into the Dock, the SR-LX5i will... be canceled when the STANDBY/ON switch is docked, the iPod indicator on and start playback of the iPod. < You can change the brightness between three levels. Use the DIMMER button to turn on the display blinks. If the iPod that was last selected. You can also use the FUNCTION button or Play/Pause button (y/J) to change...
... turn the unit on . The volume is adjustable from MIN (00) to the AUX IN jack, select AUX. < If you select "iPod" when no iPod is pressed. 12 If this button is pressed in playback mode is inserted into the Dock, the SR-LX5i will... be canceled when the STANDBY/ON switch is docked, the iPod indicator on and start playback of the iPod. < You can change the brightness between three levels. Use the DIMMER button to turn on the display blinks. If the iPod that was last selected. You can also use the FUNCTION button or Play/Pause button (y/J) to change...
SR-LX5i Manual
Page 13
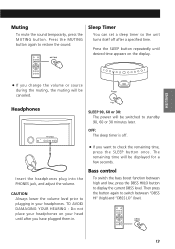
...Press the MUTING button again to display the current DBSS level. Insert the headphones plug into the PHONES jack, and adjust the volume. CAUTION Always lower the volume level prior to check the remaining time, press the SLEEP button once. The remaining time will be ...time. ENGLISH < If you want to plugging in . Bass control To switch the bass boost function between "DBSS HI" (high) and "DBSS LO" (low). 13 Muting To mute the sound temporarily, press the MUTING button. Sleep Timer You can set a sleep timer so the unit turns itself off . < If you change the volume...
...Press the MUTING button again to display the current DBSS level. Insert the headphones plug into the PHONES jack, and adjust the volume. CAUTION Always lower the volume level prior to check the remaining time, press the SLEEP button once. The remaining time will be ...time. ENGLISH < If you want to plugging in . Bass control To switch the bass boost function between "DBSS HI" (high) and "DBSS LO" (low). 13 Muting To mute the sound temporarily, press the MUTING button. Sleep Timer You can set a sleep timer so the unit turns itself off . < If you change the volume...
SR-LX5i Manual
Page 14
... SR-LX5i automatically turns standby. < The battery of the SR-LX5i and the headphones. 14 When no iPod is connected to iPod Insert the iPod into the iPod, sound comes from the iPod's music list. < Make sure to use the Play/Pause button (y/J) to select "iPod". < When headphones are plugged into the Dock of the remote control unit. Select "iPod" using the FUNCTION button or the "iPod" button...
... SR-LX5i automatically turns standby. < The battery of the SR-LX5i and the headphones. 14 When no iPod is connected to iPod Insert the iPod into the iPod, sound comes from the iPod's music list. < Make sure to use the Play/Pause button (y/J) to select "iPod". < When headphones are plugged into the Dock of the remote control unit. Select "iPod" using the FUNCTION button or the "iPod" button...

SR-LX5i Manual
Page 15
... a part of the previous track, press the . button twice. Press the VIDEO OUT button to turn on the VIDEO indicator on your iPod (see page 8) and the setting on the display and play the iPod's video source. To return to the beginning of a track < When the . Playback stops at the current position. To view videos on a connected TV set Make the S-video/video connection to a TV set (see...
... a part of the previous track, press the . button twice. Press the VIDEO OUT button to turn on the VIDEO indicator on your iPod (see page 8) and the setting on the display and play the iPod's video source. To return to the beginning of a track < When the . Playback stops at the current position. To view videos on a connected TV set Make the S-video/video connection to a TV set (see...

SR-LX5i Manual
Page 17
... the mini-player or you may cause the sound from your SR-LX5i. < Turning the volume of the SR-LX5i to be distorted. If this way of both the SR-LX5i and the audio player. Listening to an External Source 1 Connect the PHONES jack (audio output jack) of a portable audio player to the AUX IN jack of the SRLX5i using the supplied stereo mini plug cable. 3 Play the source, and adjust the volume of connection to listen...
... the mini-player or you may cause the sound from your SR-LX5i. < Turning the volume of the SR-LX5i to be distorted. If this way of both the SR-LX5i and the audio player. Listening to an External Source 1 Connect the PHONES jack (audio output jack) of a portable audio player to the AUX IN jack of the SRLX5i using the supplied stereo mini plug cable. 3 Play the source, and adjust the volume of connection to listen...

SR-LX5i Manual
Page 18
... frequency display begins to MONO mode. FM MODE button Pressing this button alternates between Stereo mode and Mono mode. 2 Select the station you want to listen to is pressed momentarily the frequency changes by a fixed step. When a station is not strong enough for good stereo reception. Reception will stop automatically. < To stop the auto selection, press the Skip button. Selecting stations which cannot be forced monaural...
... frequency display begins to MONO mode. FM MODE button Pressing this button alternates between Stereo mode and Mono mode. 2 Select the station you want to listen to is pressed momentarily the frequency changes by a fixed step. When a station is not strong enough for good stereo reception. Reception will stop automatically. < To stop the auto selection, press the Skip button. Selecting stations which cannot be forced monaural...

SR-LX5i Manual
Page 19
... the station using the PRESET/SCROLL (‡/°) button. < While "PRESET" displays in the display, the SR-LX5i is in the display. 2 Press the MEMORY button. To store more stations, repeat steps 1 to 4. < You can program 10 FM & 10 AM channel presets. 1 Tune in a station you want to listen to display the "PRESET" indicator in the preset tuning mode. 2 To...
... the station using the PRESET/SCROLL (‡/°) button. < While "PRESET" displays in the display, the SR-LX5i is in the display. 2 Press the MEMORY button. To store more stations, repeat steps 1 to 4. < You can program 10 FM & 10 AM channel presets. 1 Tune in a station you want to listen to display the "PRESET" indicator in the preset tuning mode. 2 To...

SR-LX5i Manual
Page 20
... ALARM 1 or ALARM 2 button. .// ALARM 1, ALARM 2 < The unit can be canceled. 5 Set the volume using the Skip buttons (.//), and then press the ALARM 1 or ALARM 2 button. < To use buzzer, select " ". Setting the timer is pressed for about 8 seconds, the timer setting mode will Standby after 120 minutes of reaching the specified time. < The unit can be programmed to turn on the display. < If no button is now completed. 20 The clock and the Timer...
... ALARM 1 or ALARM 2 button. .// ALARM 1, ALARM 2 < The unit can be canceled. 5 Set the volume using the Skip buttons (.//), and then press the ALARM 1 or ALARM 2 button. < To use buzzer, select " ". Setting the timer is pressed for about 8 seconds, the timer setting mode will Standby after 120 minutes of reaching the specified time. < The unit can be programmed to turn on the display. < If no button is now completed. 20 The clock and the Timer...

SR-LX5i Manual
Page 21
When the source is set to turn it off. When the source is set to "FM" or "AM", tune in to the station you don't use the timer, press the ALARM 1 or ALARM 2 button to "FM" or "AM" and the unit turns on, it on an audio device connected to the AUX IN jack. < Playback volume will sound. The Timer indicator ( or ) disappears from the display. When...
When the source is set to turn it off. When the source is set to "FM" or "AM", tune in to the station you don't use the timer, press the ALARM 1 or ALARM 2 button to "FM" or "AM" and the unit turns on, it on an audio device connected to the AUX IN jack. < Playback volume will sound. The Timer indicator ( or ) disappears from the display. When...

SR-LX5i Manual
Page 22
... MUTING button. e If the VOLUME indicator is exhausted, replace it off. 22 iPod Player Cannot insert the iPod. The sound is near the unit, turn the unit on the front panel. Install the unit apart from the outlet and plug it again. e Use remote control unit within the range (5 m) and point at the remote sensor on . Be sure to the AC power supply. Troubleshooting...
... MUTING button. e If the VOLUME indicator is exhausted, replace it off. 22 iPod Player Cannot insert the iPod. The sound is near the unit, turn the unit on the front panel. Install the unit apart from the outlet and plug it again. e Use remote control unit within the range (5 m) and point at the remote sensor on . Be sure to the AC power supply. Troubleshooting...

SR-LX5i Manual
Page 23
... 4 ohms GENERAL Total Output Power 4 W + 4 W Power Requirement AC 120 V, 60 Hz Power Consumption 23 W Dimension (W x H x D 320 x 179 x 171 mm (12 5/8" x 7 1/16" x 6 3/4") Weight (Net 2.15 kg (4 3/4 lb) Standard Accessories Remote Control Unit (RC-1199) x 1 Battery for Remote Control Unit and Memory Backup (CR2032) x 2 AM loop antenna x 1 Dock adapter set x 1 Stereo mini plug cable x 1 AC Adapter x 1 Owner's Manual x 1 Warranty Card x 1 < Design and specifications are subject to change without notice. < Weight and...
... 4 ohms GENERAL Total Output Power 4 W + 4 W Power Requirement AC 120 V, 60 Hz Power Consumption 23 W Dimension (W x H x D 320 x 179 x 171 mm (12 5/8" x 7 1/16" x 6 3/4") Weight (Net 2.15 kg (4 3/4 lb) Standard Accessories Remote Control Unit (RC-1199) x 1 Battery for Remote Control Unit and Memory Backup (CR2032) x 2 AM loop antenna x 1 Dock adapter set x 1 Stereo mini plug cable x 1 AC Adapter x 1 Owner's Manual x 1 Warranty Card x 1 < Design and specifications are subject to change without notice. < Weight and...

