SR-L70i Product Brochure
Page 1
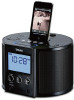
... generation 1/2/4GB 2/4/8GB 4/8GB 8/16GB 512MB 1GB 1/2/4GB Dock Dock Dock Dock AUX AUX Yes Yes Yes Yes TEAC CORPORATION, JAN. 2010 SR-L70i Hi-Fi Table Radio Detail of Back Panel Main Features General Specifications iPod Dock Output Power: 3W + 3W Quartz PLL Synthesized AM/FM Stereo Tuner Audio Input: x 1 (Stereo Mini) Large LCD with 3-step Dimmer Dock Connector: x 1 Clock, Dual Timer, Sleep Timer Headphone Jack: x 1 (stereo mini) Wake to change without notice.
... generation 1/2/4GB 2/4/8GB 4/8GB 8/16GB 512MB 1GB 1/2/4GB Dock Dock Dock Dock AUX AUX Yes Yes Yes Yes TEAC CORPORATION, JAN. 2010 SR-L70i Hi-Fi Table Radio Detail of Back Panel Main Features General Specifications iPod Dock Output Power: 3W + 3W Quartz PLL Synthesized AM/FM Stereo Tuner Audio Input: x 1 (Stereo Mini) Large LCD with 3-step Dimmer Dock Connector: x 1 Clock, Dual Timer, Sleep Timer Headphone Jack: x 1 (stereo mini) Wake to change without notice.
SR-L70i
Page 2
...USER-SERVICEABLE PARTS INSIDE. The wide blade or the third prong are provided for long periods of time. 14) Refer all instructions. 5) Do not use attachments/accessories specified by the manufacturer. 12) Use only with the cart, stand, tripod, bracket, or table specified by the manufacturer, or sold with the manufacturer's instructions. 8) Do not install...not place any way, such as power-supply cord or plug is intended to alert the user to persons. A polarized plug has two blades with liquids, such as vases, on the apparatus. < Do not install this apparatus in any objects filled ...
...USER-SERVICEABLE PARTS INSIDE. The wide blade or the third prong are provided for long periods of time. 14) Refer all instructions. 5) Do not use attachments/accessories specified by the manufacturer. 12) Use only with the cart, stand, tripod, bracket, or table specified by the manufacturer, or sold with the manufacturer's instructions. 8) Do not install...not place any way, such as power-supply cord or plug is intended to alert the user to persons. A polarized plug has two blades with liquids, such as vases, on the apparatus. < Do not install this apparatus in any objects filled ...
SR-L70i
Page 3
... USER SERVICEABLE PARTS ARE WITHIN. < IF YOU ARE EXPERIENCING PROBLEMS WITH THIS PRODUC T, CONTAC T TEAC FOR A SERVICE REFERRAL. CAUTION Changes or modifications to provide reasonable protection against harmful interference in a residential installation. The cord of such a product must be plugged into an outlet on a circuit different from that to which can radiate radio frequency energy and, if not installed and used as...
... USER SERVICEABLE PARTS ARE WITHIN. < IF YOU ARE EXPERIENCING PROBLEMS WITH THIS PRODUC T, CONTAC T TEAC FOR A SERVICE REFERRAL. CAUTION Changes or modifications to provide reasonable protection against harmful interference in a residential installation. The cord of such a product must be plugged into an outlet on a circuit different from that to which can radiate radio frequency energy and, if not installed and used as...
SR-L70i
Page 4
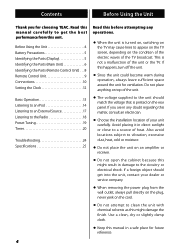
... Using the Unit 4 Battery Precautions 5 Identifying the Parts (Display 5 Identifying the Parts (Main Unit 6 Identifying the Parts (Remote Control Unit). . . 8 Remote Control Unit 9 Connections 10 Setting the Clock 12 Basic Operation 13 Listening to an iPod 14 Listening to an External Source 17 Listening to the Radio 18 Preset Tuning 19 Timer 20 Troubleshooting 24 Specifications 25 Read this before attempting any doubt regarding this manual in direct...
... Using the Unit 4 Battery Precautions 5 Identifying the Parts (Display 5 Identifying the Parts (Main Unit 6 Identifying the Parts (Remote Control Unit). . . 8 Remote Control Unit 9 Connections 10 Setting the Clock 12 Basic Operation 13 Listening to an iPod 14 Listening to an External Source 17 Listening to the Radio 18 Preset Tuning 19 Timer 20 Troubleshooting 24 Specifications 25 Read this before attempting any doubt regarding this manual in direct...
SR-L70i
Page 5
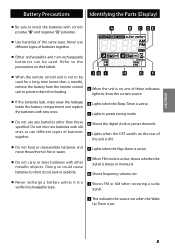
... their labels. < When the remote control unit is on the rear of the unit is set when the Wake Up Timer is ON. < Do not heat or disassemble batteries and never throw them from the remote control unit to insert the batteries with new ones. I H GF A When the unit is not to be used for a long time (more than those specified.
... their labels. < When the remote control unit is on the rear of the unit is set when the Wake Up Timer is ON. < Do not heat or disassemble batteries and never throw them from the remote control unit to insert the batteries with new ones. I H GF A When the unit is not to be used for a long time (more than those specified.
SR-L70i
Page 7
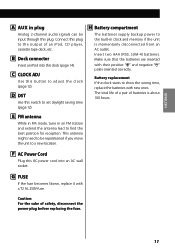
... external source connected to adjust the volume. B VOLUME Turn this knob to the AUX IN jacks (page 17). After the timer ON time is reached, use this button to enter iPod mode. In Wake Up Timer setting mode, turn this knob to turn this knob to dim the display (page 14). I Dock connector Insert an iPod into this jack while wearing headphones. Very loud sound could cause...
... external source connected to adjust the volume. B VOLUME Turn this knob to the AUX IN jacks (page 17). After the timer ON time is reached, use this button to enter iPod mode. In Wake Up Timer setting mode, turn this knob to turn this knob to dim the display (page 14). I Dock connector Insert an iPod into this jack while wearing headphones. Very loud sound could cause...
SR-L70i
Page 8
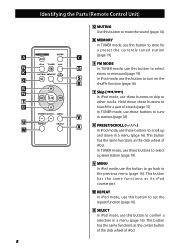
... Parts (Remote Control Unit) Q MUTING Use this button to select stereo or monaural (page 19). R MEMORY In TUNER mode, use these buttons to turn on the R shuffle function (page 16). In TUNER mode, use this button to search for a preset the currently tuned station C (page 19). S FM MODE M In TUNER mode, use this button to mute the sound (page 14). S In iPod mode, use this button to store for a part of iPod. This button...
... Parts (Remote Control Unit) Q MUTING Use this button to select stereo or monaural (page 19). R MEMORY In TUNER mode, use these buttons to turn on the R shuffle function (page 16). In TUNER mode, use this button to search for a preset the currently tuned station C (page 19). S FM MODE M In TUNER mode, use this button to mute the sound (page 14). S In iPod mode, use this button to store for a part of iPod. This button...
SR-L70i
Page 9
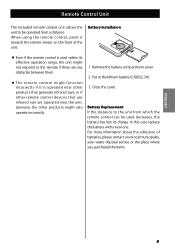
.... 1. Remove the battery compartment cover. 2. Remote Control Unit The included remote control unit allows the unit to be used within its charge. Likewise, the other remote control devices that use infrared rays are any obstacles between them. < The remote control might function incorrectly if it towards the remote sensor on the front of batteries, please contact your local municipality, your waste disposal service or the...
.... 1. Remove the battery compartment cover. 2. Remote Control Unit The included remote control unit allows the unit to be used within its charge. Likewise, the other remote control devices that use infrared rays are any obstacles between them. < The remote control might function incorrectly if it towards the remote sensor on the front of batteries, please contact your local municipality, your waste disposal service or the...
SR-L70i
Page 10
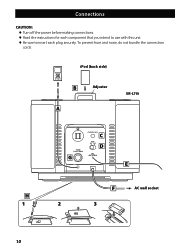
iPod (back side) B Adjuster A SR-L70i C D G E H 1 2 F 3 AC wall socket 10 To prevent hum and noise, do not bundle the connection cords. Connections CAUTION: < Turn off the power before making connections. < Read the instructions for each component that you intend to use with this unit. < Be sure to insert each plug securely.
iPod (back side) B Adjuster A SR-L70i C D G E H 1 2 F 3 AC wall socket 10 To prevent hum and noise, do not bundle the connection cords. Connections CAUTION: < Turn off the power before making connections. < Read the instructions for each component that you intend to use with this unit. < Be sure to insert each plug securely.
SR-L70i
Page 11
.... Connect this button to the output of safety, disconnect the power plug before replacing the fuse. 11 Make sure that the batteries are inserted with a T2 AL 250V fuse. F AC Power Cord Plug this dock (page 14). Caution: For the sake of an iPod, CD player, cassette tape deck, etc. E FM antenna While in FM mode, tune in an FM station and...
.... Connect this button to the output of safety, disconnect the power plug before replacing the fuse. 11 Make sure that the batteries are inserted with a T2 AL 250V fuse. F AC Power Cord Plug this dock (page 14). Caution: For the sake of an iPod, CD player, cassette tape deck, etc. E FM antenna While in FM mode, tune in an FM station and...
SR-L70i
Page 12
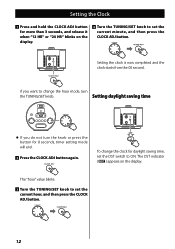
If you do not turn the TUNING/SET knob. To change the hour mode, turn the knob or press the button for 8 seconds, timer setting mode will end. 2 Press the CLOCK ADJ button again. The "hour" value blinks. 3 Turn the TUNING/SET knob to set the current hour, and then press the CLOCK ADJ button. 12 Setting daylight saving time < If you want to change the clock for more than 3 seconds...
If you do not turn the TUNING/SET knob. To change the hour mode, turn the knob or press the button for 8 seconds, timer setting mode will end. 2 Press the CLOCK ADJ button again. The "hour" value blinks. 3 Turn the TUNING/SET knob to set the current hour, and then press the CLOCK ADJ button. 12 Setting daylight saving time < If you want to change the clock for more than 3 seconds...

SR-L70i
Page 13
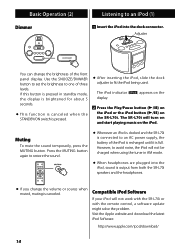
...button, the AUX button, or the iPod button (y/J). 2 Press the TUNER button, the AUX button, or the iPod button (y/J ) to select the sound source. The volume is inserted into the dock, the SR-L70i automatically turns on and starts playback of the iPod. < You can also turn the unit on the display blinks. 13 If an iPod that was last selected ready to play. or + buttons to turn 3 Play... the source, and adjust the volume the unit on with the source that is in playback mode is adjustable from MIN (00) to the AUX IN plug. < If you use the remote control ...
...button, the AUX button, or the iPod button (y/J). 2 Press the TUNER button, the AUX button, or the iPod button (y/J ) to select the sound source. The volume is inserted into the dock, the SR-L70i automatically turns on and starts playback of the iPod. < You can also turn the unit on the display blinks. 13 If an iPod that was last selected ready to play. or + buttons to turn 3 Play... the source, and adjust the volume the unit on with the source that is in playback mode is adjustable from MIN (00) to the AUX IN plug. < If you use the remote control ...
SR-L70i
Page 14
... mute the sound temporarily, press the MUTING button. The SR-L70i will not work with the SR-L70i or with the remote control, a software update might solve the problem. Basic Operation (2) Dimmer Listening to an AC power supply, the battery of the iPod is recharged until it is full. However, to avoid noise, the iPod will not be charged when using the tuner in standby mode, the...
... mute the sound temporarily, press the MUTING button. The SR-L70i will not work with the SR-L70i or with the remote control, a software update might solve the problem. Basic Operation (2) Dimmer Listening to an AC power supply, the battery of the iPod is recharged until it is full. However, to avoid noise, the iPod will not be charged when using the tuner in standby mode, the...

SR-L70i
Page 15
... resume playback, press the iPod button (G/J) again. < You can also use the button on the iPod or the Play/Pause button (y/J) on the remote control unit to pause playback. 15 Selecting iPod mode Searching for a part of the previous track, press the . When no iPod is inserted into the dock, the SR-L70i automatically starts outputting the sound. To return to is pressed during...
... resume playback, press the iPod button (G/J) again. < You can also use the button on the iPod or the Play/Pause button (y/J) on the remote control unit to pause playback. 15 Selecting iPod mode Searching for a part of the previous track, press the . When no iPod is inserted into the dock, the SR-L70i automatically starts outputting the sound. To return to is pressed during...

SR-L70i
Page 17
... hear any sound from the SR-L70i to be distorted. You can use this is the case, reduce the volume of the audio player until the distortion stops and then adjust the volume level of the SR-L70i to a comfortable listening level. 2 Press the AUX button. Listening to an External Source 1 Connect the AUX IN plug of the SR-L70i to the PHONES jack (audio output jack) of a portable audio player. 3 Play the source...
... hear any sound from the SR-L70i to be distorted. You can use this is the case, reduce the volume of the audio player until the distortion stops and then adjust the volume level of the SR-L70i to a comfortable listening level. 2 Press the AUX button. Listening to an External Source 1 Connect the AUX IN plug of the SR-L70i to the PHONES jack (audio output jack) of a portable audio player. 3 Play the source...
SR-L70i
Page 18
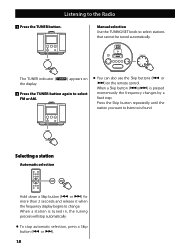
... tuned automatically. Manual selection Use the TUNING/SET knob to change. When a station is pressed momentarily the frequency changes by a fixed step. Press the Skip button repeatedly until the station you want to listen to the Radio 1 Press the TUNER button. or /) on 2 Press the TUNER button again to select FM or AM. < You can also use the Skip buttons (. When a Skip button (.or/) is...
... tuned automatically. Manual selection Use the TUNING/SET knob to change. When a station is pressed momentarily the frequency changes by a fixed step. Press the Skip button repeatedly until the station you want to listen to the Radio 1 Press the TUNER button. or /) on 2 Press the TUNER button again to select FM or AM. < You can also use the Skip buttons (. When a Skip button (.or/) is...

SR-L70i
Page 19
... can program 10 FM and 10 AM channel presets. 1 Tune in a station you want to improve the reception of a station. To store more stations, repeat steps 1 to be monaural, reducing unwanted noise. Mono To compensate for weak FM stereo reception, select this button alternates between Stereo mode and Mono mode. Reception will be forced to 4 . 19 In this case, change...
... can program 10 FM and 10 AM channel presets. 1 Tune in a station you want to improve the reception of a station. To store more stations, repeat steps 1 to be monaural, reducing unwanted noise. Mono To compensate for weak FM stereo reception, select this button alternates between Stereo mode and Mono mode. Reception will be forced to 4 . 19 In this case, change...
SR-L70i
Page 21
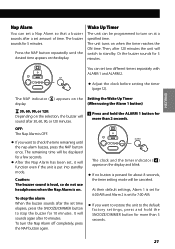
... turns on the selection, the buzzer will sound after 120 minutes the unit will be programmed to stop the buzzer for 6:00 AM and Alarm 2 is OFF. < If you want to standby. Then, after 30, 60, 90, or 120 minutes. 1 Press and hold the SNOOZE/DIMMER button for about 8 seconds, the timer setting mode will switch to check the time...
... turns on the selection, the buzzer will sound after 120 minutes the unit will be programmed to stop the buzzer for 6:00 AM and Alarm 2 is OFF. < If you want to standby. Then, after 30, 60, 90, or 120 minutes. 1 Press and hold the SNOOZE/DIMMER button for about 8 seconds, the timer setting mode will switch to check the time...
SR-L70i
Page 23
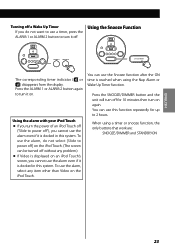
... time is docked in this system. Using the alarm with your iPod Touch < If you turn it off for up to 2 hours. To use the alarm, do not want to use a timer, press the ALARM 1 or ALARM 2 button to turn the power of an iPod Touch off ("Slide to power off without any item other than Video on . When using the Nap Alarm or Wake Up Timer function. Press the ALARM 1 or ALARM 2 button...
... time is docked in this system. Using the alarm with your iPod Touch < If you turn it off for up to 2 hours. To use the alarm, do not want to use a timer, press the ALARM 1 or ALARM 2 button to turn the power of an iPod Touch off ("Slide to power off without any item other than Video on . When using the Nap Alarm or Wake Up Timer function. Press the ALARM 1 or ALARM 2 button...
SR-L70i
Page 24
... fire. e Adjust the dock adapter. Visit the Apple website and download the latest iPod Software. e Move the antenna for FM or the main unit for AM until you have problems with a new one. Remote control does not work. e If the battery is power to any excess liquid completely. Do not use a different type of fuse. e Turn off . e Use the remote control unit within the operation...
... fire. e Adjust the dock adapter. Visit the Apple website and download the latest iPod Software. e Move the antenna for FM or the main unit for AM until you have problems with a new one. Remote control does not work. e If the battery is power to any excess liquid completely. Do not use a different type of fuse. e Turn off . e Use the remote control unit within the operation...


