MC-DX32i Manual
Page 3
... to this apparatus in the protective housings. NO USER SERVICEABLE PARTS ARE WITHIN! < IF YOU ARE EXPERIENCING PROBLEMS WITH THIS PRODUCT, CONTACT TEAC FOR A SERVICE REFERRAL. This equipment generates, uses, and can easily grasp the power cord plug at any objects filled with Class ! ... be connected to an AC outlet with a protective grounding connection. < Batteries (battery pack or batteries installed) shall not be determined by turning the equipment off and on a circuit different from the AC outlet with the limits for help. This product has been designed and manufactured according...
... to this apparatus in the protective housings. NO USER SERVICEABLE PARTS ARE WITHIN! < IF YOU ARE EXPERIENCING PROBLEMS WITH THIS PRODUCT, CONTACT TEAC FOR A SERVICE REFERRAL. This equipment generates, uses, and can easily grasp the power cord plug at any objects filled with Class ! ... be connected to an AC outlet with a protective grounding connection. < Batteries (battery pack or batteries installed) shall not be determined by turning the equipment off and on a circuit different from the AC outlet with the limits for help. This product has been designed and manufactured according...
MC-DX32i Manual
Page 6
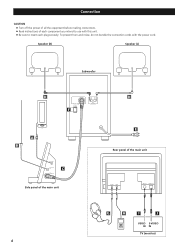
Speaker (R) Speaker (L) Subwoofer D F A B C Side panel of the main unit D E Rear panel of each plug securely. Connection CAUTION < Turn off the power of all the equipment before making connections. < Read instructions of the main unit G H I J VIDEO S-VIDEO IN IN TV (monitor) 6 To prevent hum and noise, do not bundle the connection cords with this unit. < Be sure to insert each component you intend to use with the power cord.
Speaker (R) Speaker (L) Subwoofer D F A B C Side panel of the main unit D E Rear panel of each plug securely. Connection CAUTION < Turn off the power of all the equipment before making connections. < Read instructions of the main unit G H I J VIDEO S-VIDEO IN IN TV (monitor) 6 To prevent hum and noise, do not bundle the connection cords with this unit. < Be sure to insert each component you intend to use with the power cord.
MC-DX32i Manual
Page 7
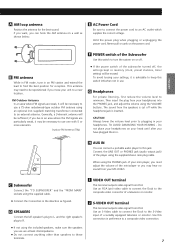
... connection. 7 H AUX IN You can hook the AM antenna on the power cord. When using the PHONES jack of your mini player, you move your MC-DX32i. D SPEAKERS Connect the left speaker's plug to L, and the right speaker's plug to R. < If not using the included speakers, make sure the speakers you ...-type outdoor FM antenna using the VOLUME buttons. Then insert the plug from iPod. Outdoor FM Antenna (75Ω) F POWER switch of the subwoofer turned off, the settings kept in . Do not place your headphones on or off while the headphone jack is advisable to keep this switch to...
... connection. 7 H AUX IN You can hook the AM antenna on the power cord. When using the PHONES jack of your mini player, you move your MC-DX32i. D SPEAKERS Connect the left speaker's plug to L, and the right speaker's plug to R. < If not using the included speakers, make sure the speakers you ...-type outdoor FM antenna using the VOLUME buttons. Then insert the plug from iPod. Outdoor FM Antenna (75Ω) F POWER switch of the subwoofer turned off, the settings kept in . Do not place your headphones on or off while the headphone jack is advisable to keep this switch to...
MC-DX32i Manual
Page 9
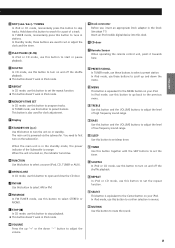
... main unit is equivalent to set the repeat function. < This button doesn't work in stations. X REPEAT In iPod or CD mode, use this button to turn on and off the shuffle playback. < This button doesn't work in the Dock (see page 11). F Display G STANDBY/ON ( ) Use this button to .... In Standby mode, these buttons are used for a part of high frequency sound range. J FM/AM Use this button together with the SKIP buttons to turn on the subwoofer. O CD door P Remote Sensor When operating the remote control unit, point it towards here. V TIMER Use this button to the previous...
... main unit is equivalent to set the repeat function. < This button doesn't work in stations. X REPEAT In iPod or CD mode, use this button to turn on and off the shuffle playback. < This button doesn't work in the Dock (see page 11). F Display G STANDBY/ON ( ) Use this button to .... In Standby mode, these buttons are used for a part of high frequency sound range. J FM/AM Use this button together with the SKIP buttons to turn on the subwoofer. O CD door P Remote Sensor When operating the remote control unit, point it towards here. V TIMER Use this button to the previous...
MC-DX32i Manual
Page 12
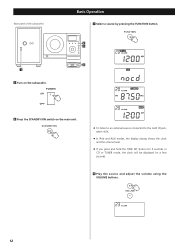
(Rear panel of the subwoofer) 1 1 Turn on the main unit. < To listen to an external source connected to the AUX IN jack, select AUX. < In iPod and AUX modes, the display always shows the clock and the volume level. < If you press and hold the TIME SET button for 3 seconds in CD or TUNER mode, the clock will be displayed for a few seconds. 4 Play the source and adjust the volume using the VOLUME buttons. 12 Basic Operation 3 Select a source by pressing the FUNCTION button. 2 3 4 2 Press the STANDBY/ON switch on the subwoofer.
(Rear panel of the subwoofer) 1 1 Turn on the main unit. < To listen to an external source connected to the AUX IN jack, select AUX. < In iPod and AUX modes, the display always shows the clock and the volume level. < If you press and hold the TIME SET button for 3 seconds in CD or TUNER mode, the clock will be displayed for a few seconds. 4 Play the source and adjust the volume using the VOLUME buttons. 12 Basic Operation 3 Select a source by pressing the FUNCTION button. 2 3 4 2 Press the STANDBY/ON switch on the subwoofer.

MC-DX32i Manual
Page 13
... change the volume or source during the muting, the muting will be displayed for a few seconds. The level can set a sleep timer so the unit turns itself off after a specified time. Muting To mute the sound temporarily, press the MUTING button. Press the BASS or TREBLE button. SLEEP 00: The sleep...
... change the volume or source during the muting, the muting will be displayed for a few seconds. The level can set a sleep timer so the unit turns itself off after a specified time. Muting To mute the sound temporarily, press the MUTING button. Press the BASS or TREBLE button. SLEEP 00: The sleep...
MC-DX32i Manual
Page 14
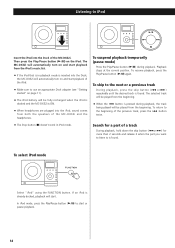
... mode) Press the Play/Pause button (G/J) during playback, the track being played will be played from both the speakers of the MC-DX32i. button is found . The MC-DX32i will start playback of the iPod. < Make sure to use an appropriate Dock adapter (see "Getting started" on and start or... to listen to is ON. < When headphones are plugged into the Dock of the MC-DX32i and the headphones. < The Stop button (H) doesn't work in playback mode is inserted into the Dock, the MC-DX32i will automatically turn on page 11). < The iPod battery will be played from the iPod's music list...
... mode) Press the Play/Pause button (G/J) during playback, the track being played will be played from both the speakers of the MC-DX32i. button is found . The MC-DX32i will start playback of the iPod. < Make sure to use an appropriate Dock adapter (see "Getting started" on and start or... to listen to is ON. < When headphones are plugged into the Dock of the MC-DX32i and the headphones. < The Stop button (H) doesn't work in playback mode is inserted into the Dock, the MC-DX32i will automatically turn on page 11). < The iPod battery will be played from the iPod's music list...
MC-DX32i Manual
Page 20
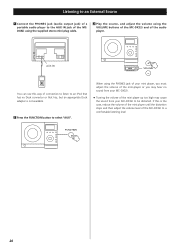
... and then adjust the volume level of the MC-DX32i to a comfortable listening level 20 If this way of the audio player. When using the VOLUME buttons of the MC-DX32i and of connection to listen to an iPod that has no sound from your MC-DX32i. < Turning the volume of the mini player up too... high may cause the sound from your MC-DX32i to be distorted.
... and then adjust the volume level of the MC-DX32i to a comfortable listening level 20 If this way of the audio player. When using the VOLUME buttons of the MC-DX32i and of connection to listen to an iPod that has no sound from your MC-DX32i. < Turning the volume of the mini player up too... high may cause the sound from your MC-DX32i to be distorted.

MC-DX32i Manual
Page 22
..., press the FM/AM button. If the power switch of page 21). 2 Press the MEMORY button. 3 Within 5 seconds, select a preset channel to 3 of the subwoofer turned off . preset channel 4 Within 5 seconds, press the MEMORY button. You can program 10 FM & 10 AM channel presets.
..., press the FM/AM button. If the power switch of page 21). 2 Press the MEMORY button. 3 Within 5 seconds, select a preset channel to 3 of the subwoofer turned off . preset channel 4 Within 5 seconds, press the MEMORY button. You can program 10 FM & 10 AM channel presets.
MC-DX32i Manual
Page 23
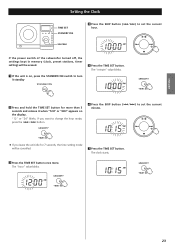
... for 7 seconds, the time setting mode will be cancelled. 7 Press the TIME SET button. "12" or "24" blinks. If the power switch of the subwoofer turned off, the settings kept in memory (clock, preset stations, timer setting) will be erased. 1 If the unit is on, press the STANDBY/ON switch to... turn it when "12H" or "24H" appears on the display. The "hour" value blinks. 23 ENGLISH Setting the Clock TIME SET STANDBY/ON 4 Press the SKIP ...
... for 7 seconds, the time setting mode will be cancelled. 7 Press the TIME SET button. "12" or "24" blinks. If the power switch of the subwoofer turned off, the settings kept in memory (clock, preset stations, timer setting) will be erased. 1 If the unit is on, press the STANDBY/ON switch to... turn it when "12H" or "24H" appears on the display. The "hour" value blinks. 23 ENGLISH Setting the Clock TIME SET STANDBY/ON 4 Press the SKIP ...
MC-DX32i Manual
Page 24
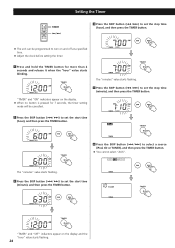
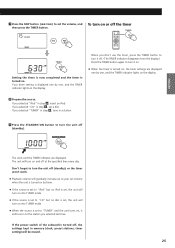
..." value starts flashing. 5 Press the SKIP button (.//) to set the stop time (hour), and then press the TIMER button. < The unit can be programmed to turn on and off at a specified time. < Adjust the clock before setting the timer. 1 Press and hold the TIMER button for 7 seconds, the timer setting mode...
..." value starts flashing. 5 Press the SKIP button (.//) to set the stop time (hour), and then press the TIMER button. < The unit can be programmed to turn on and off at a specified time. < Adjust the clock before setting the timer. 1 Press and hold the TIMER button for 7 seconds, the timer setting mode...
MC-DX32i Manual
Page 25
... (standby). If you selected "CD" in step 6 , set a disc. If you selected "iPod" in a station. 9 Press the STANDBY/ON button to turn it will be erased. 25 Don't forget to turn the unit off (standby), or the timer won't work. < Playback volume will gradually increase up to your set volume when the... unit is turned on by timer. < If the source is set to "iPod" but no iPod is set, the unit will turn on into TUNER mode. < If the source is set to "CD" but no disc is set...
... (standby). If you selected "CD" in step 6 , set a disc. If you selected "iPod" in a station. 9 Press the STANDBY/ON button to turn it will be erased. 25 Don't forget to turn the unit off (standby), or the timer won't work. < Playback volume will gradually increase up to your set volume when the... unit is turned on by timer. < If the source is set to "iPod" but no iPod is set, the unit will turn on into TUNER mode. < If the source is set to "CD" but no disc is set...
MC-DX32i Manual
Page 26
... place to a TV or similar appliances. Tuner Cannot listen to dry completely before calling your dealer or TEAC service center. Then the unit will be recovered, unplug the power cord from them, or turn them off . e Select the source by plugging another disc. e The unit is too weak. Try...If normal operation cannot be erased. iPod Player Will not play back CD-R/RW discs. e If a strong light is a danger of the subwoofer turned off, the settings kept in memory (clock, preset stations, timer setting) will stabilize at the front panel. If the power switch of condensation; ...
... place to a TV or similar appliances. Tuner Cannot listen to dry completely before calling your dealer or TEAC service center. Then the unit will be recovered, unplug the power cord from them, or turn them off . e Select the source by plugging another disc. e The unit is too weak. Try...If normal operation cannot be erased. iPod Player Will not play back CD-R/RW discs. e If a strong light is a danger of the subwoofer turned off, the settings kept in memory (clock, preset stations, timer setting) will stabilize at the front panel. If the power switch of condensation; ...
MC-DX32i Quick Start Guide
Page 1
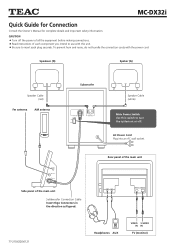
.... < Be sure to turn the system on or off. CAUTION < Turn off the power of all the equipment before making connections. < Read instructions of the main unit Subbwoofer Connection Cable Insert thge Connectors in the direction as figured. 77-21DX32I00121 Headphones AUX VIDEO S-VIDEO IN IN TV (monitor) Z MC-DX32i Quick Guide for Connection...
.... < Be sure to turn the system on or off. CAUTION < Turn off the power of all the equipment before making connections. < Read instructions of the main unit Subbwoofer Connection Cable Insert thge Connectors in the direction as figured. 77-21DX32I00121 Headphones AUX VIDEO S-VIDEO IN IN TV (monitor) Z MC-DX32i Quick Guide for Connection...


