MC-DX32i Manual
Page 2
...instructions, and should be equipped with care. Quick stops, excessive force, and uneven surfaces may cause hazards. 7) Water and Moisture - This product should be of sufficient magnitude to constitute a risk of antenna-discharge unit, connection to persons. This product may be taken to your home... the point of cable entry as this product during a lightning storm, or when it is in a wet basement; This is damaged. If the plug should be sure the service technician has used replacement parts specified by following conditions: a ) when the power-supply cord or plug is ...
...instructions, and should be equipped with care. Quick stops, excessive force, and uneven surfaces may cause hazards. 7) Water and Moisture - This product should be of sufficient magnitude to constitute a risk of antenna-discharge unit, connection to persons. This product may be taken to your home... the point of cable entry as this product during a lightning storm, or when it is in a wet basement; This is damaged. If the plug should be sure the service technician has used replacement parts specified by following conditions: a ) when the power-supply cord or plug is ...
MC-DX32i Manual
Page 3
... non-operating power from the AC outlet with the instructions, may cause harmful interference to excessive heat such as class 1 laser product. CAUTION Changes or modifications to comply with a protective grounding connection. < Batteries (battery pack or batteries installed) shall not be determined by turning the equipment off and on a circuit different from earphones and headphones can radiate radio frequency energy...
... non-operating power from the AC outlet with the instructions, may cause harmful interference to excessive heat such as class 1 laser product. CAUTION Changes or modifications to comply with a protective grounding connection. < Batteries (battery pack or batteries installed) shall not be determined by turning the equipment off and on a circuit different from earphones and headphones can radiate radio frequency energy...
MC-DX32i Manual
Page 4
...installation or packing the unit for ventilation. Avoid placing it and always close to remove the disc. WHEN MOVING THIS UNIT When changing places of heat. Important Safety Instructions 2 Before Using the Unit 4 Discs 5 Connection 6 Unit Functions 8 Wall Mounting 10 Remote Control...New Transducers Ltd. 4 Use a clean, dry, lint-free cloth. < Keep this manual in malfunction or other electronic components. < Do not open the cabinet as this might result in damage to the Radio 21 Preset Tuning 22 Setting the Clock 23 Setting the Timer 24 Troubleshooting 26 Specifications...
...installation or packing the unit for ventilation. Avoid placing it and always close to remove the disc. WHEN MOVING THIS UNIT When changing places of heat. Important Safety Instructions 2 Before Using the Unit 4 Discs 5 Connection 6 Unit Functions 8 Wall Mounting 10 Remote Control...New Transducers Ltd. 4 Use a clean, dry, lint-free cloth. < Keep this manual in malfunction or other electronic components. < Do not open the cabinet as this might result in damage to the Radio 21 Preset Tuning 22 Setting the Clock 23 Setting the Timer 24 Troubleshooting 26 Specifications...
MC-DX32i Manual
Page 5
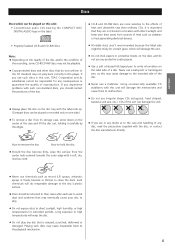
..., read the precautions supplied with this unit will damage the mechanisms and cause them to malfunction. < Do not use such discs in this player. Long exposure to high temperatures will warp the disc. < Do not play back correctly in a location with a soft, dry, lint-free cloth: < Never use a stabilizer. It is...disc. < Always place the disc on the disc tray with the label side up. (Compact discs can be played on this unit: • Conventional audio CDs bearing the COMPACT DISC DIGITAL AUDIO logo on the label: • Properly finalized CD-R and CD-RW discs Note: < Depending on the ...
..., read the precautions supplied with this unit will damage the mechanisms and cause them to malfunction. < Do not use such discs in this player. Long exposure to high temperatures will warp the disc. < Do not play back correctly in a location with a soft, dry, lint-free cloth: < Never use a stabilizer. It is...disc. < Always place the disc on the disc tray with the label side up. (Compact discs can be played on this unit: • Conventional audio CDs bearing the COMPACT DISC DIGITAL AUDIO logo on the label: • Properly finalized CD-R and CD-RW discs Note: < Depending on the ...
MC-DX32i Manual
Page 6
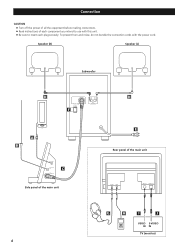
Connection CAUTION < Turn off the power of all the equipment before making connections. < Read instructions of the main unit G H I J VIDEO S-VIDEO IN IN TV (monitor) 6 To prevent hum and noise, do not bundle the connection cords with this unit. < Be sure to use with the power cord. Speaker (R) Speaker (L) Subwoofer D F A B C Side panel of the main unit D E Rear panel of each component you intend to insert each plug securely.
Connection CAUTION < Turn off the power of all the equipment before making connections. < Read instructions of the main unit G H I J VIDEO S-VIDEO IN IN TV (monitor) 6 To prevent hum and noise, do not bundle the connection cords with this unit. < Be sure to use with the power cord. Speaker (R) Speaker (L) Subwoofer D F A B C Side panel of the main unit D E Rear panel of each component you intend to insert each plug securely.
MC-DX32i Manual
Page 7
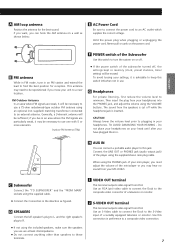
... player using the included speakers, make sure the speakers you can connect a portable audio player to this switch to R. < If not using the supplied stereo mini plug cable. If you want, you use a 75-ohm unbalanced-type outdoor FM antenna using the VOLUME buttons. Outdoor FM Antenna (75Ω) F POWER switch of the subwoofer turned off while the headphone jack is advisable to keep this connection in memory (clock, preset stations, timer setting...
... player using the included speakers, make sure the speakers you can connect a portable audio player to this switch to R. < If not using the supplied stereo mini plug cable. If you want, you use a 75-ohm unbalanced-type outdoor FM antenna using the VOLUME buttons. Outdoor FM Antenna (75Ω) F POWER switch of the subwoofer turned off while the headphone jack is advisable to keep this connection in memory (clock, preset stations, timer setting...
MC-DX32i Manual
Page 9
... mode, use this button to stop playback. < This button doesn't work in iPod mode. L STOP (H) In CD mode, use , insert an appropriate Dock adapter in the standby mode, the power indicator of low frequency sound range. M VOLUME Press the up and down the menu. O CD door P Remote Sensor When operating the remote control unit, point it towards here. F Display G STANDBY/ON ( ) Use this button to select STEREO or MONO. J FM/AM Use this button...
... mode, use this button to stop playback. < This button doesn't work in iPod mode. L STOP (H) In CD mode, use , insert an appropriate Dock adapter in the standby mode, the power indicator of low frequency sound range. M VOLUME Press the up and down the menu. O CD door P Remote Sensor When operating the remote control unit, point it towards here. F Display G STANDBY/ON ( ) Use this button to select STEREO or MONO. J FM/AM Use this button...

MC-DX32i Manual
Page 10
... cover. Fix the brackets on , connect the speakers and the subwoofer using the supplied short screws. Battery Installation 1 2. Put in the wall at the marked points. 4. Conversely, the other remote control devices using a 6 mm drill bit then tap the anchor into the wall. When operating the remote control unit, point it may be mounted. Drill holes in the lithium battery (CR2032, 3V). 3. Battery Replacement If...
... cover. Fix the brackets on , connect the speakers and the subwoofer using the supplied short screws. Battery Installation 1 2. Put in the wall at the marked points. 4. Conversely, the other remote control devices using a 6 mm drill bit then tap the anchor into the wall. When operating the remote control unit, point it may be mounted. Drill holes in the lithium battery (CR2032, 3V). 3. Battery Replacement If...
MC-DX32i Manual
Page 11
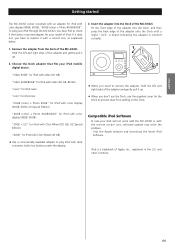
... ENGLISH Getting started The MC-DX32i comes mounted with an adapter for iPod with video (60 GB, 80 GB). "Video 30GB" for iPod with the remote control unit, software update may solve the problem. Compatible iPod Software In case your iPod through the MC-DX32i, you have first to replace it with color display (40GB, 60GB). Insert the adapter into the Dock, and then press...
... ENGLISH Getting started The MC-DX32i comes mounted with an adapter for iPod with video (60 GB, 80 GB). "Video 30GB" for iPod with the remote control unit, software update may solve the problem. Compatible iPod Software In case your iPod through the MC-DX32i, you have first to replace it with color display (40GB, 60GB). Insert the adapter into the Dock, and then press...
MC-DX32i Manual
Page 14
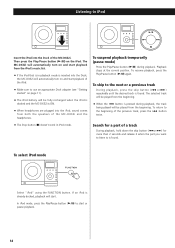
... it when the part you want to listen to is ON. < When headphones are plugged into the Dock of the MC-DX32i. Listening to iPod Insert the iPod into the iPod, sound comes from both the speakers of the MC-DX32i and the headphones. < The Stop button (H) doesn't work in playback mode is inserted into the Dock, the MC-DX32i will automatically turn on and start...
... it when the part you want to listen to is ON. < When headphones are plugged into the Dock of the MC-DX32i. Listening to iPod Insert the iPod into the iPod, sound comes from both the speakers of the MC-DX32i and the headphones. < The Stop button (H) doesn't work in playback mode is inserted into the Dock, the MC-DX32i will automatically turn on and start...
MC-DX32i Manual
Page 15
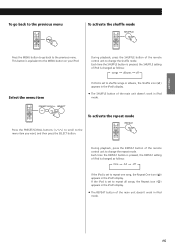
.... < The SHUFFLE button of the remote control unit to change the repeat mode. To activate the repeat mode Press the PRESET/SCROLL buttons (‡/°) to scroll to the previous menu. During playback, press the REPEAT button of the main unit doesn't work in the iPod's display. < The REPEAT button of the remote control unit to change the shuffle mode. This button is set to repeat...
.... < The SHUFFLE button of the remote control unit to change the repeat mode. To activate the repeat mode Press the PRESET/SCROLL buttons (‡/°) to scroll to the previous menu. During playback, press the REPEAT button of the main unit doesn't work in the iPod's display. < The REPEAT button of the remote control unit to change the shuffle mode. This button is set to repeat...
MC-DX32i Manual
Page 17
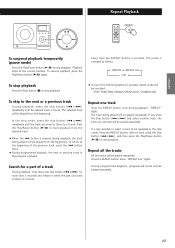
... 2 seconds and release it when the part you selected will be played repeatedly. Playback stops at the current position. Every time the REPEAT button is pressed, the mode is changed as follows: REPEAT REPEAT ALL (off) To stop playback Press the Stop button (H) to the next or a previous track During playback, press the skip button (.or/) repeatedly until the track you...
... 2 seconds and release it when the part you selected will be played repeatedly. Playback stops at the current position. Every time the REPEAT button is pressed, the mode is changed as follows: REPEAT REPEAT ALL (off) To stop playback Press the Stop button (H) to the next or a previous track During playback, press the skip button (.or/) repeatedly until the track you...
MC-DX32i Manual
Page 19
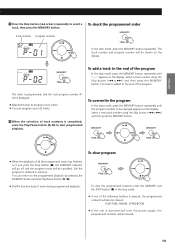
... button (G/J). < Shuffle function doesn't work during programmed playback. Select a track number using the Skip button (.or/) and then press the MEMORY button. To overwrite the program In the stop mode. < If one of the following buttons is pressed, the programmed contents will also be cleared: FUNCTION, FM/AM, STANDBY/ON < If the unit is disconnected from the power supply, the programmed contents will be changed...
... button (G/J). < Shuffle function doesn't work during programmed playback. Select a track number using the Skip button (.or/) and then press the MEMORY button. To overwrite the program In the stop mode. < If one of the following buttons is pressed, the programmed contents will also be cleared: FUNCTION, FM/AM, STANDBY/ON < If the unit is disconnected from the power supply, the programmed contents will be changed...
MC-DX32i Manual
Page 20
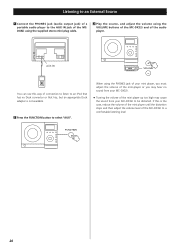
... "AUX". AUX IN You can use this is not available. 2 Press the FUNCTION button to a comfortable listening level 20 When using the PHONES jack of your MC-DX32i to the AUX IN jack of the MCDX32i using the supplied stereo mini plug cable. 3 Play the source, and adjust the volume using the VOLUME buttons of the MC-DX32i and of the audio player. Listening to an External Source 1 Connect the PHONES jack (audio output jack) of a portable audio player...
... "AUX". AUX IN You can use this is not available. 2 Press the FUNCTION button to a comfortable listening level 20 When using the PHONES jack of your MC-DX32i to the AUX IN jack of the MCDX32i using the supplied stereo mini plug cable. 3 Play the source, and adjust the volume using the VOLUME buttons of the MC-DX32i and of the audio player. Listening to an External Source 1 Connect the PHONES jack (audio output jack) of a portable audio player...
MC-DX32i Manual
Page 21
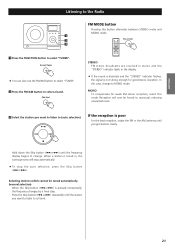
... pressed momentarily, the frequency changes by a fixed step. Selecting stations which cannot be forced to monaural, reducing unwanted noise. 3 Select the station you want to listen to MONO mode. Press the Skip button (.or/) repeatedly until the station you get stations clearly. MONO To compensate for good stereo reception. STEREO FM stereo broadcasts are received in stereo and the "STEREO" indicator lights in...
... pressed momentarily, the frequency changes by a fixed step. Selecting stations which cannot be forced to monaural, reducing unwanted noise. 3 Select the station you want to listen to MONO mode. Press the Skip button (.or/) repeatedly until the station you get stations clearly. MONO To compensate for good stereo reception. STEREO FM stereo broadcasts are received in stereo and the "STEREO" indicator lights in...

MC-DX32i Manual
Page 22
... to 4 . 22 You can program 10 FM & 10 AM channel presets. preset channel 4 Within 5 seconds, press the MEMORY button. The station is stored and the MEMORY indicator goes off , the settings kept in memory (clock, preset stations, timer setting) will be erased. 2 Press the PRESET button repeatedly until the desired preset station is found. 1 Tune in a station you want to listen...
... to 4 . 22 You can program 10 FM & 10 AM channel presets. preset channel 4 Within 5 seconds, press the MEMORY button. The station is stored and the MEMORY indicator goes off , the settings kept in memory (clock, preset stations, timer setting) will be erased. 2 Press the PRESET button repeatedly until the desired preset station is found. 1 Tune in a station you want to listen...
MC-DX32i Manual
Page 25
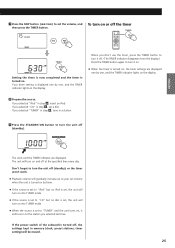
... you don't use the timer, press the TIMER button to turn it off. (The TIMER indicator disappears from the display.) Press the TIMER button again to turn the unit off the timer then press the TIMER button. The unit will turn it will tune in memory (clock, preset stations, timer setting) will turn on into TUNER mode. < When the source is turned on, the timer settings are displayed. Your timer setting is turned on the...
... you don't use the timer, press the TIMER button to turn it off. (The TIMER indicator disappears from the display.) Press the TIMER button again to turn the unit off the timer then press the TIMER button. The unit will turn it will tune in memory (clock, preset stations, timer setting) will turn on into TUNER mode. < When the source is turned on, the timer settings are displayed. Your timer setting is turned on the...
MC-DX32i Manual
Page 26
... the FUNCTION button. Make sure there is power to a warm environment, or used after a sudden temperature change, there is too close to the speakers. e The unit is a danger of the disc. Install the unit apart from the PHONES jack. Remote control doesn't work. e Software update may not be possible to your dealer or TEAC service center. Visit the Apple website and download the latest...
... the FUNCTION button. Make sure there is power to a warm environment, or used after a sudden temperature change, there is too close to the speakers. e The unit is a danger of the disc. Install the unit apart from the PHONES jack. Remote control doesn't work. e Software update may not be possible to your dealer or TEAC service center. Visit the Apple website and download the latest...
MC-DX32i Manual
Page 27
...) x 1 Battery for Remote Control Unit x 1 Dock adapter x 8 (adapter "60GB (color) + Photo 40GB/60GB" premounted) Cover for the Dock x 1 Subwoofer Cable x 1 Speaker Cable x 2 FM Antenna x 1 AM Antenna x 1 Stereo mini plug cable x 1 Wall mount brackets x 4 Screw (short) x 8 Screw (long) x 4 Tapered Plastic Wall Anchor x 4 Template for Wall Mounting x 2 Owner's Manual x 1 Quick Guide for Connection x 1 Warranty Card x 1 SPEAKER Type Full range flat type Impedance 4 ohms SUBWOOFER Impedance 8 ohms • Design and specifications...
...) x 1 Battery for Remote Control Unit x 1 Dock adapter x 8 (adapter "60GB (color) + Photo 40GB/60GB" premounted) Cover for the Dock x 1 Subwoofer Cable x 1 Speaker Cable x 2 FM Antenna x 1 AM Antenna x 1 Stereo mini plug cable x 1 Wall mount brackets x 4 Screw (short) x 8 Screw (long) x 4 Tapered Plastic Wall Anchor x 4 Template for Wall Mounting x 2 Owner's Manual x 1 Quick Guide for Connection x 1 Warranty Card x 1 SPEAKER Type Full range flat type Impedance 4 ohms SUBWOOFER Impedance 8 ohms • Design and specifications...
MC-DX32i Quick Start Guide
Page 1
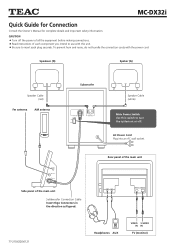
... before making connections. < Read instructions of the main unit Subbwoofer Connection Cable Insert thge Connectors in the direction as figured. 77-21DX32I00121 Headphones AUX VIDEO S-VIDEO IN IN TV (monitor) Rear panel of the main unit Side panel of each plug securely. CAUTION < Turn off . Z MC-DX32i Quick Guide for Connection Consult the Owner's Manual for complete details and important safety information. AC Power Cord Plug into...
... before making connections. < Read instructions of the main unit Subbwoofer Connection Cable Insert thge Connectors in the direction as figured. 77-21DX32I00121 Headphones AUX VIDEO S-VIDEO IN IN TV (monitor) Rear panel of the main unit Side panel of each plug securely. CAUTION < Turn off . Z MC-DX32i Quick Guide for Connection Consult the Owner's Manual for complete details and important safety information. AC Power Cord Plug into...


