Operating Instructions
Page 4
... Side/Front 10 Rear/Bottom 10 Control Panel 12 Connector Panel 14 Remote Commander 15 Projecting the Picture Installing the Projector 17 Connecting the Projector 18 Connecting a Computer 18 Connecting a VCR 19 Projecting 20 Turning Off the Power 22 Convenient Functions Selecting the ... SETTING Menu 33 The MENU SETTING Menu ...........35 The INSTALL SETTING Menu .......36 The INFORMATION Menu 38 Maintenance Replacing the Lamp 40 Cleaning the Air Filter 42 Others Troubleshooting 43 Messages List 45 Specifications 47 Installation Diagram 52 Floor Installation (Front Projection...
... Side/Front 10 Rear/Bottom 10 Control Panel 12 Connector Panel 14 Remote Commander 15 Projecting the Picture Installing the Projector 17 Connecting the Projector 18 Connecting a Computer 18 Connecting a VCR 19 Projecting 20 Turning Off the Power 22 Convenient Functions Selecting the ... SETTING Menu 33 The MENU SETTING Menu ...........35 The INSTALL SETTING Menu .......36 The INFORMATION Menu 38 Maintenance Replacing the Lamp 40 Cleaning the Air Filter 42 Others Troubleshooting 43 Messages List 45 Specifications 47 Installation Diagram 52 Floor Installation (Front Projection...
Operating Instructions
Page 5
... lightreflecting material. Cleaning Before cleaning Be sure to the projector. Precautions 5 As incorrect maintenance may damage the finish of the projector, take care with ventilation holes (intake) and ventilation holes (exhaust). Use a cover over fluorescent lamps to avoid lowering the contrast ratio. • Cover ...The air coming out is not to be used for the air filter cleaning. If voltage adaptation is required, consult with qualified Sony personnel. • Should any windows that the carpet and wall paper be exposed to direct lighting or sunlight. • Ceiling-...
... lightreflecting material. Cleaning Before cleaning Be sure to the projector. Precautions 5 As incorrect maintenance may damage the finish of the projector, take care with ventilation holes (intake) and ventilation holes (exhaust). Use a cover over fluorescent lamps to avoid lowering the contrast ratio. • Cover ...The air coming out is not to be used for the air filter cleaning. If voltage adaptation is required, consult with qualified Sony personnel. • Should any windows that the carpet and wall paper be exposed to direct lighting or sunlight. • Ceiling-...
Operating Instructions
Page 7
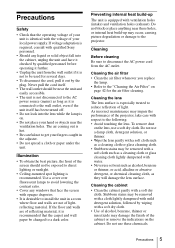
...it on Installation and Usage 7 Malfunction of the unit. Notes on a level surface or suspending from an air-conditioner Installing the projector in temperature. Hot and humid Very dusty, extremely smoky locations • Avoid installing the unit in a location where the temperature or...environment. Locations subject to moisture condensation or a rise in such a location may occur. Clean the air filter whenever you replace the lamp. Such an installation may cause malfunction. Otherwise, the air filter will become obstructed, and this may cause a malfunction of the ...
...it on Installation and Usage 7 Malfunction of the unit. Notes on a level surface or suspending from an air-conditioner Installing the projector in temperature. Hot and humid Very dusty, extremely smoky locations • Avoid installing the unit in a location where the temperature or...environment. Locations subject to moisture condensation or a rise in such a location may occur. Clean the air filter whenever you replace the lamp. Such an installation may cause malfunction. Otherwise, the air filter will become obstructed, and this may cause a malfunction of the ...
Operating Instructions
Page 9
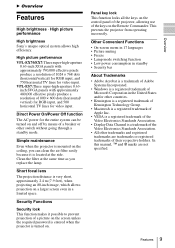
...the projector is mounted on the ceiling, you replace the lamp. ...the required password is entered when the projector is a trademark of 800 ×... for video input. Features 9 VPL-ES7:Three super-high-aperture 0.63inch...; Picture muting • Freeze • Lamp mode switching function • Low power consumption...projector, allowing use of the keys on and off by means of Microsoft Corporation in a limited space. High picture performance VPL-EX70/EX7:Three super-high-aperture 0.63-inch XGA...projector from operating incorrectly. Overview B Overview Features High brightness · High...
...the projector is mounted on the ceiling, you replace the lamp. ...the required password is entered when the projector is a trademark of 800 ×... for video input. Features 9 VPL-ES7:Three super-high-aperture 0.63inch...; Picture muting • Freeze • Lamp mode switching function • Low power consumption...projector, allowing use of the keys on and off by means of Microsoft Corporation in a limited space. High picture performance VPL-EX70/EX7:Three super-high-aperture 0.63-inch XGA...projector from operating incorrectly. Overview B Overview Features High brightness · High...
Operating Instructions
Page 12
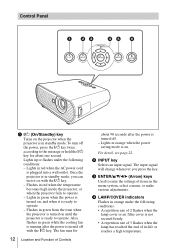
... a high temperature. c ENTER/v/V/b/B (Arrow) keys Used to enter the settings of 2 flashes when the lamp cover or air filter cover is plugged into a wall outlet. Control Panel 1 23 45 6 a ?/1 (On/Standby) key Turns on the projector when the projector is ready to operate. - To turn it is in the menu system, select a menu...
... a high temperature. c ENTER/v/V/b/B (Arrow) keys Used to enter the settings of 2 flashes when the lamp cover or air filter cover is plugged into a wall outlet. Control Panel 1 23 45 6 a ?/1 (On/Standby) key Turns on the projector when the projector is ready to operate. - To turn it is in the menu system, select a menu...
Operating Instructions
Page 27
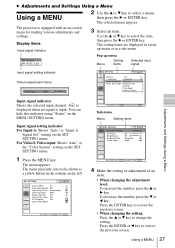
The projector is equipped with an on the SET SETTING menu. Display items Input signal indicator 3 Select an item. Use the v or V key to restore the previous ... Input-A Smar t APA: On Auto Input Search: Off Input-A Signal Sel.: Component Color System: Auto Power Saving: Off Panel Key Lock: Off CC Display: Off Lamp Timer Reset Sub menu Menu Setting items PICTURE SETTING Input A ADJUST PICTURE Contrast: Brightness: Gamma Mode: Color Temp.: Standard 80 50 Graphics High 4 Make the...
The projector is equipped with an on the SET SETTING menu. Display items Input signal indicator 3 Select an item. Use the v or V key to restore the previous ... Input-A Smar t APA: On Auto Input Search: Off Input-A Signal Sel.: Component Color System: Auto Power Saving: Off Panel Key Lock: Off CC Display: Off Lamp Timer Reset Sub menu Menu Setting items PICTURE SETTING Input A ADJUST PICTURE Contrast: Brightness: Gamma Mode: Color Temp.: Standard 80 50 Graphics High 4 Make the...
Operating Instructions
Page 33
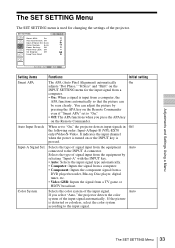
... Input-A Signal Sel.: Auto Color System: Auto Power Saving: Off Panel Key Lock: Off CC Display: Off Lamp Timer Reset Input-A Setting items Functions Initial setting Smart APA The APA (Auto Pixel Alignment) automatically On adjusts "Dot ... INPUT SETTING menu for changing the settings of the projector. Auto Input Search When set to "On." • Off: The APA functions when you select "Auto," the projector detects the color system of the input signal. Auto... the color system according to "On," the projector detects input signals in Off the following order: Input-A/Input...
... Input-A Signal Sel.: Auto Color System: Auto Power Saving: Off Panel Key Lock: Off CC Display: Off Lamp Timer Reset Input-A Setting items Functions Initial setting Smart APA The APA (Auto Pixel Alignment) automatically On adjusts "Dot ... INPUT SETTING menu for changing the settings of the projector. Auto Input Search When set to "On." • Off: The APA functions when you select "Auto," the projector detects the color system of the input signal. Auto... the color system according to "On," the projector detects input signals in Off the following order: Input-A/Input...
Operating Instructions
Page 34
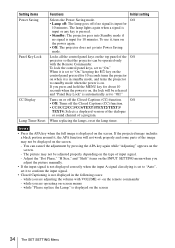
...for about 10 seconds when the power is in the following cases: - while "Please replace the Lamp." Off • Off: Turns off if no signal is not displayed in standby mode, and turns the projector to "On." on the screen. - while you press and hold the MENU key for 10 ...the "Dot Phase," "H Size," and "Shift" items on the power again. • Off: The projector does not go into Standby mode if no signal is displayed on the screen. When replacing the lamps, reset the lamp timer. - Notes • Press the APA key when the full image is input for 10 minutes.
...for about 10 seconds when the power is in the following cases: - while "Please replace the Lamp." Off • Off: Turns off if no signal is not displayed in standby mode, and turns the projector to "On." on the screen. - while you press and hold the MENU key for 10 ...the "Dot Phase," "H Size," and "Shift" items on the power again. • Off: The projector does not go into Standby mode if no signal is displayed on the screen. When replacing the lamps, reset the lamp timer. - Notes • Press the APA key when the full image is input for 10 minutes.
Operating Instructions
Page 36
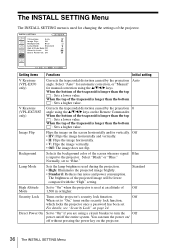
... 0 angle using the v/V/b/B keys. Auto V Keystone (VPL-EX7/ES7 only) Corrects the trapezoidal distortion caused by the projection angle. Image Flip Flips the image on page 24. Standard High Altitude Set to "On" when the projector is input to turn the power on the security lock ... used at an altitude of the trapezoid is longer than the bottom : Sets a higher value. Lamp Mode Sets the lamp brightness used for manual correction using the v/V/b/B keys on the projector's security lock function. For details, see "Security Lock" on the screen horizontally and/or vertically....
... 0 angle using the v/V/b/B keys. Auto V Keystone (VPL-EX7/ES7 only) Corrects the trapezoidal distortion caused by the projection angle. Image Flip Flips the image on page 24. Standard High Altitude Set to "On" when the projector is input to turn the power on the security lock ... used at an altitude of the trapezoid is longer than the bottom : Sets a higher value. Lamp Mode Sets the lamp brightness used for manual correction using the v/V/b/B keys on the projector's security lock function. For details, see "Security Lock" on the screen horizontally and/or vertically....

Operating Instructions
Page 40
... safety reasons, do not loosen any other screws. 4 Loosen the two screws on the screen • The LAMP/COVER indicator lights up . Handle 40 Replacing the Lamp appears on the lamp unit with the Phillips screwdriver (a). Use of use. Notes • If the lamp breaks, ask qualified Sony personnel to replace the lamp and to the projector.
... safety reasons, do not loosen any other screws. 4 Loosen the two screws on the screen • The LAMP/COVER indicator lights up . Handle 40 Replacing the Lamp appears on the lamp unit with the Phillips screwdriver (a). Use of use. Notes • If the lamp breaks, ask qualified Sony personnel to replace the lamp and to the projector.
Operating Instructions
Page 41
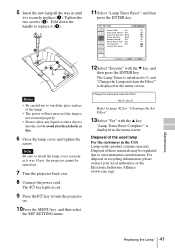
...and then press the ENTER key. is displayed in the menu screen. Disposal of the used lamp For the customers in the USA Lamp in this product contains mercury. Tighten the two screws (b). If not, the projector cannot be regulated due to page 42 for "Cleaning the Air Filter". 13Select "Yes" with... Color System: Auto Power Saving: Off Panel Key Lock: Off CC Display: Off Lamp Timer Reset Input-A Notes • Be careful not to touch the glass surface of the lamp. • The power will not turn the projector on. 10Press the MENU key, and then select the SET SETTING menu. 12Select "...
...and then press the ENTER key. is displayed in the menu screen. Disposal of the used lamp For the customers in the USA Lamp in this product contains mercury. Tighten the two screws (b). If not, the projector cannot be regulated due to page 42 for "Cleaning the Air Filter". 13Select "Yes" with... Color System: Auto Power Saving: Off Panel Key Lock: Off CC Display: Off Lamp Timer Reset Input-A Notes • Be careful not to touch the glass surface of the lamp. • The power will not turn the projector on. 10Press the MENU key, and then select the SET SETTING menu. 12Select "...
Operating Instructions
Page 42
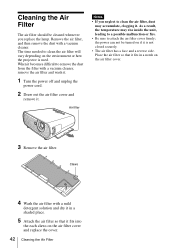
... the air filter so that it fits in a shaded place. 5 Attach the air filter so that it in a notch on the environment or how the projector is not closed securely. • The air filter has a face and a reverse side. Claws 4 Wash the air filter with a vacuum cleaner. The time needed to...
... the air filter so that it fits in a shaded place. 5 Attach the air filter so that it in a notch on the environment or how the projector is not closed securely. • The air filter has a face and a reverse side. Claws 4 Wash the air filter with a vacuum cleaner. The time needed to...
Operating Instructions
Page 43
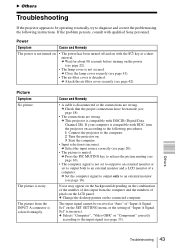
...(see page 22). • The lamp cover is compatible with DDC2B (Digital Data Channel 2B). The picture is disconnected or the connections are wrong. c This projector is not turned on. • The power has been turned off and on with qualified Sony personnel. c Change the desktop pattern on... the connected computer. The picture from the computer and the numbers of pixels on the LCD panel. Power Symptom Cause and Remedy The power is compatible with DDC, turn the projector on according to the following...
...(see page 22). • The lamp cover is compatible with DDC2B (Digital Data Channel 2B). The picture is disconnected or the connections are wrong. c This projector is not turned on. • The power has been turned off and on with qualified Sony personnel. c Change the desktop pattern on... the connected computer. The picture from the computer and the numbers of pixels on the LCD panel. Power Symptom Cause and Remedy The power is compatible with DDC, turn the projector on according to the following...
Operating Instructions
Page 44
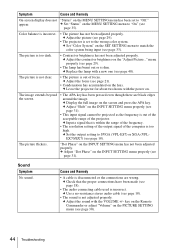
...key has been pressed even though there are wrong. c Set the output setting to SVGA (VPL-ES7) or XGA (VPLEX70/EX7) (see page 30). 44 Troubleshooting c Set "Color System" on the SET SETTING menu ... menu has not been adjusted properly. c Adjust the picture (see page 31). c Leave the projector for about two hours with the VOLUME +/- c Display the full image on . c Adjust "...the MENU SETTING menu to match the color system being input (see page 29). • The lamp has burnt out or is incorrect. • The picture has not been adjusted properly. Sound Symptom ...
...key has been pressed even though there are wrong. c Set the output setting to SVGA (VPL-ES7) or XGA (VPLEX70/EX7) (see page 30). 44 Troubleshooting c Set "Color System" on the SET SETTING menu ... menu has not been adjusted properly. c Adjust the picture (see page 31). c Leave the projector for about two hours with the VOLUME +/- c Display the full image on . c Adjust "...the MENU SETTING menu to match the color system being input (see page 29). • The lamp has burnt out or is incorrect. • The picture has not been adjusted properly. Sound Symptom ...
Operating Instructions
Page 45
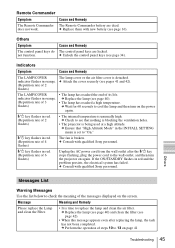
... c Perform the operation of the messages displayed on page 41 Troubleshooting 45 c Replace them with qualified Sony personnel. c Replace the lamp (see pages 41 and 42). (Repetition rate of 2 flashes) The LAMP/COVER indicator flashes in red. (Repetition rate of its life. c Consult with new battery (see page... is unusually high. c Wait for 60 seconds to "On." :/1 key flashes in the INSTALL SETTING menu is set to cool the lamp and then turn the projector on the power again. :/1 key flashes in red. (Repetition rate of 4 flashes) The fan is detached. c Ensure that nothing...
... c Perform the operation of the messages displayed on page 41 Troubleshooting 45 c Replace them with qualified Sony personnel. c Replace the lamp (see pages 41 and 42). (Repetition rate of 2 flashes) The LAMP/COVER indicator flashes in red. (Repetition rate of its life. c Consult with new battery (see page... is unusually high. c Wait for 60 seconds to "On." :/1 key flashes in the INSTALL SETTING menu is set to cool the lamp and then turn the projector on the power again. :/1 key flashes in red. (Repetition rate of 4 flashes) The fan is detached. c Ensure that nothing...
Operating Instructions
Page 47
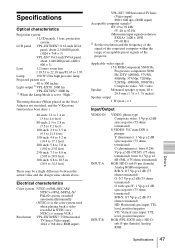
... signals of the projector. Electrical characteristics Color system NTSC3.58/PAL/SECAM/ NTSC4.43/PAL-M/PAL-N/ PAL60 system, switched automatically/manually (NTSC4.43 is set to "High." Specifications Optical characteristics Projection system 3 LCD panels, 1 lens, projection system LCD panel VPL-EX70/EX7: 0.63-inch XGA panel, about ... f 18.53 to 22.18 mm/F1.65 to 1.93 Lamp 190 W Ultra high pressure lamp Projected picture size 40 to 300 inches Light output 1) VPL-EX70: 2600 lm VPL-EX7/ES7: 2000 lm 1) When the Lamp Mode is the color system used when playing back a video recorded...
... signals of the projector. Electrical characteristics Color system NTSC3.58/PAL/SECAM/ NTSC4.43/PAL-M/PAL-N/ PAL60 system, switched automatically/manually (NTSC4.43 is set to "High." Specifications Optical characteristics Projection system 3 LCD panels, 1 lens, projection system LCD panel VPL-EX70/EX7: 0.63-inch XGA panel, about ... f 18.53 to 22.18 mm/F1.65 to 1.93 Lamp 190 W Ultra high pressure lamp Projected picture size 40 to 300 inches Light output 1) VPL-EX70: 2600 lm VPL-EX7/ES7: 2000 lm 1) When the Lamp Mode is the color system used when playing back a video recorded...
Operating Instructions
Page 48
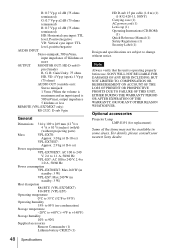
...75 ohms) AUDIO OUT (variable out): Stereo minijack 1 Vrms (When the volume is maximum and an input signal is operating properly before use. SONY WILL NOT BE LIABLE FOR DAMAGES OF ANY KIND INCLUDING, BUT NOT LIMITED TO, COMPENSATION OR REIMBURSEMENT ON ACCOUNT OF THE LOSS OF PRESENT OR...AFTER EXPIRATION OF THE WARRANTY, OR FOR ANY OTHER REASON WHATSOEVER. Optional accessories Projector Lamp LMP-E191 (for replacement) Some of the items may not be available in standby: 3 W) Heat dissipation 884 BTU (VPL-EX70/EX7) 816 BTU (VPL-ES7) Operating temperature 0°C to 35°C (32°F to 95...
...75 ohms) AUDIO OUT (variable out): Stereo minijack 1 Vrms (When the volume is maximum and an input signal is operating properly before use. SONY WILL NOT BE LIABLE FOR DAMAGES OF ANY KIND INCLUDING, BUT NOT LIMITED TO, COMPENSATION OR REIMBURSEMENT ON ACCOUNT OF THE LOSS OF PRESENT OR...AFTER EXPIRATION OF THE WARRANTY, OR FOR ANY OTHER REASON WHATSOEVER. Optional accessories Projector Lamp LMP-E191 (for replacement) Some of the items may not be available in standby: 3 W) Heat dissipation 884 BTU (VPL-EX70/EX7) 816 BTU (VPL-ES7) Operating temperature 0°C to 35°C (32°F to 95...


